NepalHRM - Customer Booklet
What this is. A self-contained tour of every module in your NepalHRM workspace, with real screenshots from the live product, setup steps you'll follow once, and the day-to-day operations checklist your HR team will run.
How to read it. The left sidebar mirrors the menu inside the app - your personal shortcuts (Home, Inbox, Tasks, My Time, My Pay…) at the top, then every module grouped exactly as you see it in NepalHRM: People, Time & Attendance, Leave, Payroll, Talent, Workplace and Administration. Each section has the same shape: what the module does → a screenshot of the actual screen → setup steps (you do once) → day-to-day operations (the running flow). New to the product? Follow the “Quick start” order just below. Print to PDF via Cmd-P for a hand-off-able copy.
Quick start in 5 steps
1. Setup → System Health: all configuration lives here, and you can’t add employees until its Tier 1 “Must-have” checks pass - so start here.
2. Settings → Clear demo data, then company profile, fiscal year (Shrawan → Asar) and operating hours.
3. Org structure: departments, job positions and work types, then import or invite your Employees.
4. Time & Attendance + Leave: shifts, attendance & leave policies, holidays.
5. Payroll: salary structures, pay cycle, PF / CIT / tax slabs - then you’re ready for your first payroll run.
Dashboard
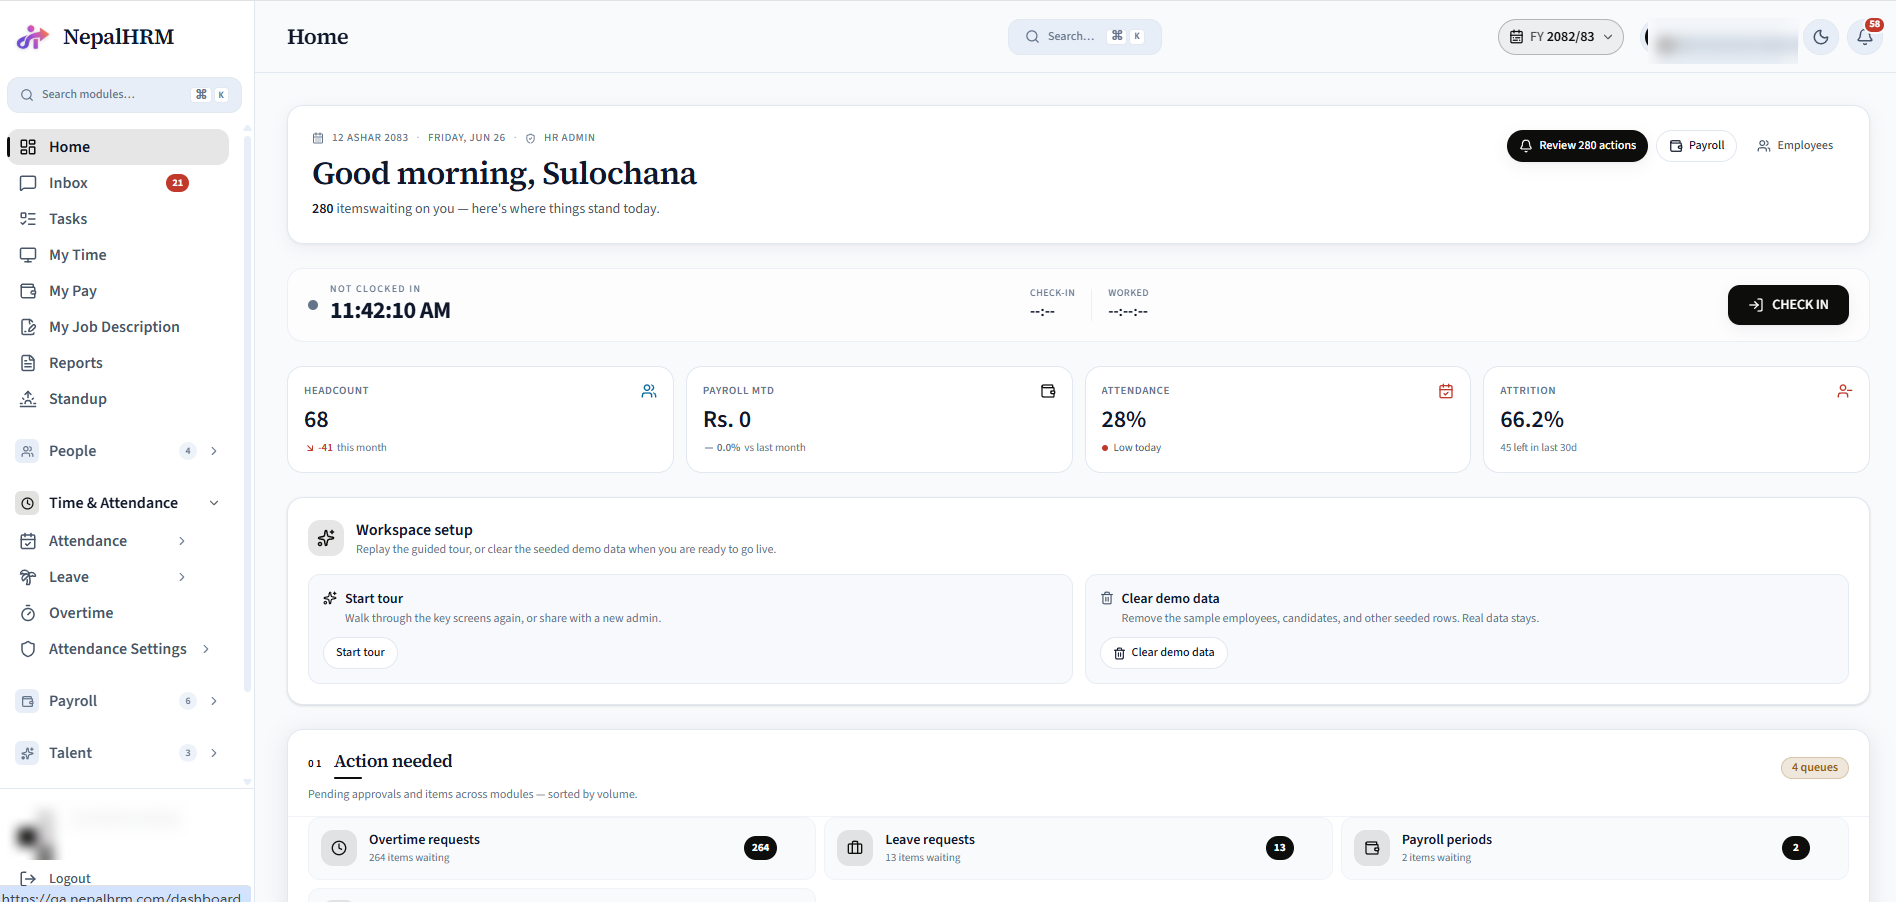
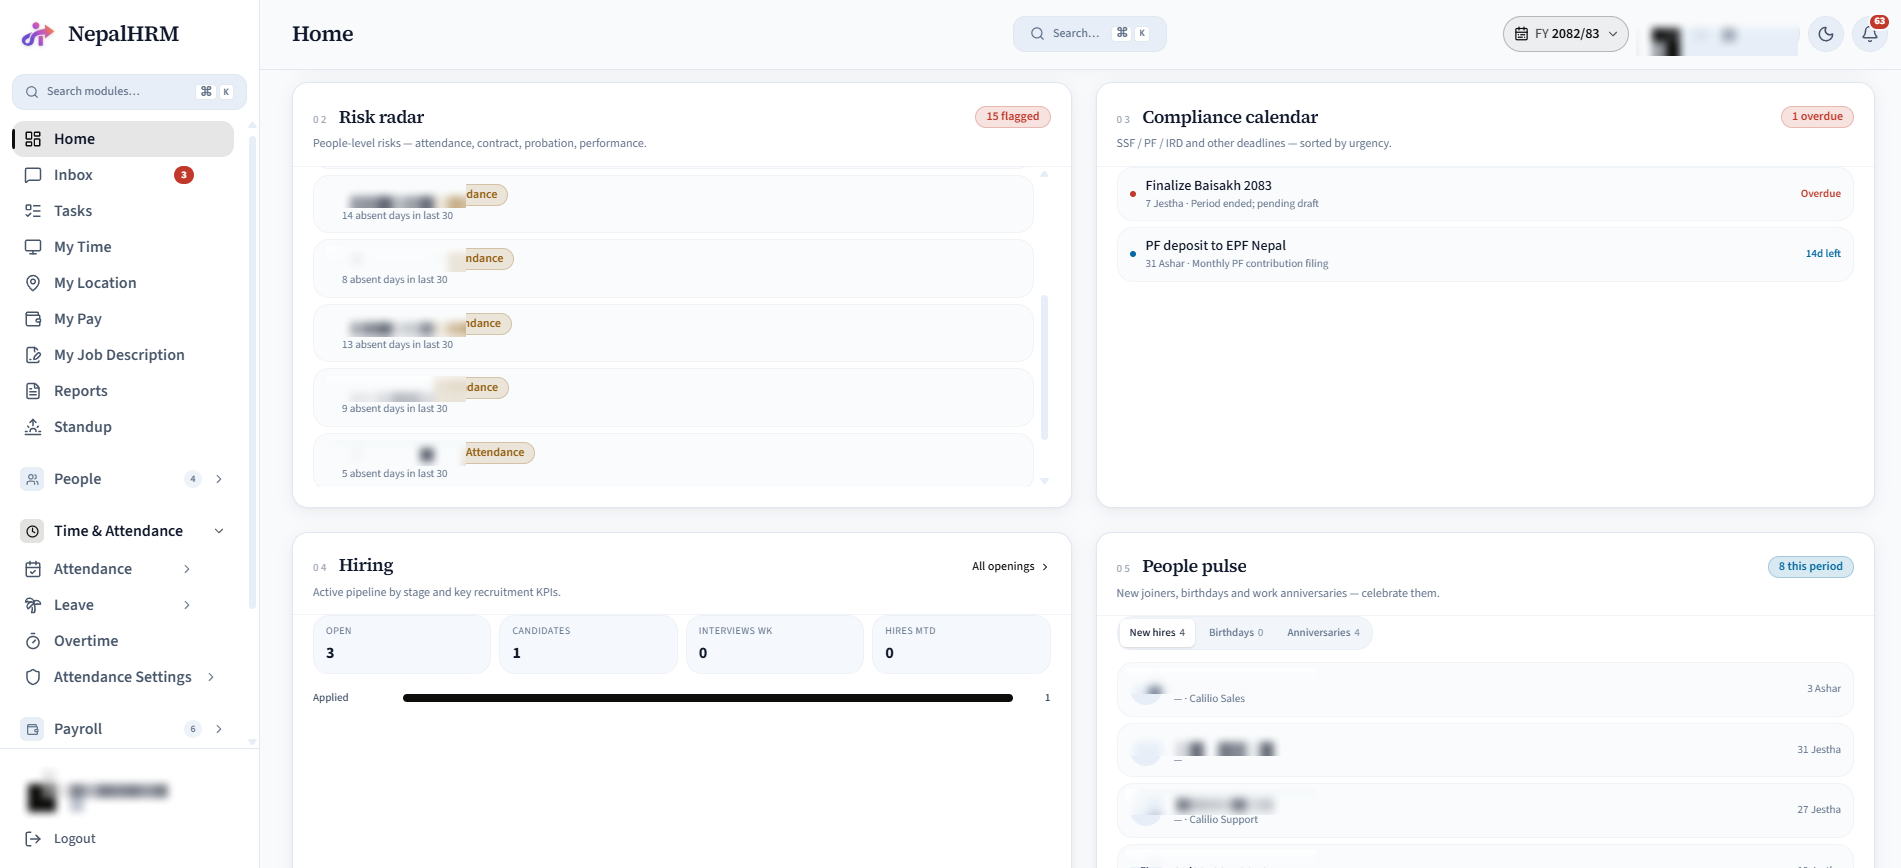
Every sign-in lands on the Dashboard - the single page that answers "what needs my attention?". HR / admin roles see the Command Center with hero metrics, pending approvals, risk radar, hiring funnel, and the People Pulse strip (new hires, birthdays, anniversaries, top performers). Regular employees see a personal home with attendance streak, leave balance, payroll status, goals, and upcoming holidays.
Setup
- Nothing to switch on - the Dashboard builds itself from your live data the moment the tenant is activated.
- Tune what shows: admins use Settings → Module Toggles to hide tiles for modules you don't use (e.g. Recruitment), so the page only surfaces what's relevant.
- Roles set the layout automatically - HR/admin get the Command Center, employees get the personal home; no manual config.
Day-to-day operations
- Open every morning to scan Action Needed (pending leaves, overtime, reimbursements) and click straight into each module from there.
- Click any number tile to drill into the underlying list pre-filtered to that pending state.
- Use the "Wish" button on celebration cards (birthdays / anniversaries) to post to #kudos with one click.
Messages
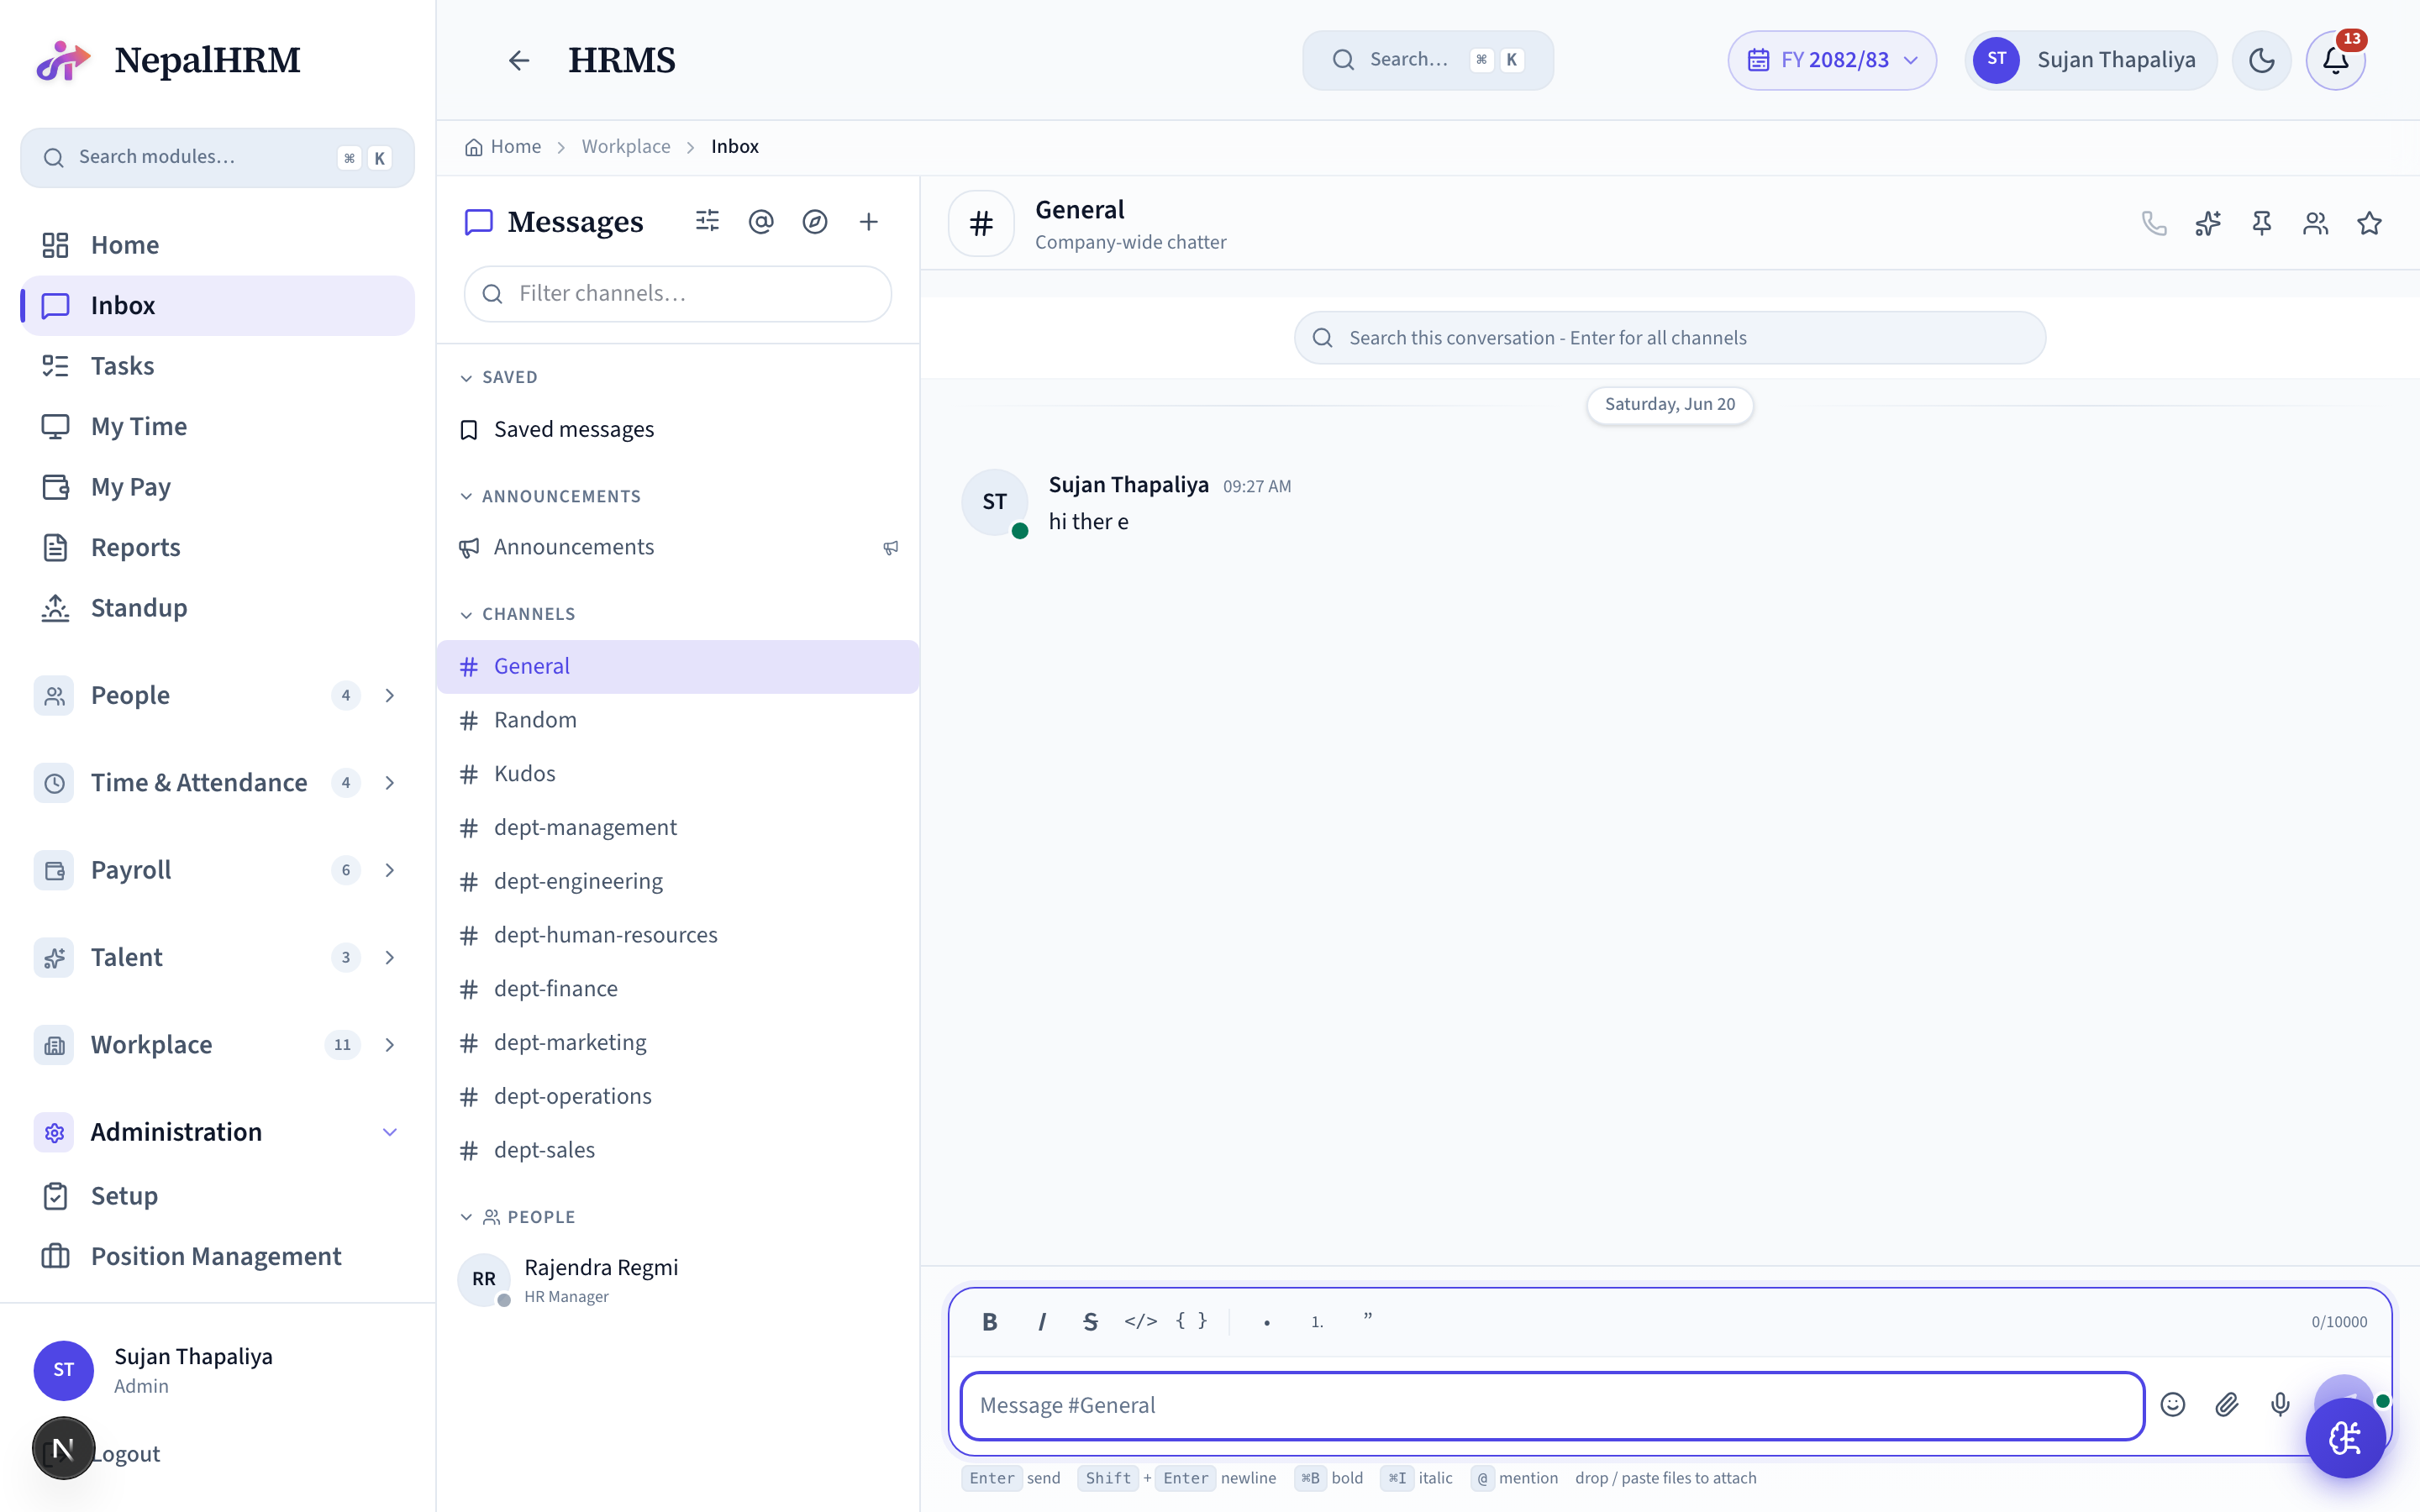
Built-in chat keeps company conversations off external Slack / WhatsApp where HR has no audit trail. Every tenant ships with #general, #announcements, #random, and #kudos channels auto-created; HR can add team / department / private channels. Direct messages, threads, reactions, file attachments, and @mentions are all supported. Archived employees still appear in historical messages but show as "Former employee" - no leak of contact info.
Setup
- Default channels are seeded on signup - no action needed.
- Create a new channel: Messages → "+" → pick kind (team / announcement / private).
- Invite teammates: open the channel → Members → Invite, or @mention them in a message.
Day-to-day operations
- Use the per-conversation search bar above the message list to filter the current channel's messages.
- React to a message with 🎉 / ❤️ / 🎂 from the hover toolbar.
- Pin important messages (Channel → Pinned) so the next person on call doesn't dig through scroll-back.
- Use @here for online members, @channel for everyone, @<employee_code> for a single person.
Tasks
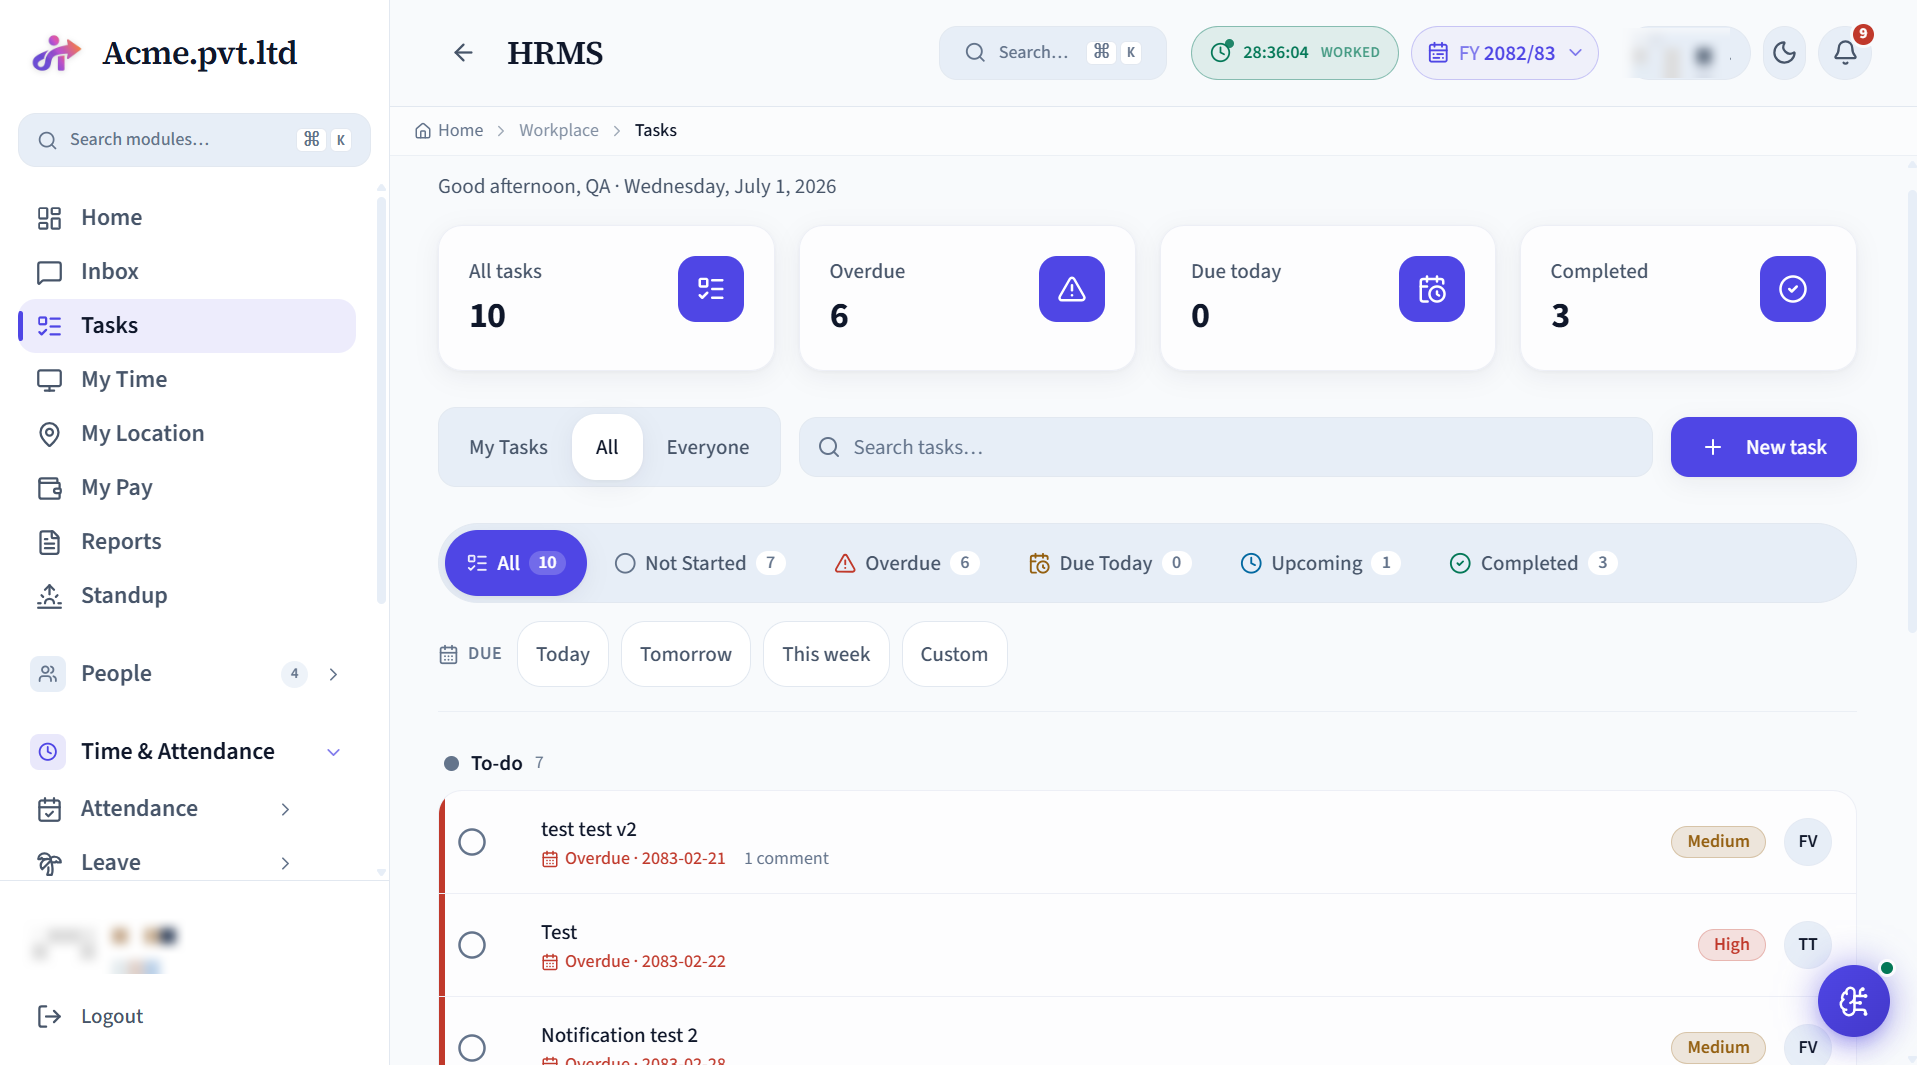
Lightweight task management - assign to-dos to people or teams, set due dates and track status across the company.
Setup
- Create task lists or projects.
- Assign owners and set due dates / priorities.
Day-to-day operations
- Assignees update status as work moves.
- Reminders fire on due dates; managers see the rollup.
My Time
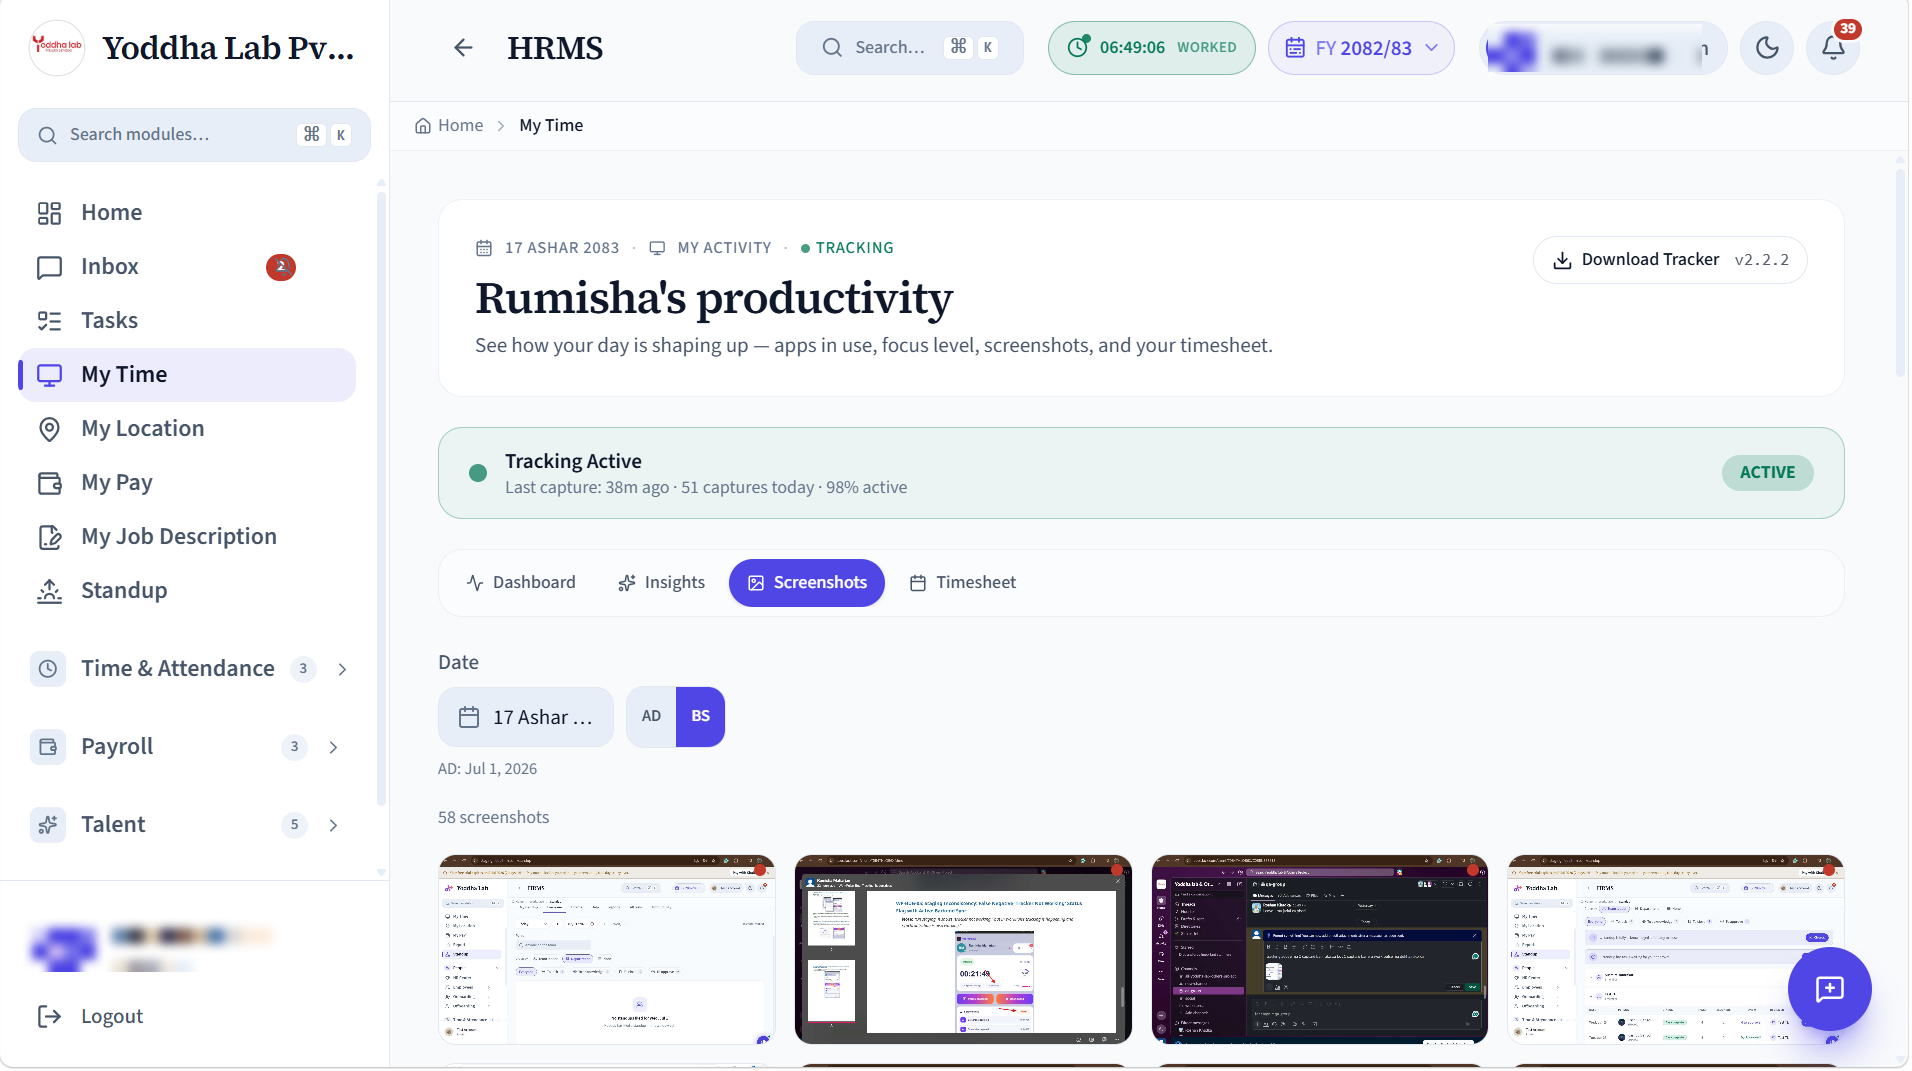
Your own time and activity - the employee-facing counterpart to the HR Attendance module. Check in and out, see today's worked hours and this month's attendance, and - if your team runs the desktop Activity Tracker - review your own captured timeline and activity score. Everyone has this; no admin rights needed.
Setup
- It's on for every employee - open My Time from the top of the sidebar to see today's hours.
- For activity capture, click Download Tracker and install the desktop agent once; sign in and it starts recording your timeline and screenshots.
- No tracker? You still get check-in/out and your attendance here - the activity tiles just stay empty.
Day-to-day operations
- Check in / out; watch today's hours and the month's attendance build up.
- If the Activity Tracker is installed, review your own captures and activity score here.
My Location
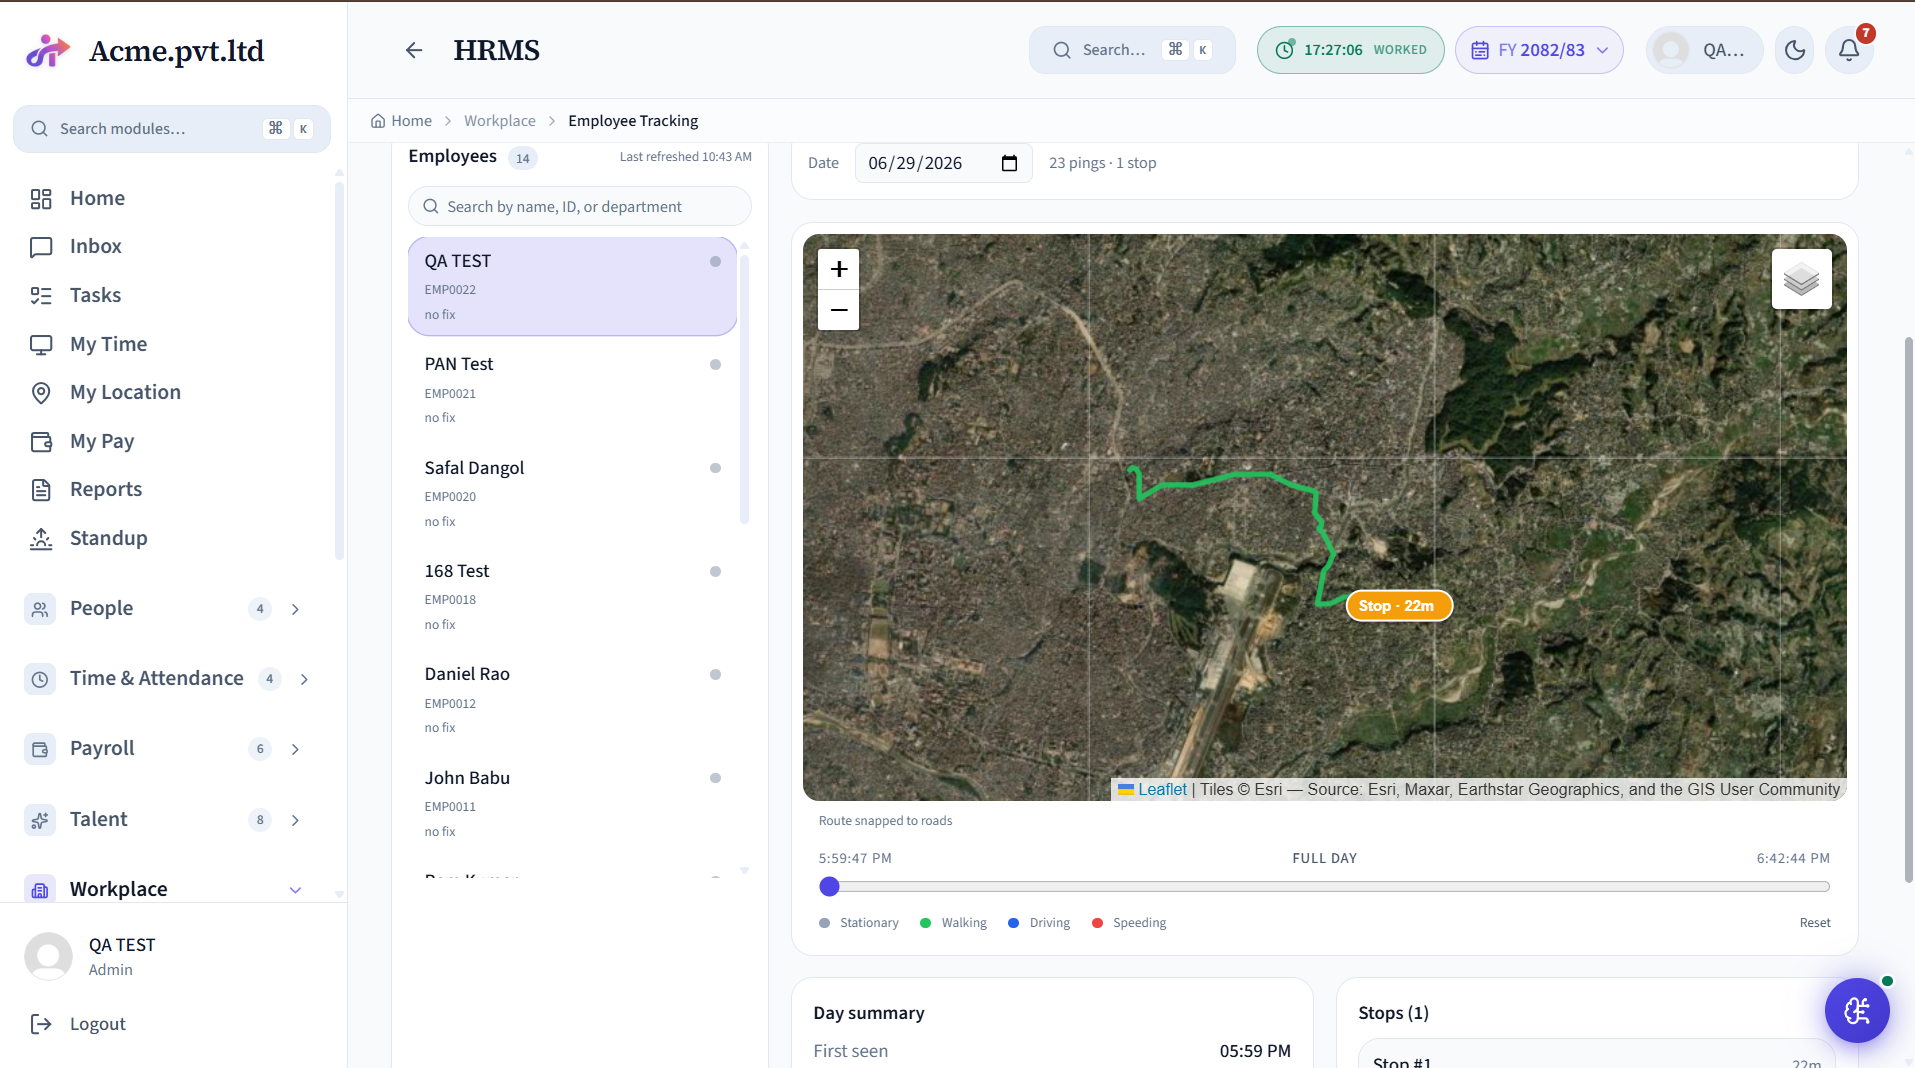
Your own location insight - for field and mobile staff. Shows the GPS check-ins, trips, routes and stops recorded against you for the day from mobile attendance, so you can confirm what the system logged. The personal view of the HR Locations module.
Setup
- Install the NepalHRM mobile app and allow location permission - that's what feeds this page.
- Clock in/out from the app while on site or in the field; each punch drops a GPS point.
- Nothing to configure on the web - your day's route and stops appear here automatically.
Day-to-day operations
- See your day's check-ins and route on the map.
- Flag a wrong or missing location to HR.
My Pay
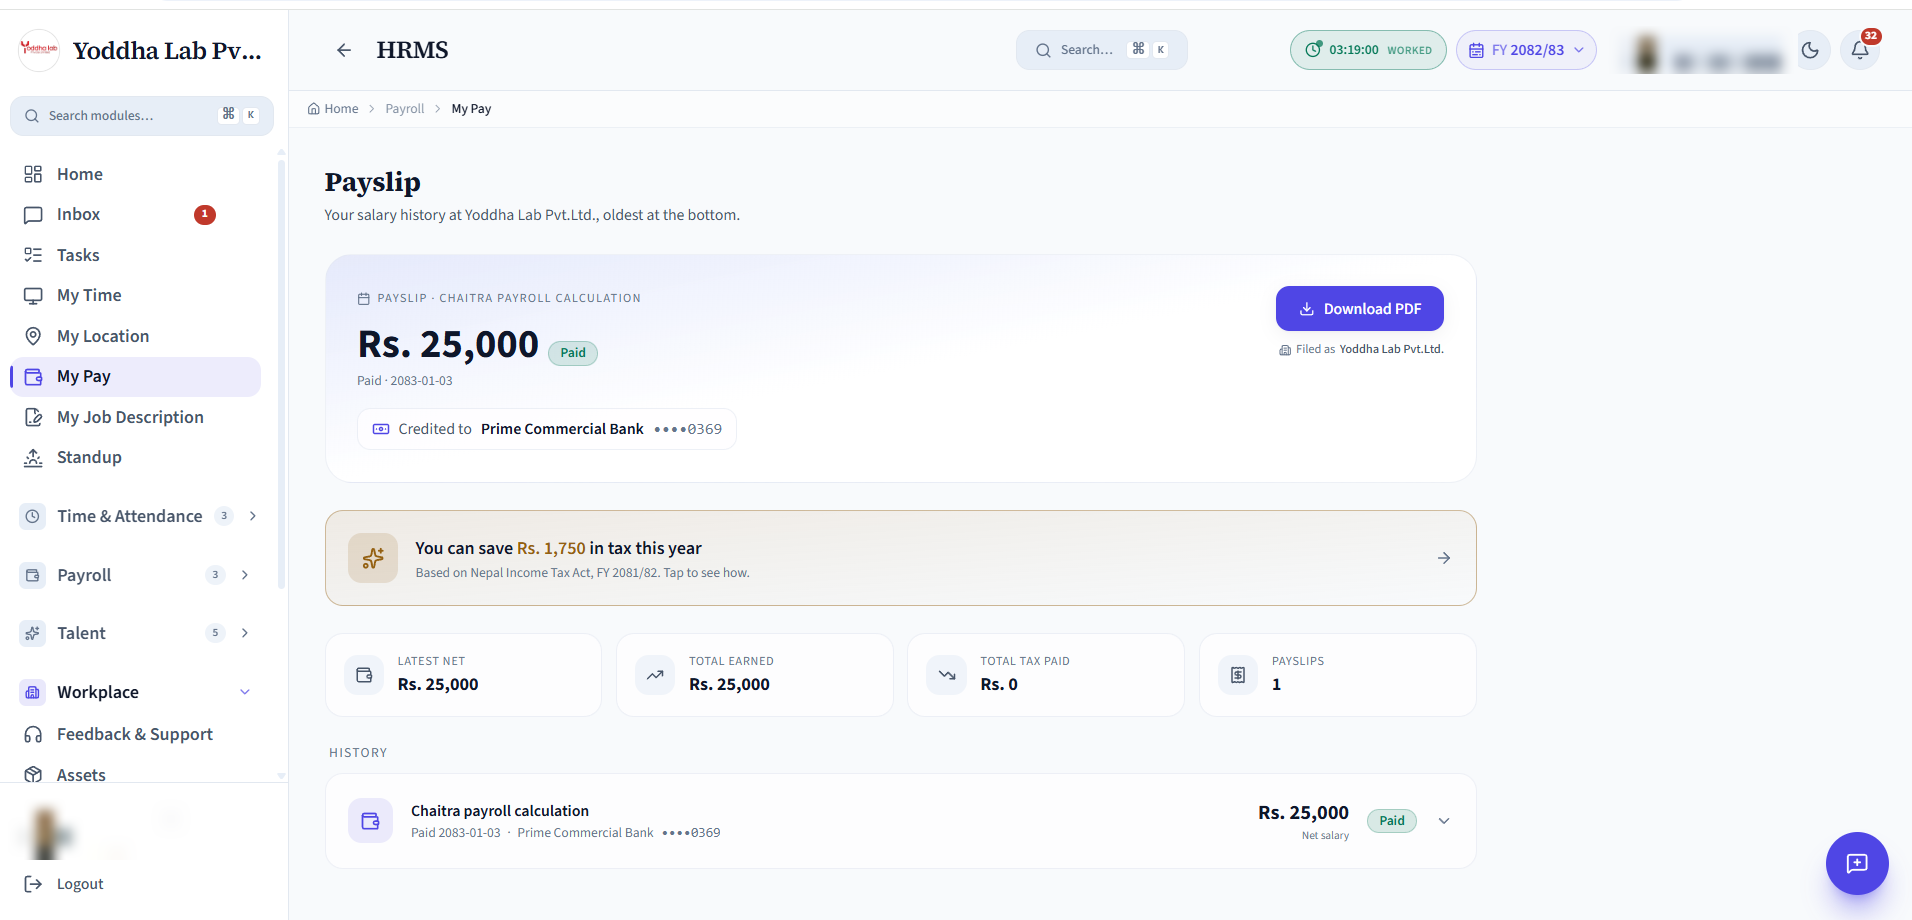
Your own payslips - self-service. Every paid employee can open any month's slip, download it as a PDF, and see their earnings, deductions, tax and year-to-date totals - without going through HR.
Setup
- No setup - once HR runs a payroll that includes you, your slips appear here.
- Add your bank account in My Profile so the "Credited to" line and bank transfer are correct.
- Open any month → Download PDF for a shareable copy.
Day-to-day operations
- Open a month → view or download the payslip (PDF).
- Check your year-to-date earnings and tax.
My Job Description
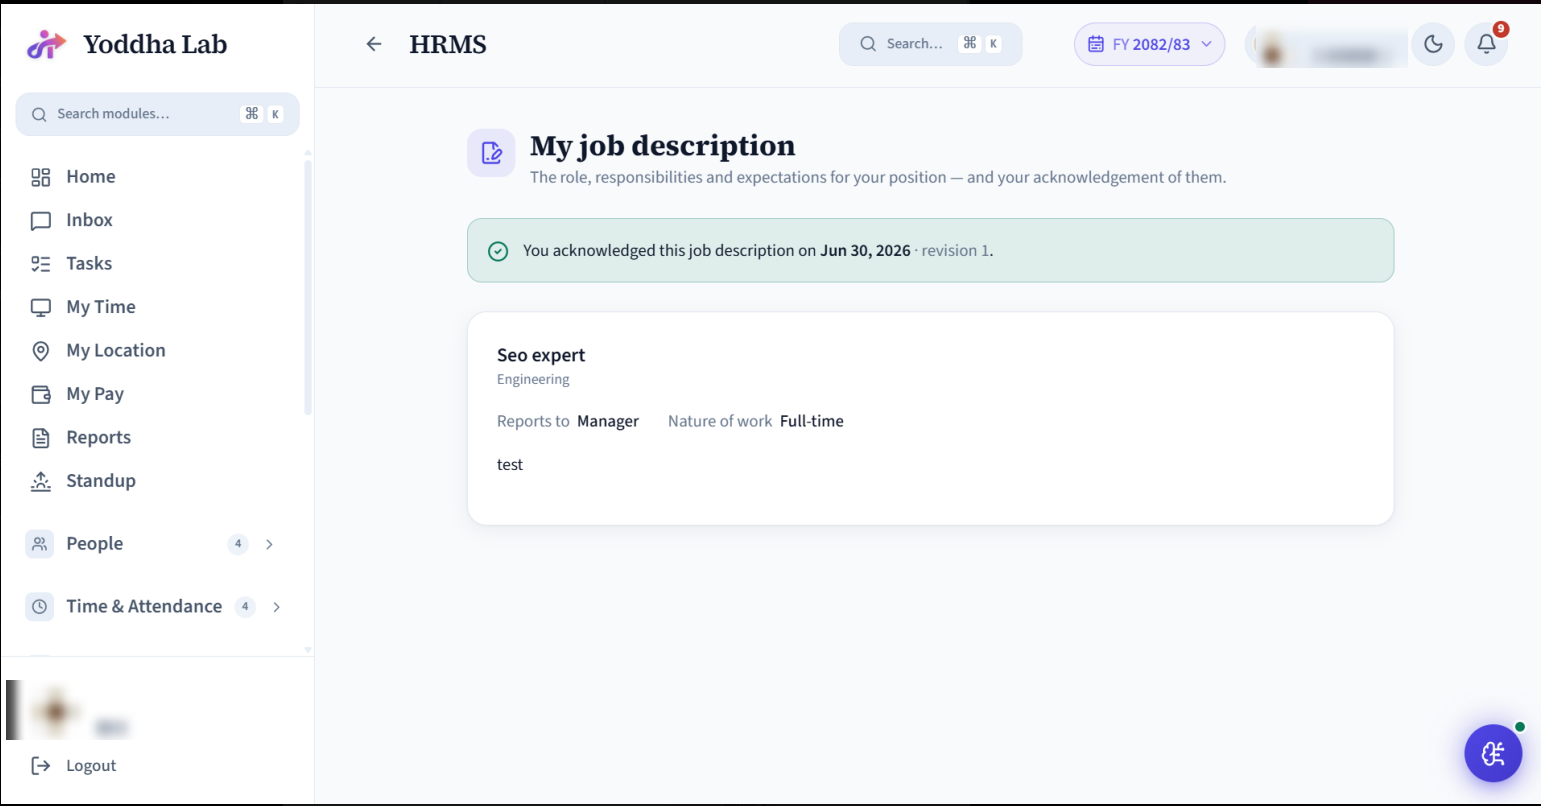
Your own job description - the employee-facing view of the JD attached to your position (responsibilities, requirements, skills, KPIs). Read it, and acknowledge that you've understood it; HR can see who has and hasn't signed off. The personal counterpart to the admin Position Management module.
Setup
- Nothing for you to set up - it appears once HR attaches a JD to your position (they do that in Position Management).
- Don't see one? Ask HR to publish the JD for your job position.
- Open it once and click Acknowledge so your sign-off is on record.
Day-to-day operations
- Read your responsibilities, requirements, skills and KPIs.
- Click Acknowledge to confirm you've read it; HR tracks the sign-off.
Reports
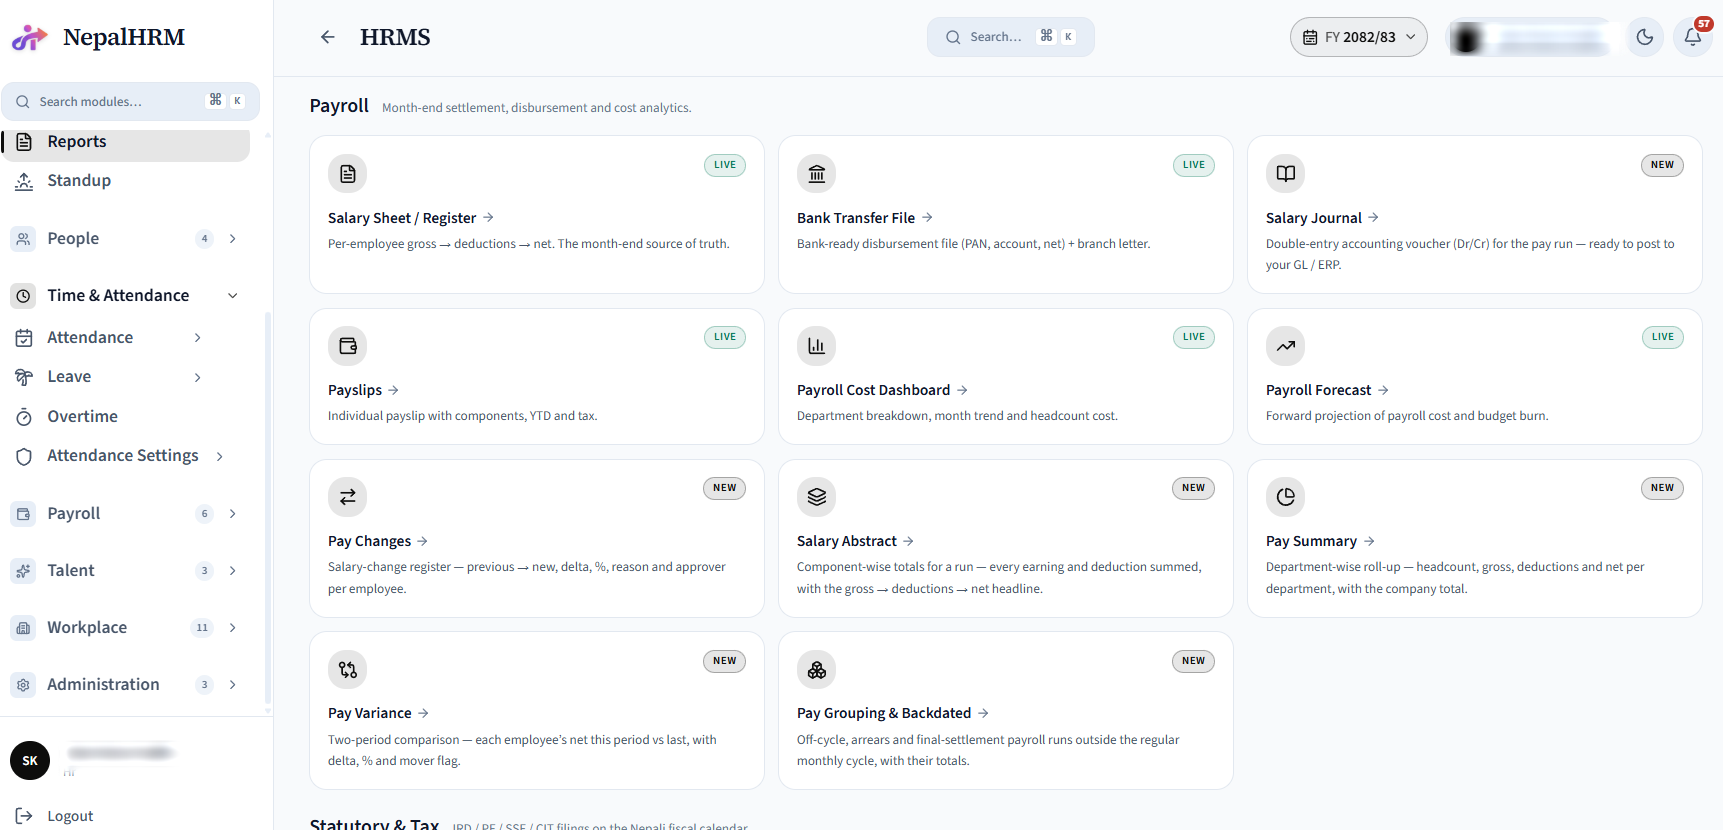
The reports hub - a single index of every report: payroll (salary sheet, PF / SSF / eTDS), attendance & leave, loans and HR. Each destination enforces its own role gate.
Setup
- Nothing to build - every report is pre-wired; the hub just indexes them.
- Make sure the source modules have run (payroll, attendance, leave) so the reports have data to pull.
- Access is by role - HR/Finance see statutory and payroll reports, managers see their team's; grant extra access in Settings → Permissions.
Day-to-day operations
- Pick a report, set the period and filters, then export to Excel / PDF.
Standup
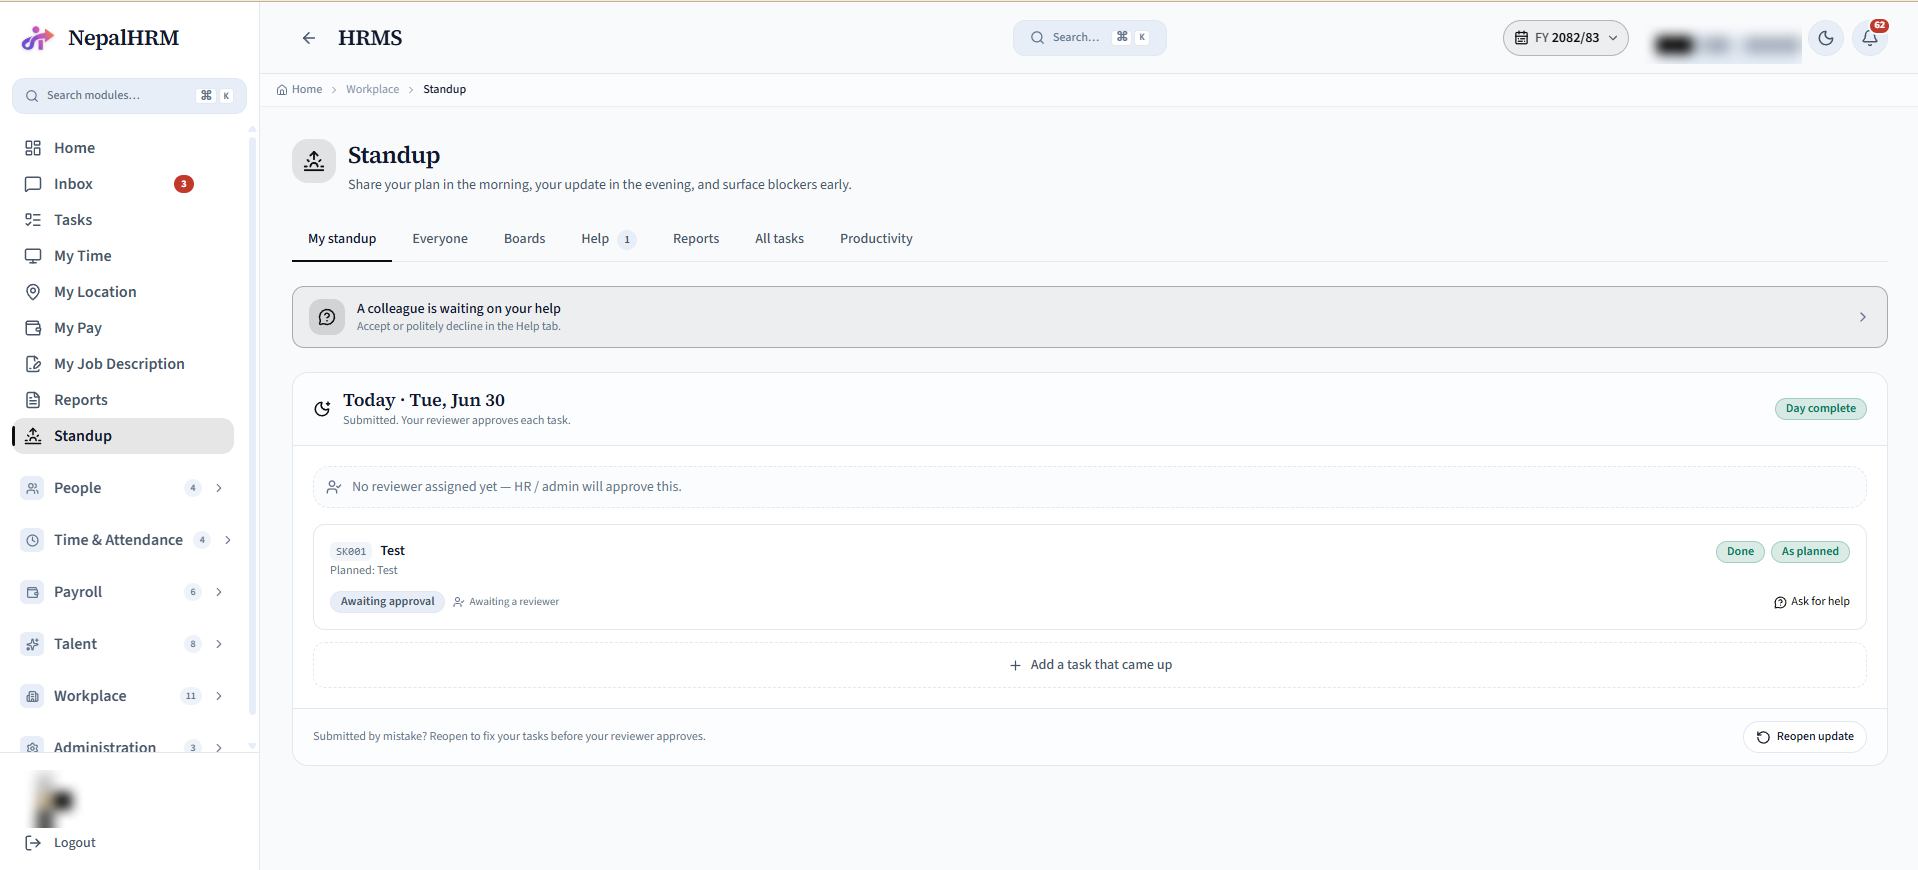
A twice-a-day plan / update ritual - each person posts a morning plan and an end-of-day update with per-task verification, blockers and a “seek a solution” help thread, plus weekly / monthly rollups and a productivity score.
Setup
- Turn Standup on for the team (Workplace → Standup) so it shows in everyone's sidebar.
- Set the daily windows - a morning plan time and an evening update time - so reminders fire on schedule.
- Assign reviewers (reporting managers) so each person's tasks have someone to approve them.
- Optional: use Boards to group standups by team, and the Help tab to route "stuck" requests to a teammate.
Day-to-day operations
- Post a plan in the morning, an update in the evening.
- Managers review blockers; the Productivity tab rolls up output.
HR Center
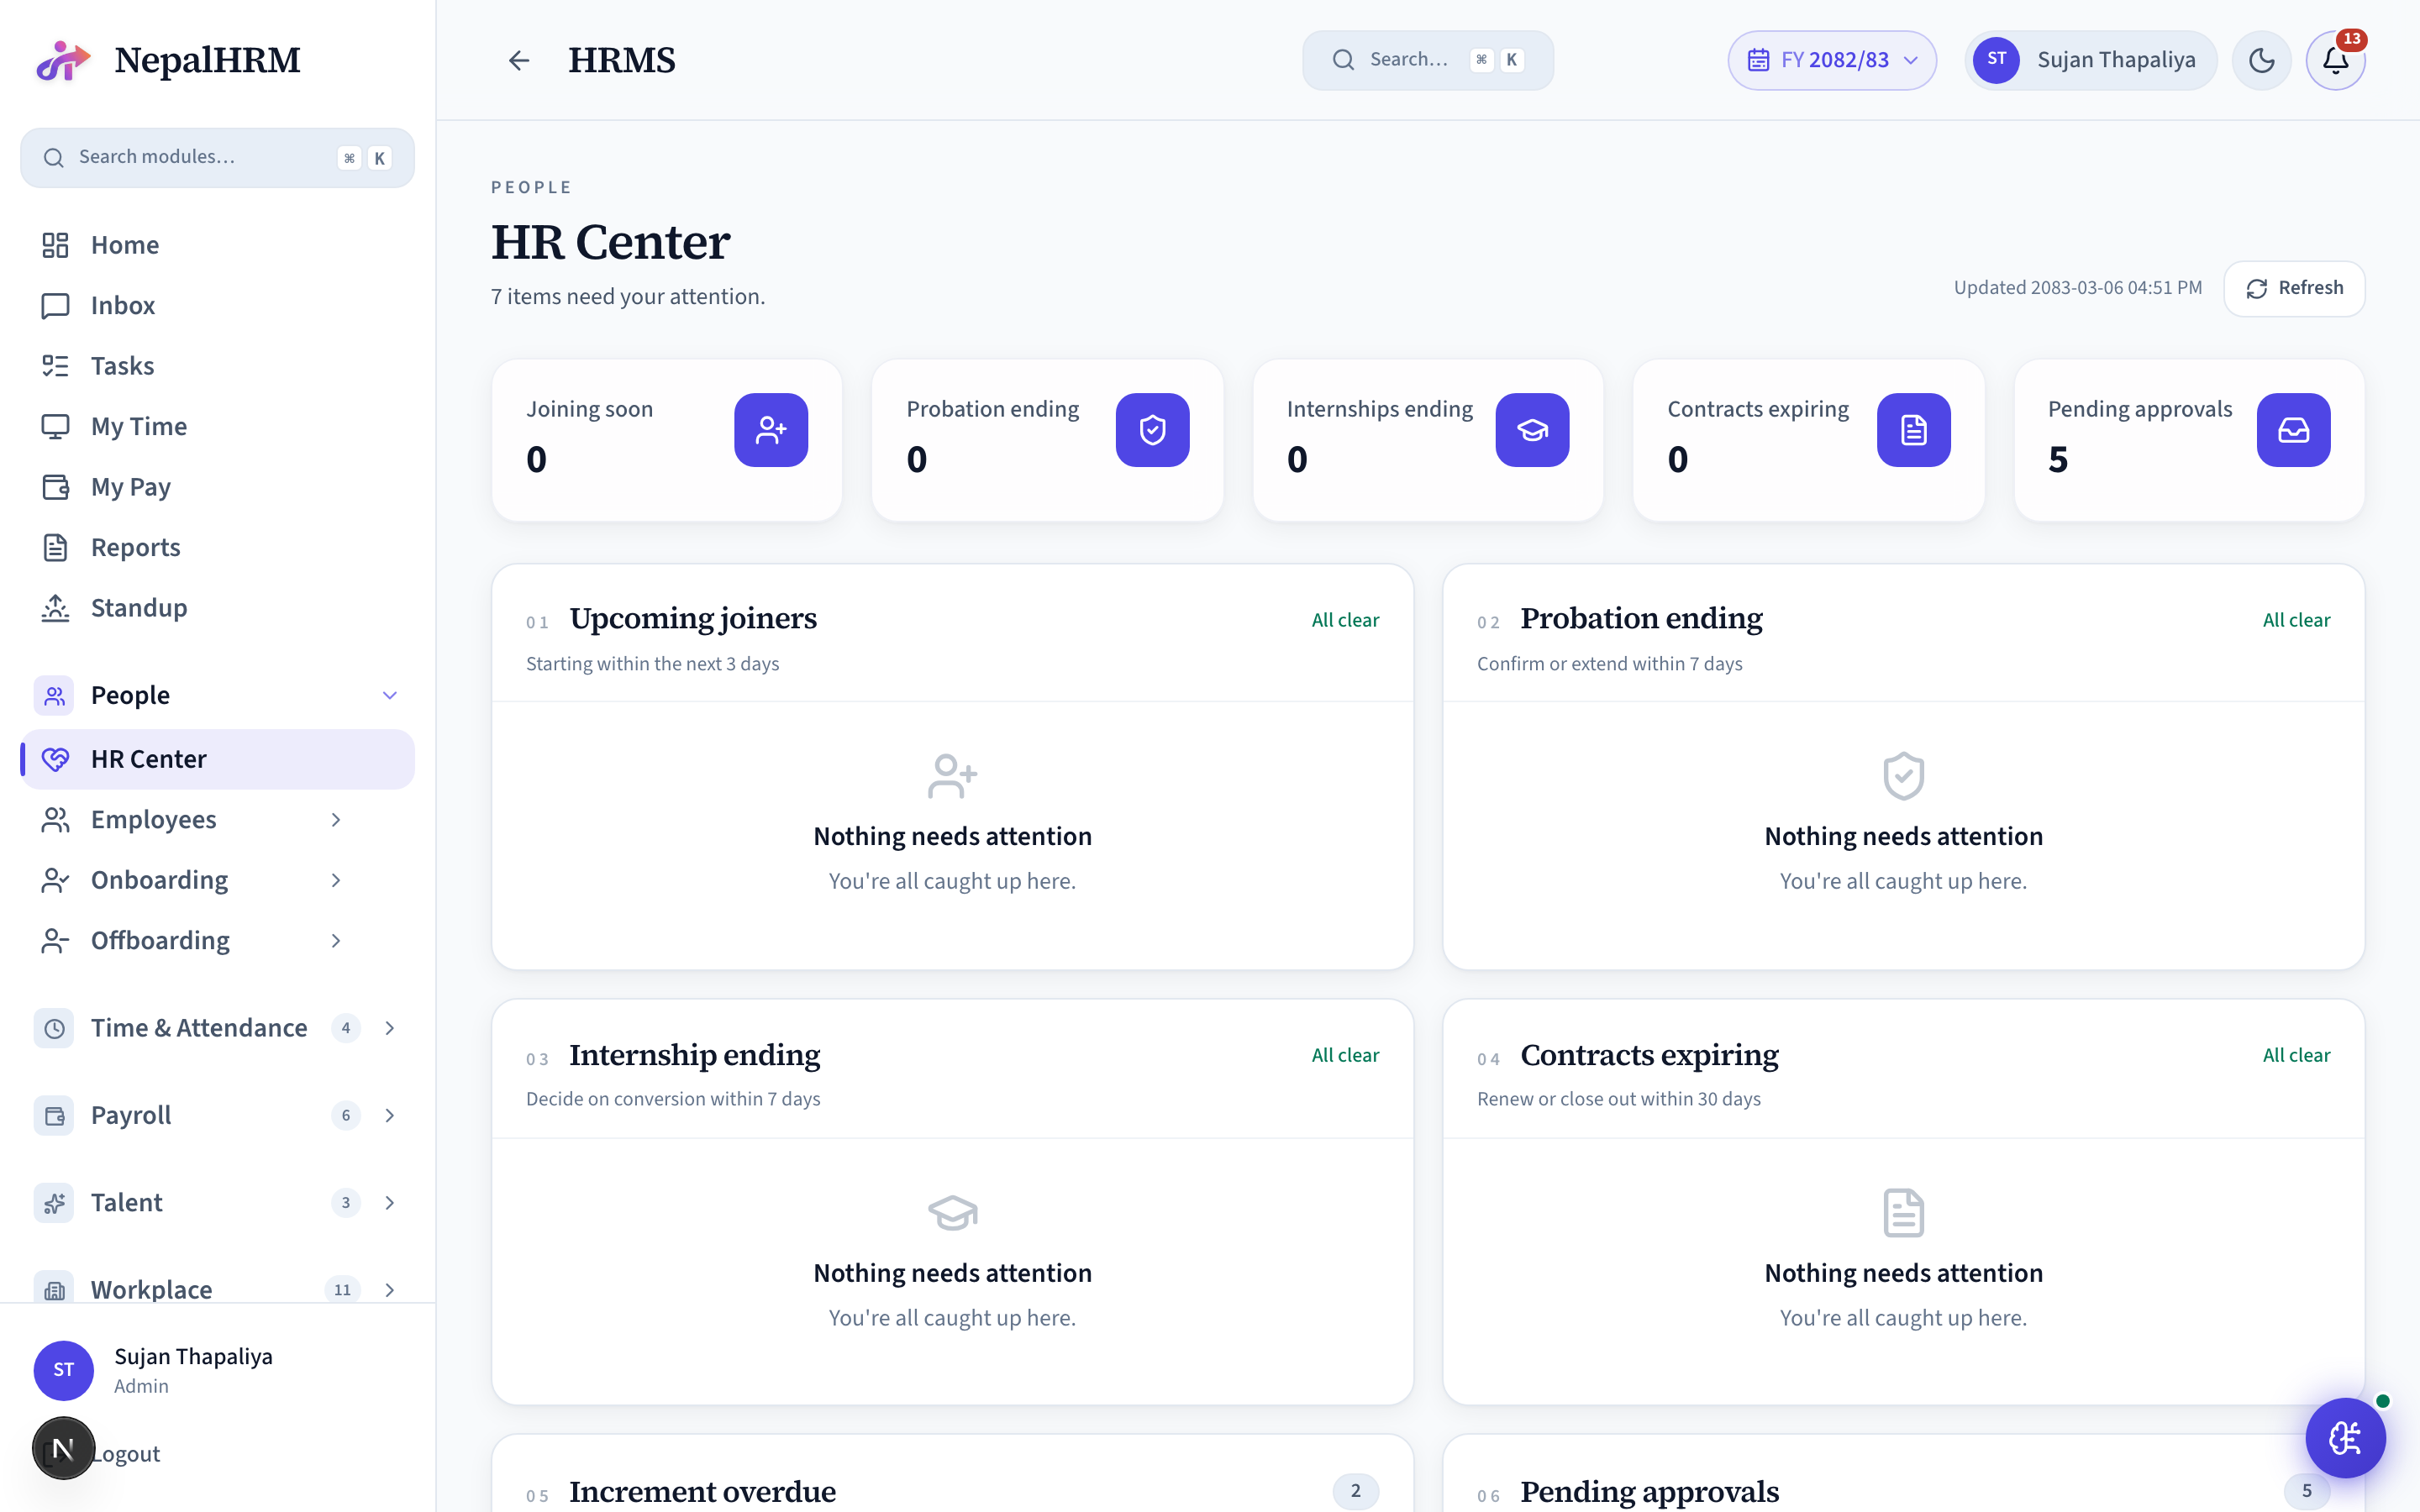
An HR-only lifecycle command surface - joiners, probation endings, contract / internship expiries, offboarding, increments due, certificate expiry, data-hygiene gaps, retirement and pending approvals, all in one attention queue.
Setup
- Nothing to switch on - HR Center reads your live employee, contract and leave data and surfaces what needs attention.
- Keep the source data clean (hire dates, probation end, contract end, reporting managers) so its alerts fire on time.
- HR-tier role required - it's hidden for regular employees.
Day-to-day operations
- Work the alert cards daily; each links straight to the screen that resolves it.
Employees
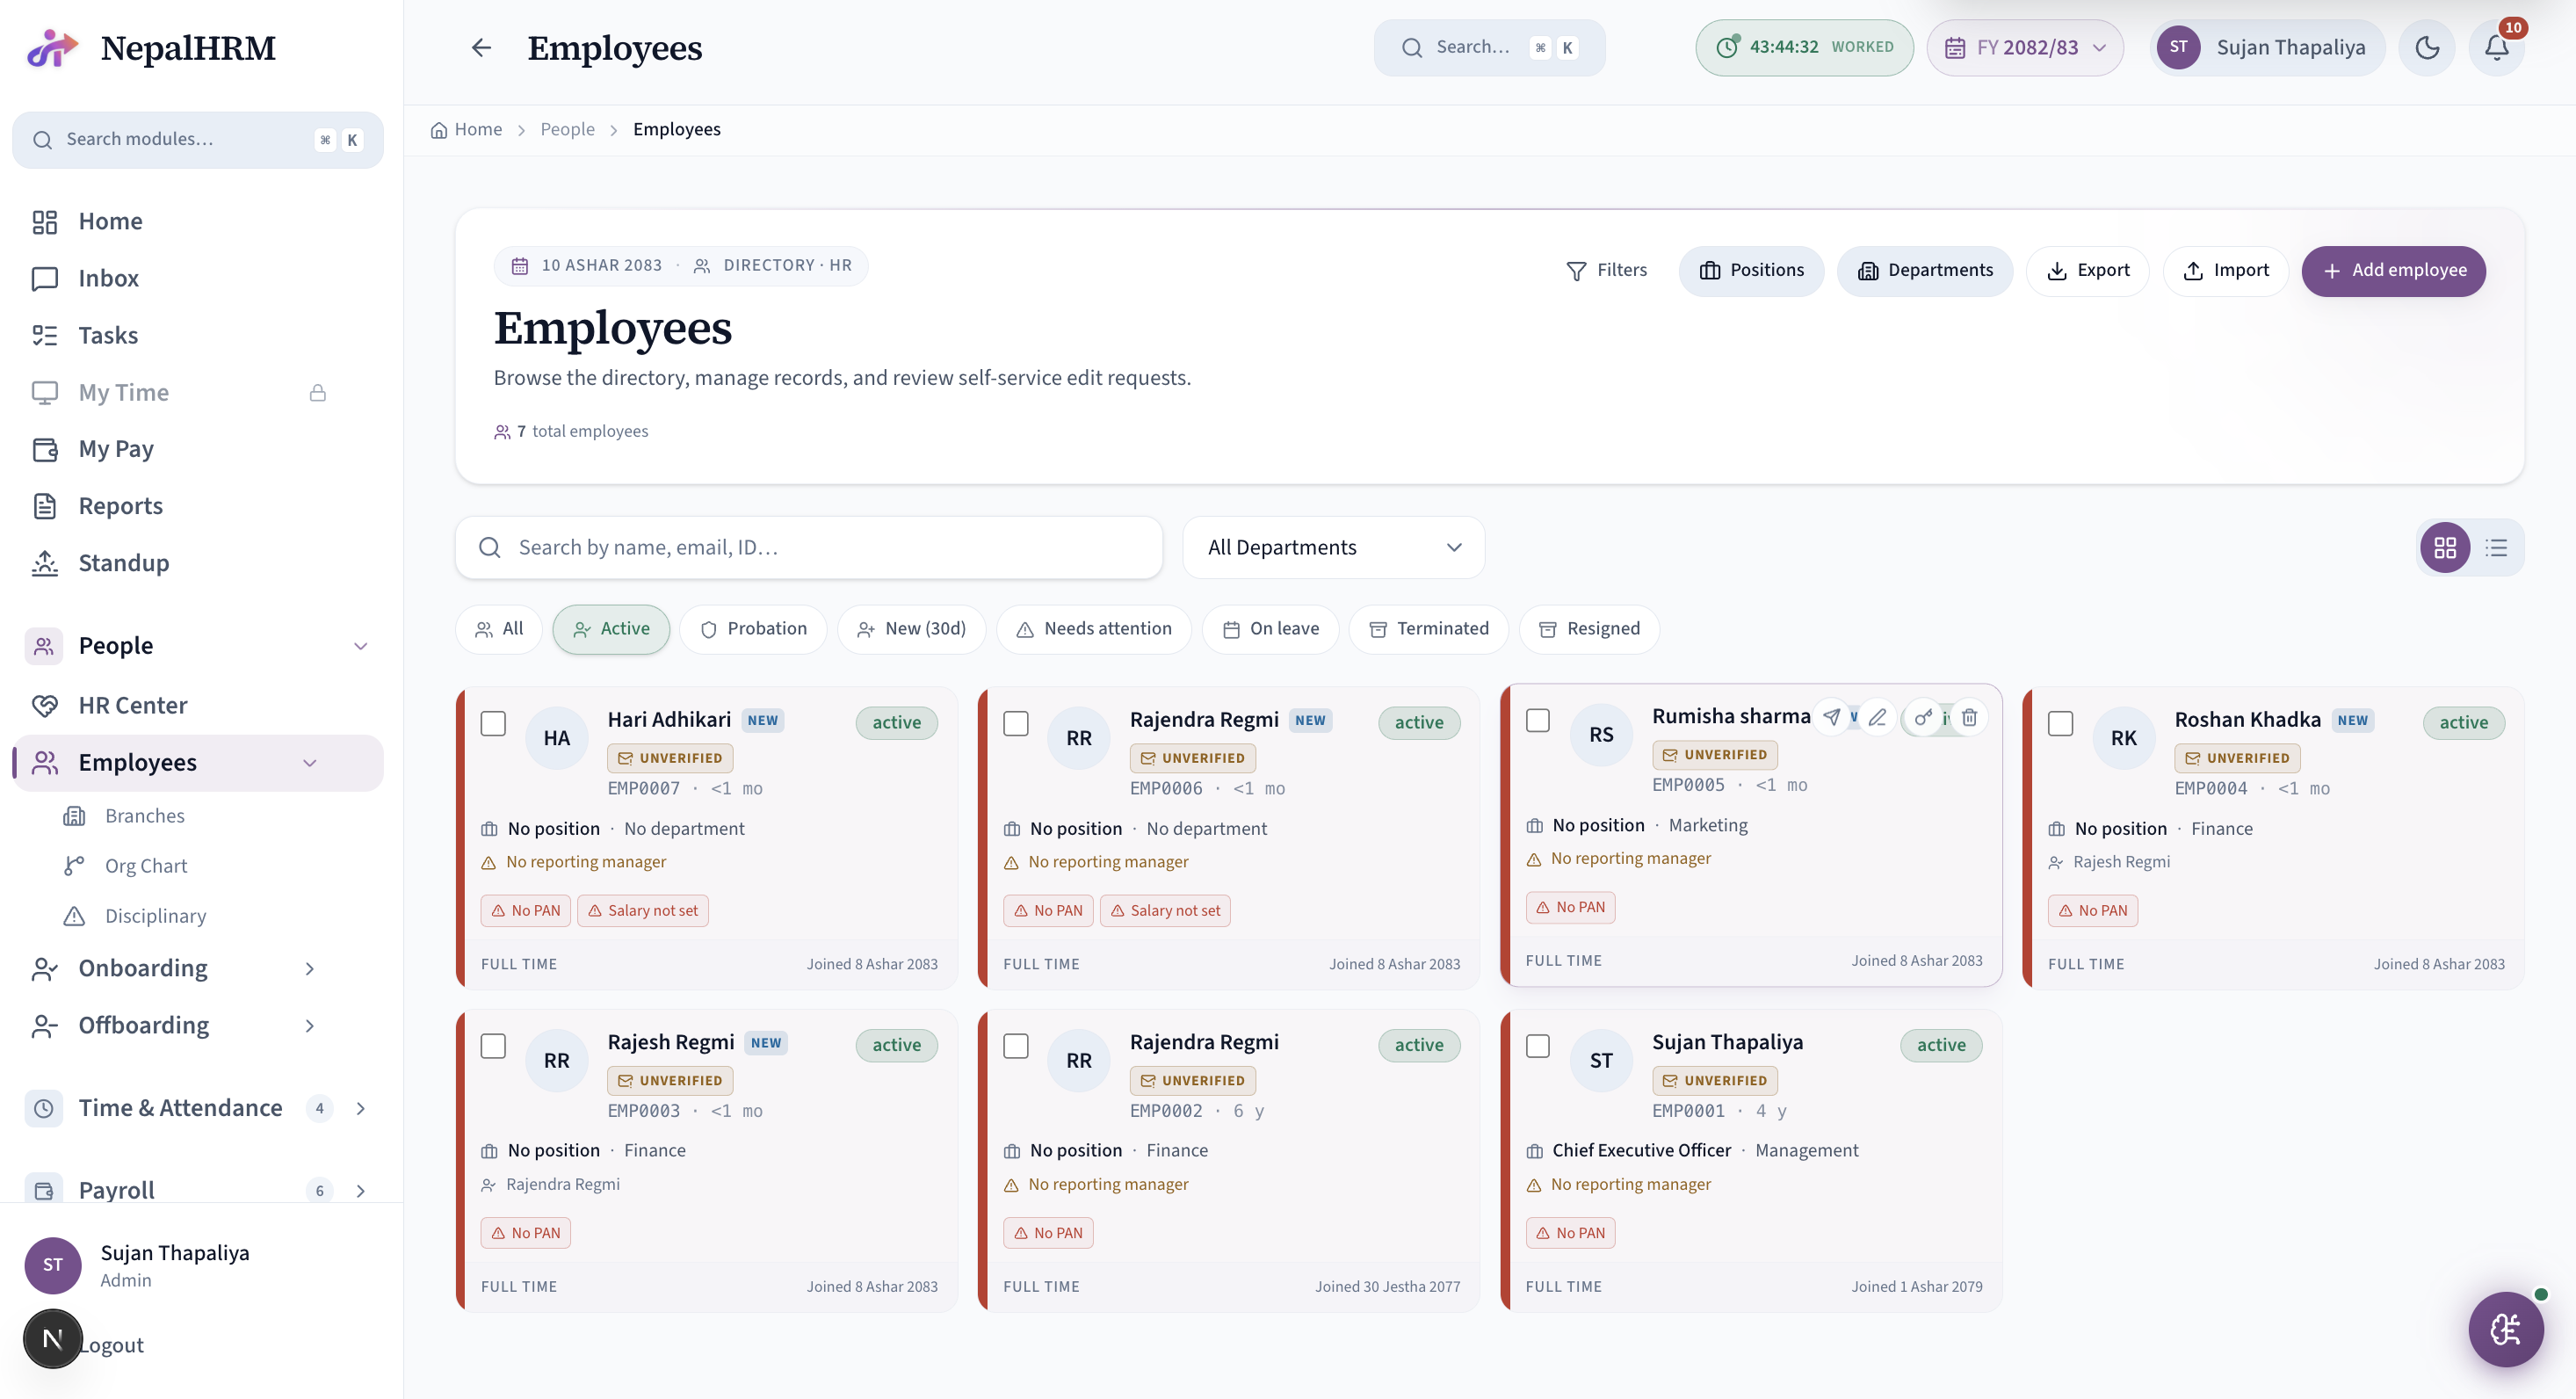
The single source of truth for every person in the company. List view supports search, department filter, status filter (active / on-leave / resigned / terminated), and bulk actions (import, archive, send email). Clicking a row opens the profile drawer with tabs for About, Work Info, Attendance, Leave, Overtime, Payroll, Finance Profile, Assets, Documents, Bonus Points, and History.
Setup
- Import employees: Employees → Import → upload CSV/XLSX, map columns, run.
- Invite an existing person: Invitations → Invite → email + role; they click the link to set a password.
- Add manually: Employees → "Add" → fill the form (department, job position, hire date, salary).
Day-to-day operations
- Filter by department / status from the toolbar; use Search for name / employee ID / email.
- Open profile → History tab to see the lifecycle timeline (joined → salary changes → role changes → resignation → offboarding).
- Reset password (HR): profile → Security → Reset password; an email goes to the employee.
- Archive a leaver: profile → Archive (admin-only). Their history stays intact, login disabled, email freed for reuse.
Branches
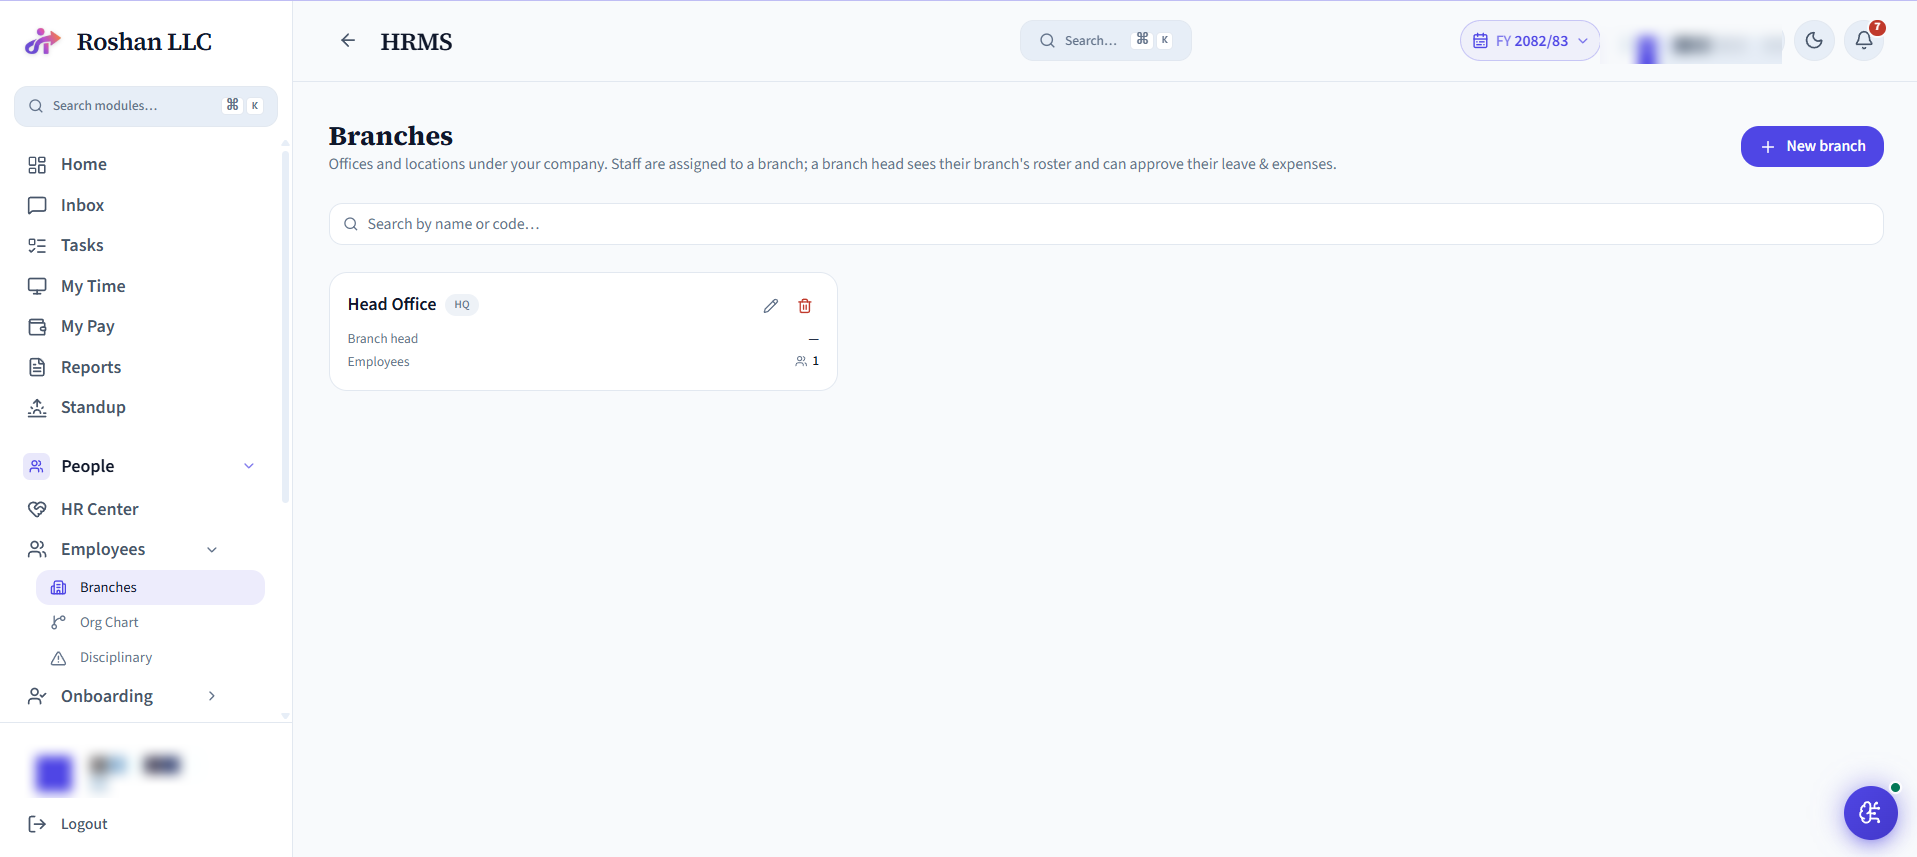
Multiple worksites / branches under one company - each with its own address, employees and, optionally, its own attendance rules.
Setup
- Add each branch with an address and a branch manager.
Day-to-day operations
- Assign employees to branches; filter attendance and payroll by branch.
Org Chart
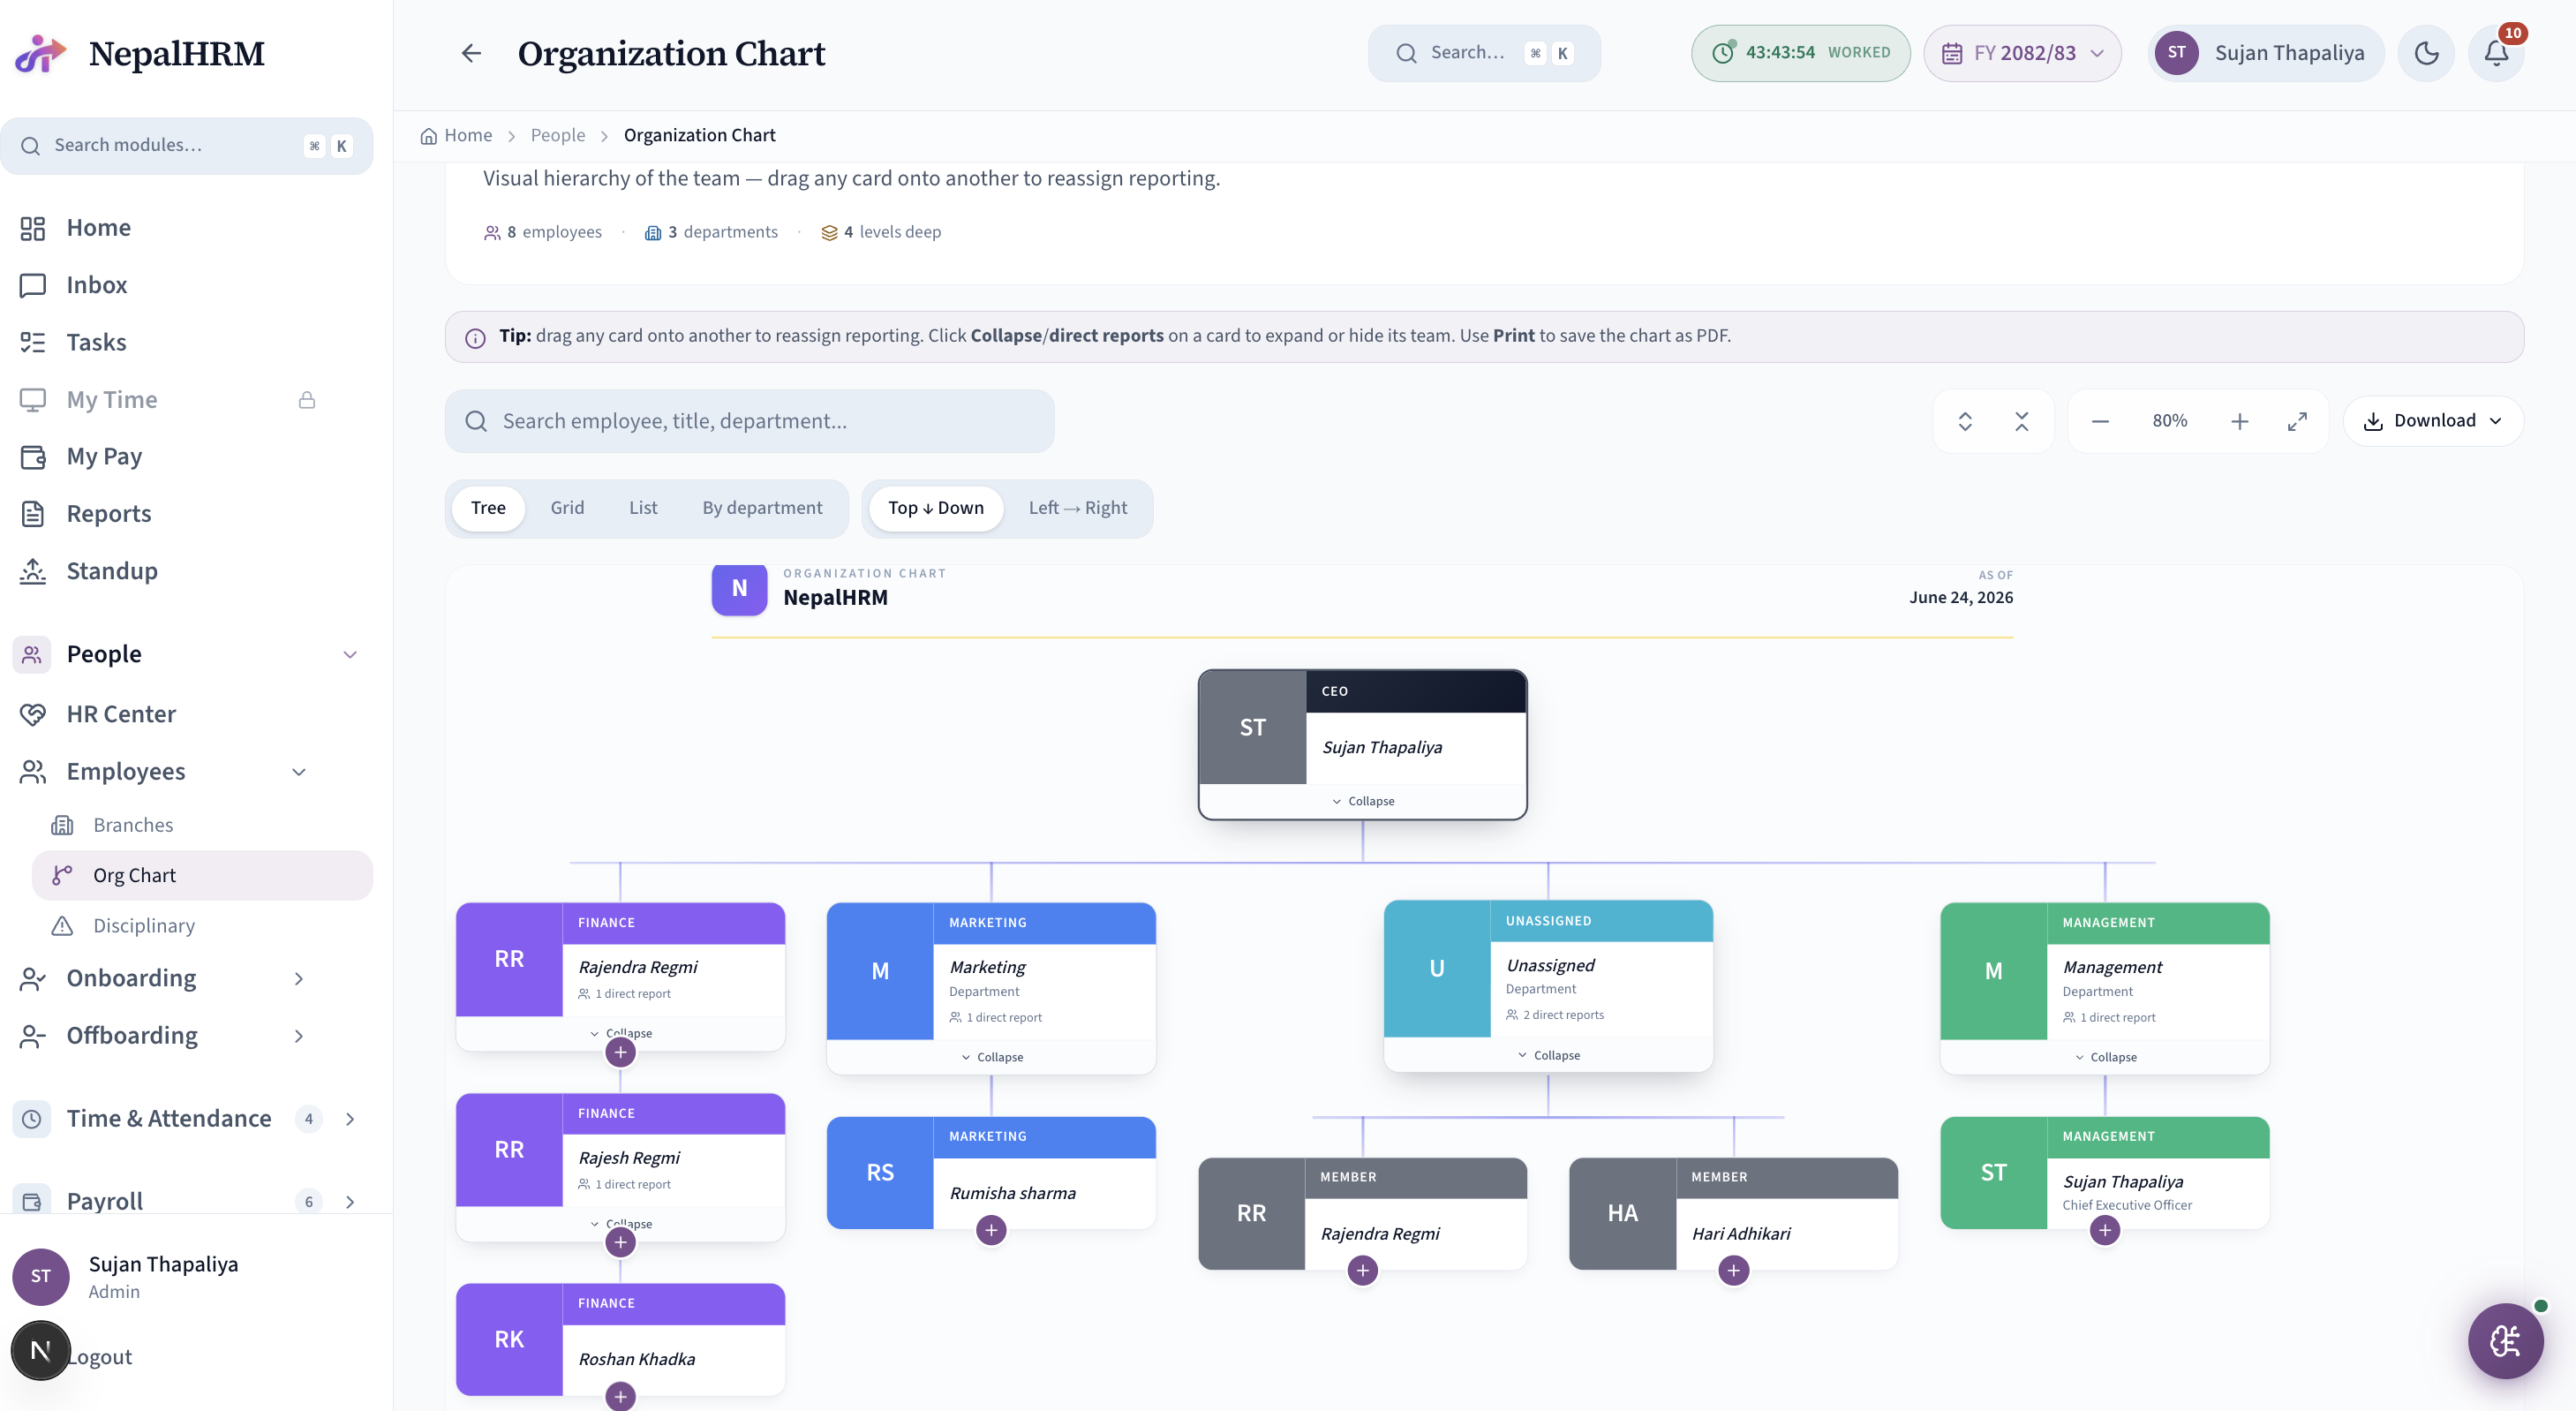
Visual hierarchy of every reporting line, built automatically from each employee's assigned reporting manager. Useful for showing new hires who their skip-level is, and for HR to spot odd lines - a manager reporting to their own report, or a team with no head.
Setup
- Set each employee's reporting manager on their profile → Work Info → Reporting Manager.
- Departments and Job Positions populate the lateral grouping; configure them in Settings → Departments.
Day-to-day operations
- Expand / collapse nodes by clicking a manager.
- Click a face to jump to the profile drawer.
- Export the org chart (top-right "Download") as PDF for printing or sharing with new hires.
Disciplinary
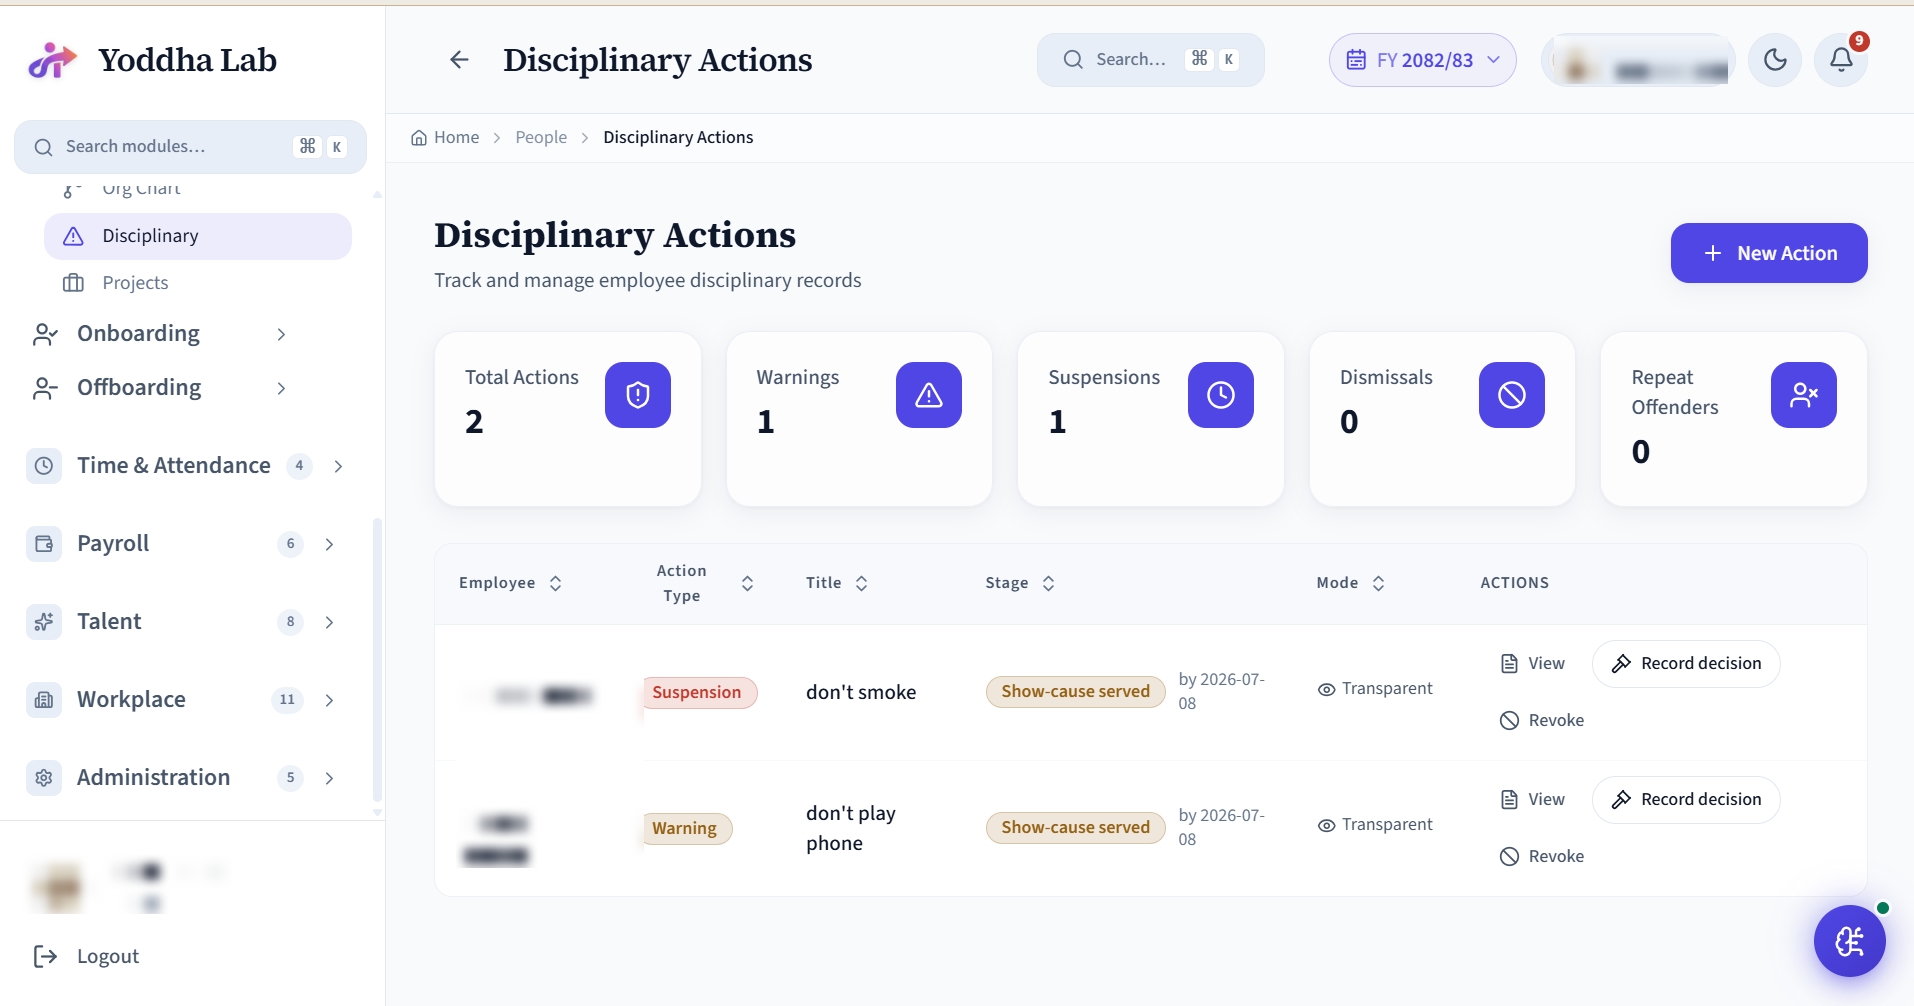
Record warnings, suspensions, and dismissals with audit-grade trail. HR captures the action type, the issued title + description, the start date, and any supporting attachment URL. Status moves through Active → Completed or Appealed so the same row tracks the full lifecycle.
Setup
- Ready out of the box - no catalog to build.
- Agree your action types up front (Warning / Suspension / Dismissal) so HR records them consistently.
- Optional: add an approval chain so dismissals need an admin co-sign before they take effect.
Day-to-day operations
- HR opens: Disciplinary → New → pick employee + action type (Warning / Suspension / Dismissal) + title + description.
- Set the start date + duration; the record auto-marks Completed once the duration elapses (or HR closes it manually).
- Attach evidence: upload a PDF / image to the record.
- Appeal flow: employee disputes → HR sets the status to Appealed → admin reviews → resolves.
Projects
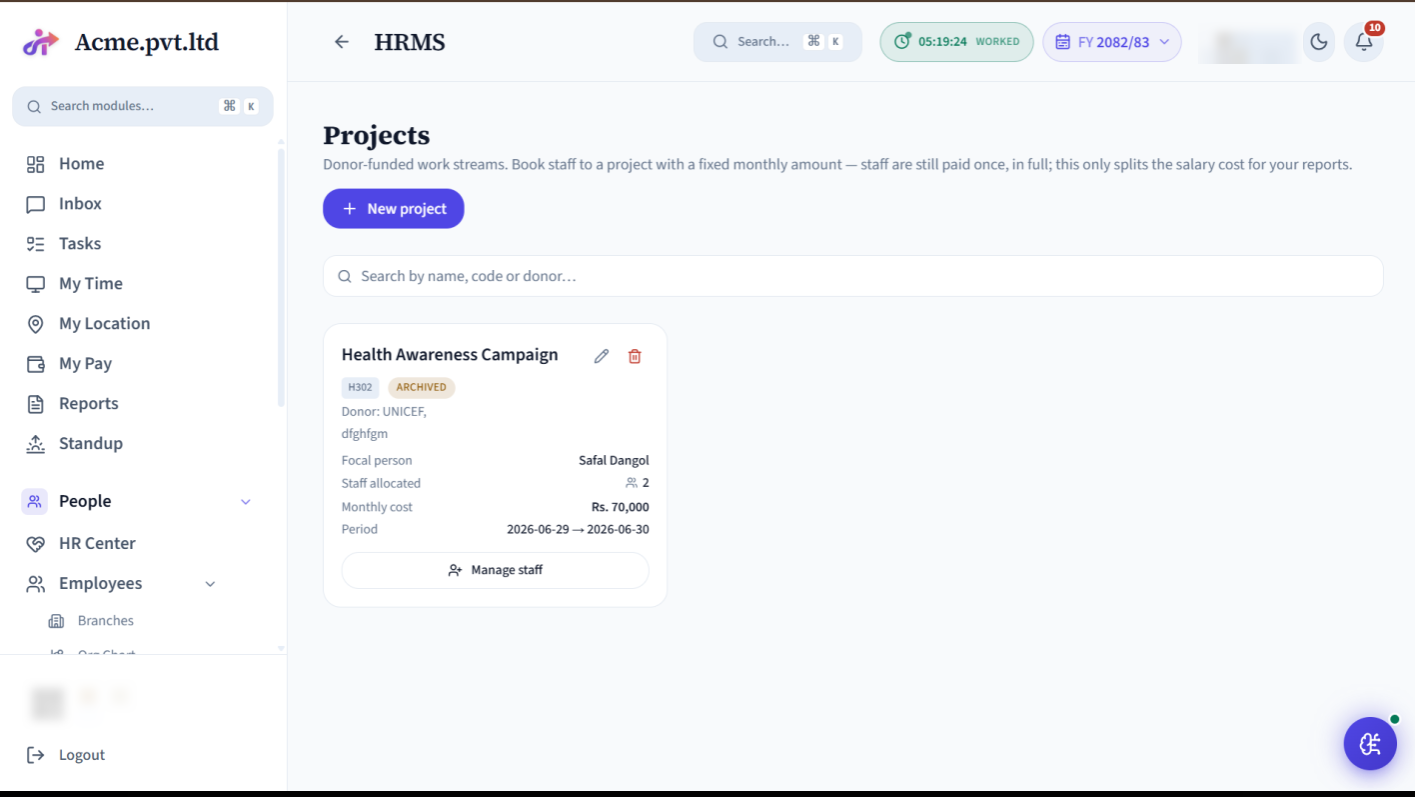
Track the projects or programmes your organisation runs - common for NGOs and donor-funded teams - and allocate each employee's time and payroll cost to them. A project carries a name, code, donor / funder, period and budget. Assigning employees splits their cost across projects, so finance can report spend per project and per donor.
Setup
- Projects → Add: name + code + donor / funder + period + budget.
- Assign employees and their cost share (e.g. 60% Project A, 40% Project B).
Day-to-day operations
- Update allocations when people move between projects.
- Pull cost-per-project / cost-per-donor figures for funder reports.
- Closed projects stay on record for the audit trail.
Onboarding
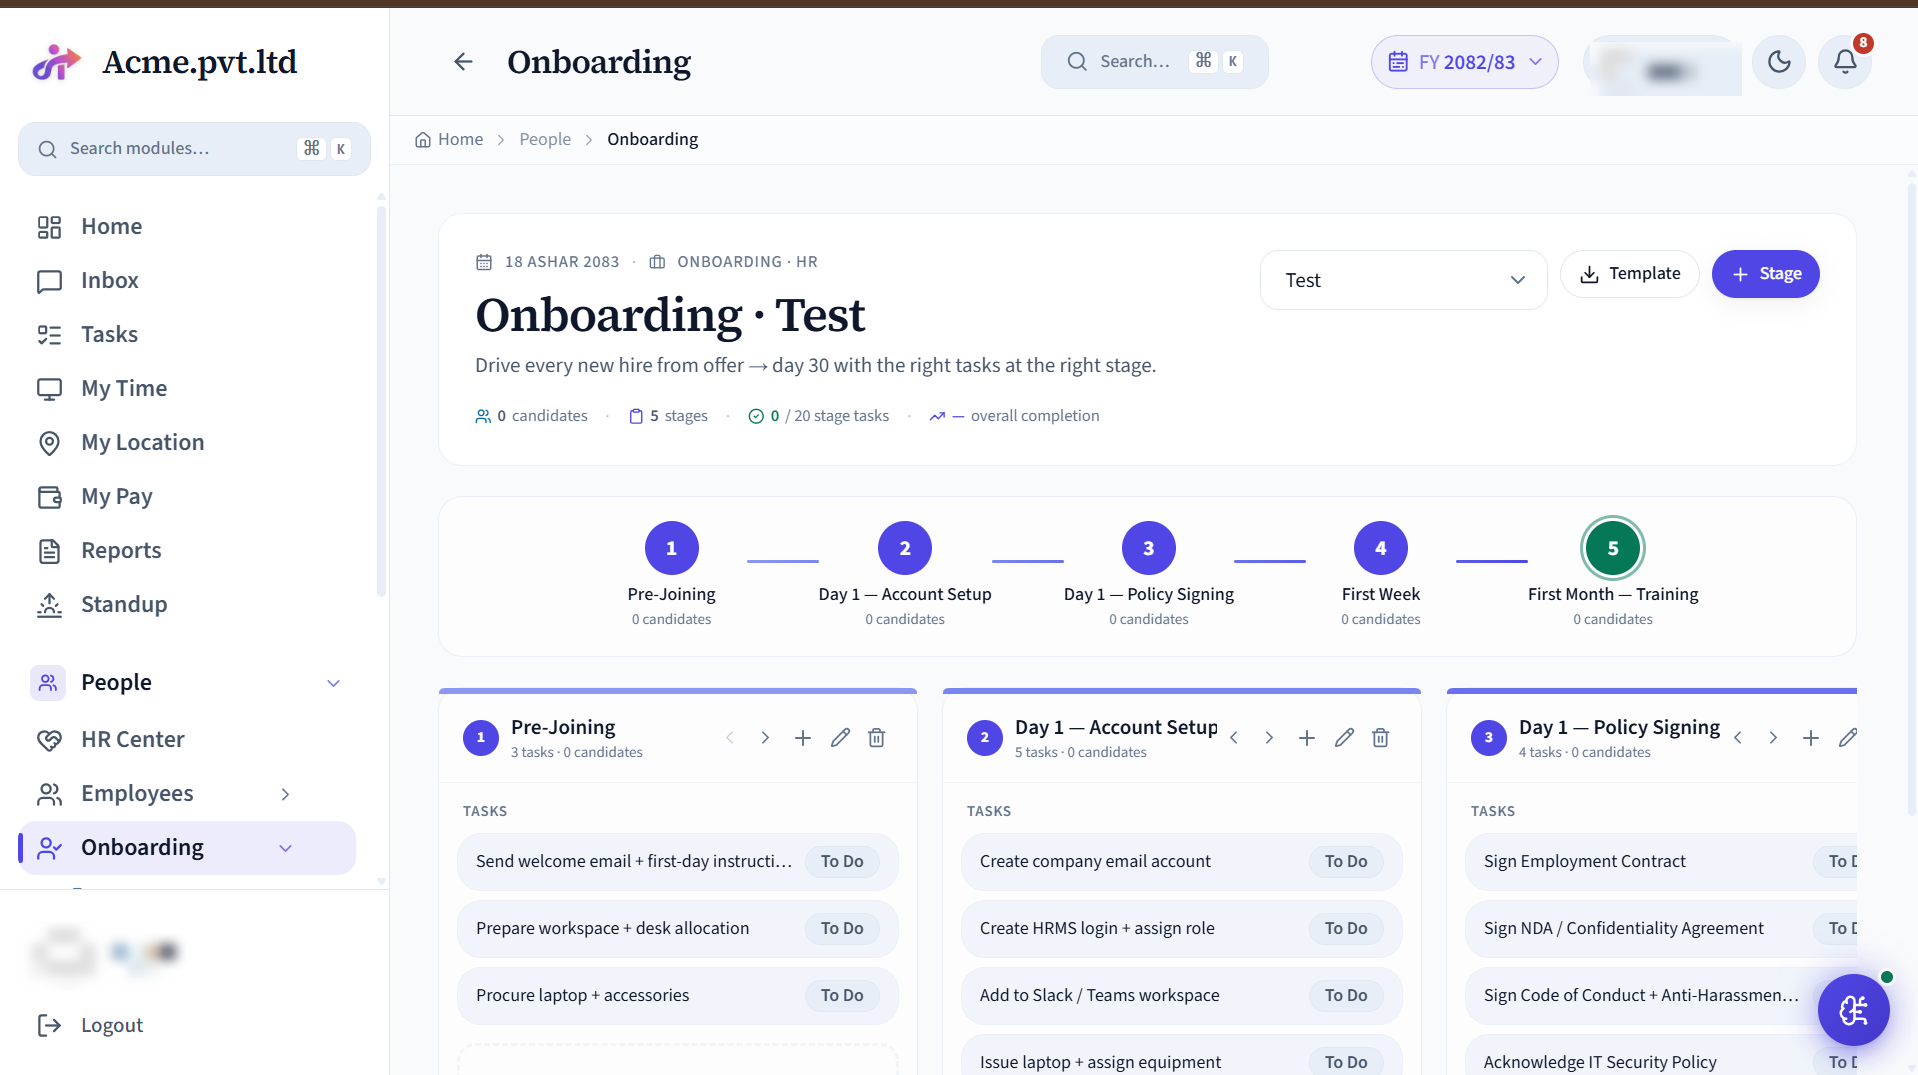
The pipeline a new hire walks through between offer-accepted and Day-30. Stages (Pre-boarding / Day 1 / Week 1 / Month 1) are configurable; each stage holds tasks (Sign offer, Provision Workspace, Intro 1:1, etc.). Tasks can be marked Confirmed or Not - the dashboard widget reads from these to remind HR what's pending.
Setup
- Stages auto-seed when the first recruitment opens. Customize: Onboarding → Stages → edit/add.
- Add a default task to a stage: Onboarding → Stage → Tasks → "+".
- Assign tasks to a specific user / role so the right person gets the to-do.
Day-to-day operations
- When a candidate accepts an offer, their onboarding case auto-creates with the default tasks.
- Tick tasks off as they complete; the pipeline progress bar updates and the new hire's dashboard reflects it.
- Use the kanban view to see all in-flight onboardings at a glance.
New Joiners
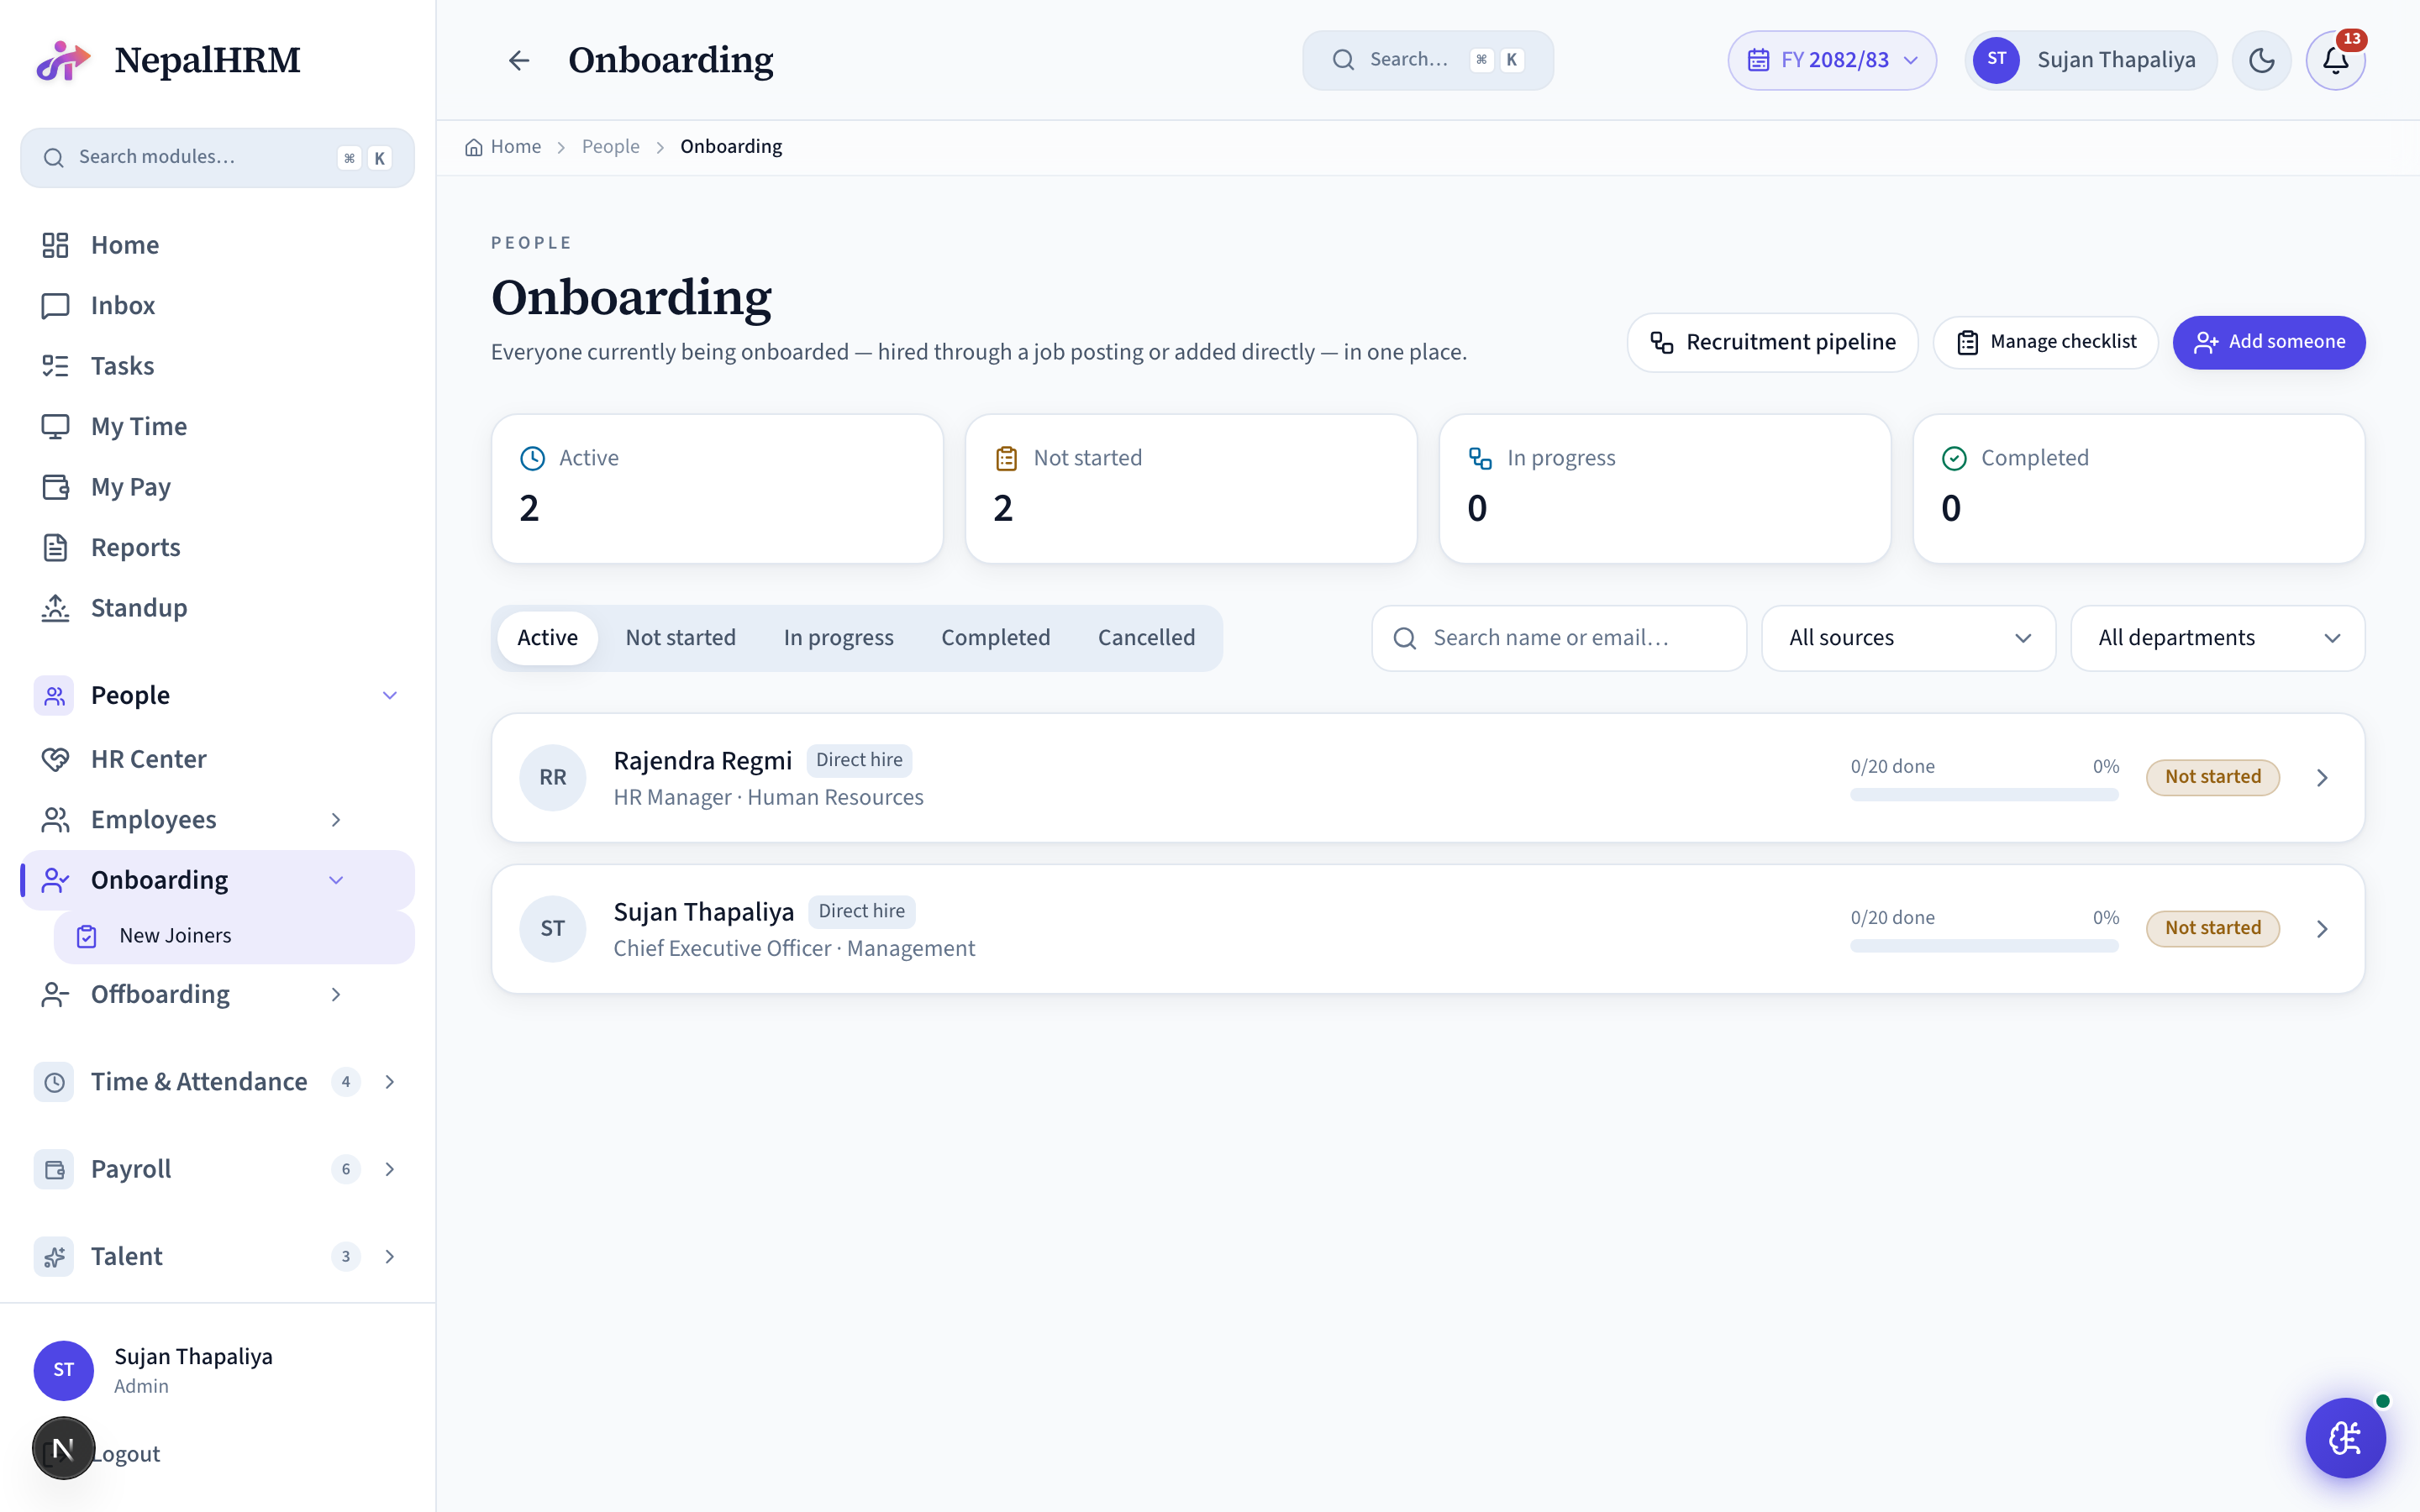
The onboarding board - every new hire and direct joiner with their checklist progress at a glance.
Setup
- Define onboarding stages first (see Onboarding).
Day-to-day operations
- Track each joiner through the stages; nudge any incomplete tasks.
Offboarding
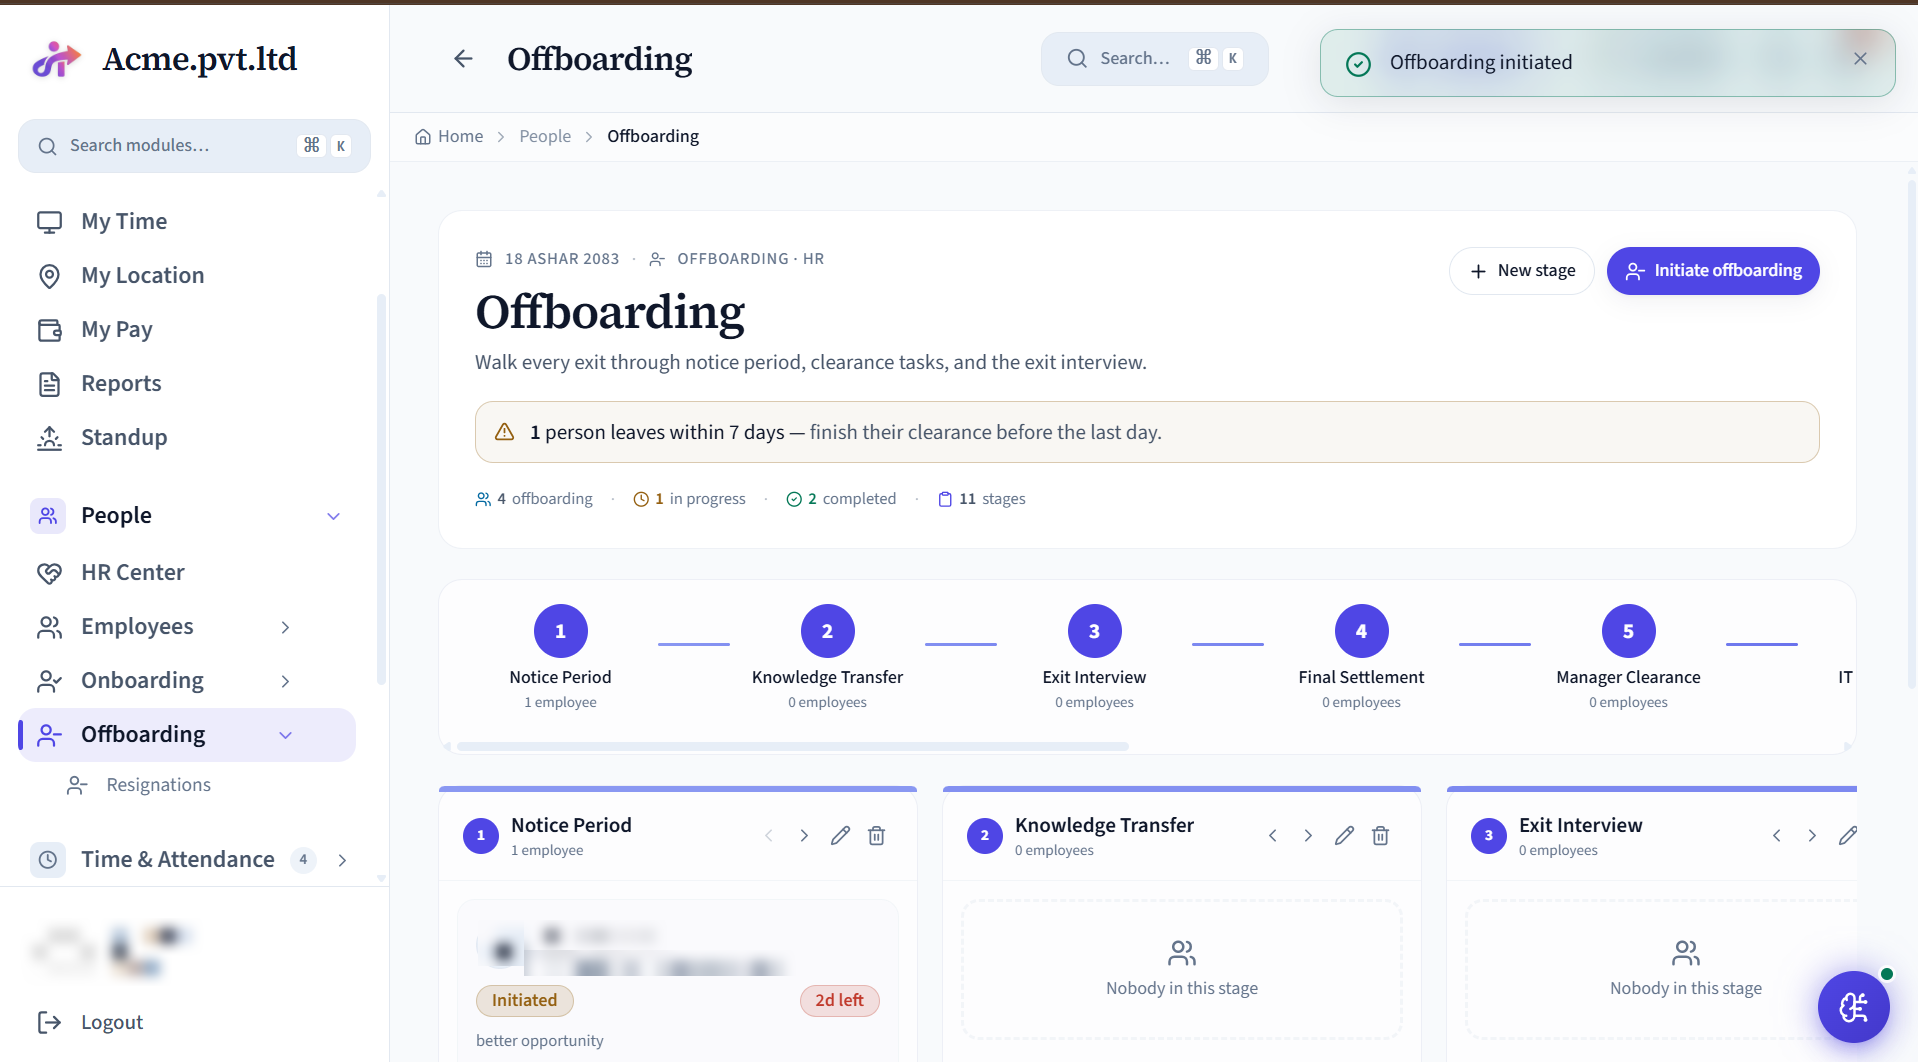
Mirror of Onboarding for departures. Stages (Notice Period / Knowledge Transfer / Exit Interview / Final Settlement) hold tasks each employee must complete before their last working day. Once every task is marked Completed, the system sets the employee's status to Resigned, signs them out of every device, and stops their app notifications automatically.
Setup
- Default stages auto-seed on the first kickoff. Customize: Offboarding → Stages.
- Add stage-default tasks (Return laptop, Revoke email, Final 1:1, etc.).
- Stages are sequence-ordered - drag to reorder.
Day-to-day operations
- Initiate from a resignation: Resignations → Approve → "Initiate offboarding".
- Drag a case to a different stage column to move them through the funnel.
- Tick tasks off; pipeline auto-advances to the next stage when all tasks in the current one are done.
- Force-finalize (HR-only): Offboarding → Case → "Finalize" - flips remaining tasks to done and disables login immediately.
Resignations
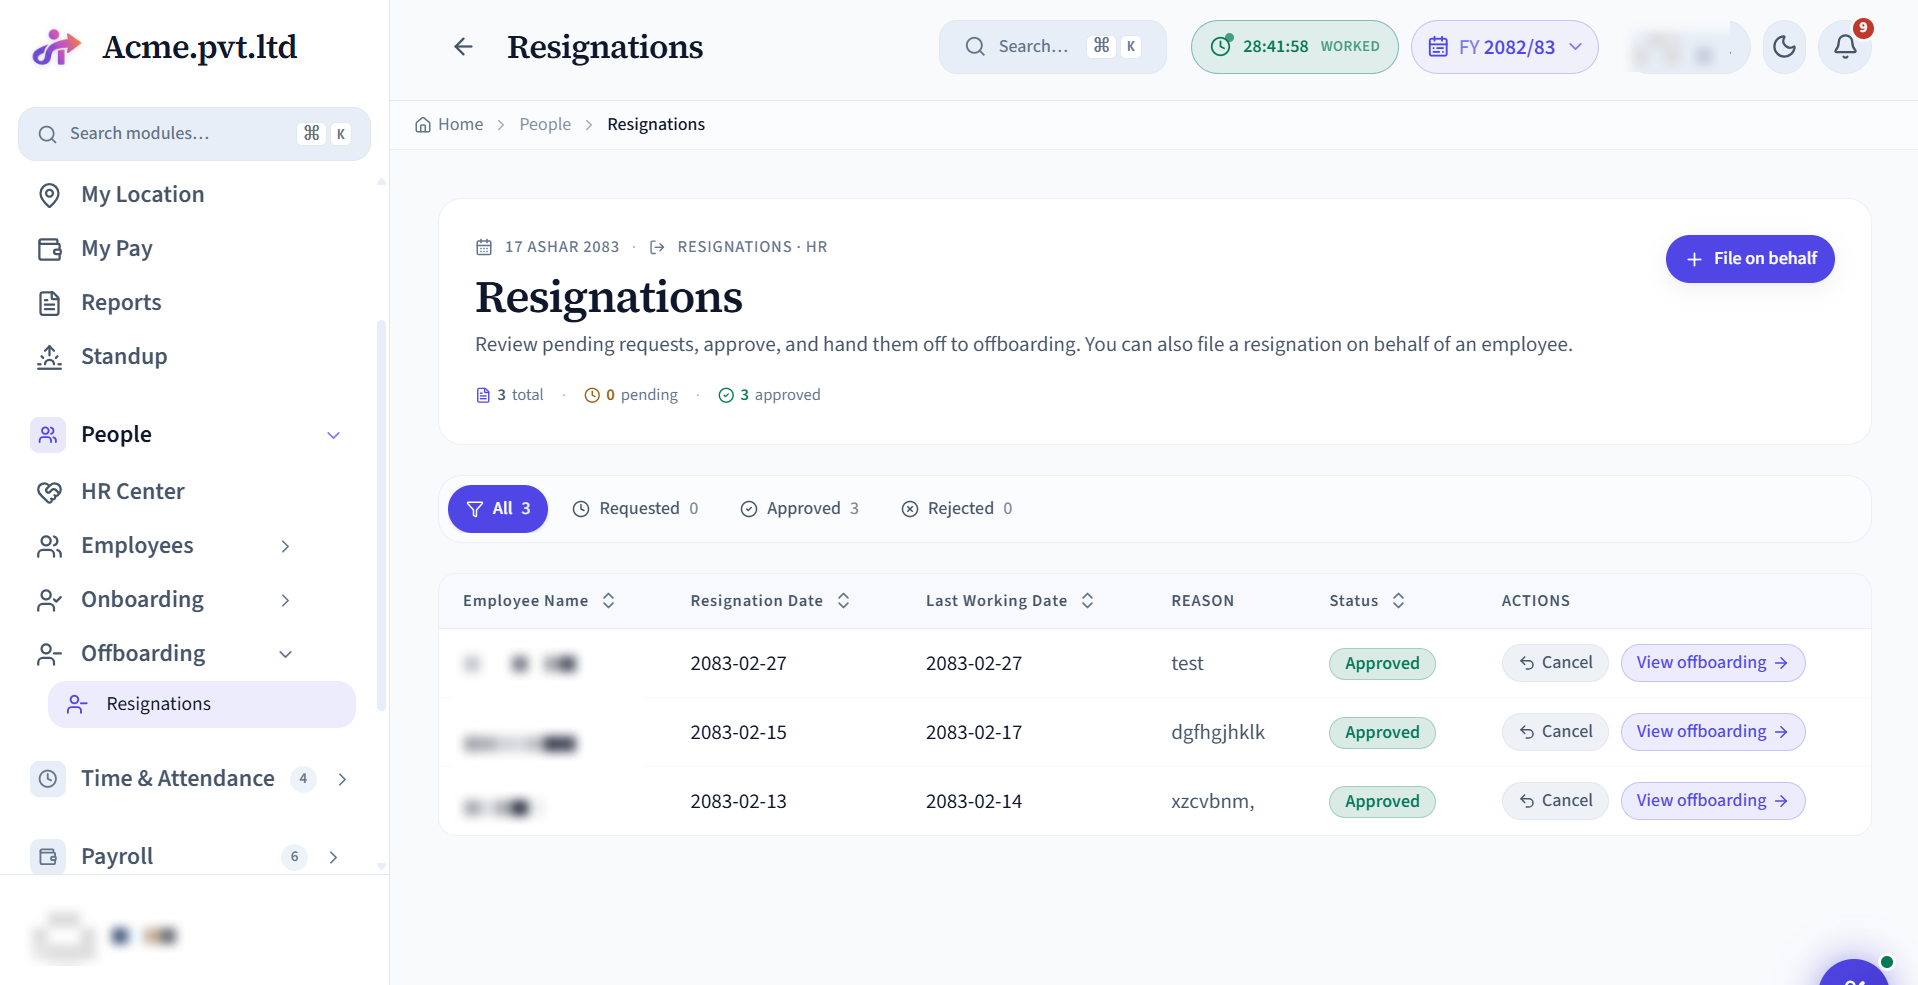
Employees submit a resignation with last-working-date + reason; HR reviews, approves, or rejects. Approving auto-creates an offboarding case in the kanban.
Setup
- Works out of the box - employees can file a resignation immediately.
- Set the notice period on your contracts / attendance policy so the last-working-date math is right.
- Choose the approval flow: HR-only by default, or add reporting-manager review via the approval-chain configurator.
Day-to-day operations
- Employee files: My Profile → Resign → fill form.
- HR review: Resignations → row → Approve / Reject (with note).
- On approval, the offboarding kanban gets a new card; the employee's status changes to Resigned on the last working day automatically.
Attendance
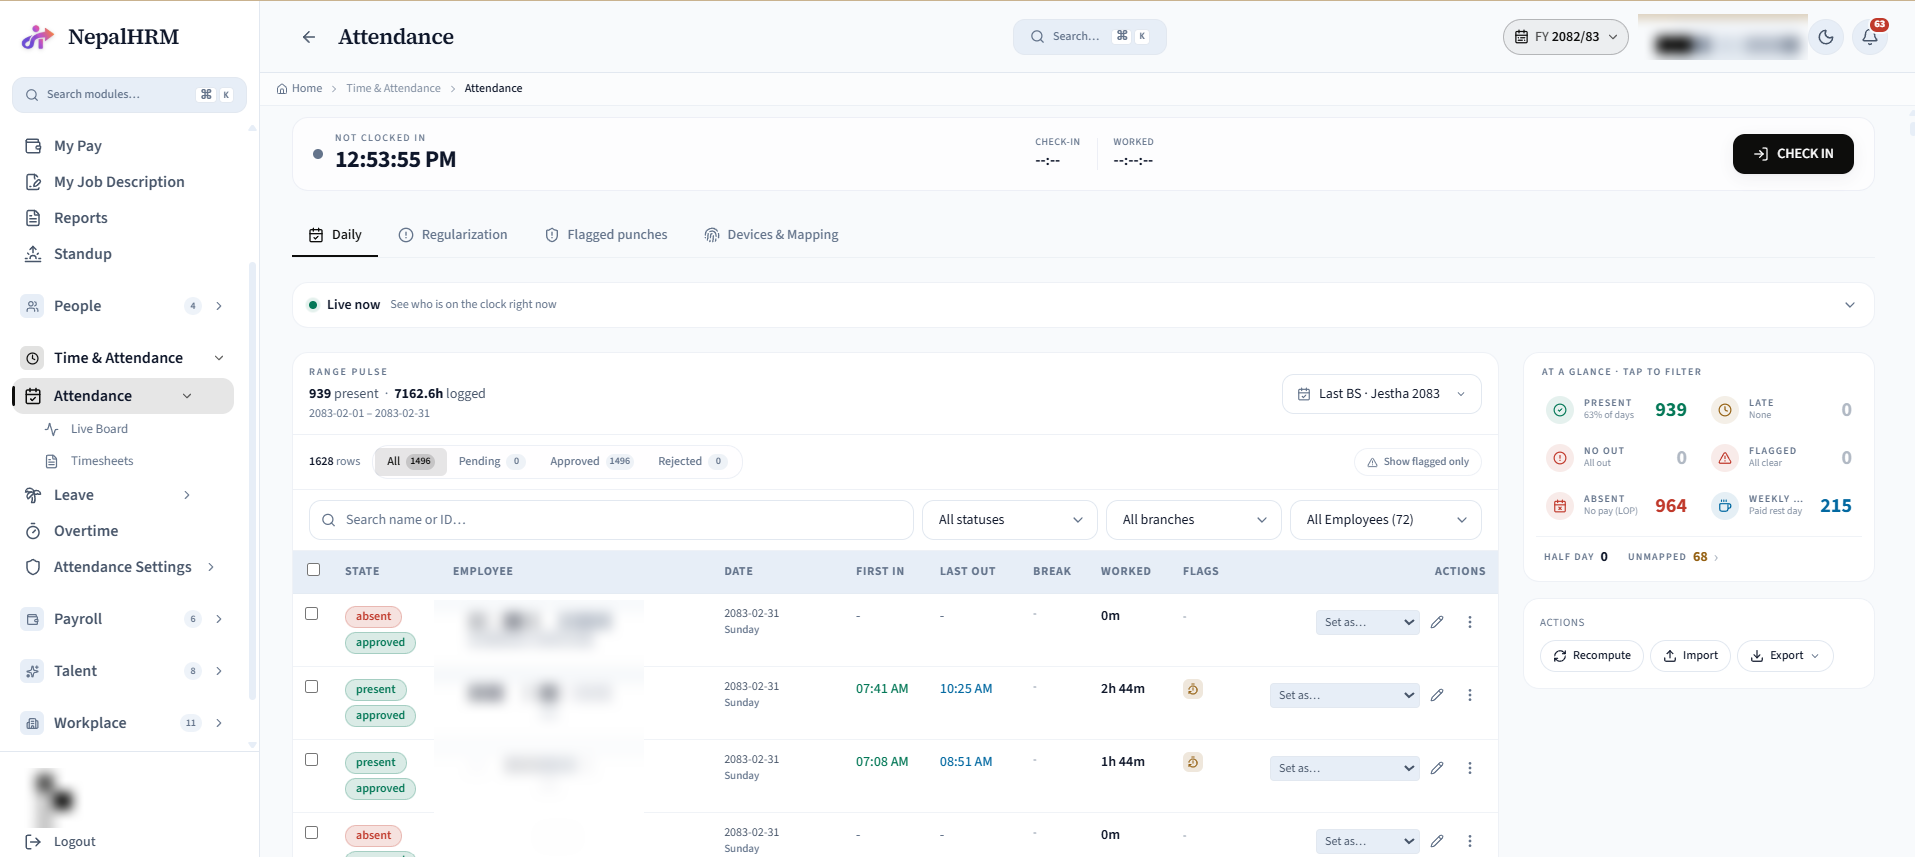
Daily attendance summary built from biometric punches, web / mobile check-ins, and manual entries. Stat tiles show Total (all active employees), Unmapped (employees not linked to a biometric device), Present, Late, Half Day, Missing Checkout, Flagged, and total worked Hours. Source icons next to each row's first-in / last-out times show whether the punch came from Biometric / Web / Mobile / Manual / Regularized.
Setup
- Register a biometric device: Attendance → Devices & Mapping → Add Device. Enter serial number + assign to office location.
- Map device users to employees: Devices & Mapping → click an unmapped row → pick employee.
- Set the attendance policy: Attendance Policies → choose default working hours, grace minutes, overtime rules.
Day-to-day operations
- Filter by date range from the toolbar. Use Quick Range chips: Today / Yesterday / Last 7 days / This month.
- Click "Unmapped" stat tile → jumps to Devices & Mapping with HR's queue of unlinked device users.
- Approve / reject pending rows in bulk: tick checkboxes → Approve / Reject.
- Recompute from punches: rebuilds the day's summary if biometric events landed late.
- Bulk upload (Import): upload a CSV / XLSX of punches or day records to backfill offline days or migrate history in one go - summaries recompute automatically. Use the template so columns map cleanly.
- Export: Excel / PDF / CSV button on the toolbar - async, you'll be notified when ready.
Live Board
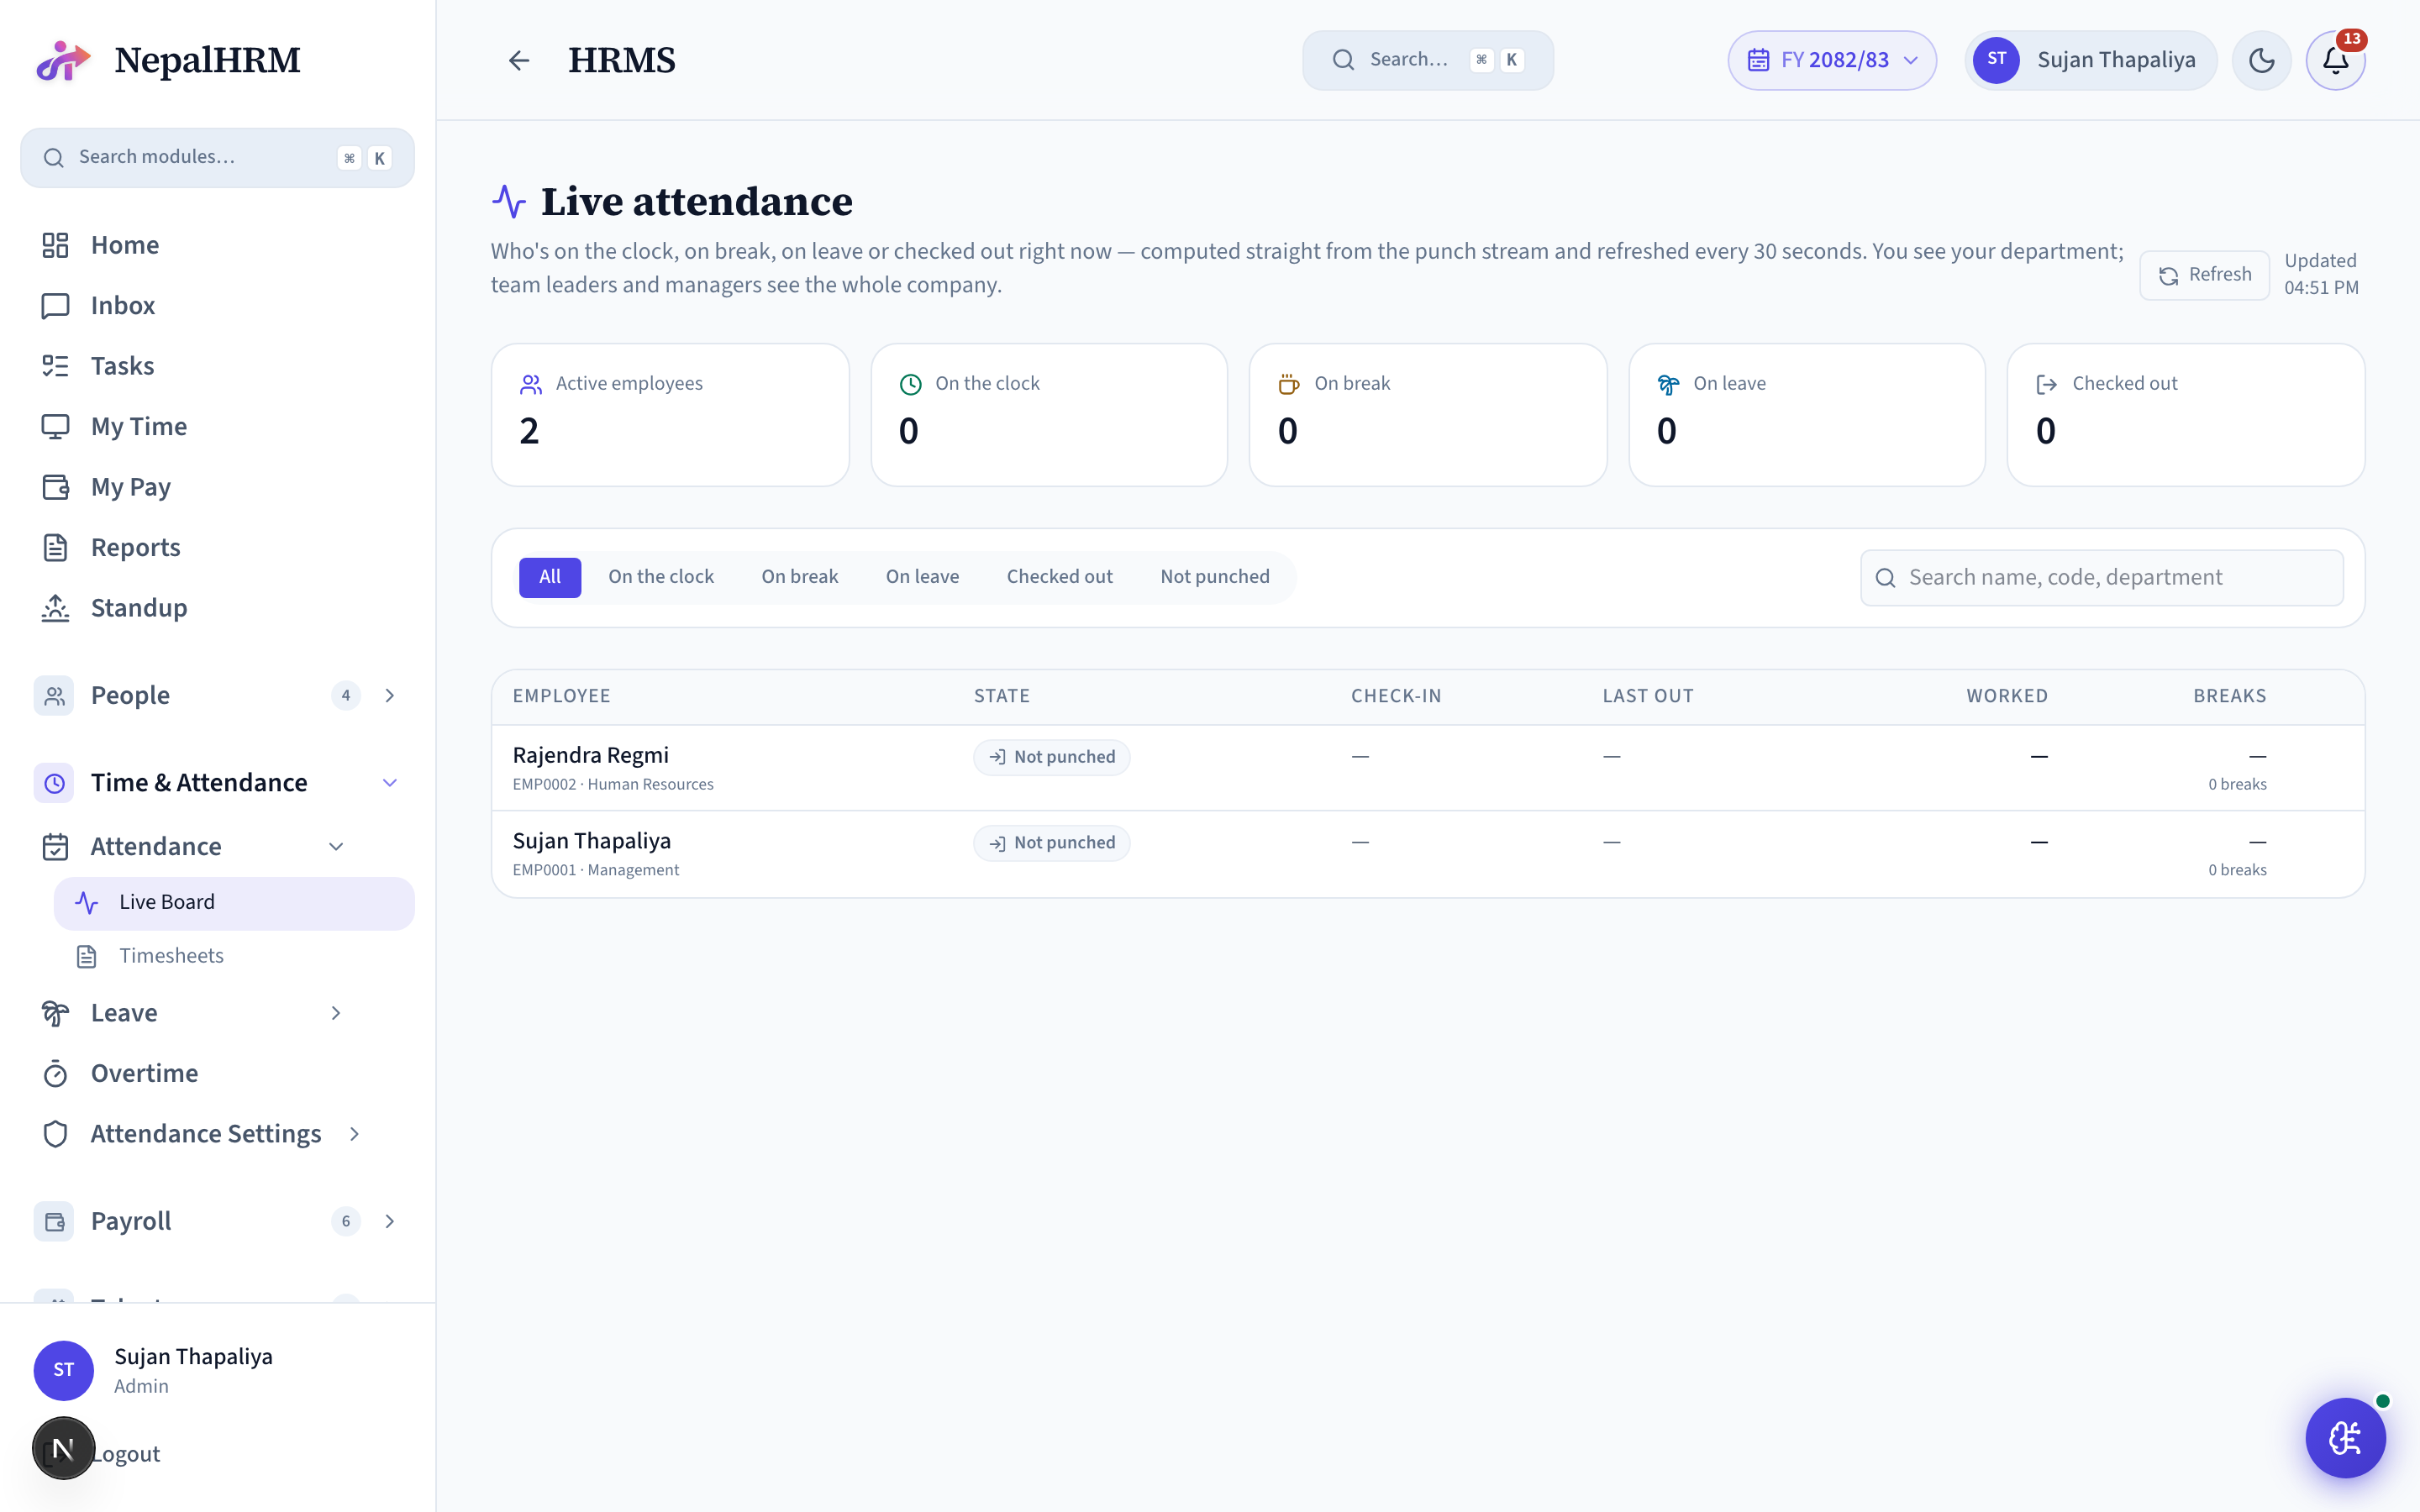
A real-time who’s-in board - see who is currently clocked in, on break, late or absent across branches, updating live through the day.
Setup
- Nothing to configure - the Live Board reads punches as they land.
- Prerequisite: employees must be clocking in (biometric, web or mobile) for anyone to appear.
- Map device users to employees (Attendance Settings → Device Fleet) so rows show names, not device IDs.
Day-to-day operations
- Monitor during working hours; spot gaps and follow up immediately.
Attendance Summary
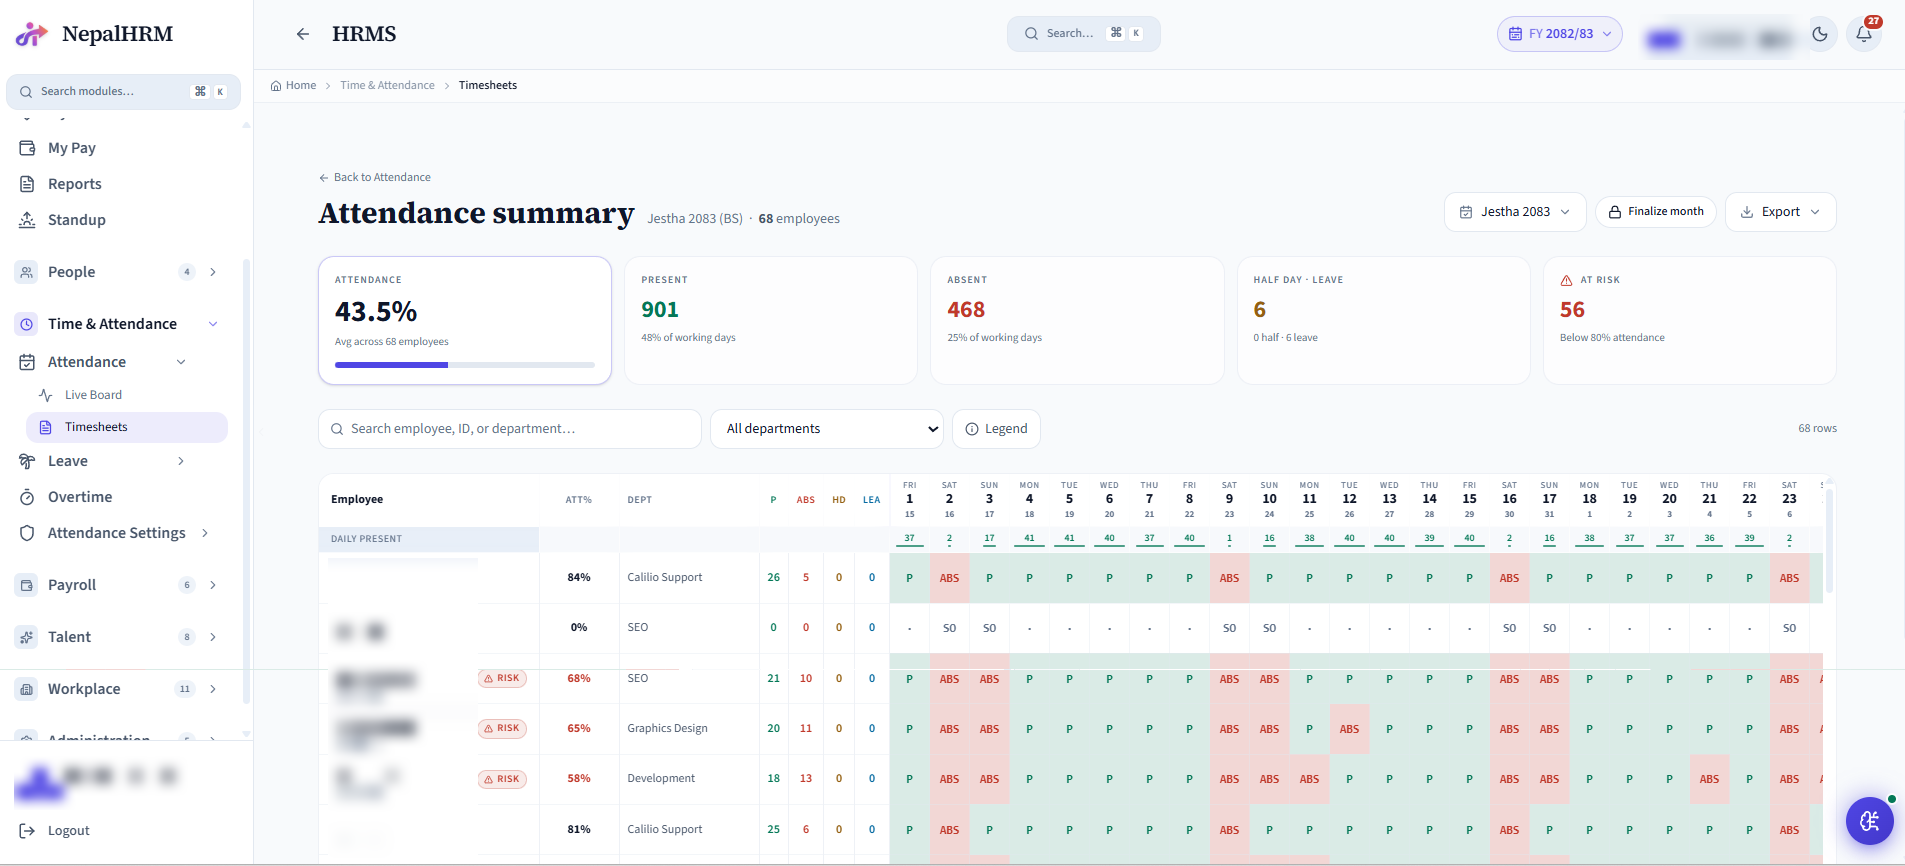
Per-day, per-employee attendance matrix. Letters across the row show P=Present, HD=Half-day, ABS=Absent, SO=Weekly off, WH=Holiday, AL/UPL=Leave. Useful for the monthly payroll review and HR's manager scorecards. Daily totals across the bottom show the head-count present each day.
Setup
- No separate setup - the matrix is computed live from daily attendance.
- It only reads correctly once Attendance Policies, Shifts and Holidays are set (they define P / HD / leave / weekly-off).
- Use it for the month-end attendance review before each payroll run.
Day-to-day operations
- Pick From / To dates (defaults to current month).
- Filter by Department or Search by employee name / ID.
- Click Download to grab a CSV for spreadsheet work.
Leaves
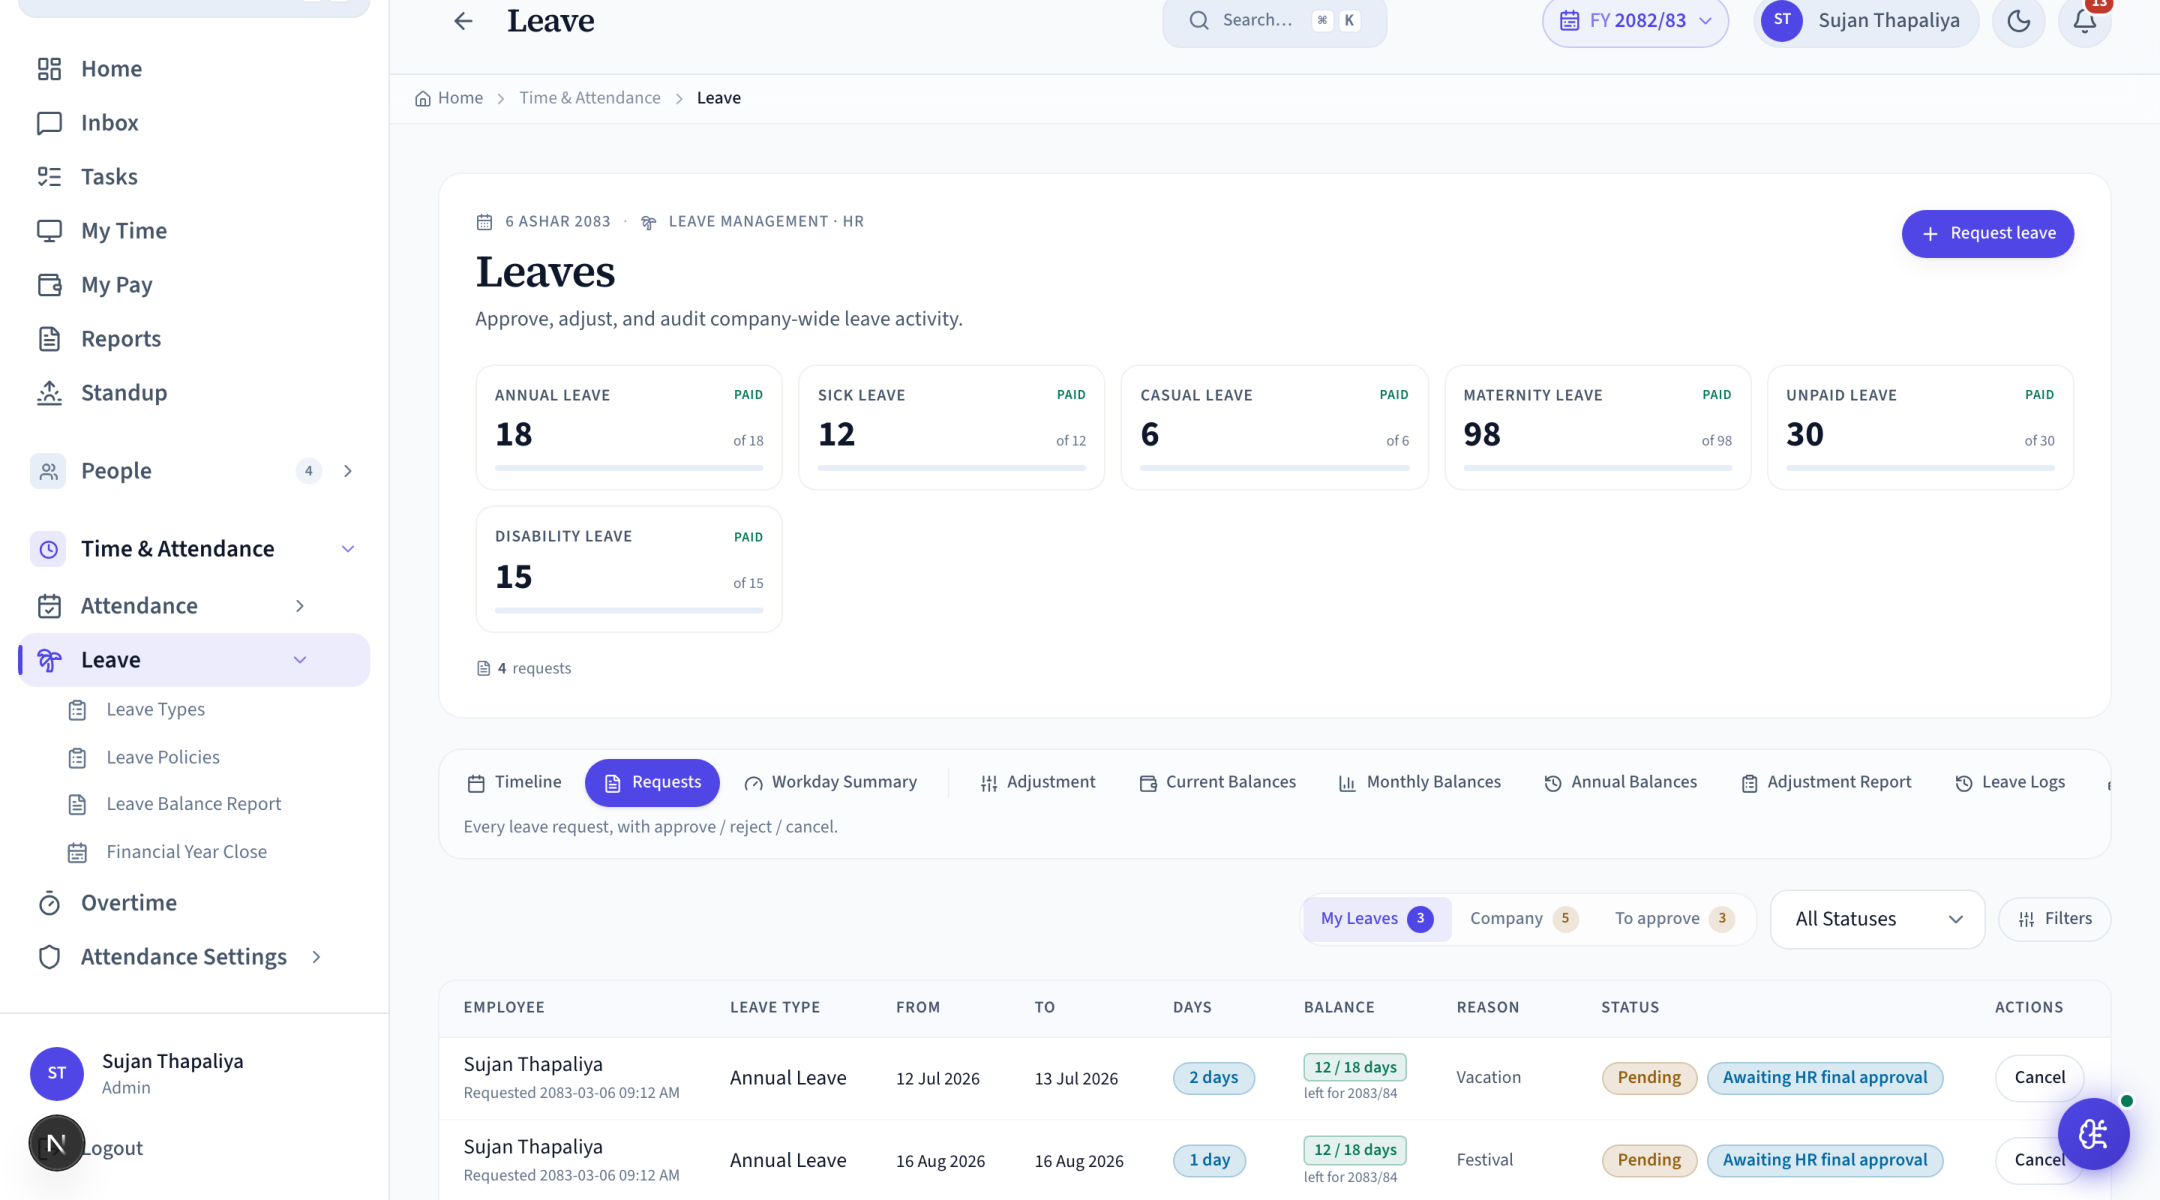
Self-service leave requests with HR oversight. Employees apply (type, dates, reason); managers approve (or HR overrides); the balance debits automatically. Approved leave shows on the daily attendance summary and reduces payroll for unpaid types. Pending leave requests are private to the requester + their reporting manager + HR - colleagues only see approved leaves.
Setup
- Define leave types: Leave Types → Add (name, accrual cadence, days per year).
- Configure policies per type: Leave Policies (carry-forward, encashment, attachment rules, gender filter, min tenure).
- Set up the approval chain: Leave Policies → Approval Chains → ordered list of approvers (manager → HR).
Day-to-day operations
- Employee applies: My Leave → Apply → type + dates + reason; manager gets a notification.
- Approver opens: Leaves → row → Approve / Reject (with rejection reason - visible to the employee).
- Half-day, hourly, and compensatory leave supported via the type-config.
- Cancel an approved leave (employee or HR) restores the balance.
Leave Types
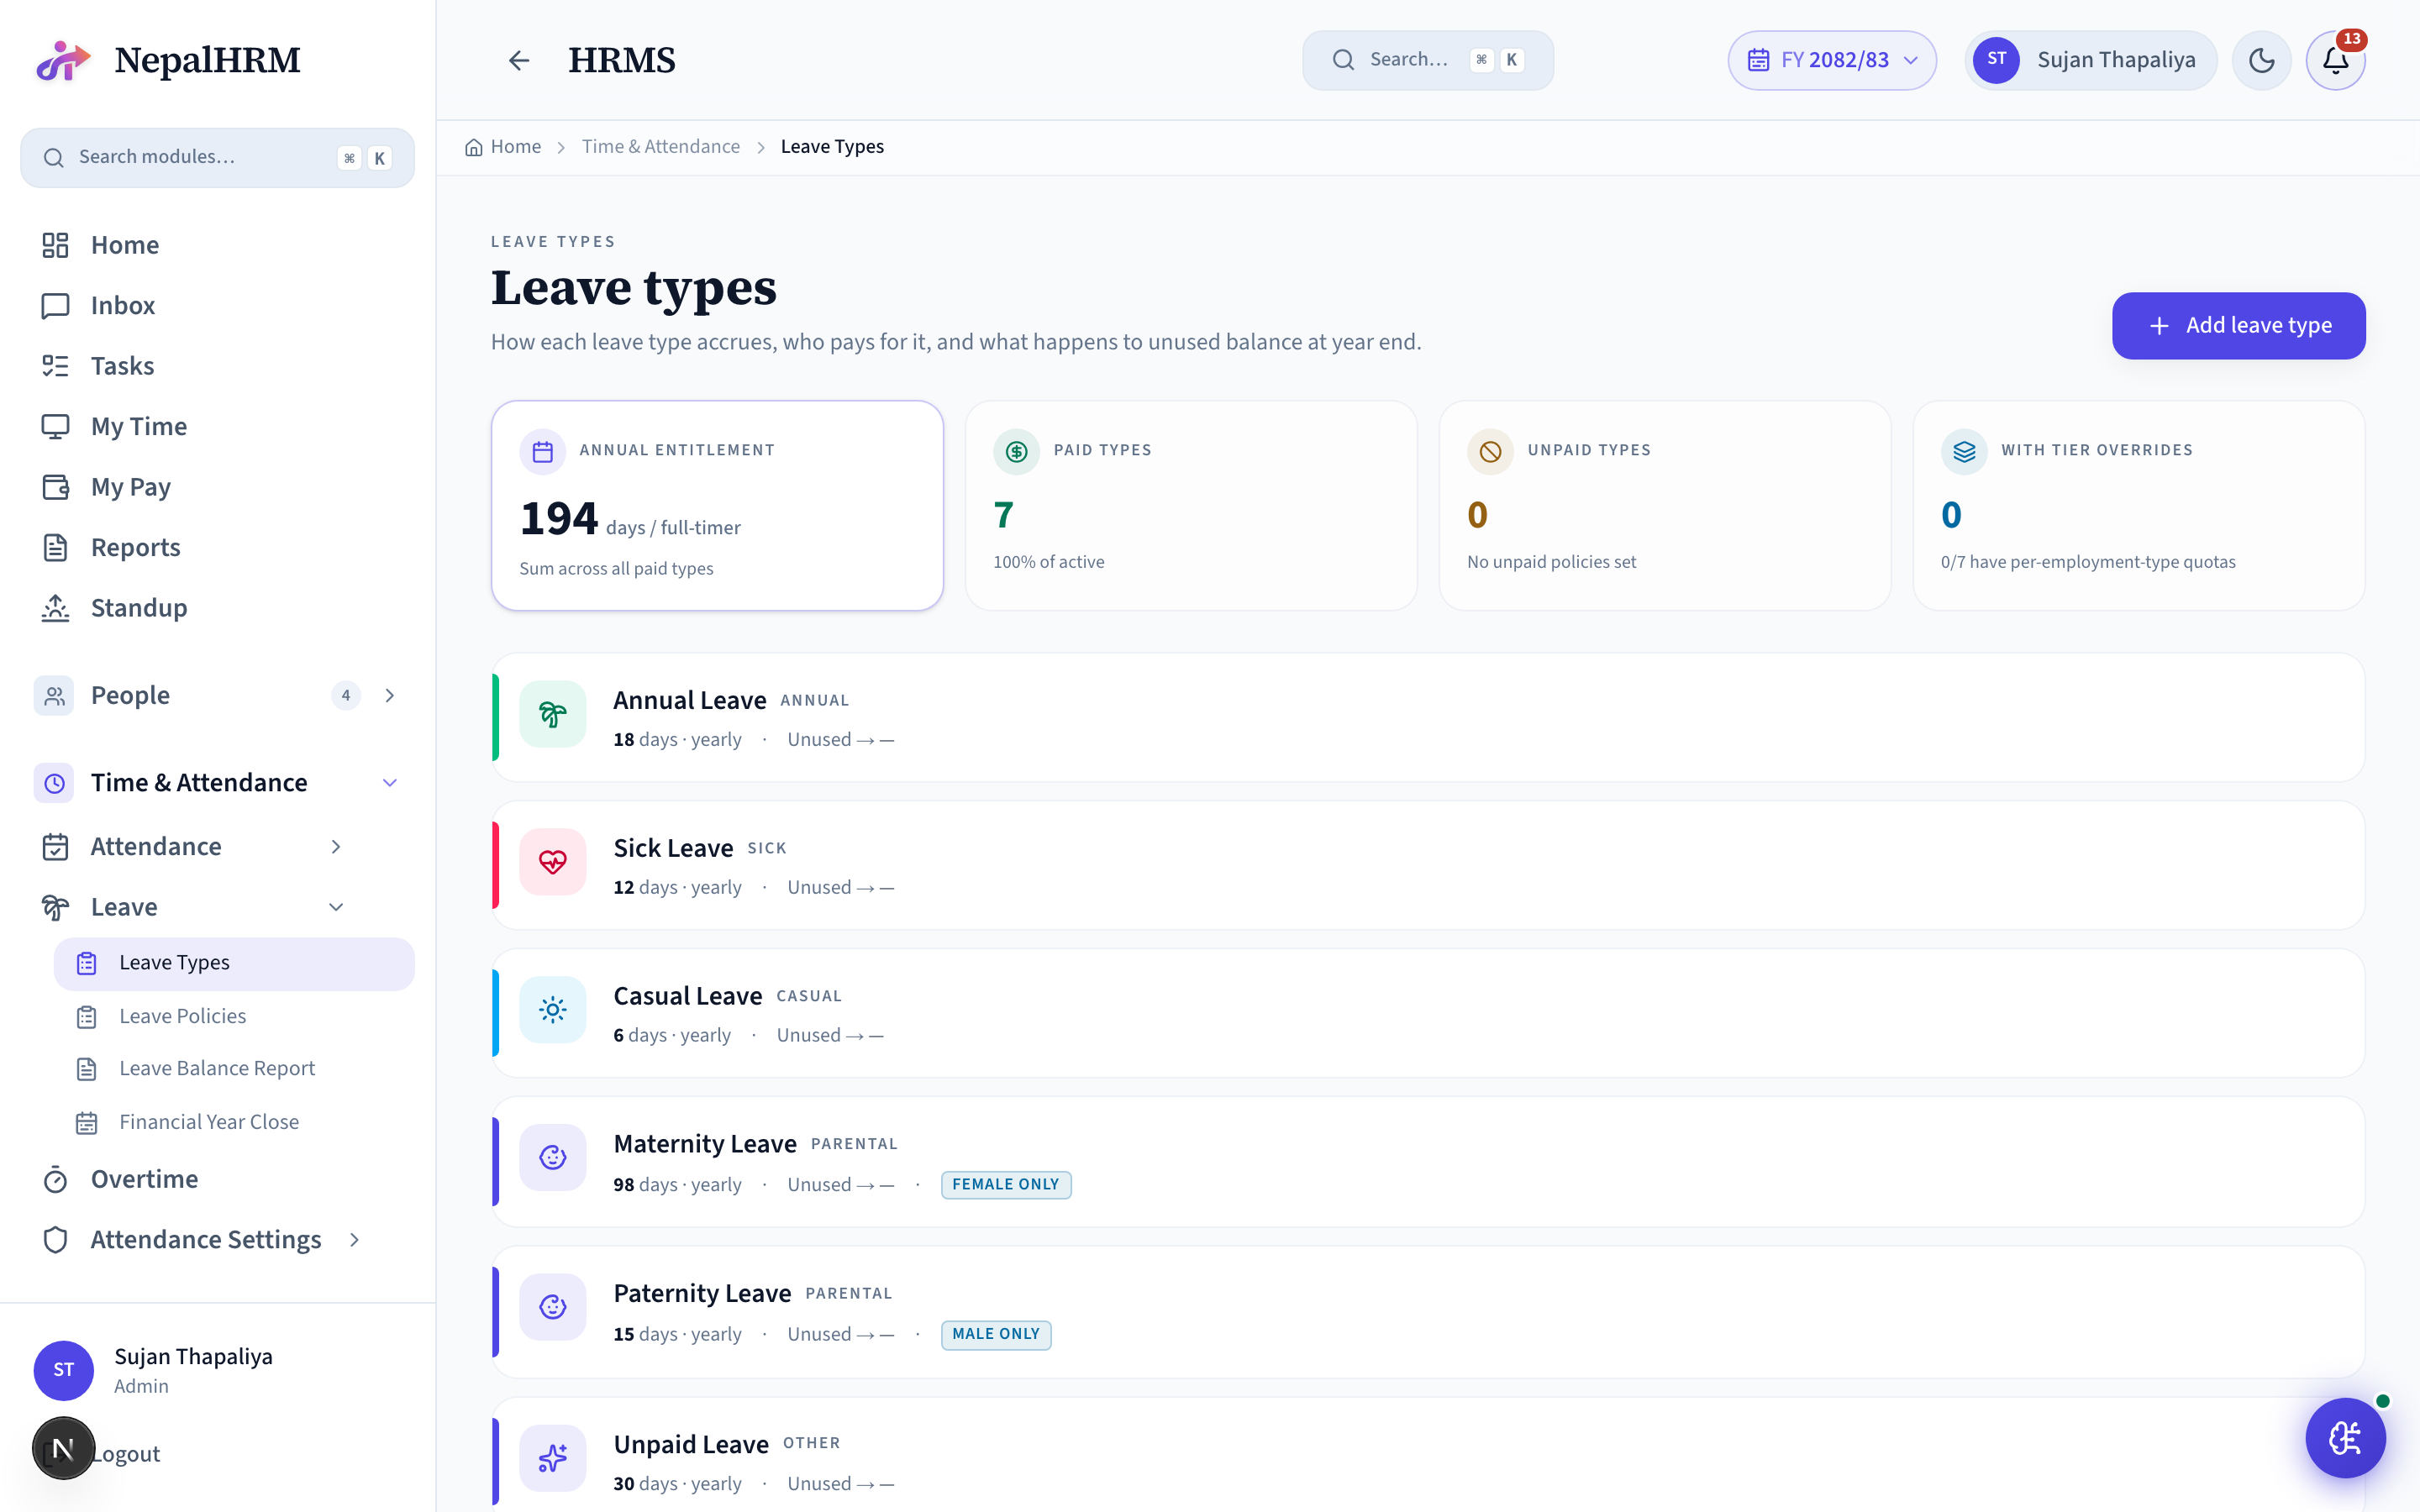
The catalog HR draws from when configuring leave: Annual, Sick, Casual, Maternity, Paternity, etc. Each type has its own quota, gender filter, and accrual rule.
Setup
- Leave Types → Add: name + code + days per year + accrual cadence + paid/unpaid.
- Toggle Active off to retire a type without deleting historical leaves.
Day-to-day operations
- Renaming a type updates everywhere it's displayed (forms, reports, balances).
- Use the per-type policy editor to adjust carry-forward limits without touching the type itself.
Leave Policies
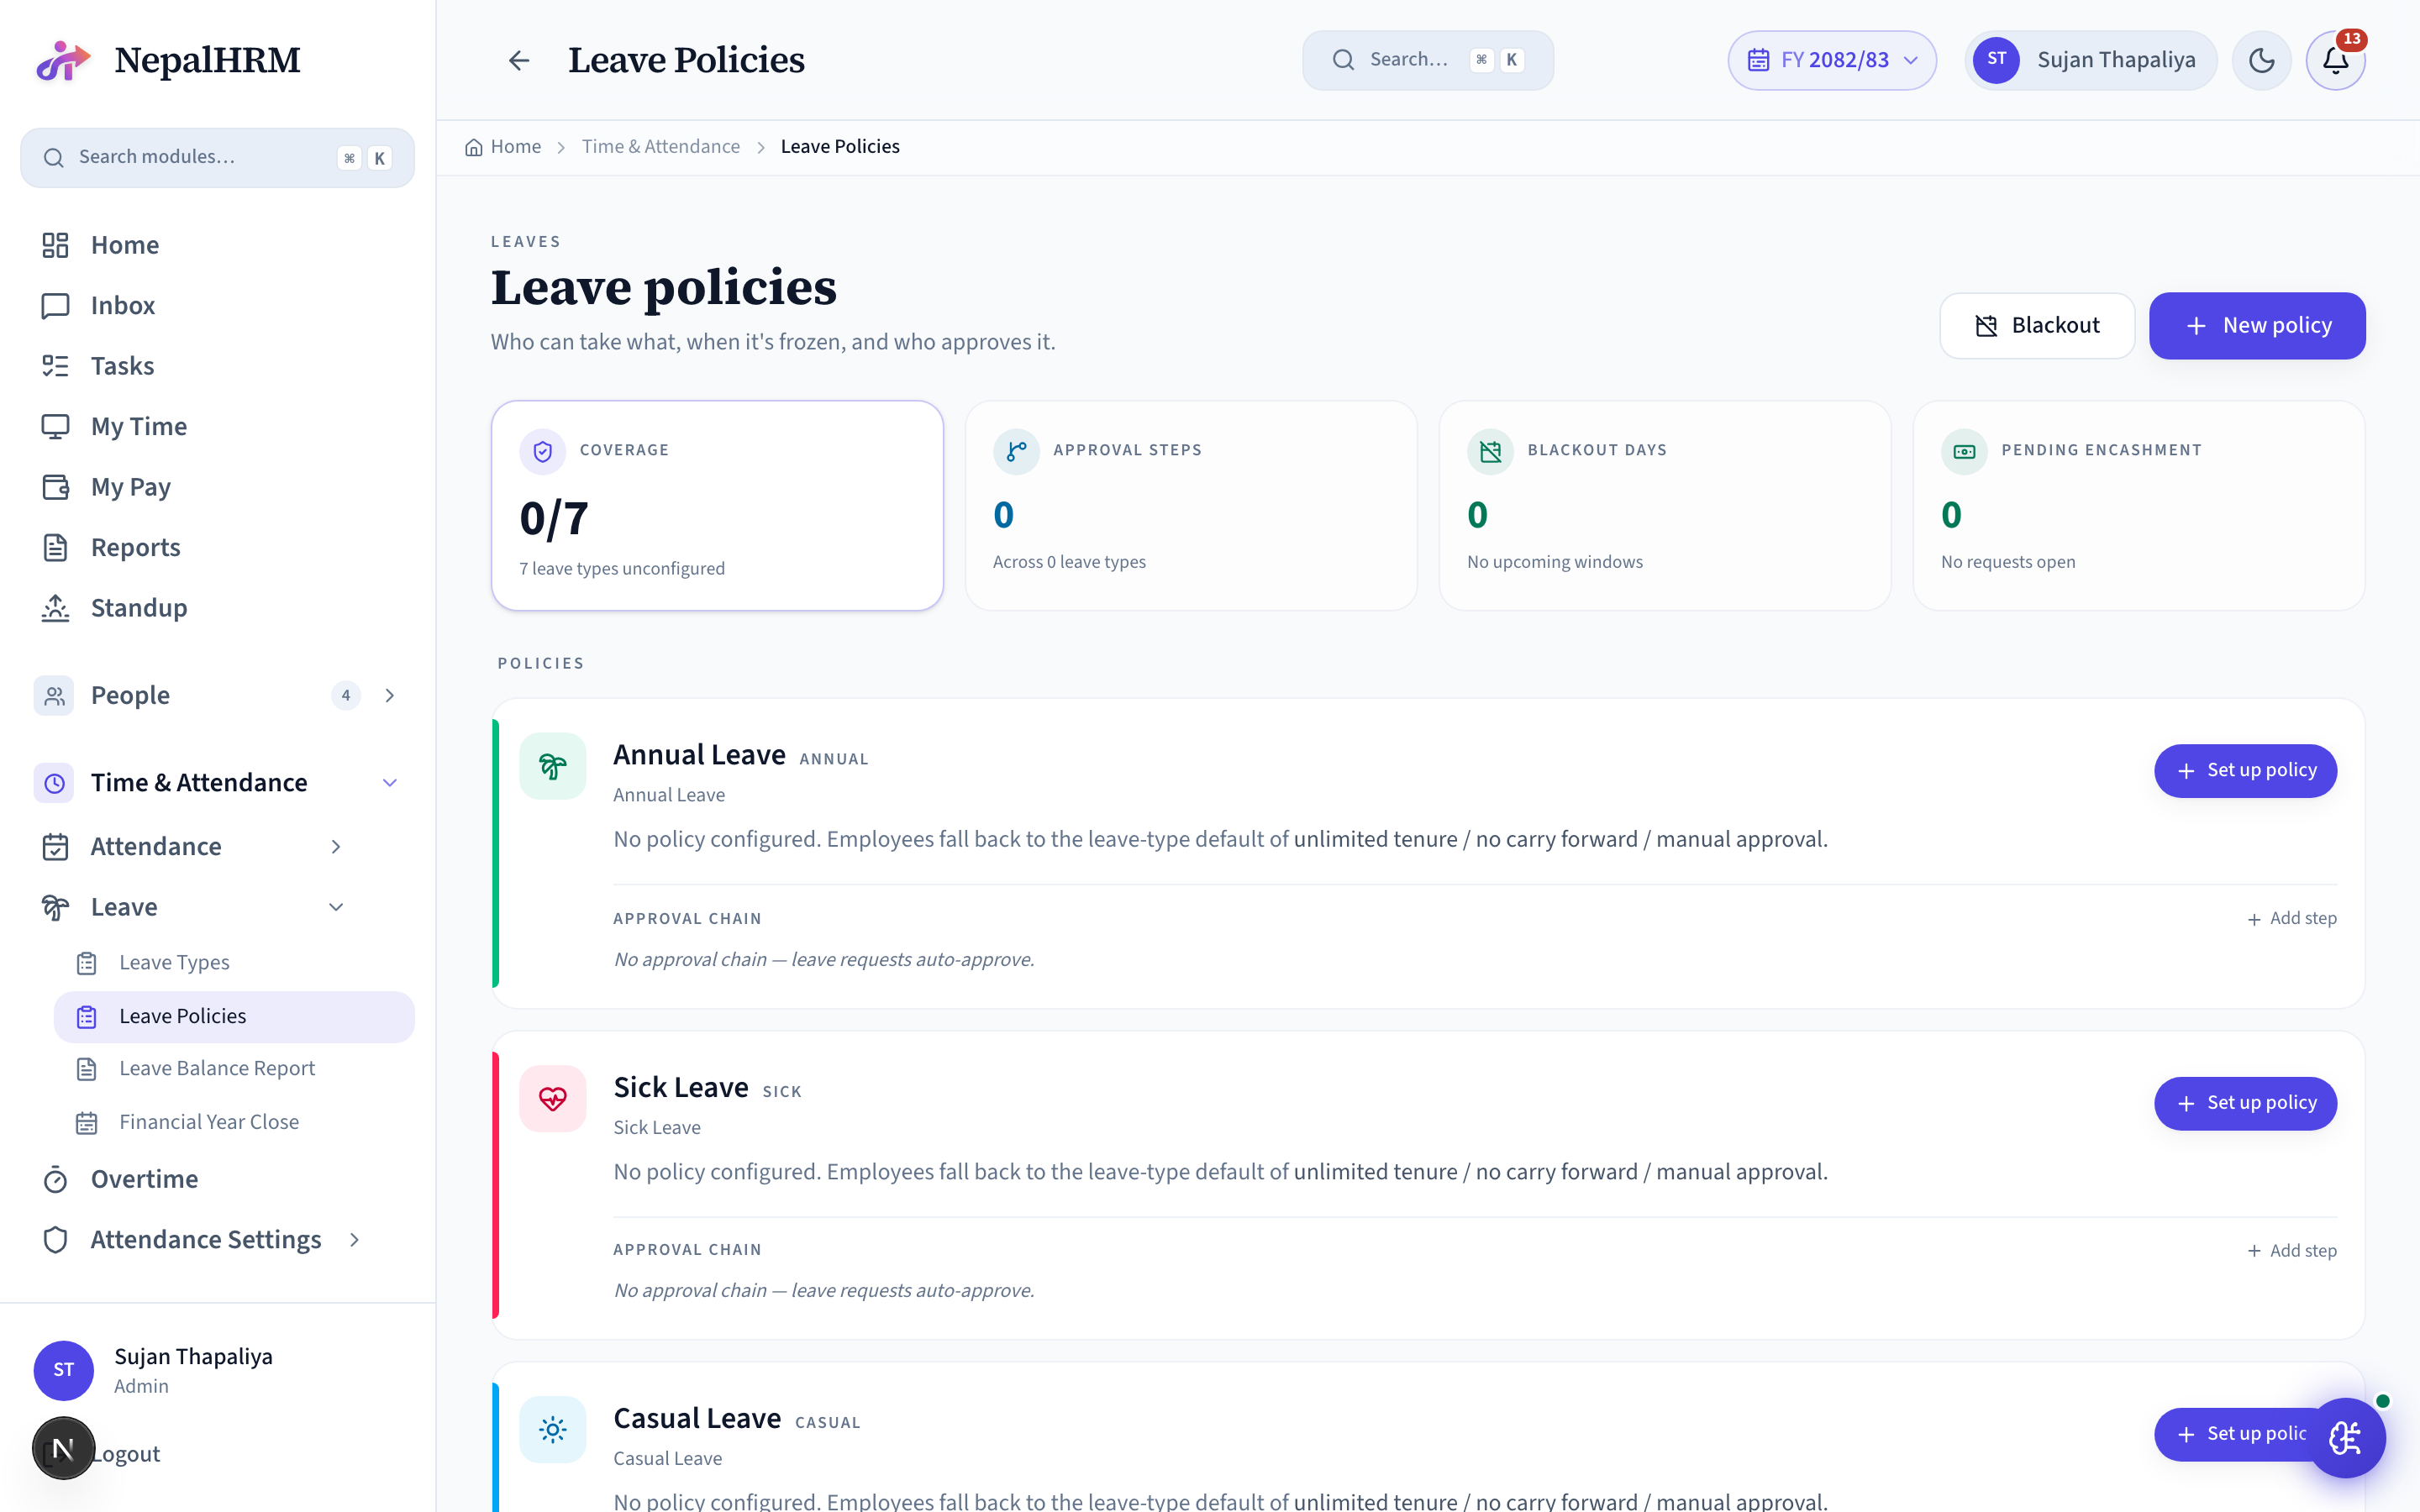
Per-leave-type rule sheet covering carry-forward, encashment, blackout dates, approval chains, gender / location filters, attachment requirements, and minimum tenure. Each leave type has one policy; HR edits in place rather than creating duplicates.
Setup
- Leave Policies → Add Policy → pick the leave_type.
- Configure carry-forward: how many days roll over, when they expire.
- Configure encashment: how many days can be cashed out + amount per day.
- Add Blackout Dates: ranges where leave can't be taken (year-end close, audit week).
- Build the Approval Chain: ordered approvers with escalation timeouts.
Day-to-day operations
- Re-run policy after a change: HR → Recompute Leave Balances to apply new carry-forward rules retroactively.
- Encashment requests appear in the Encashments tab → approve → amount lands in the next payslip.
Leave Balance Report
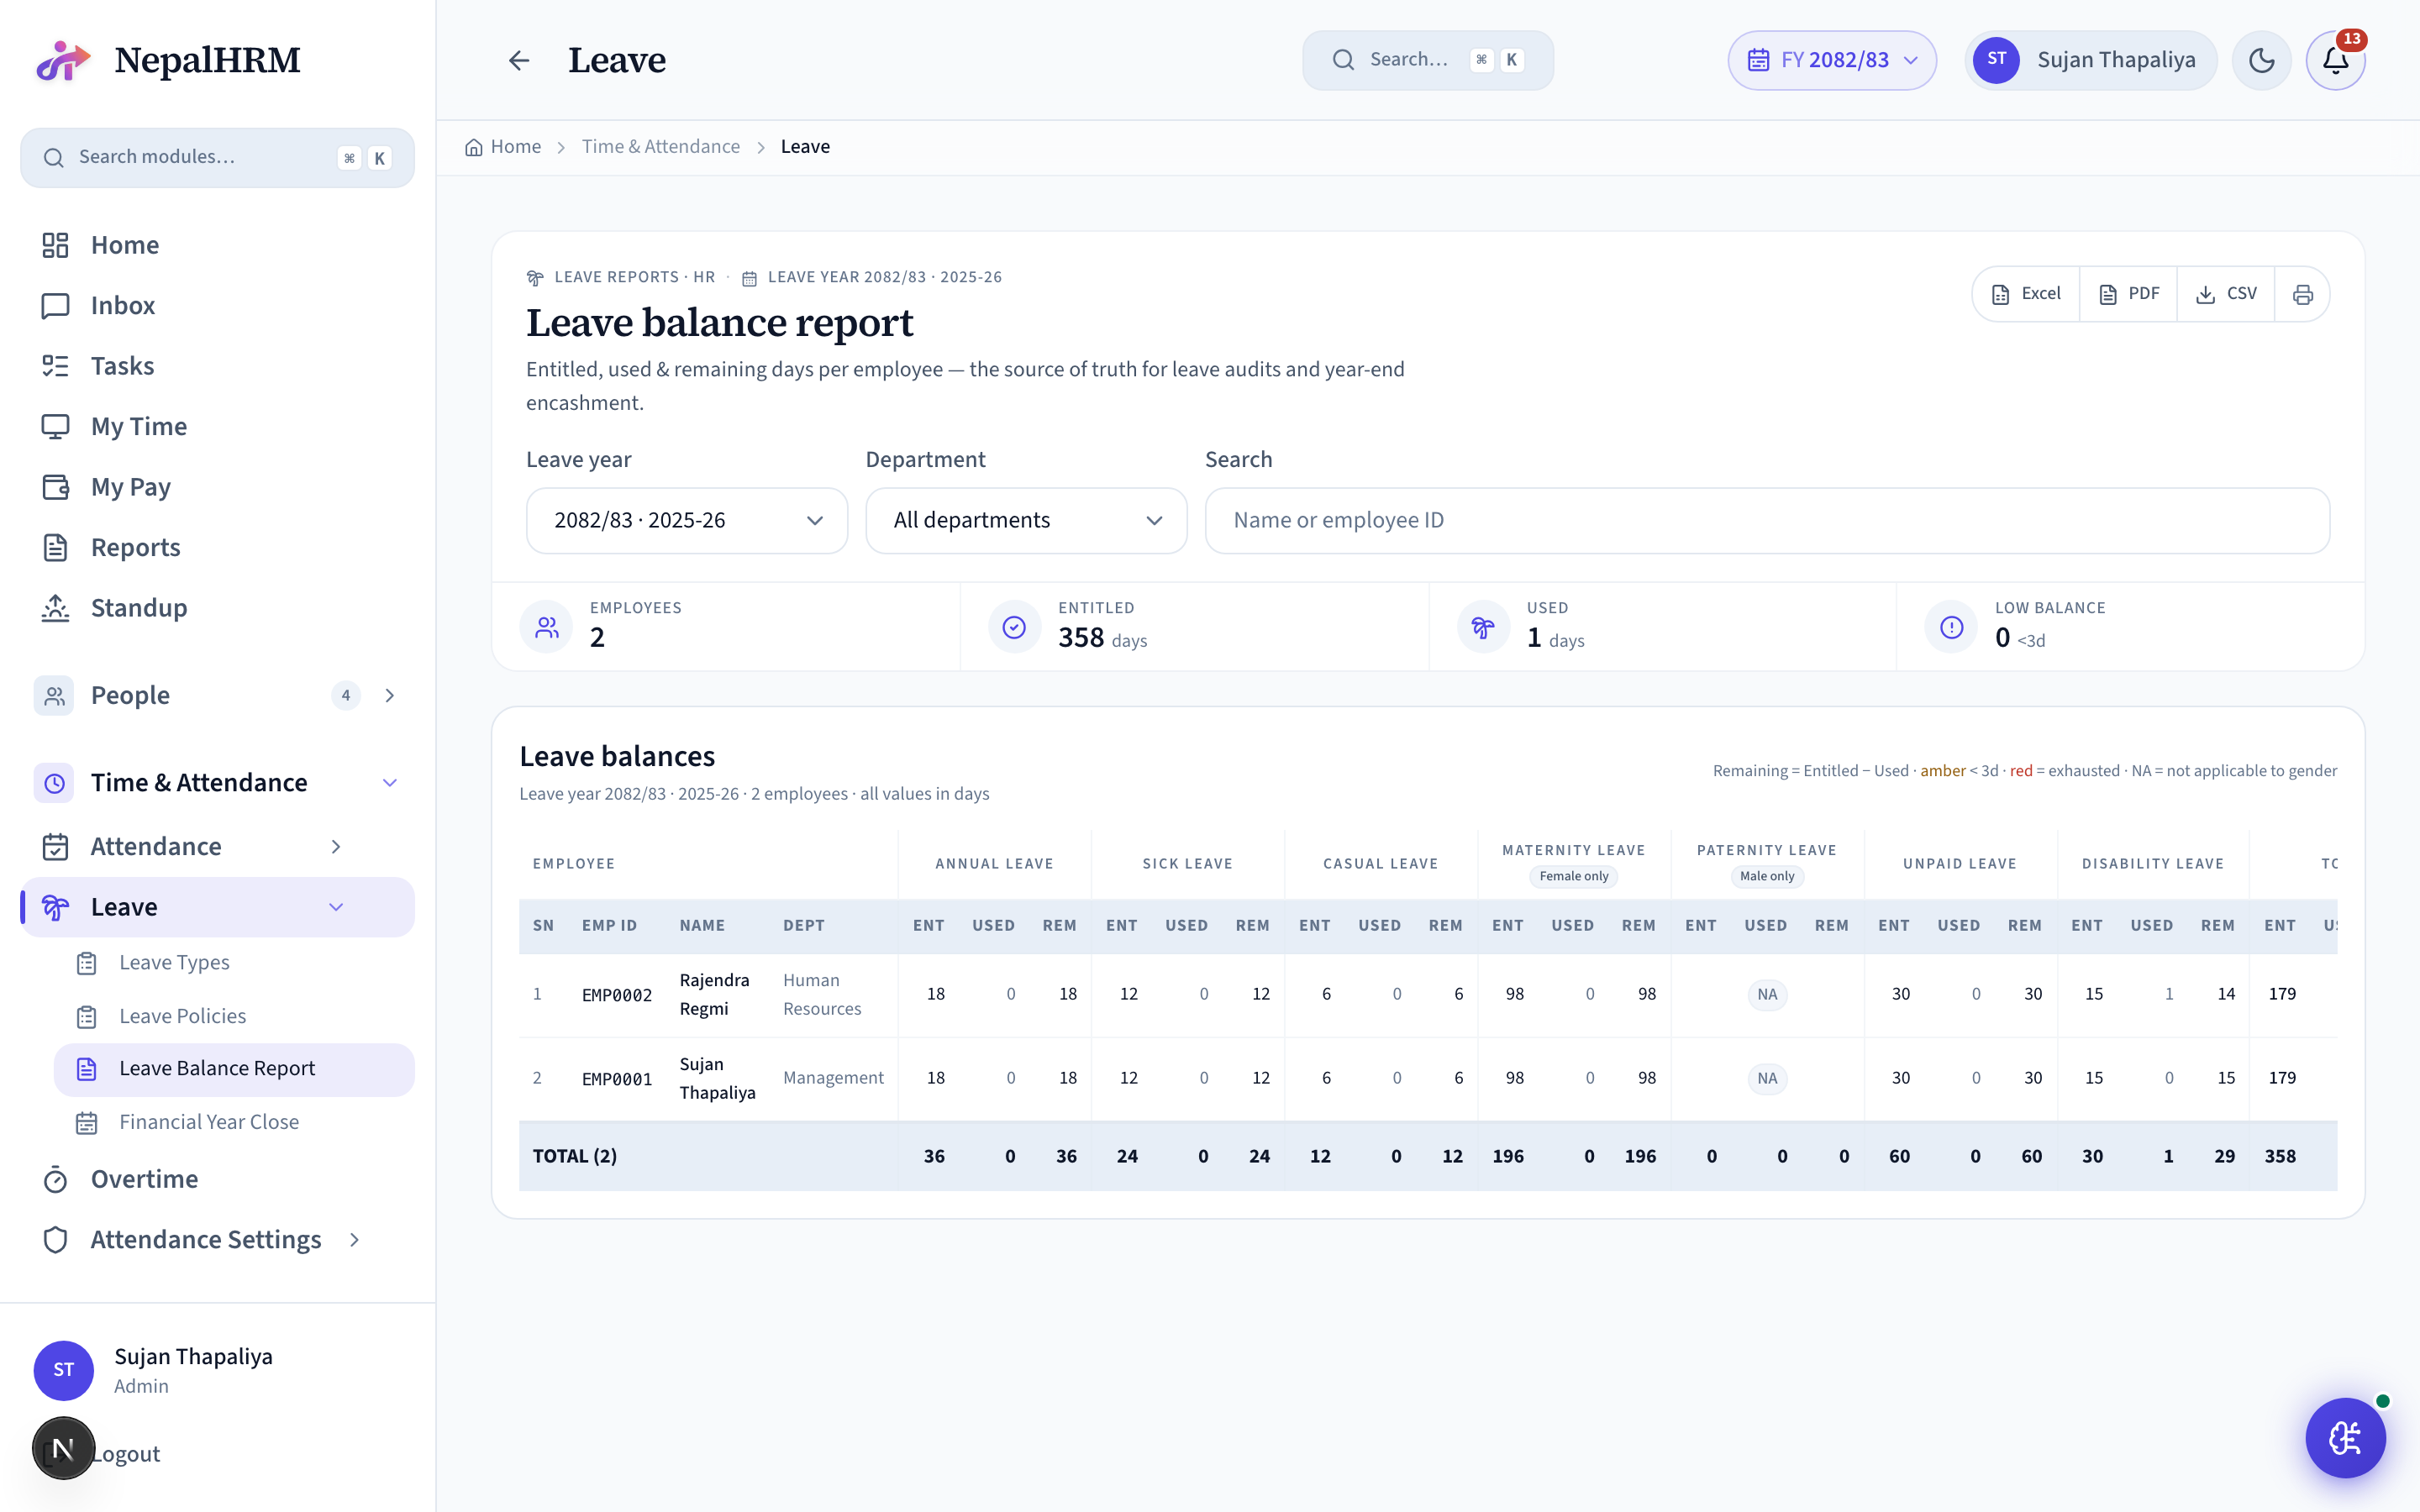
Per-employee leave entitlement, taken, remaining and encashable balance for every leave type.
Setup
- Leave types and policies must be configured first.
Day-to-day operations
- Review before approvals and at year-end; export for payroll encashment.
Financial Year Close
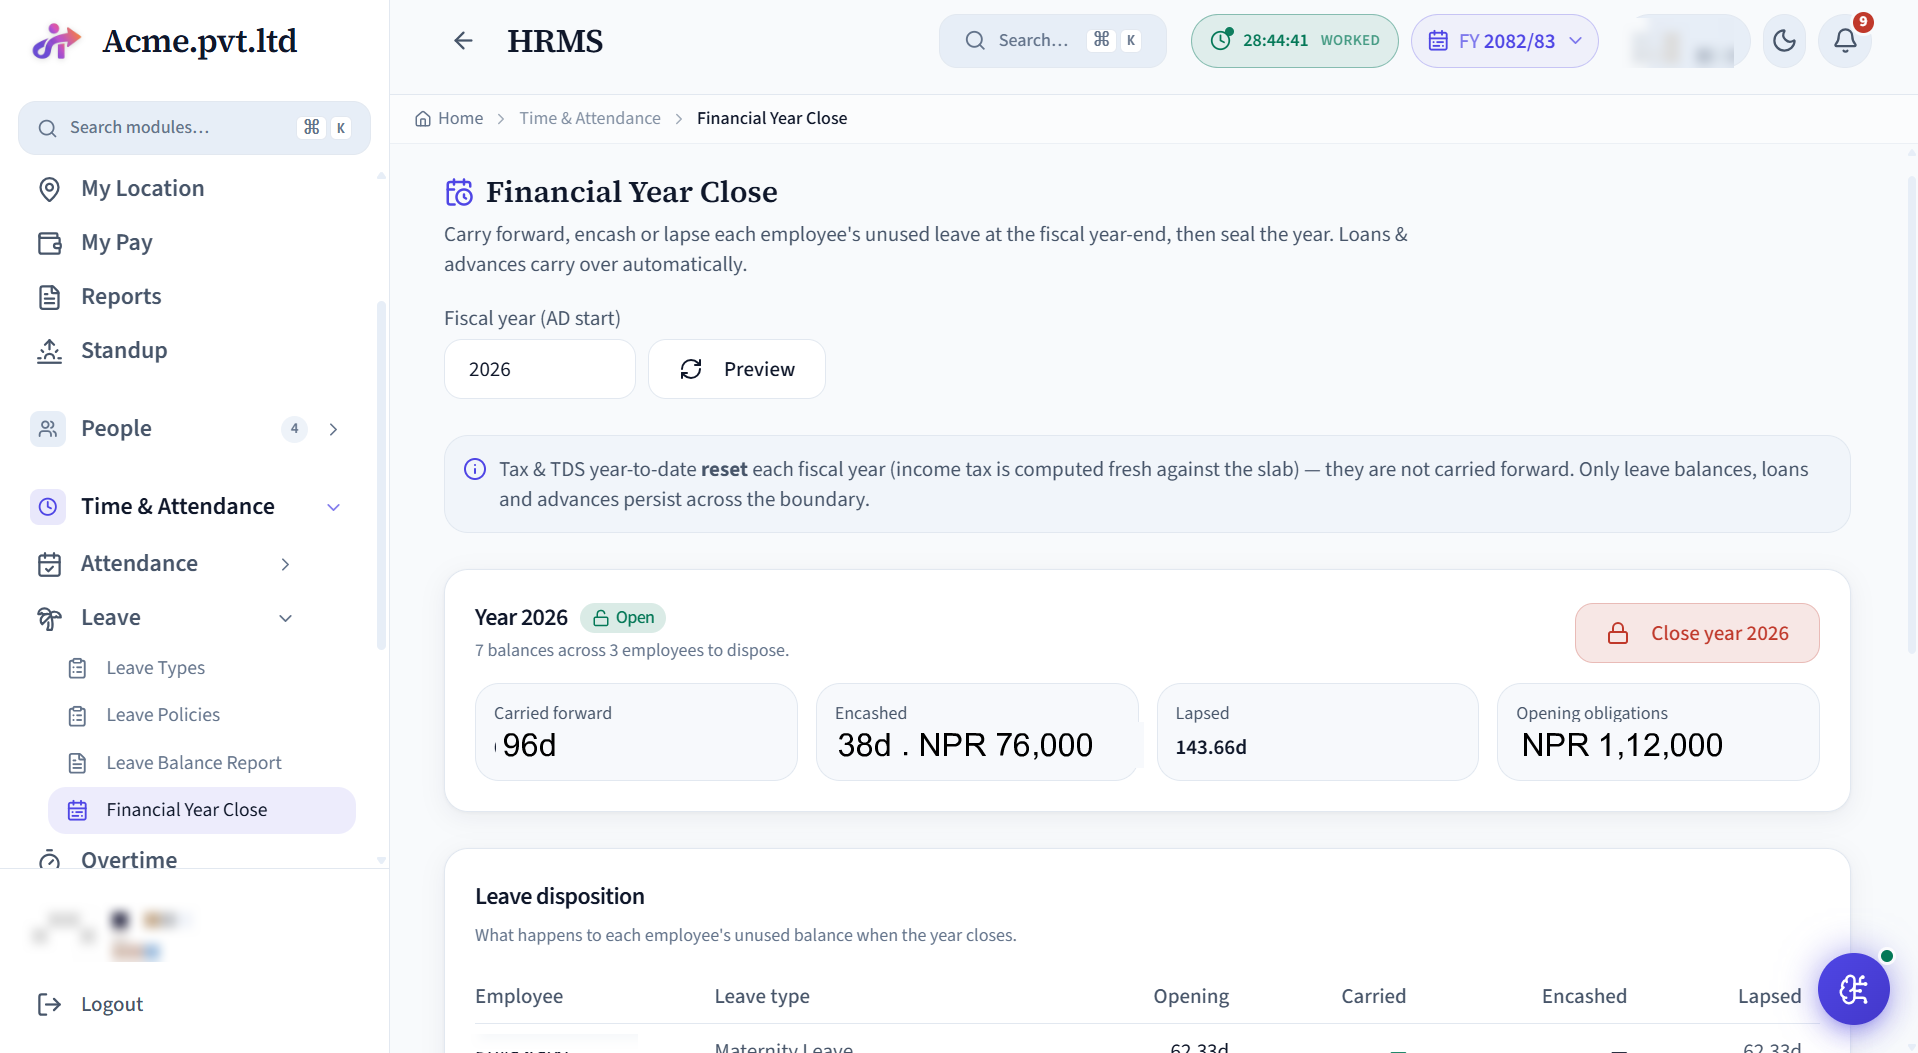
Year-end leave processing - carry forward, lapse or encash balances as the Nepali fiscal year rolls over.
Setup
- Set carry-forward / lapse / encashment rules per leave type.
Day-to-day operations
- Run the close at year-end; reconcile carried and encashed balances into payroll.
Overtime
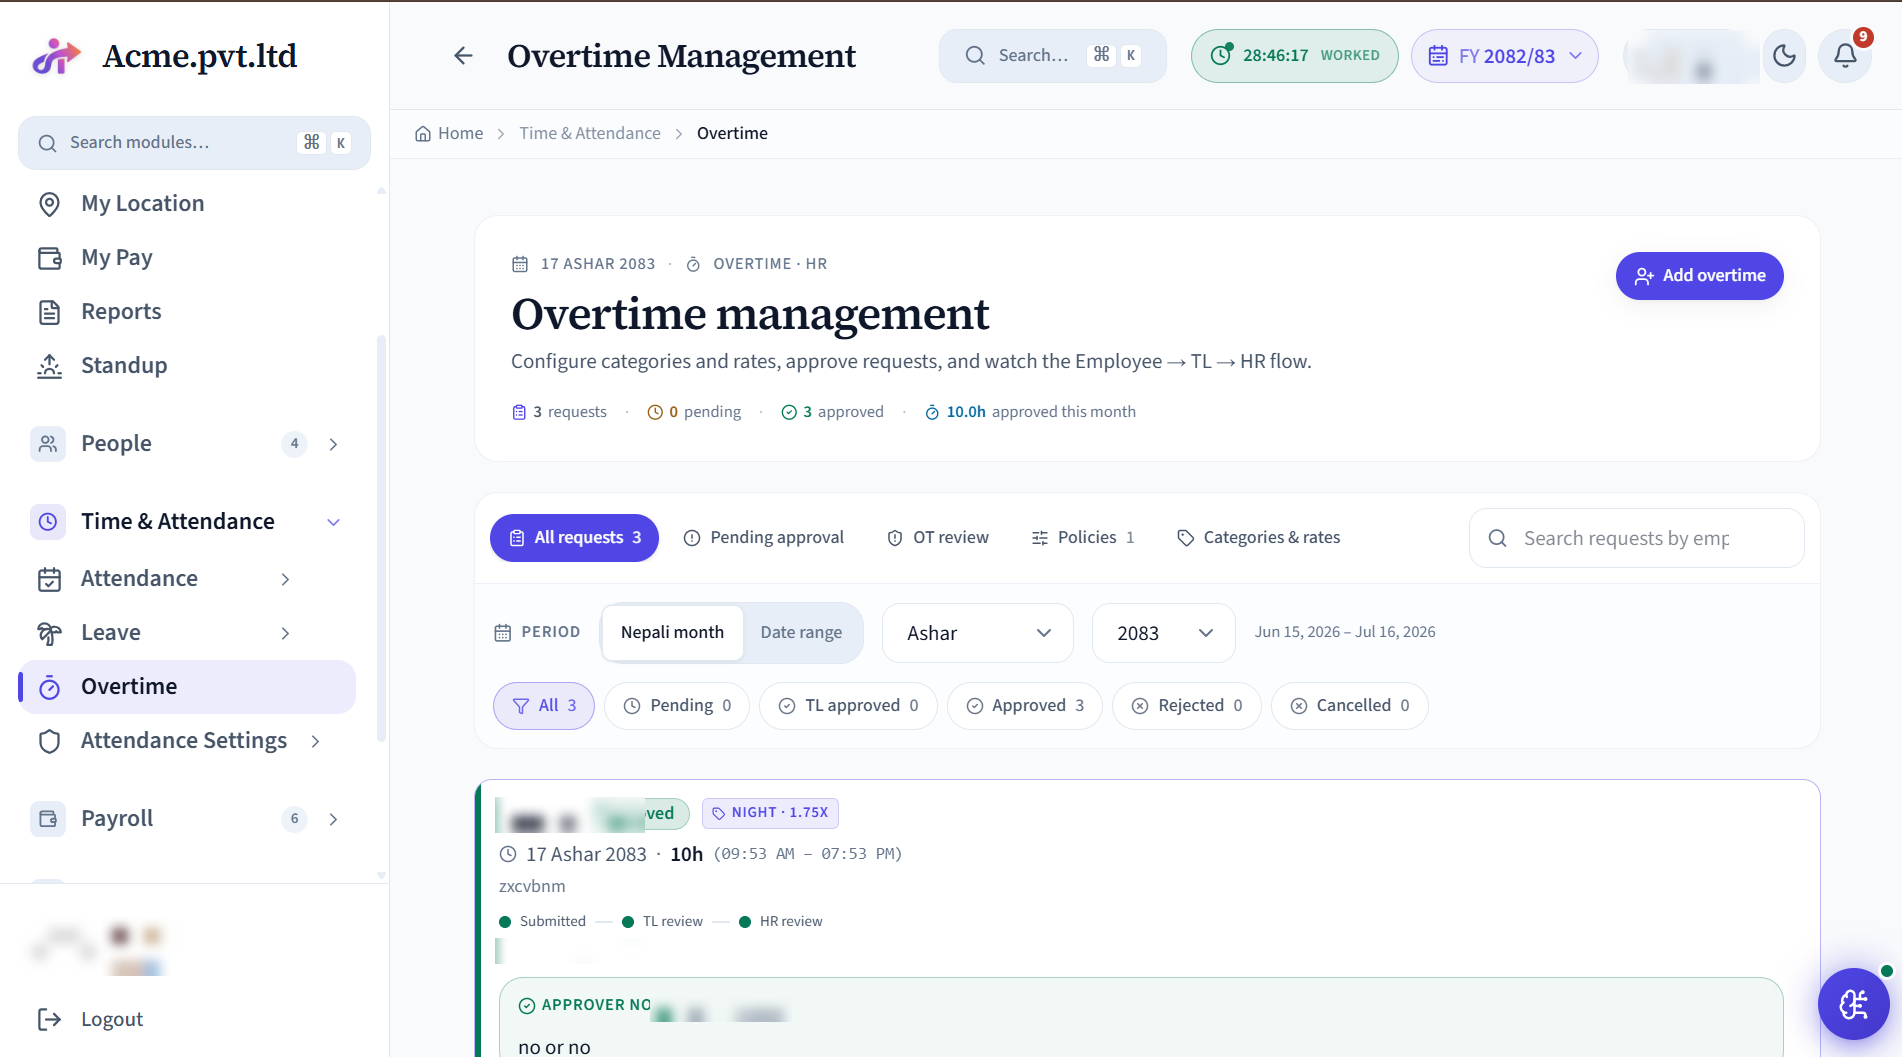
Employees log overtime hours against pre-configured categories; HR approves; approved hours flow into payroll as a separate earning. Reports show overtime spend per department / per employee.
Setup
- Overtime → Categories → define types (Weekend, Public Holiday, Night Shift) with multiplier rates.
- Attendance Policy → Overtime → enable + set daily/weekly thresholds.
Day-to-day operations
- Employee logs: My Overtime → Add → date + hours + category + reason.
- Manager approves; approved entries flow into the next payroll run.
- Reports: Overtime → Reports → spend per department over the last 6 months.
Attendance Settings
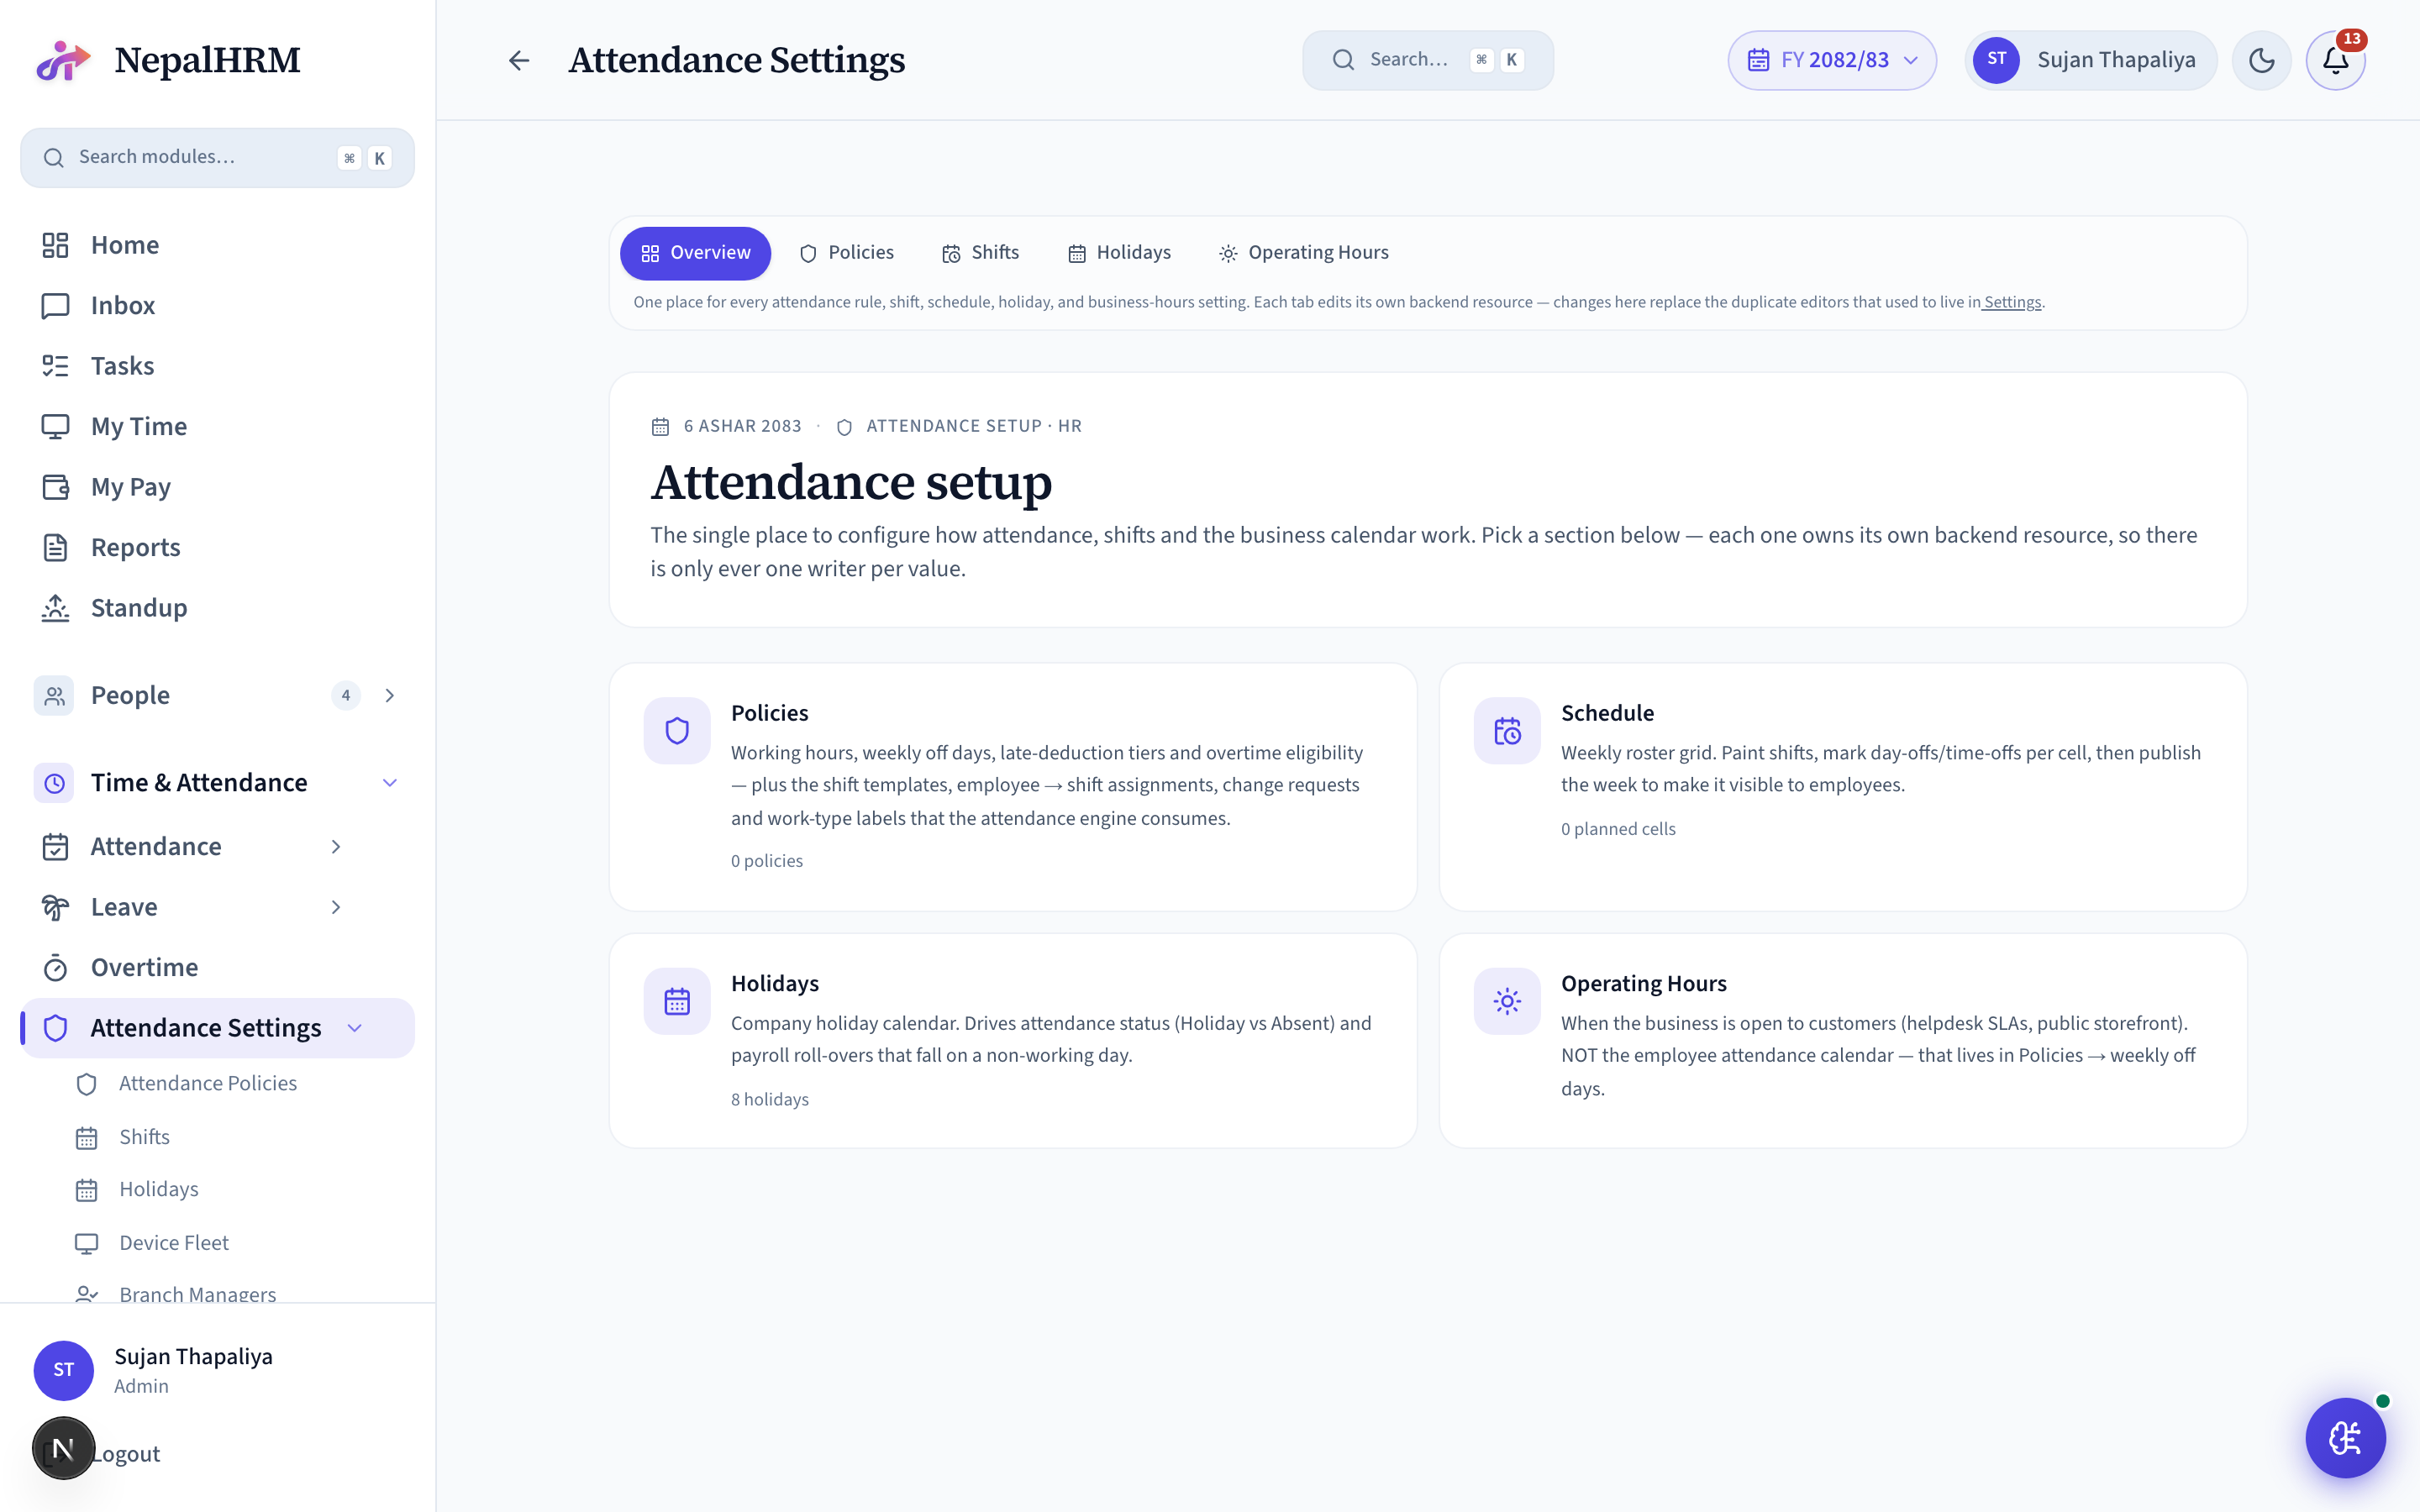
The single hub for every attendance config knob - operating hours, attendance policies, shifts, holidays and devices - that used to be scattered across Settings.
Setup
- Work through each tab once: operating hours → policies → shifts → holidays → devices.
Day-to-day operations
- Revisit whenever a rule changes (new shift, holiday, late-mark policy).
Attendance Policies
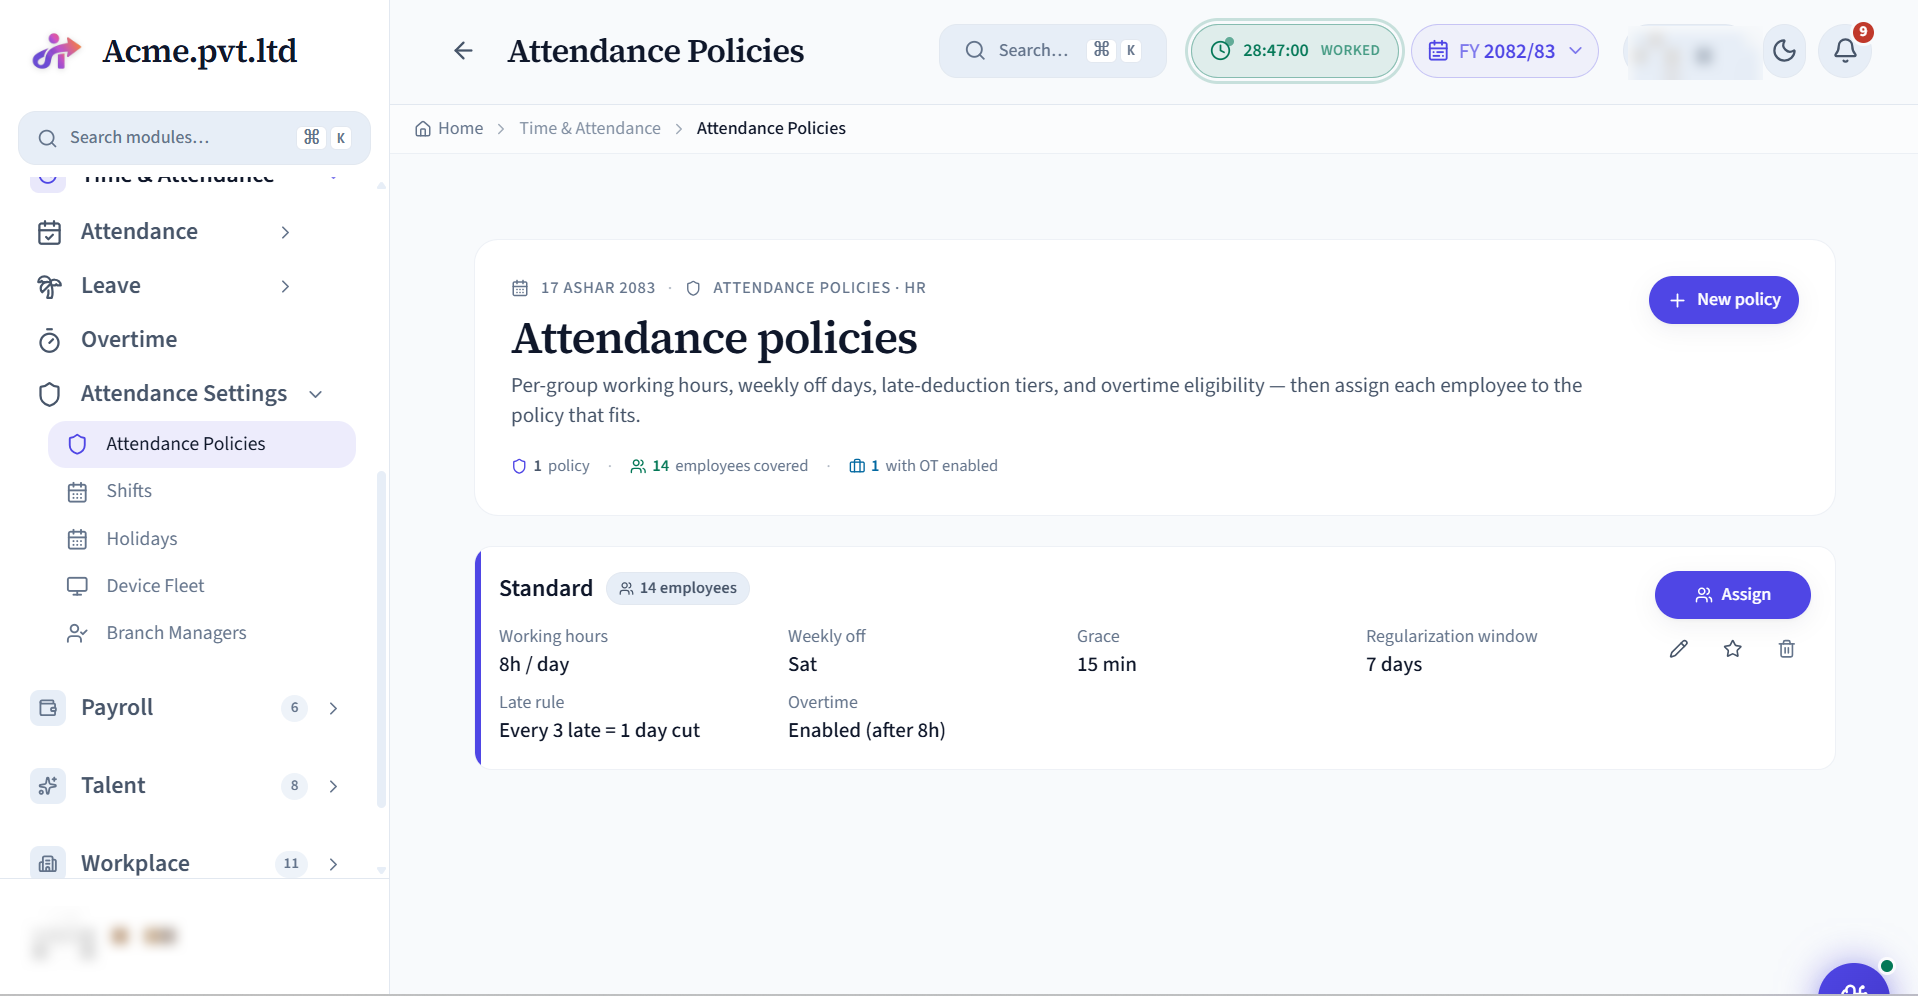
Rule sheet for what counts as present, late, half-day, full-day. Working hours per day, grace minutes, overtime thresholds, late-deduction ladder, weekly off days - all configurable. Multiple policies supported; each employee belongs to one.
Setup
- Attendance Policies → Add: name + working_hours_per_day + grace_minutes + full_day_min_hours + half_day_max_hours.
- Configure late deduction: enable + rules ladder (e.g. "3 lates / month = 0.5 day deducted").
- Configure overtime: enable + daily threshold + weekly threshold + max OT hours per month.
Day-to-day operations
- Set the default policy (HR-wide); override per employee from Employees → profile → Work Info.
- Recompute Attendance retroactively after a policy change to back-fill existing day summaries.
Shifts
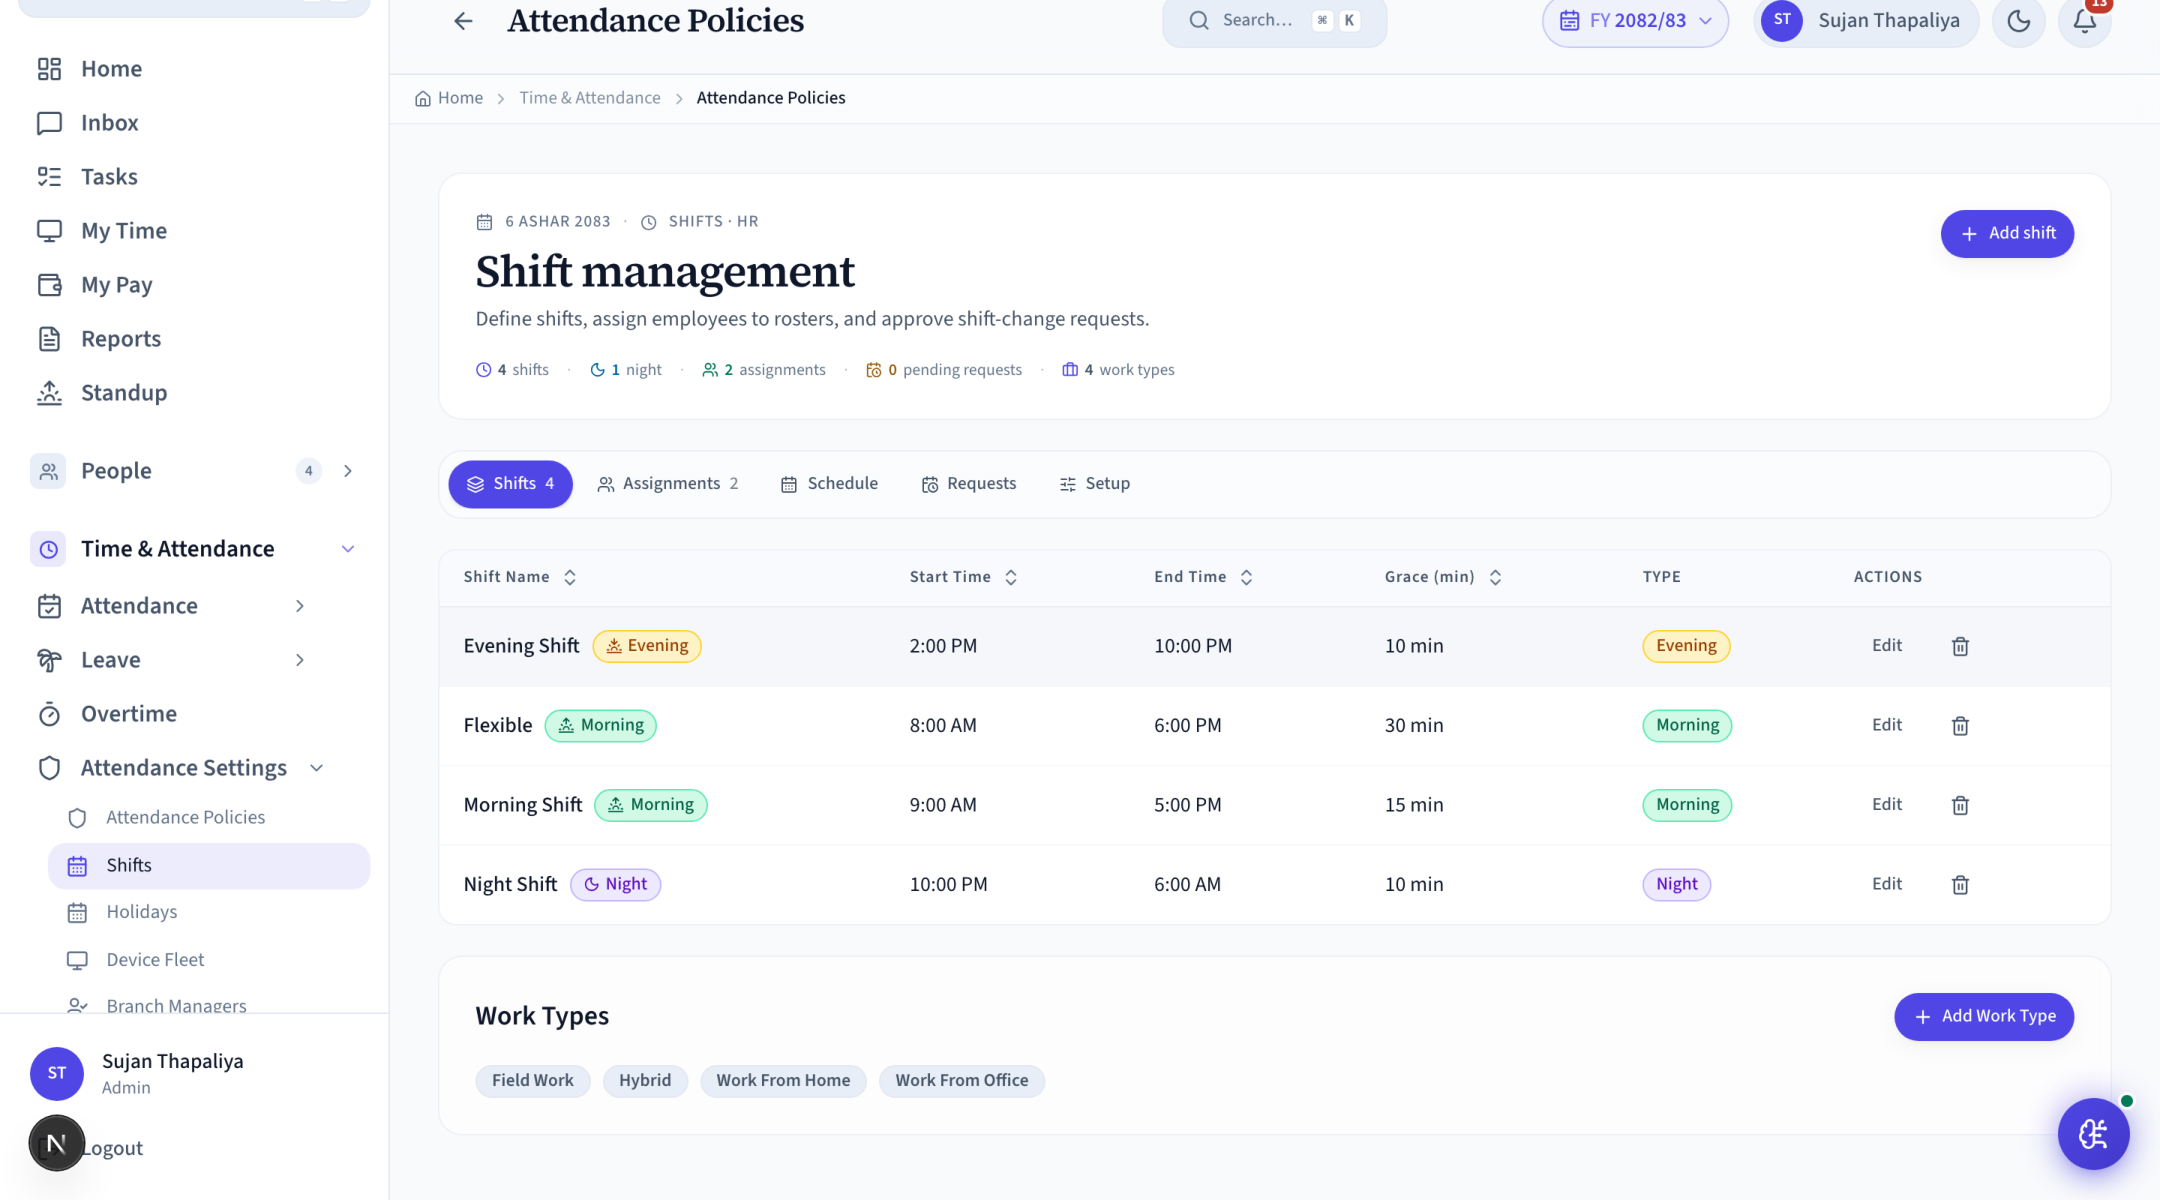
Working-hour patterns the company supports - Day Shift (9–6), Night Shift (10pm–6am), Split shifts - and the weekly roster that puts people on them. Each employee is assigned to a shift; their attendance is evaluated against that shift's expected window. The weekly schedule grid (draft → publish) now lives inside Shifts, so the catalog and the roster are one screen.
Setup
- Shifts → Add: name + start time + end time + mark as night shift.
- Activate the shift catalog so it's available on the roster.
Day-to-day operations
- Assign employees: Shifts → row → "Assign Employees" → multi-select.
- Weekly roster: open the schedule grid → drag a shift onto a (day × employee) cell, or bulk-select cells → apply → Publish. Published shifts show on each employee's My Time and the mobile app.
- Night shifts auto-handle midnight crossover: a 23:00 → 07:00 shift is attributed to the day it STARTED, so HR's attendance review reads naturally.
Holidays
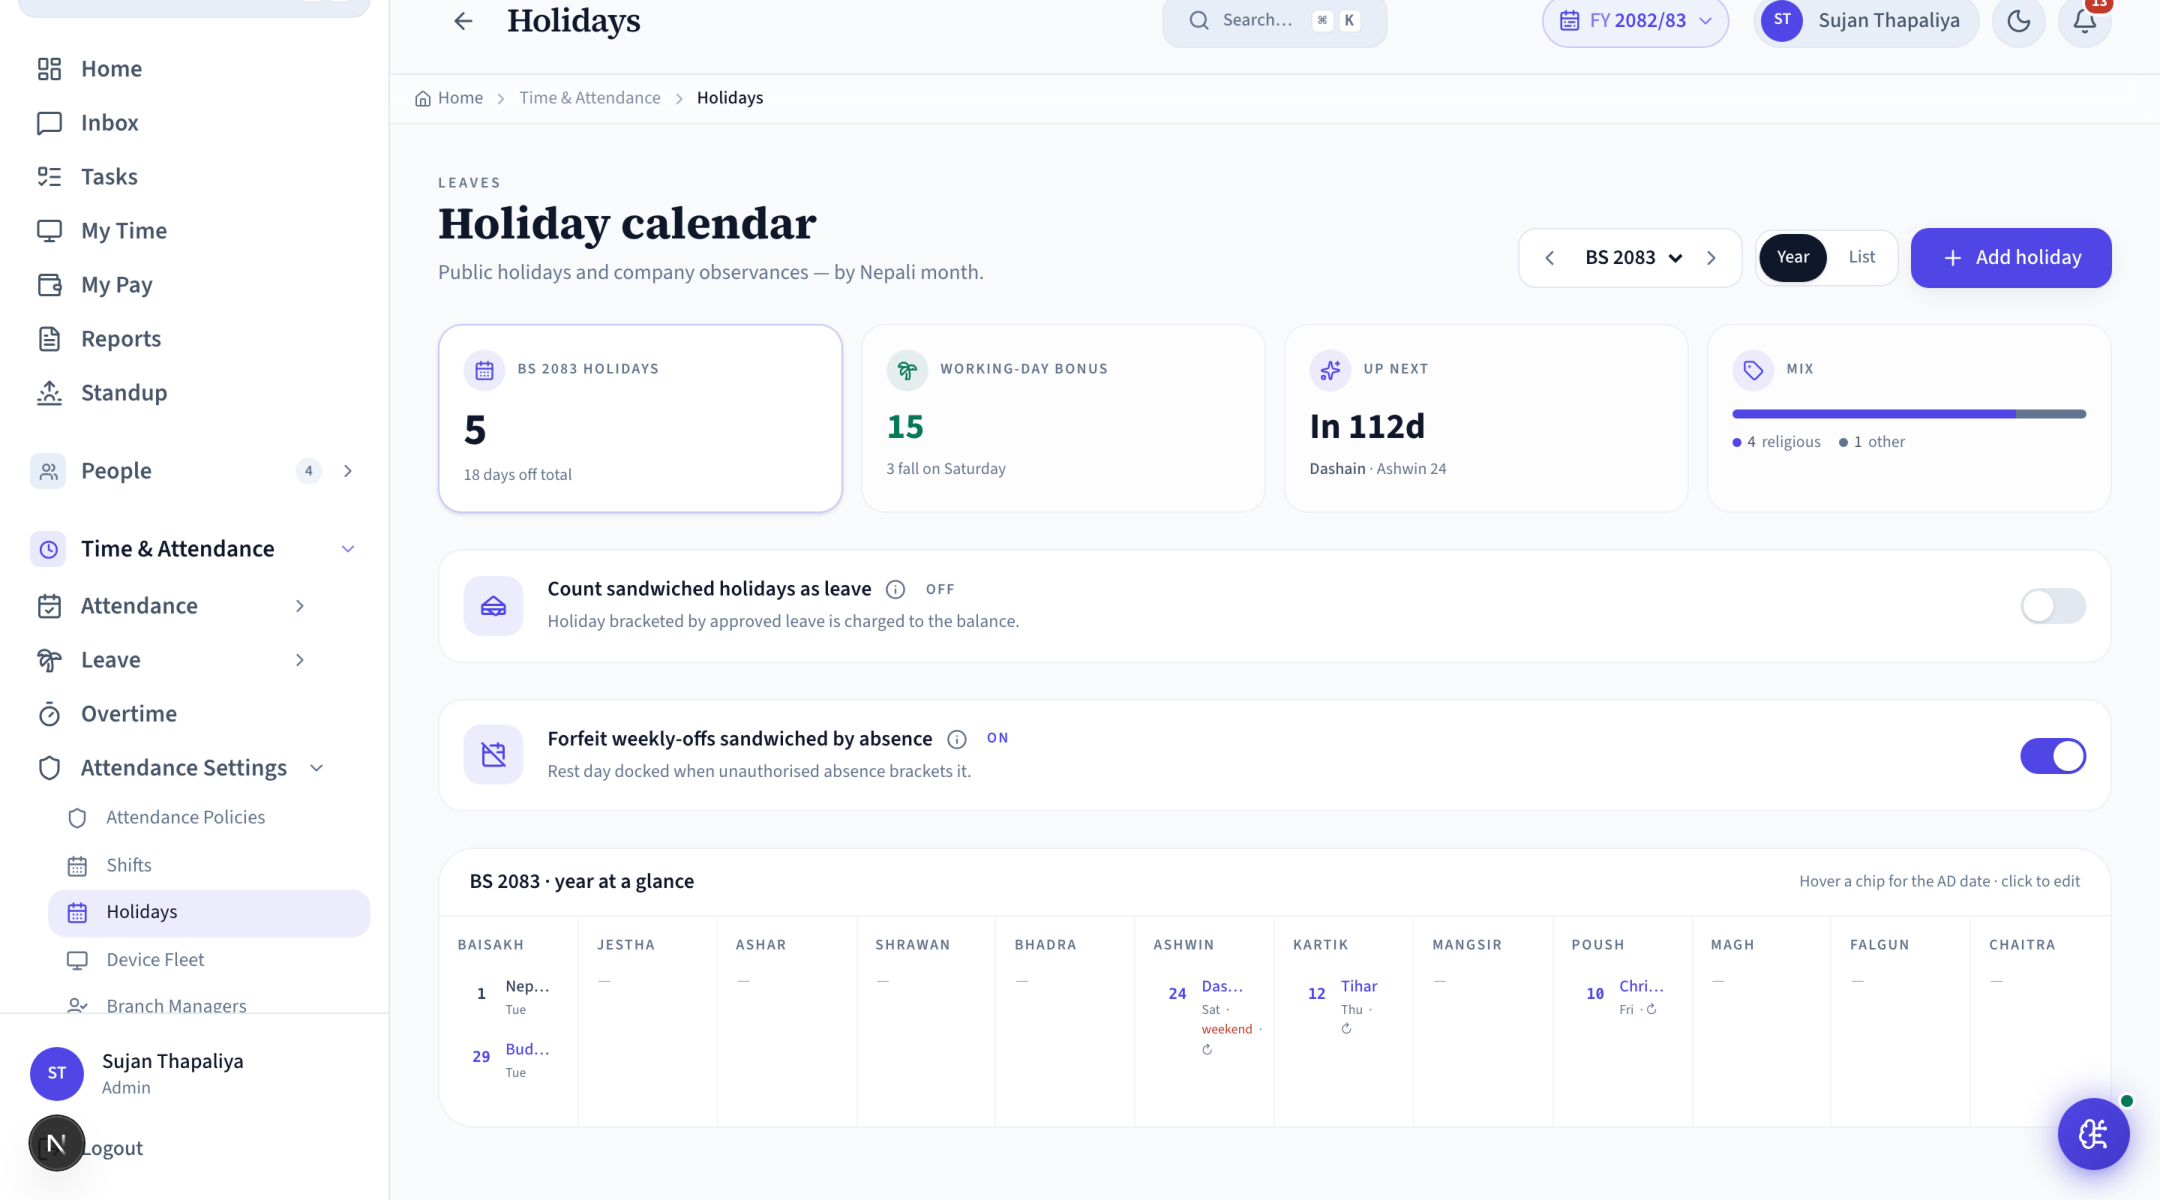
Company-recognized holidays - Dashain, Tihar, Republic Day, etc. - automatically suppress attendance expectations and show on the calendar.
Setup
- Holidays → Add: name + start date + end date (multi-day for Dashain, Tihar).
- Import preset: "Add Nepali Calendar" loads the standard public holidays for the year.
Day-to-day operations
- The dashboard's Upcoming Holidays widget surfaces the next 5.
- Employees see them on My Calendar, and a leave request spanning one follows your holiday and weekend overlap rules.
Device Fleet
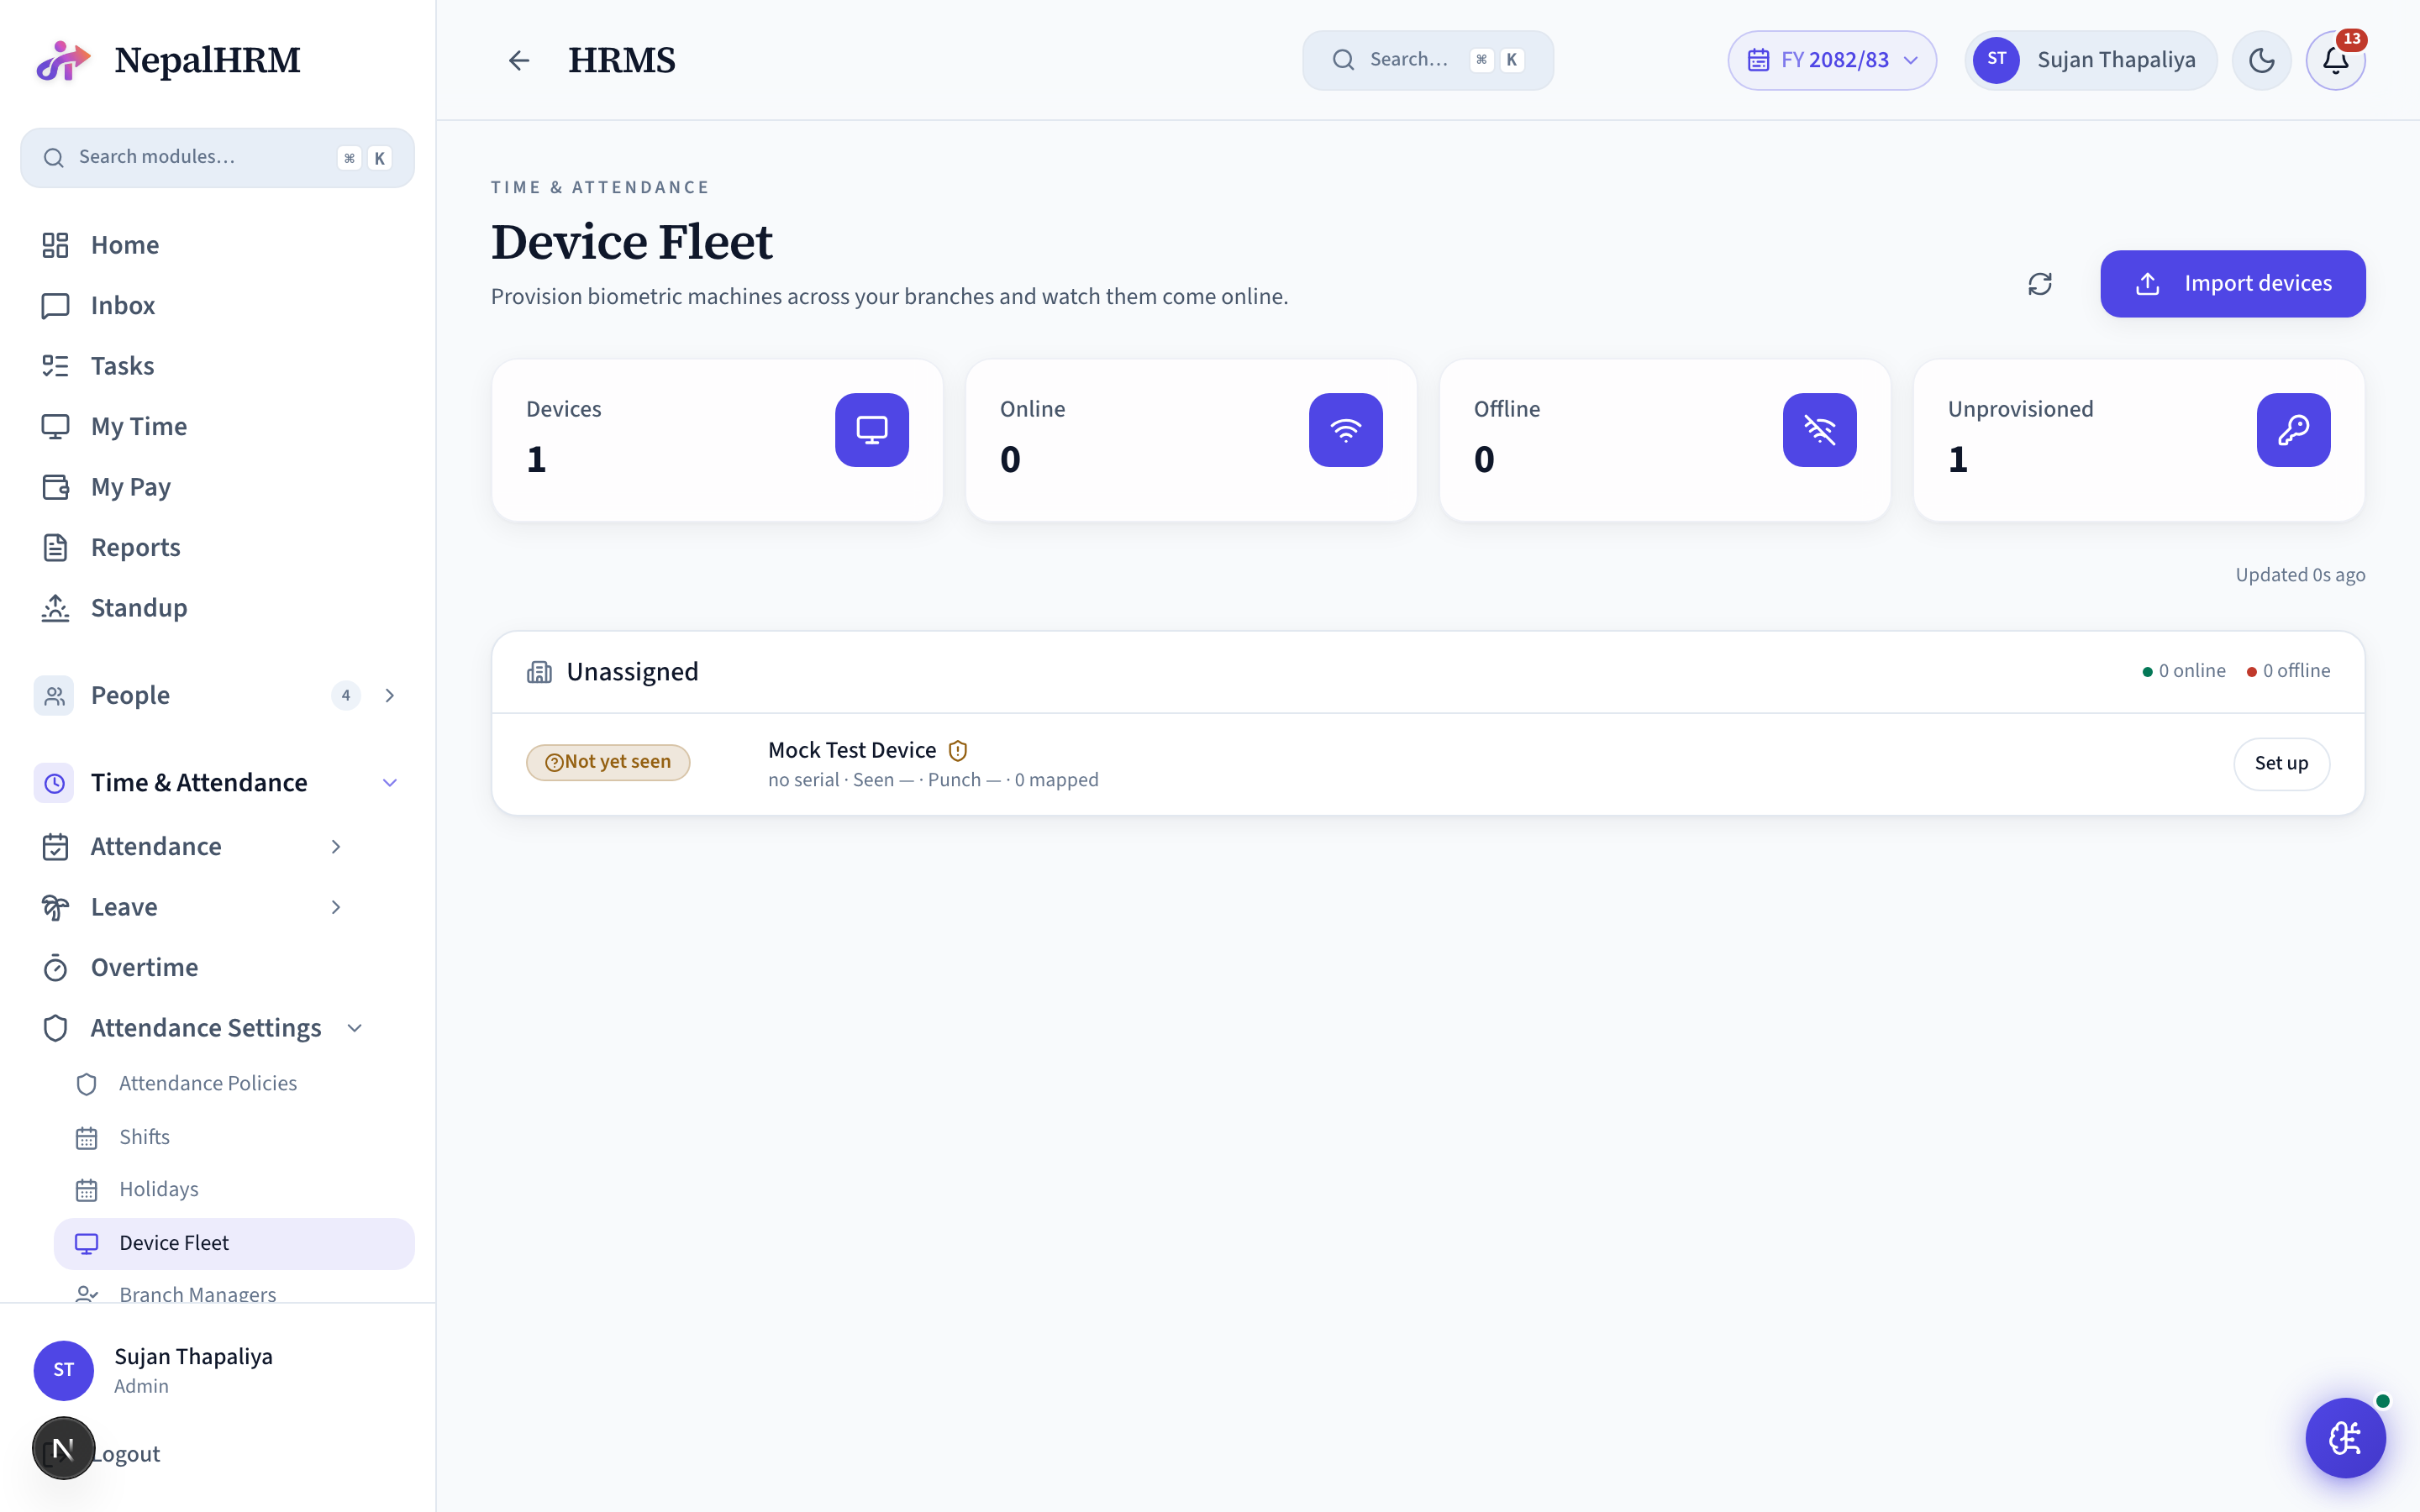
Biometric device management - pair ZKTeco and Hikvision machines by serial, provision them per branch, monitor online / offline status and pull users without console pasting.
Setup
- Add each device, assign it to a branch, and generate its setup URL / QR.
Day-to-day operations
- Monitor fleet health; “Pull Users from Device”; reconcile offline punches.
Branch Managers
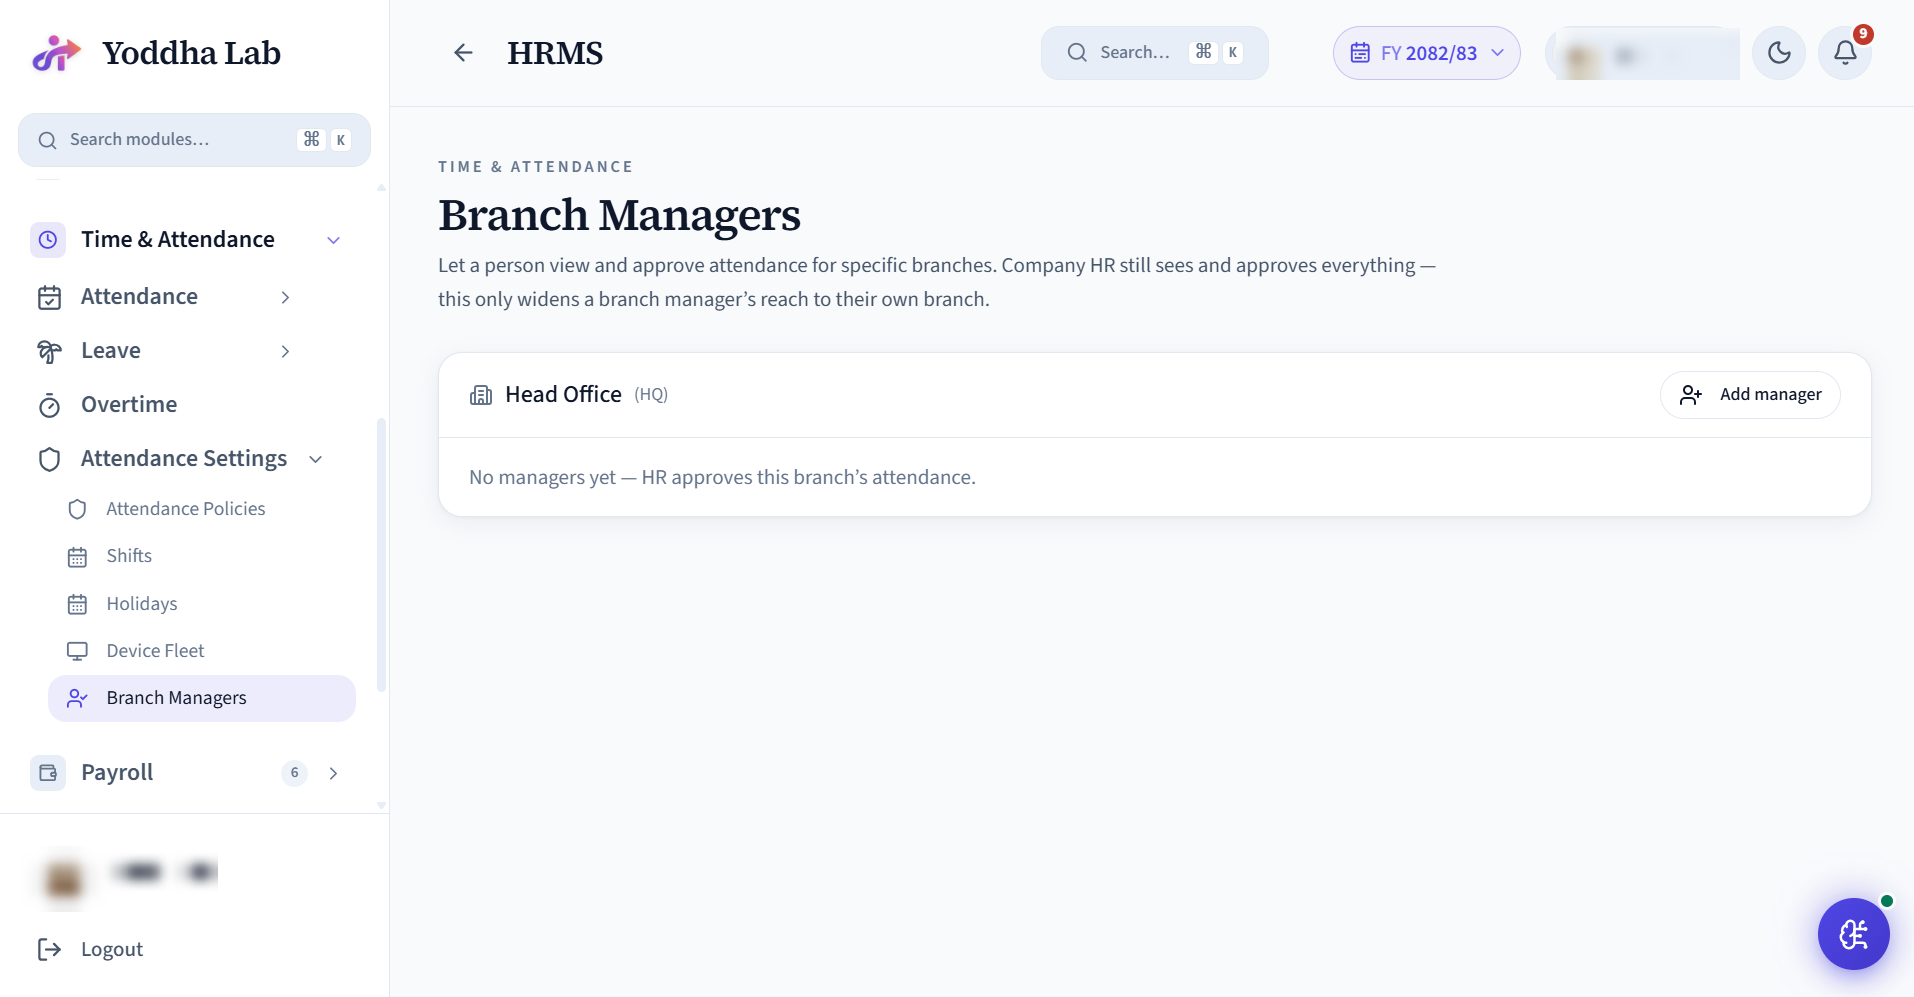
Assign branch managers as attendance approvers - who can approve attendance and regularization for which branch.
Setup
- Map each manager to the branch(es) they approve for.
Day-to-day operations
- Approvals route to the right manager automatically; adjust as the org changes.
Team Activity
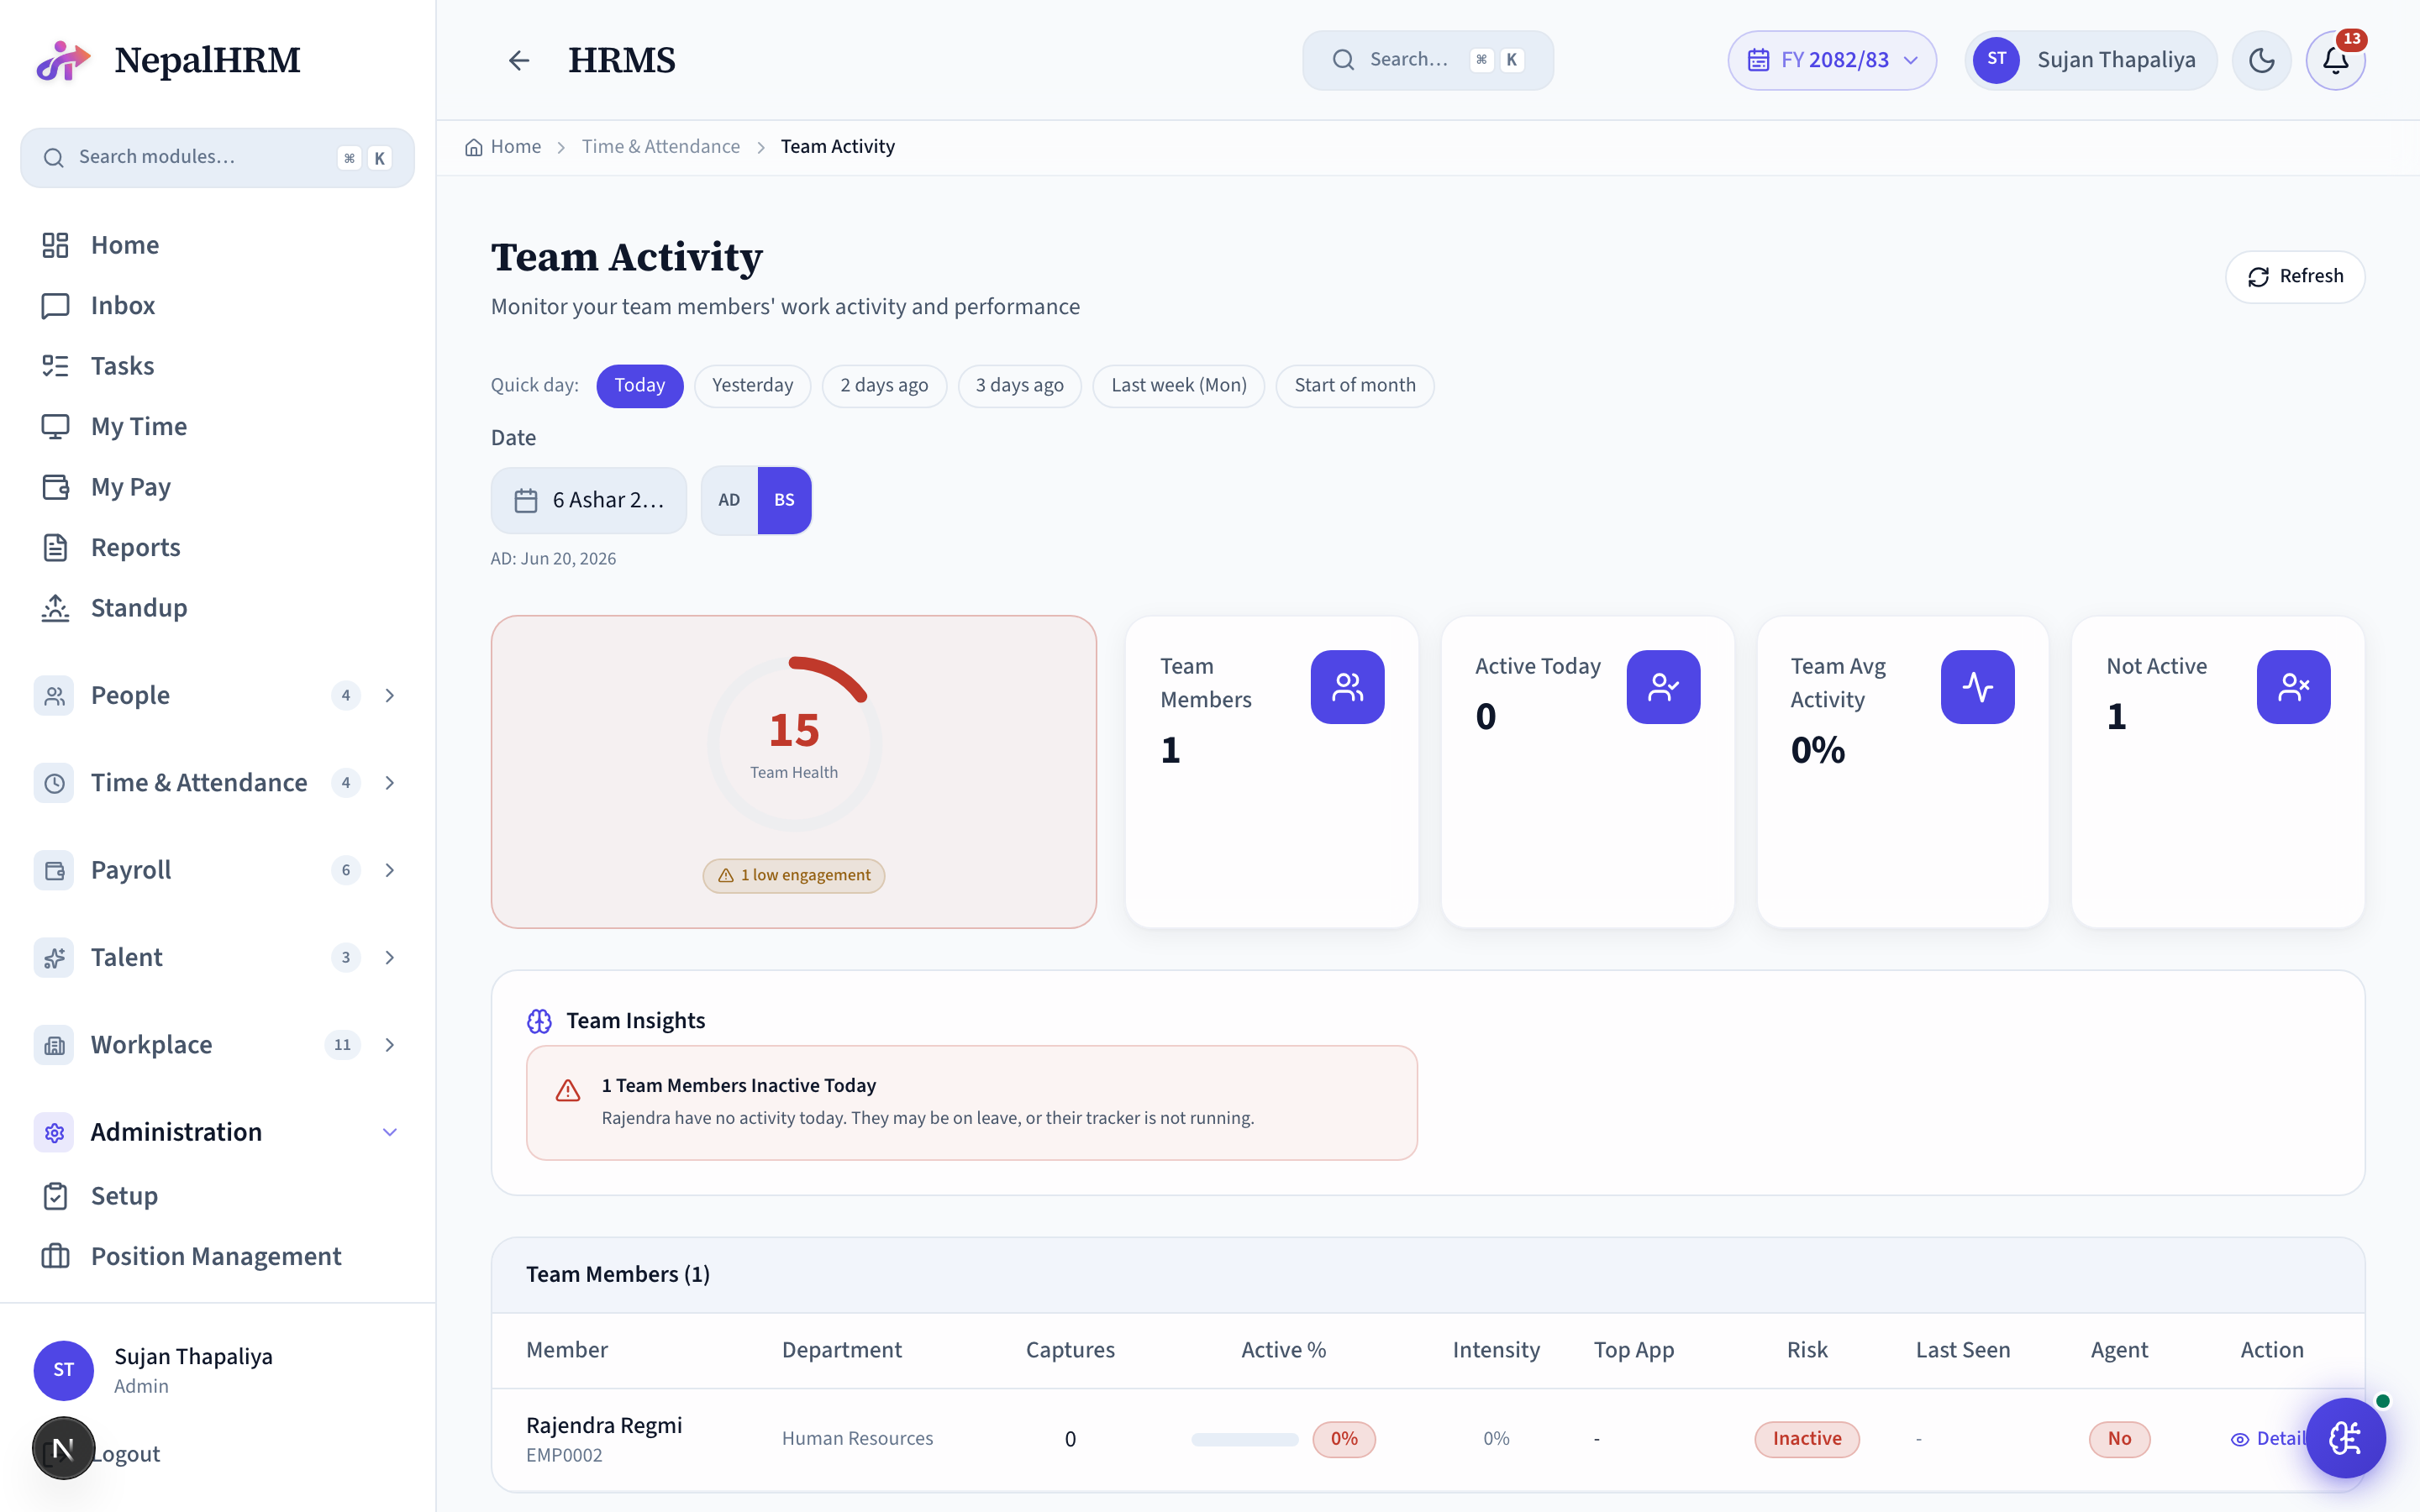
The manager view of the Desktop Activity Tracker - team focus, active-app time and (with consent) productivity, rolled up by person and day.
Setup
- The tracker agent must be installed (see Activity Tracker).
Day-to-day operations
- Review team productivity; spot idle or over-work patterns.
Payroll
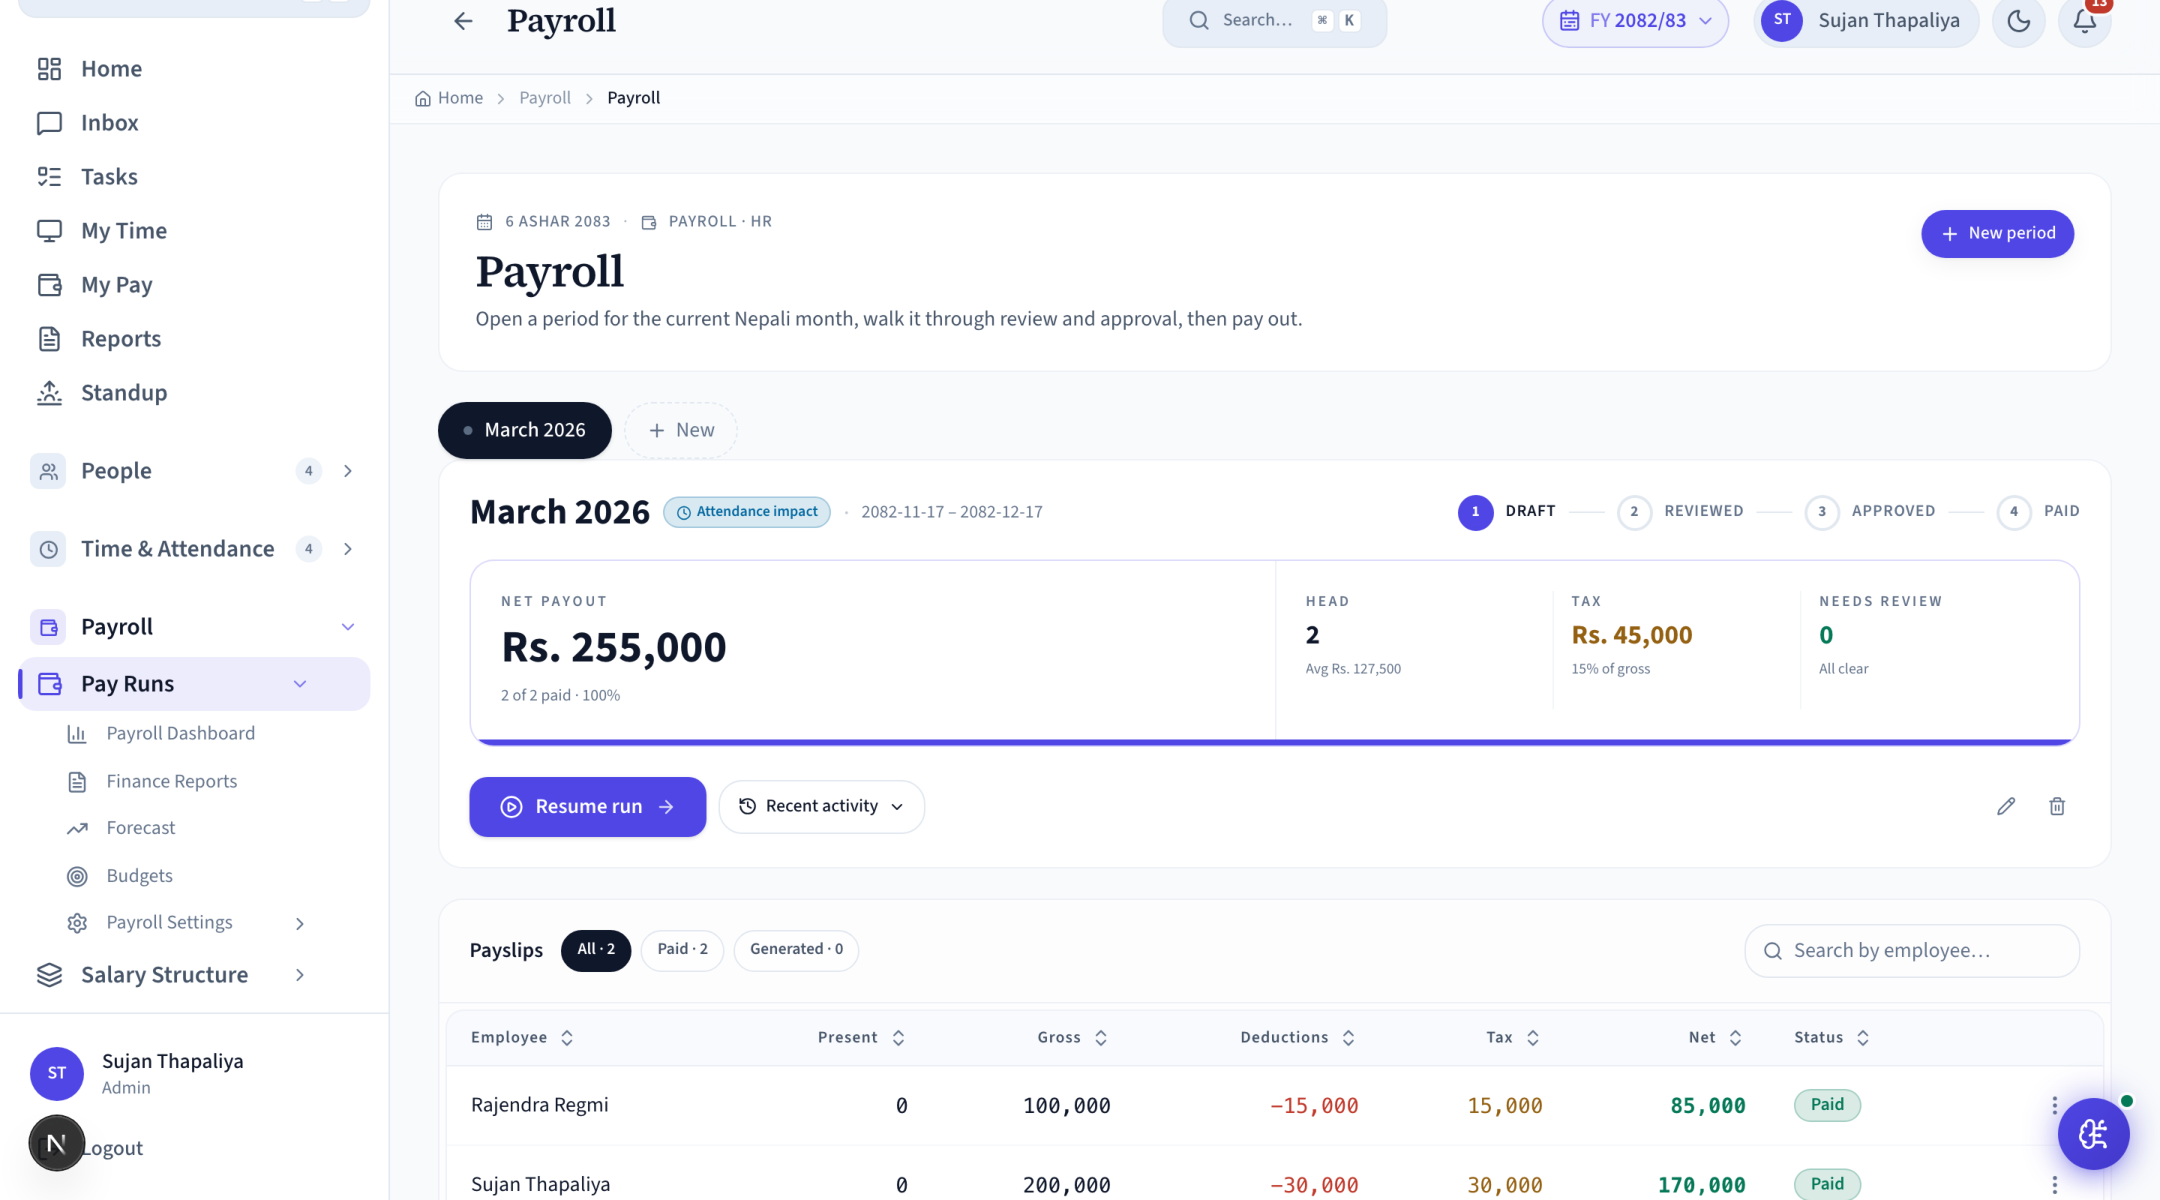
The monthly payroll run. Draft → Reviewed → Approved → Paid lifecycle. Each period generates per-employee payslips with earnings, deductions, tax, PF / SSF, CIT, and net pay. Every payslip now shows a full tax breakdown - cumulative (year-to-date) TDS, insurance rebate, and day-rate working - and lists the employer PF/SSF contribution (ER) directly beneath the employee's own (EE) in Deductions, so both halves are clear. Bulk pay marks everyone paid; email-payslips sends each employee their slip.
Setup
- Payroll Settings → enable PF, CIT, tax slabs.
- Salary Structures → assign employees to a structure so the run knows what to pay them.
- Pay Groups → group employees by pay schedule if not everyone runs monthly.
Day-to-day operations
- Run payroll: Payroll → New Period → pick month → Generate.
- Review draft: every row recomputes earnings + deductions; open any payslip → Tax breakdown to check cumulative TDS, insurance rebate and day-rate.
- Approve → Mark Paid → Email Payslips. Each step is auditable. (A period with no payslips can't be approved - the system warns and blocks it.)
- Adjustments: per-payslip overrides for one-off bonuses or corrections.
Payroll Dashboard
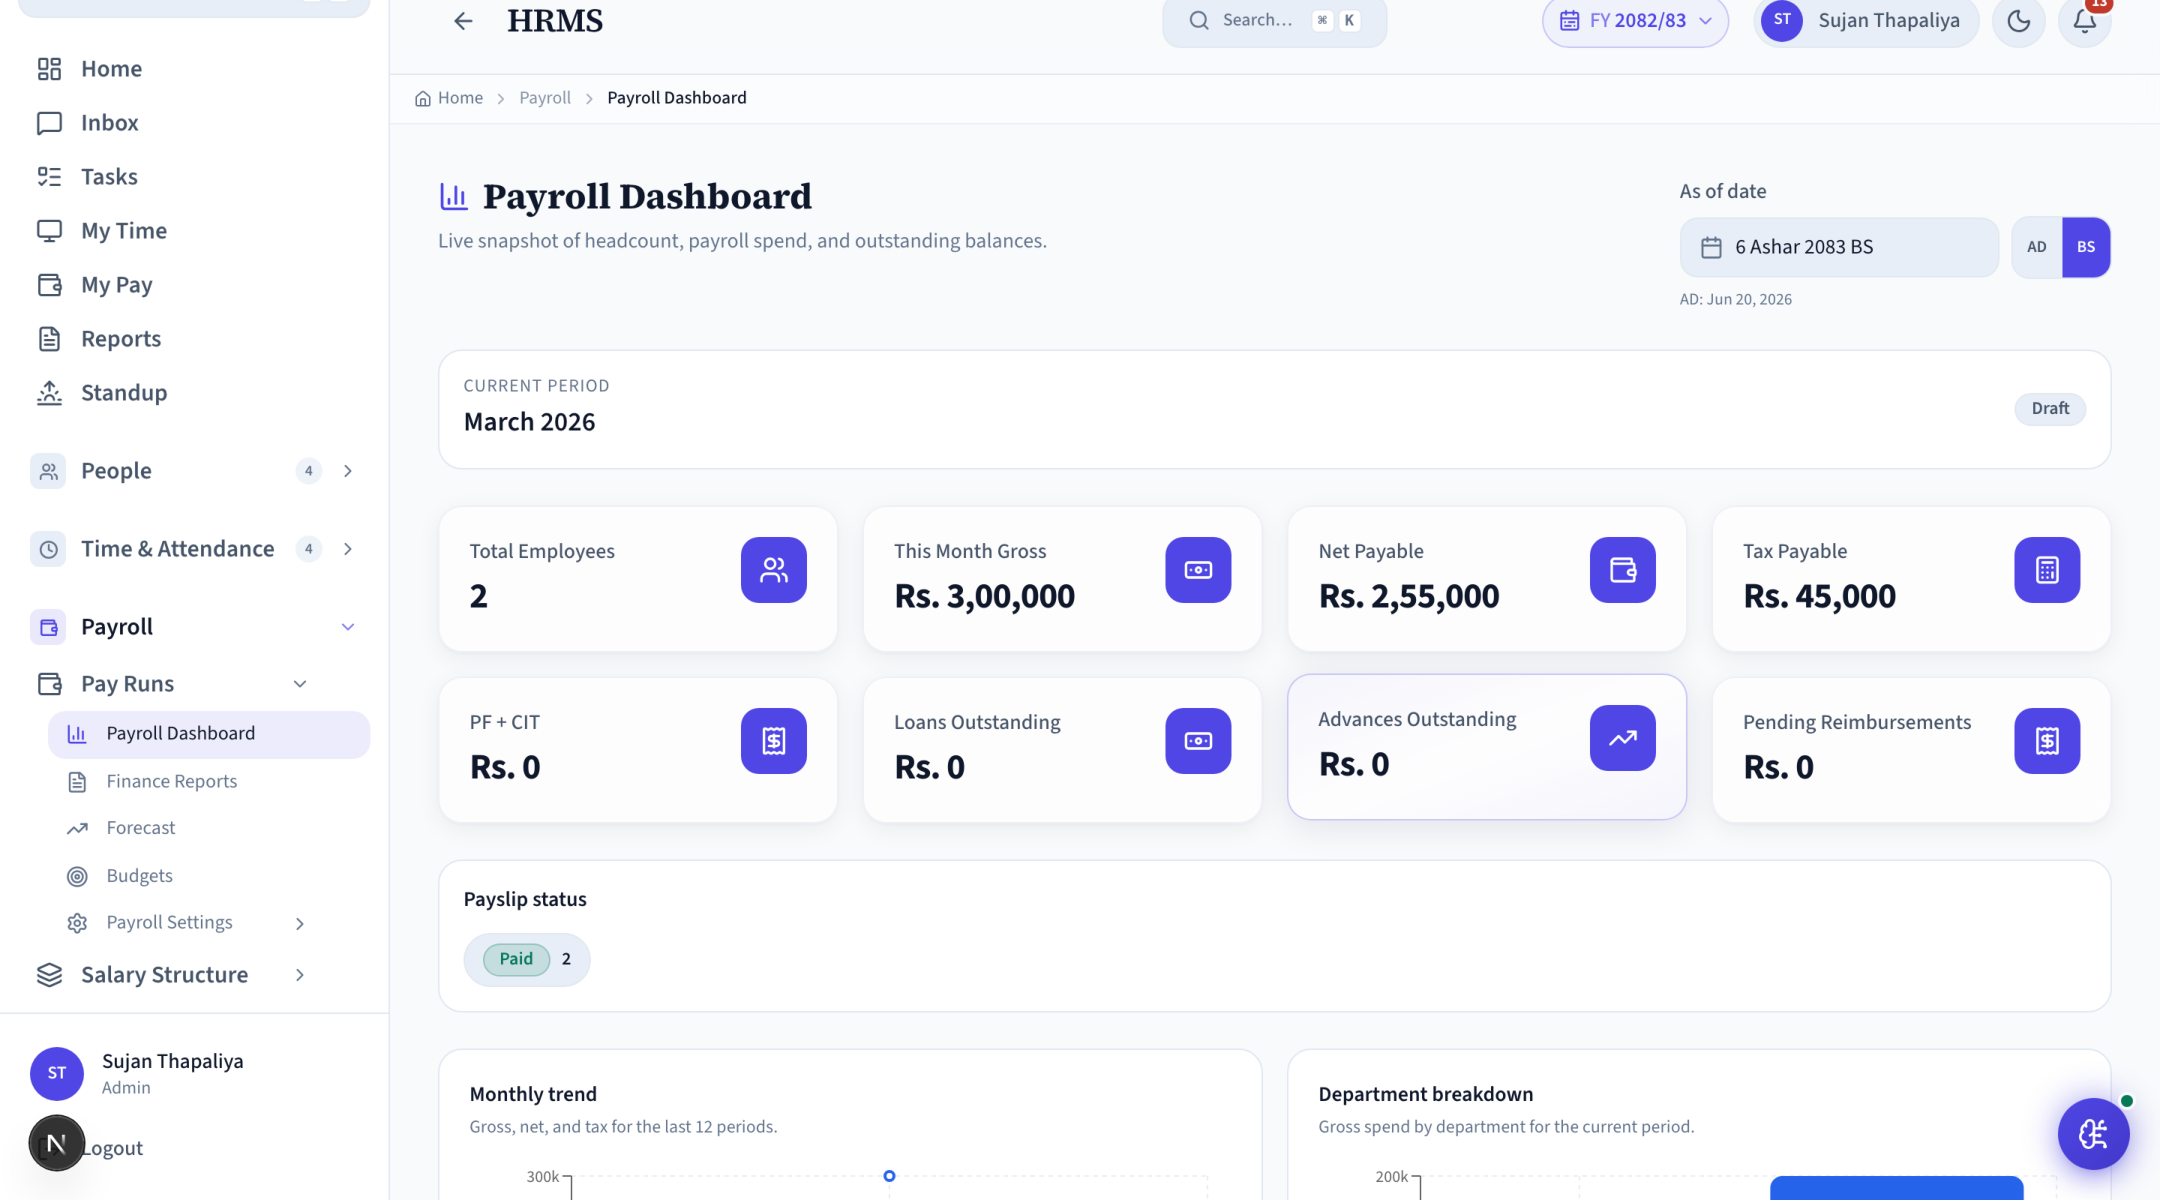
Top-level payroll metrics: month-over-month cost, headcount trend, salary distribution, top earners, deductions breakdown, year-to-date spend.
Setup
- No setup - it renders from your completed payroll periods.
- Run at least one payroll (Pay Runs) so the charts have data; the more months you run, the better the trends.
Day-to-day operations
- Use the period selector to compare two months.
- Click a bar in the trend chart to drill into that month's payslips.
Finance Reports
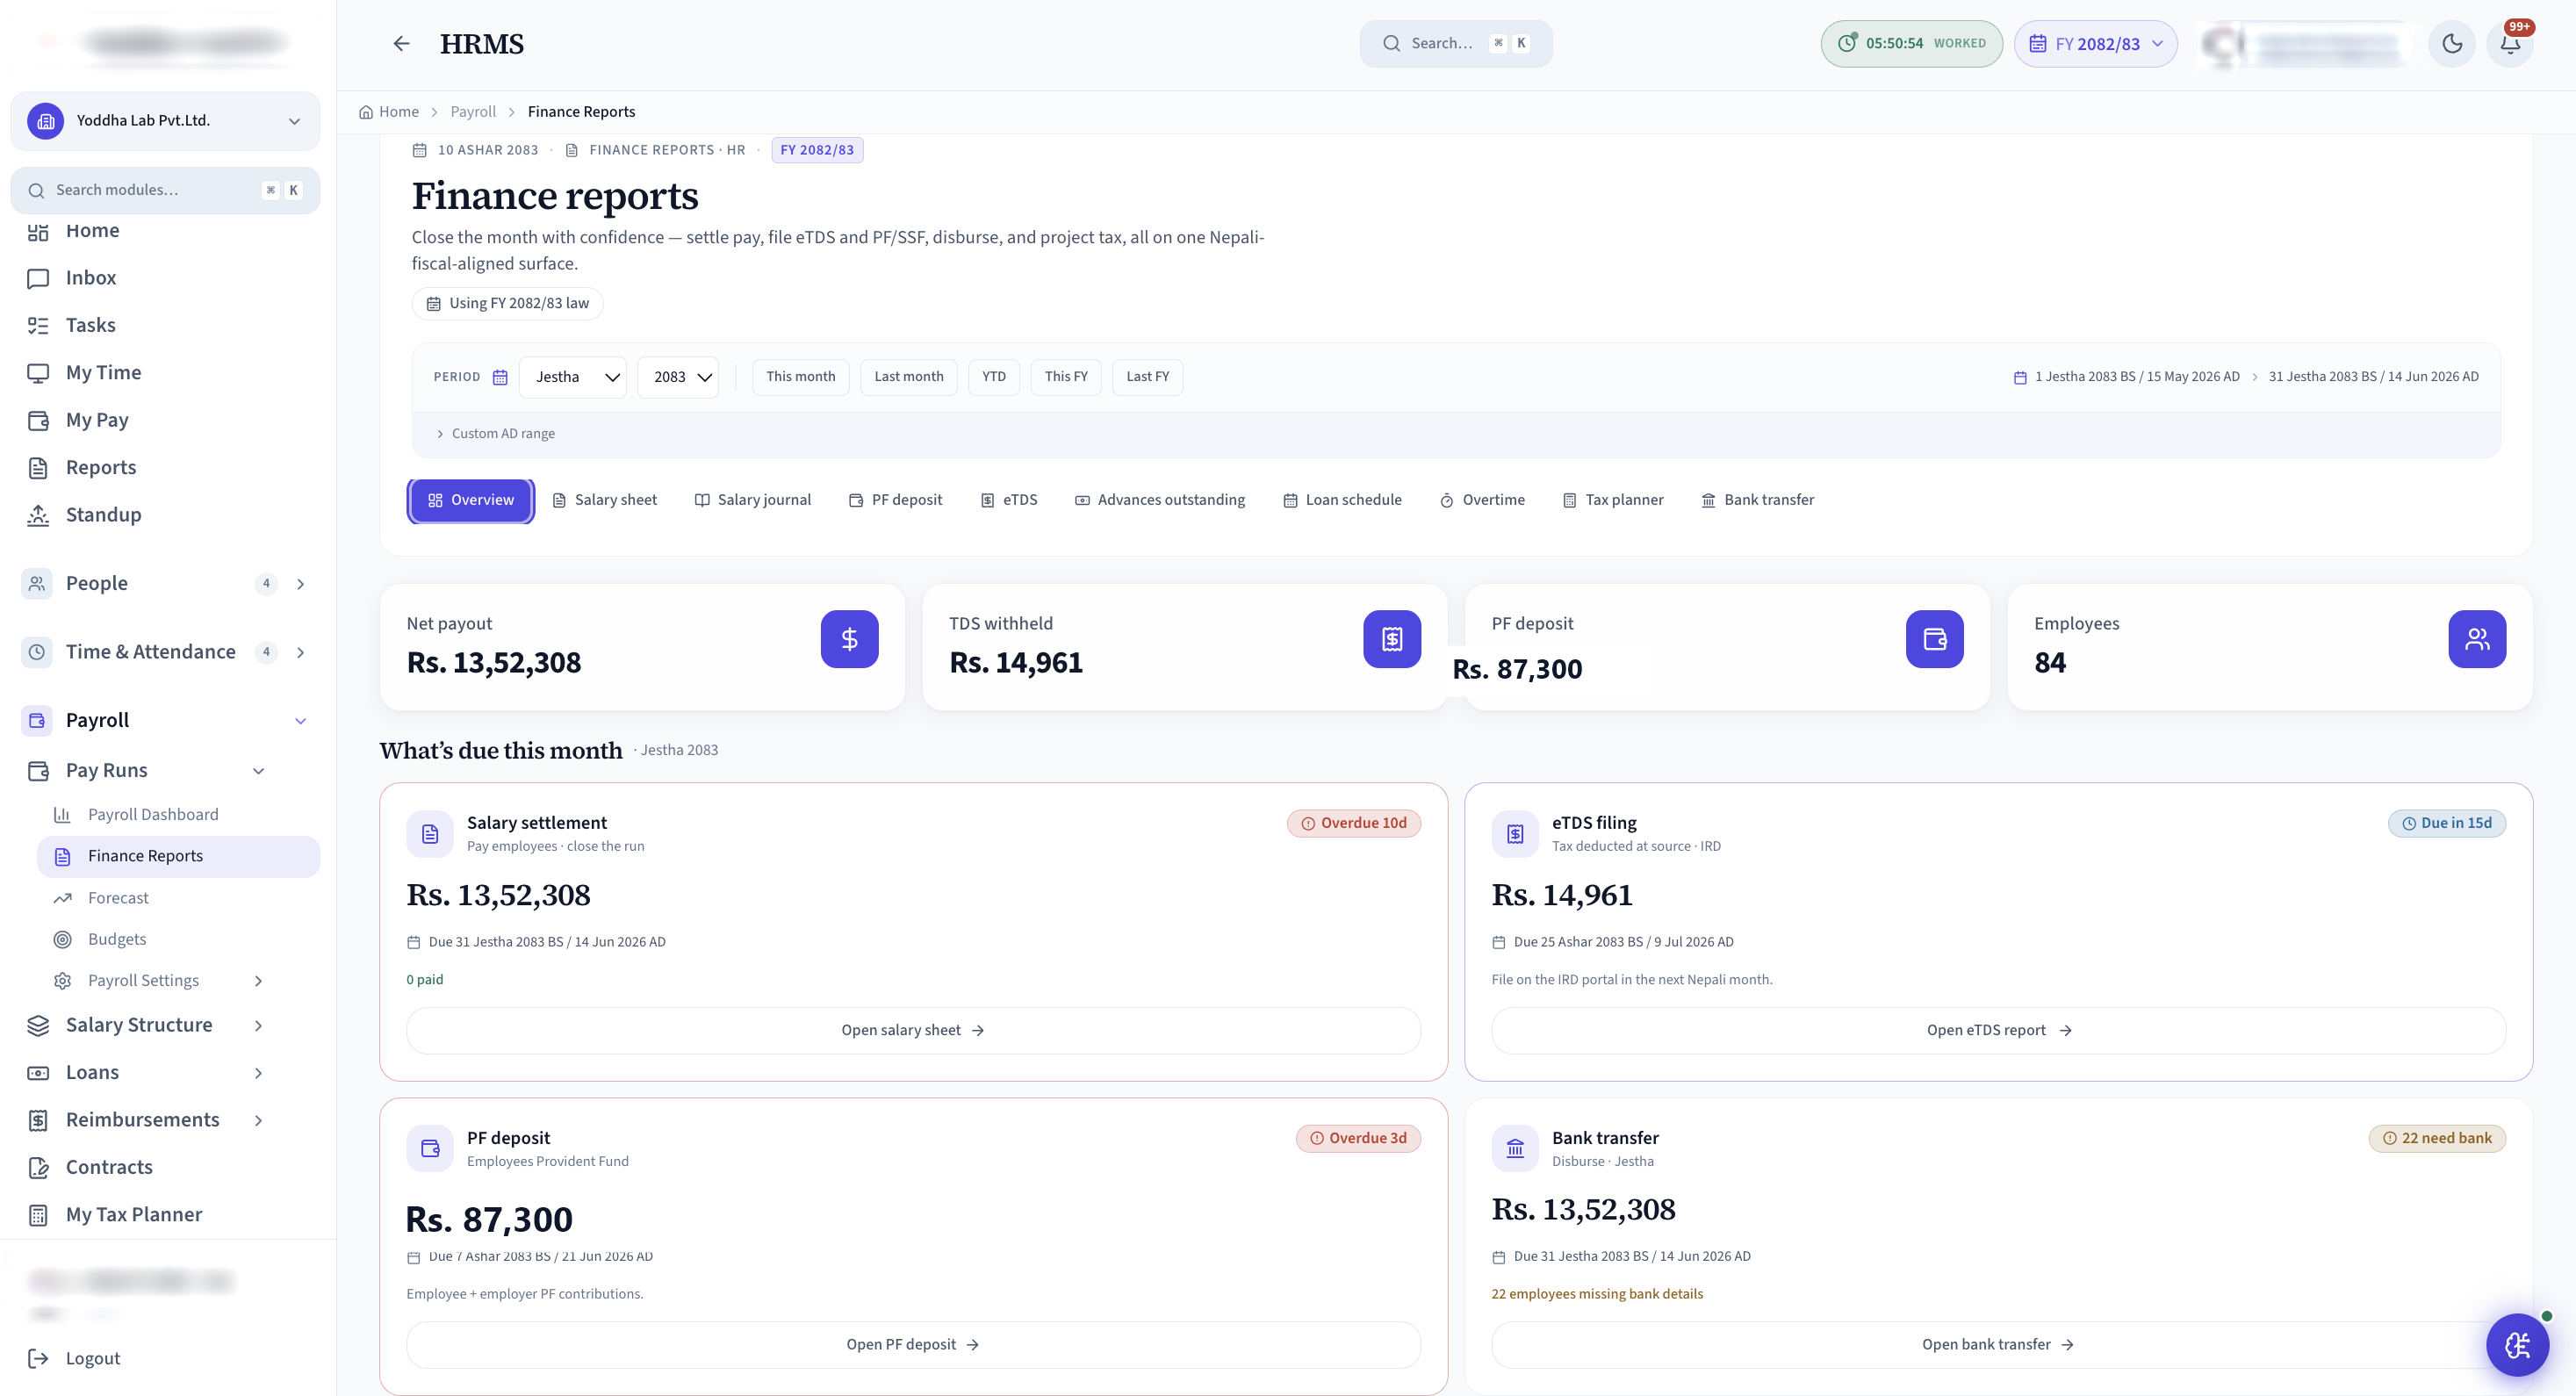
Statutory reports HR submits to government / auditors: PF returns, CIT statements, tax breakdowns, salary register, bank file for the disbursement run.
Setup
- Payroll Settings → fill organisation PAN, PF account, CIT account.
Day-to-day operations
- Pick the report + period → Download (PDF / CSV / XLSX).
- Bank file: includes account number, IFSC, amount per employee - ready to upload to net-banking.
Forecast
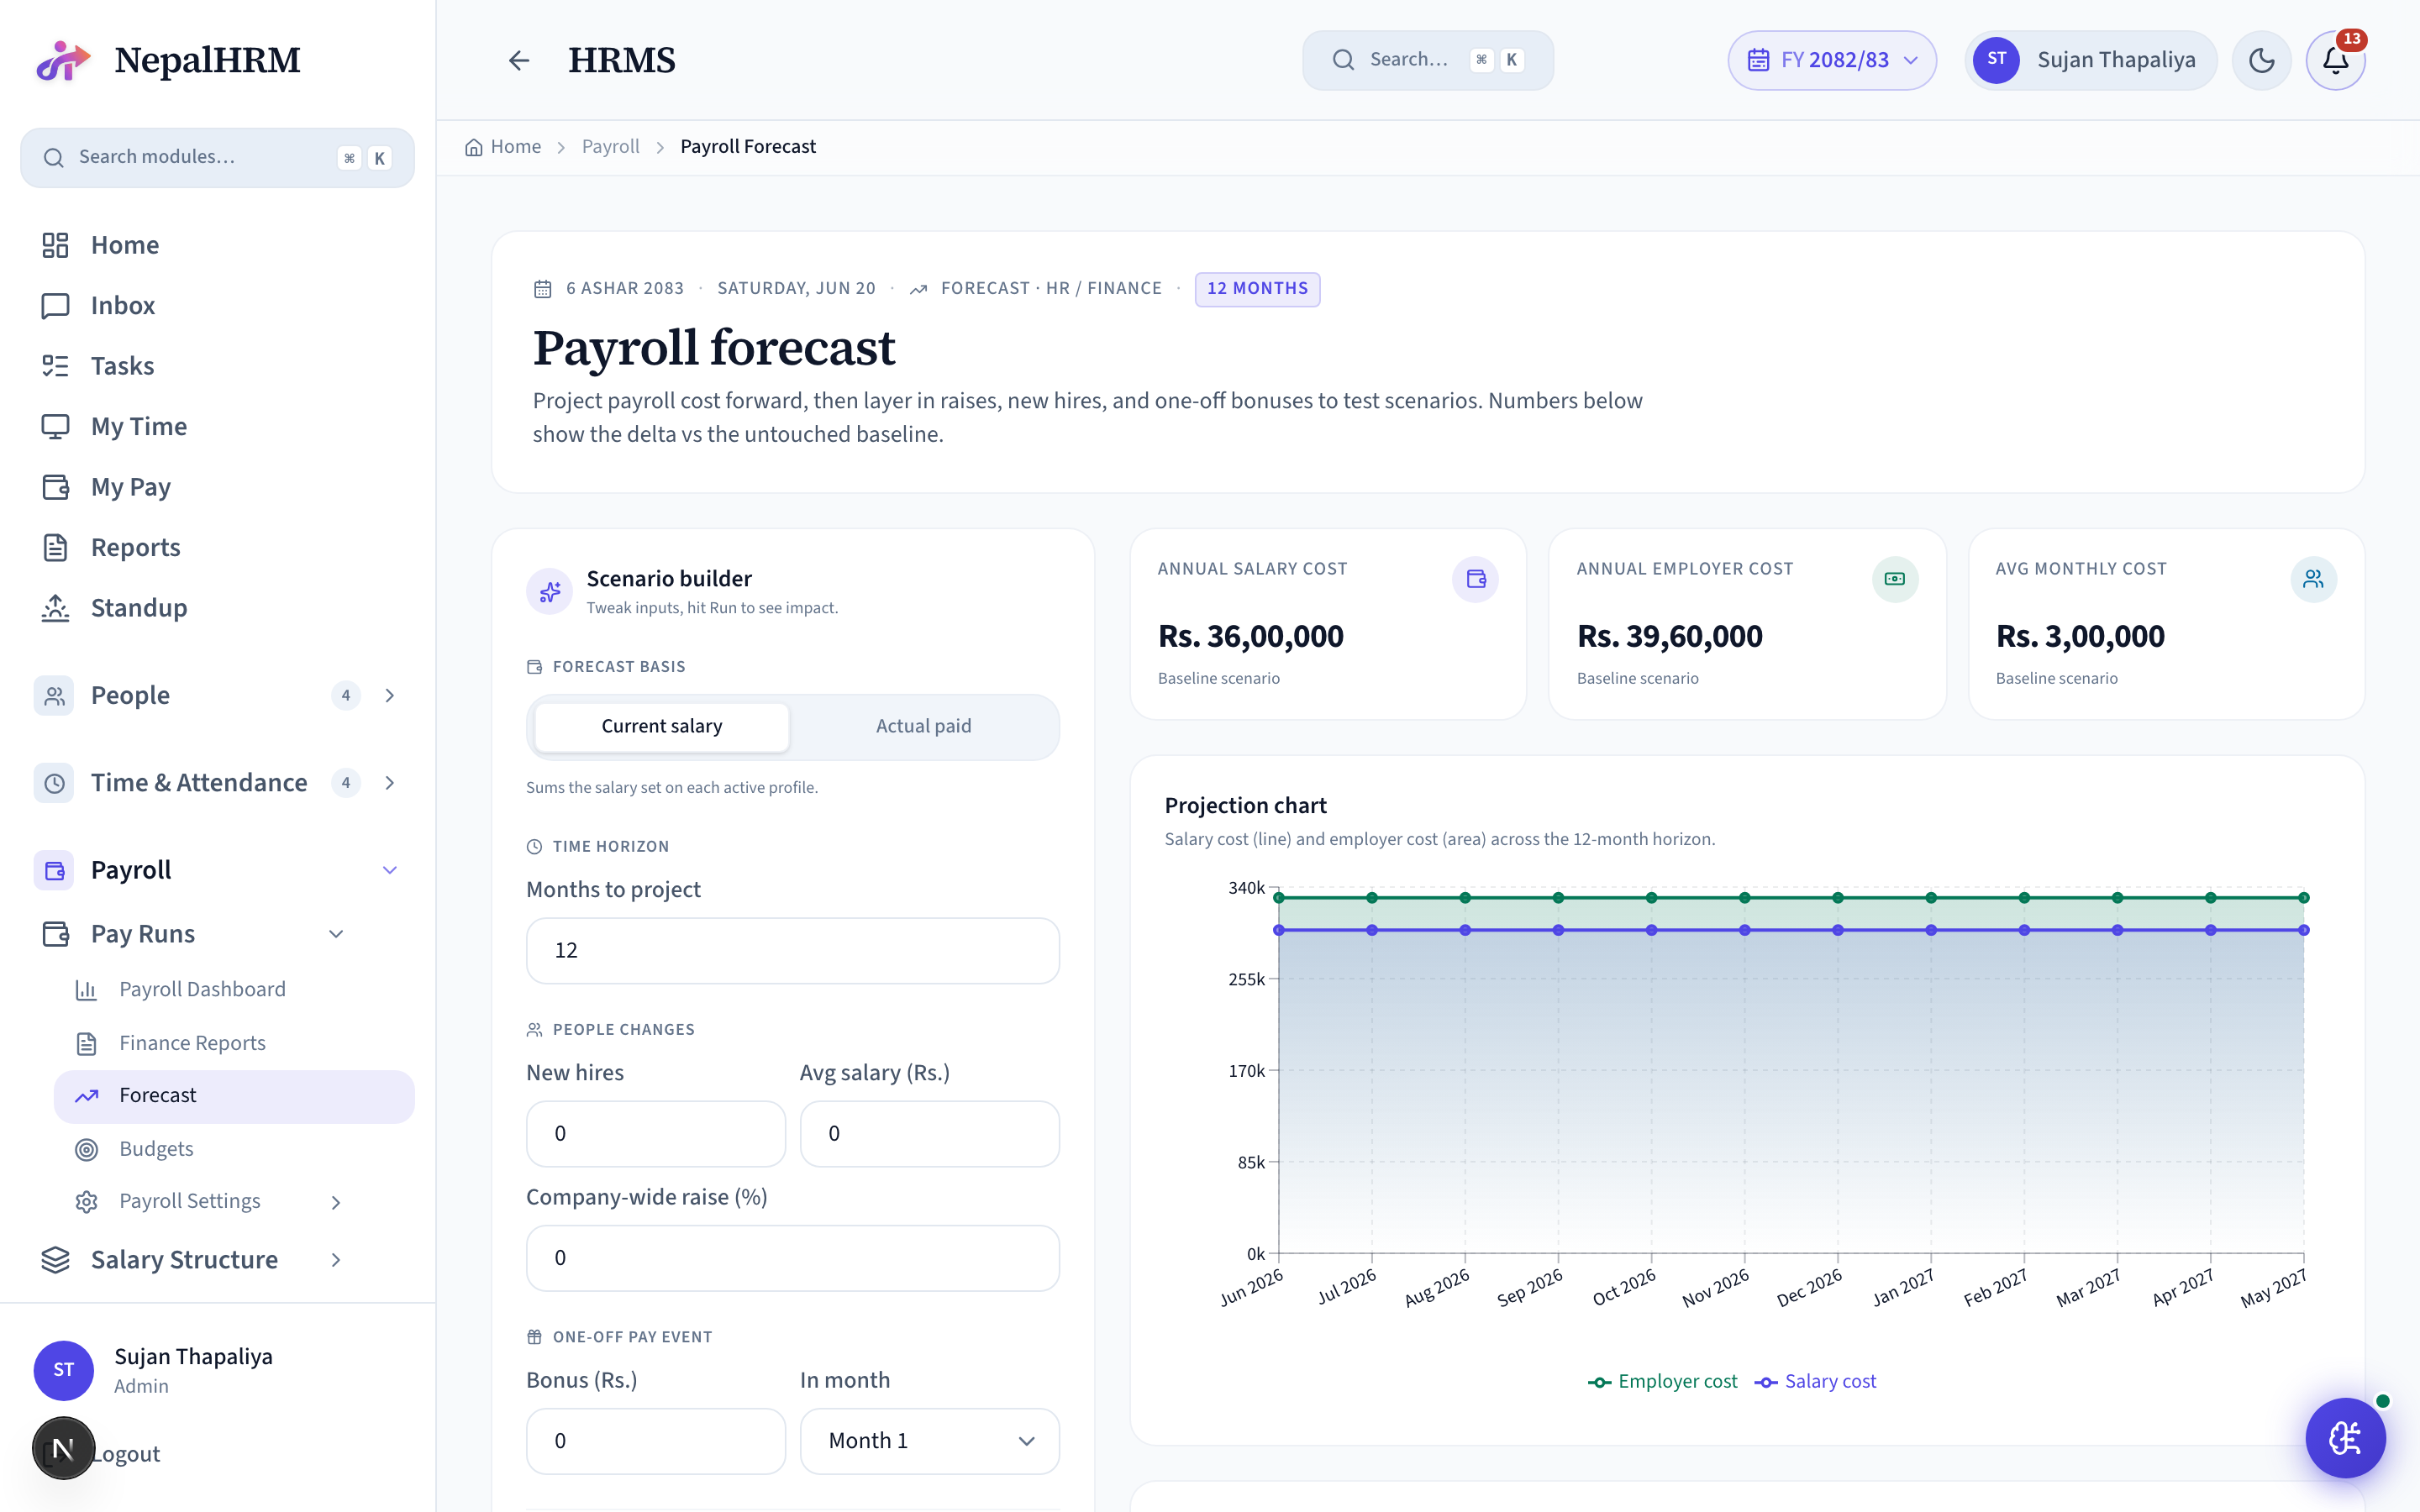
Projects next-period payroll cost based on current salary structures + hiring plan. Useful for finance to budget for next month before it runs.
Setup
- Add planned hires: Recruitment → Hiring Plan.
Day-to-day operations
- Pick the forecast month → see projected cost vs current month.
- Scenarios: add/remove planned hires to see impact.
Budgets
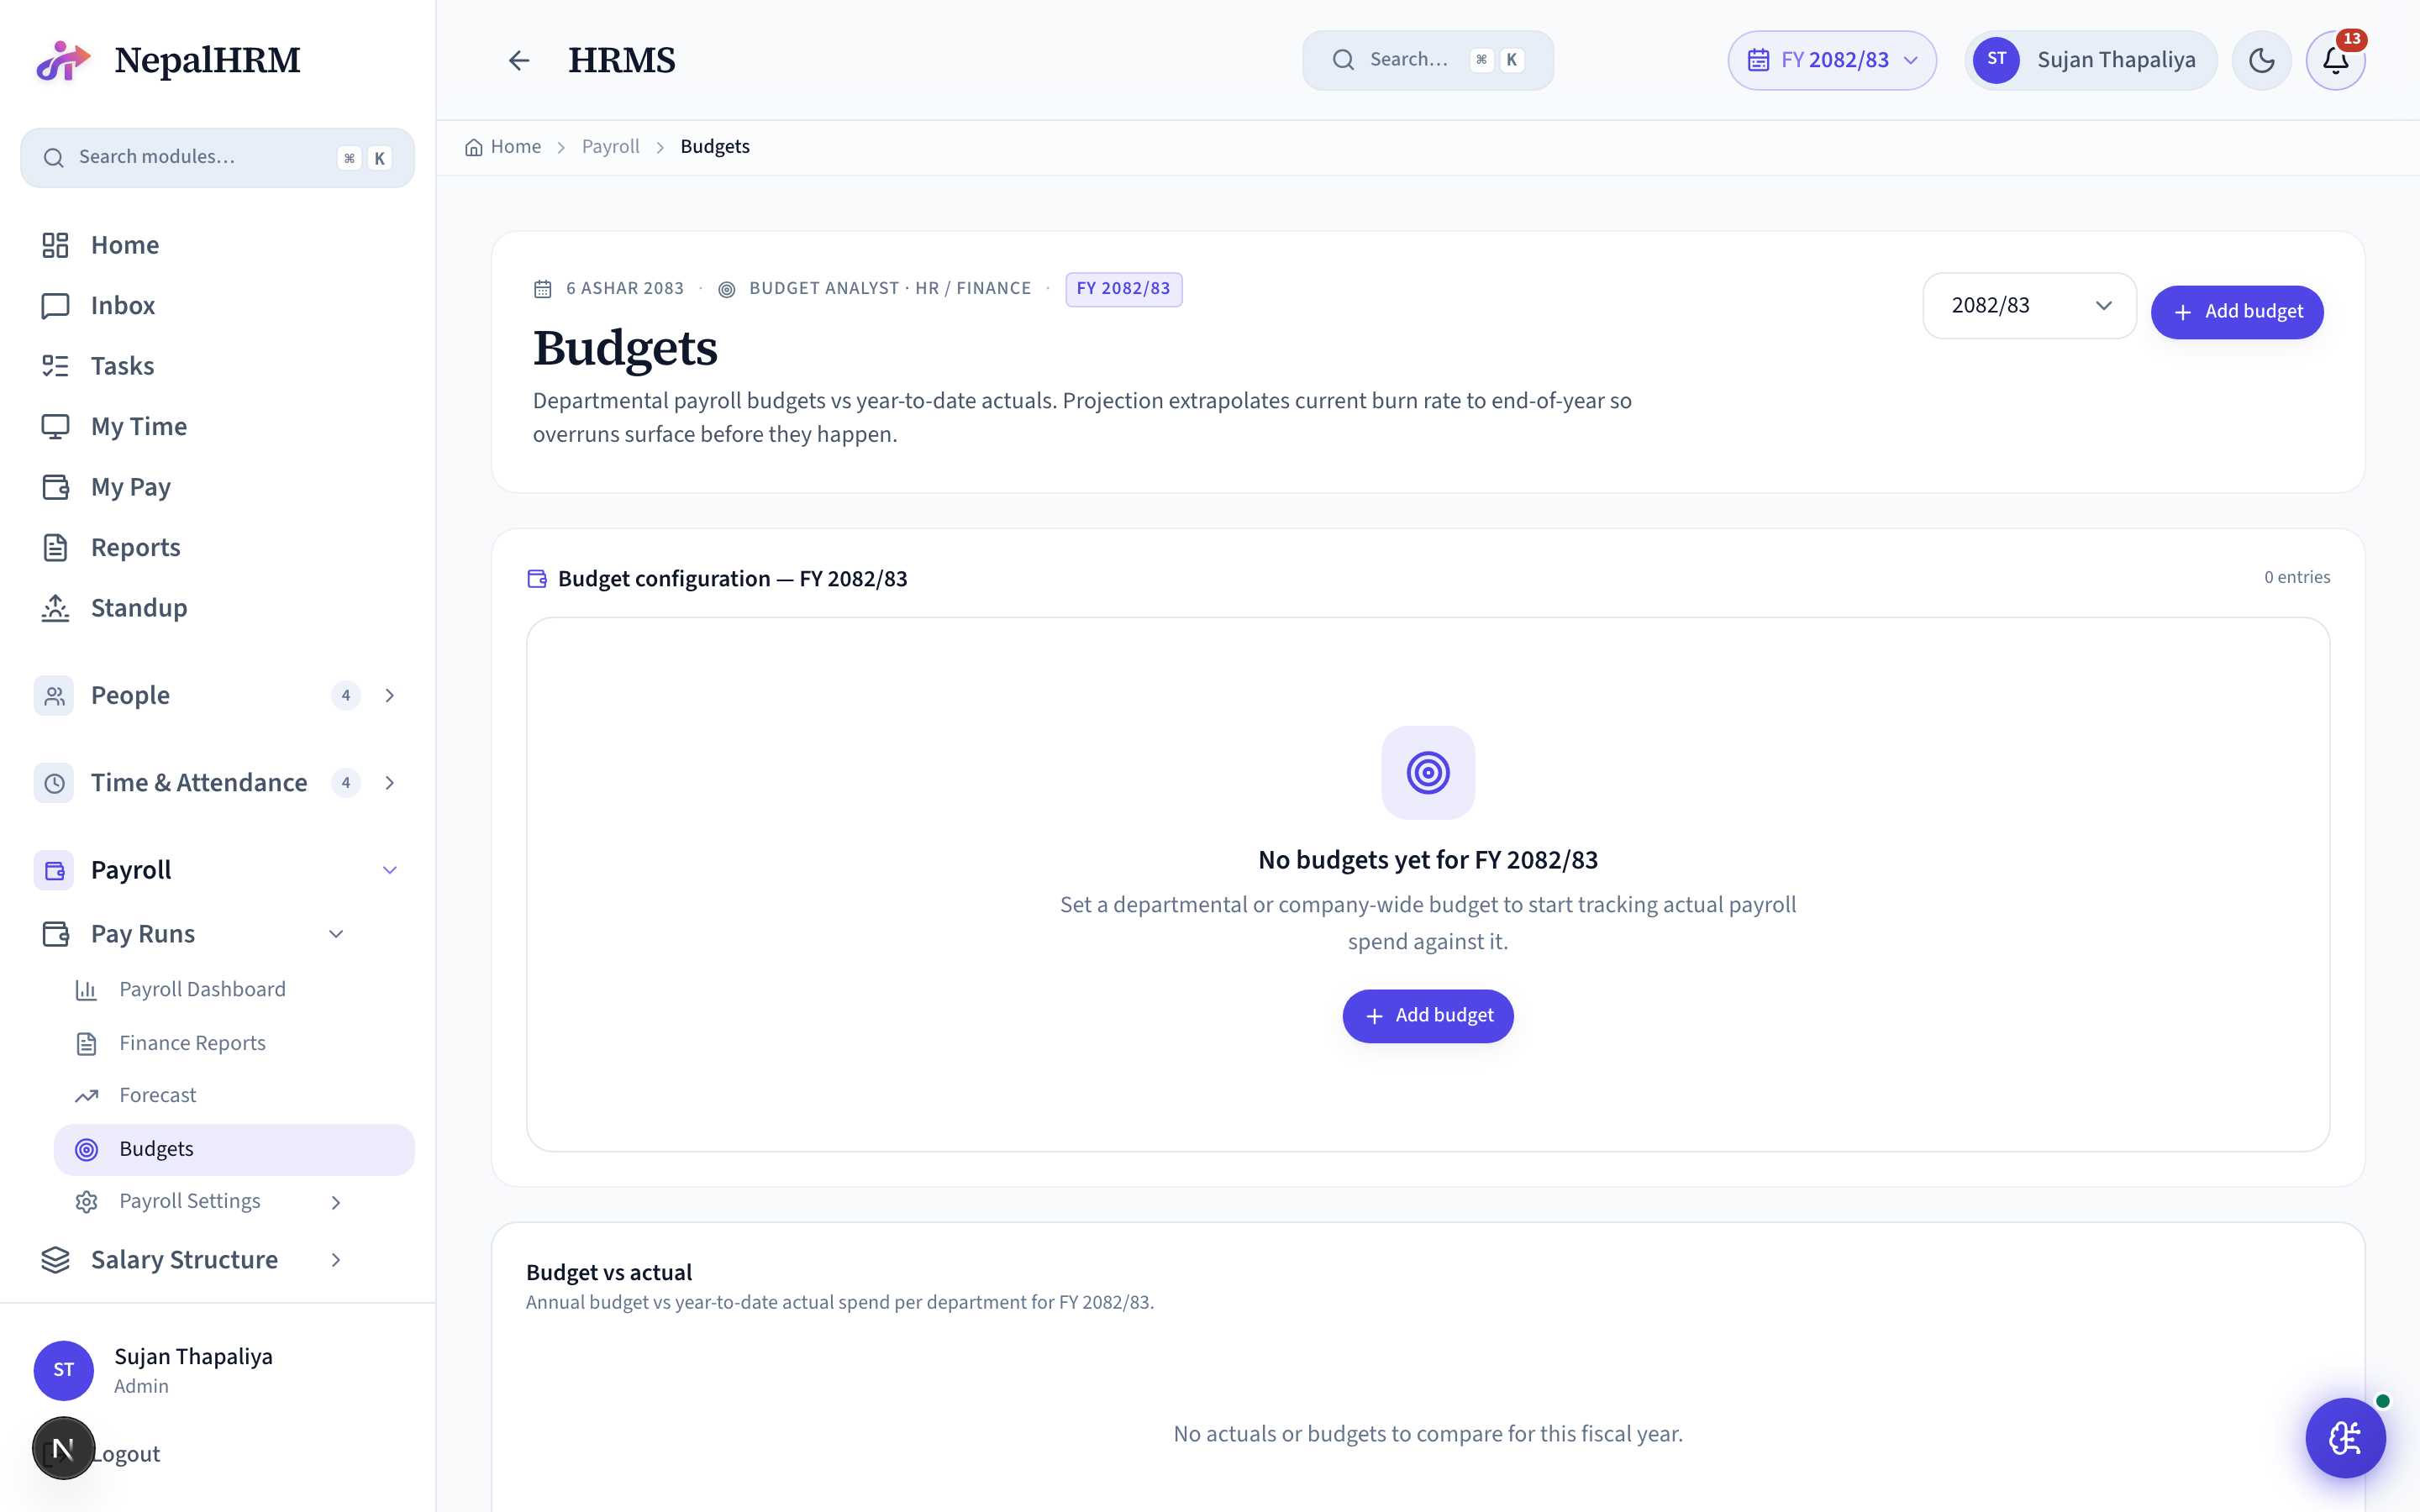
Department-level annual / monthly budgets. The actual spend (from payroll + reimbursements + procurement) shows alongside the planned amount so HR / finance can spot drift early.
Setup
- Budgets → Add: pick department, fiscal year, annual amount.
- A company-wide budget row is auto-created from the sum of department budgets.
Day-to-day operations
- Review at month-end: planned vs actual variance per department.
- Lock budgets once approved by leadership to prevent edits.
Payroll Settings
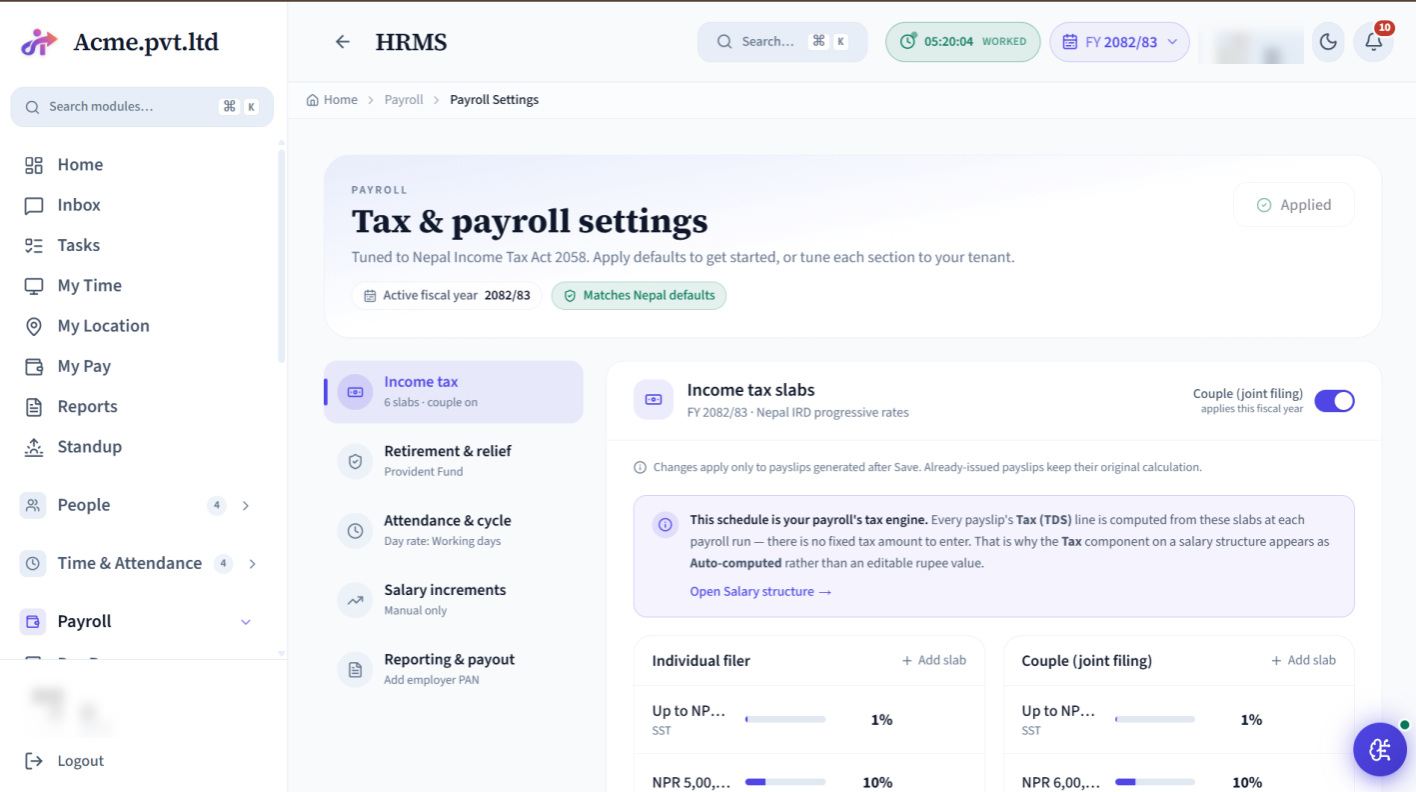
Tenant-level toggles for PF, CIT, tax slabs, payment terms, pay cycle, increment cadence. One-time setup at the start of the fiscal year + occasional tweaks.
Setup
- Fill organisation PAN, PF account, CIT account.
- Set tax slabs (or import the Nepal standard preset).
- Set pay cycle: monthly / fortnightly / weekly.
- Set increment cycle: anniversary-based or January cohort.
Day-to-day operations
- Test: run a sample payroll preview to verify deductions look right after each settings change.
- Audit: every settings change is logged in Audit Log.
Fiscal Years
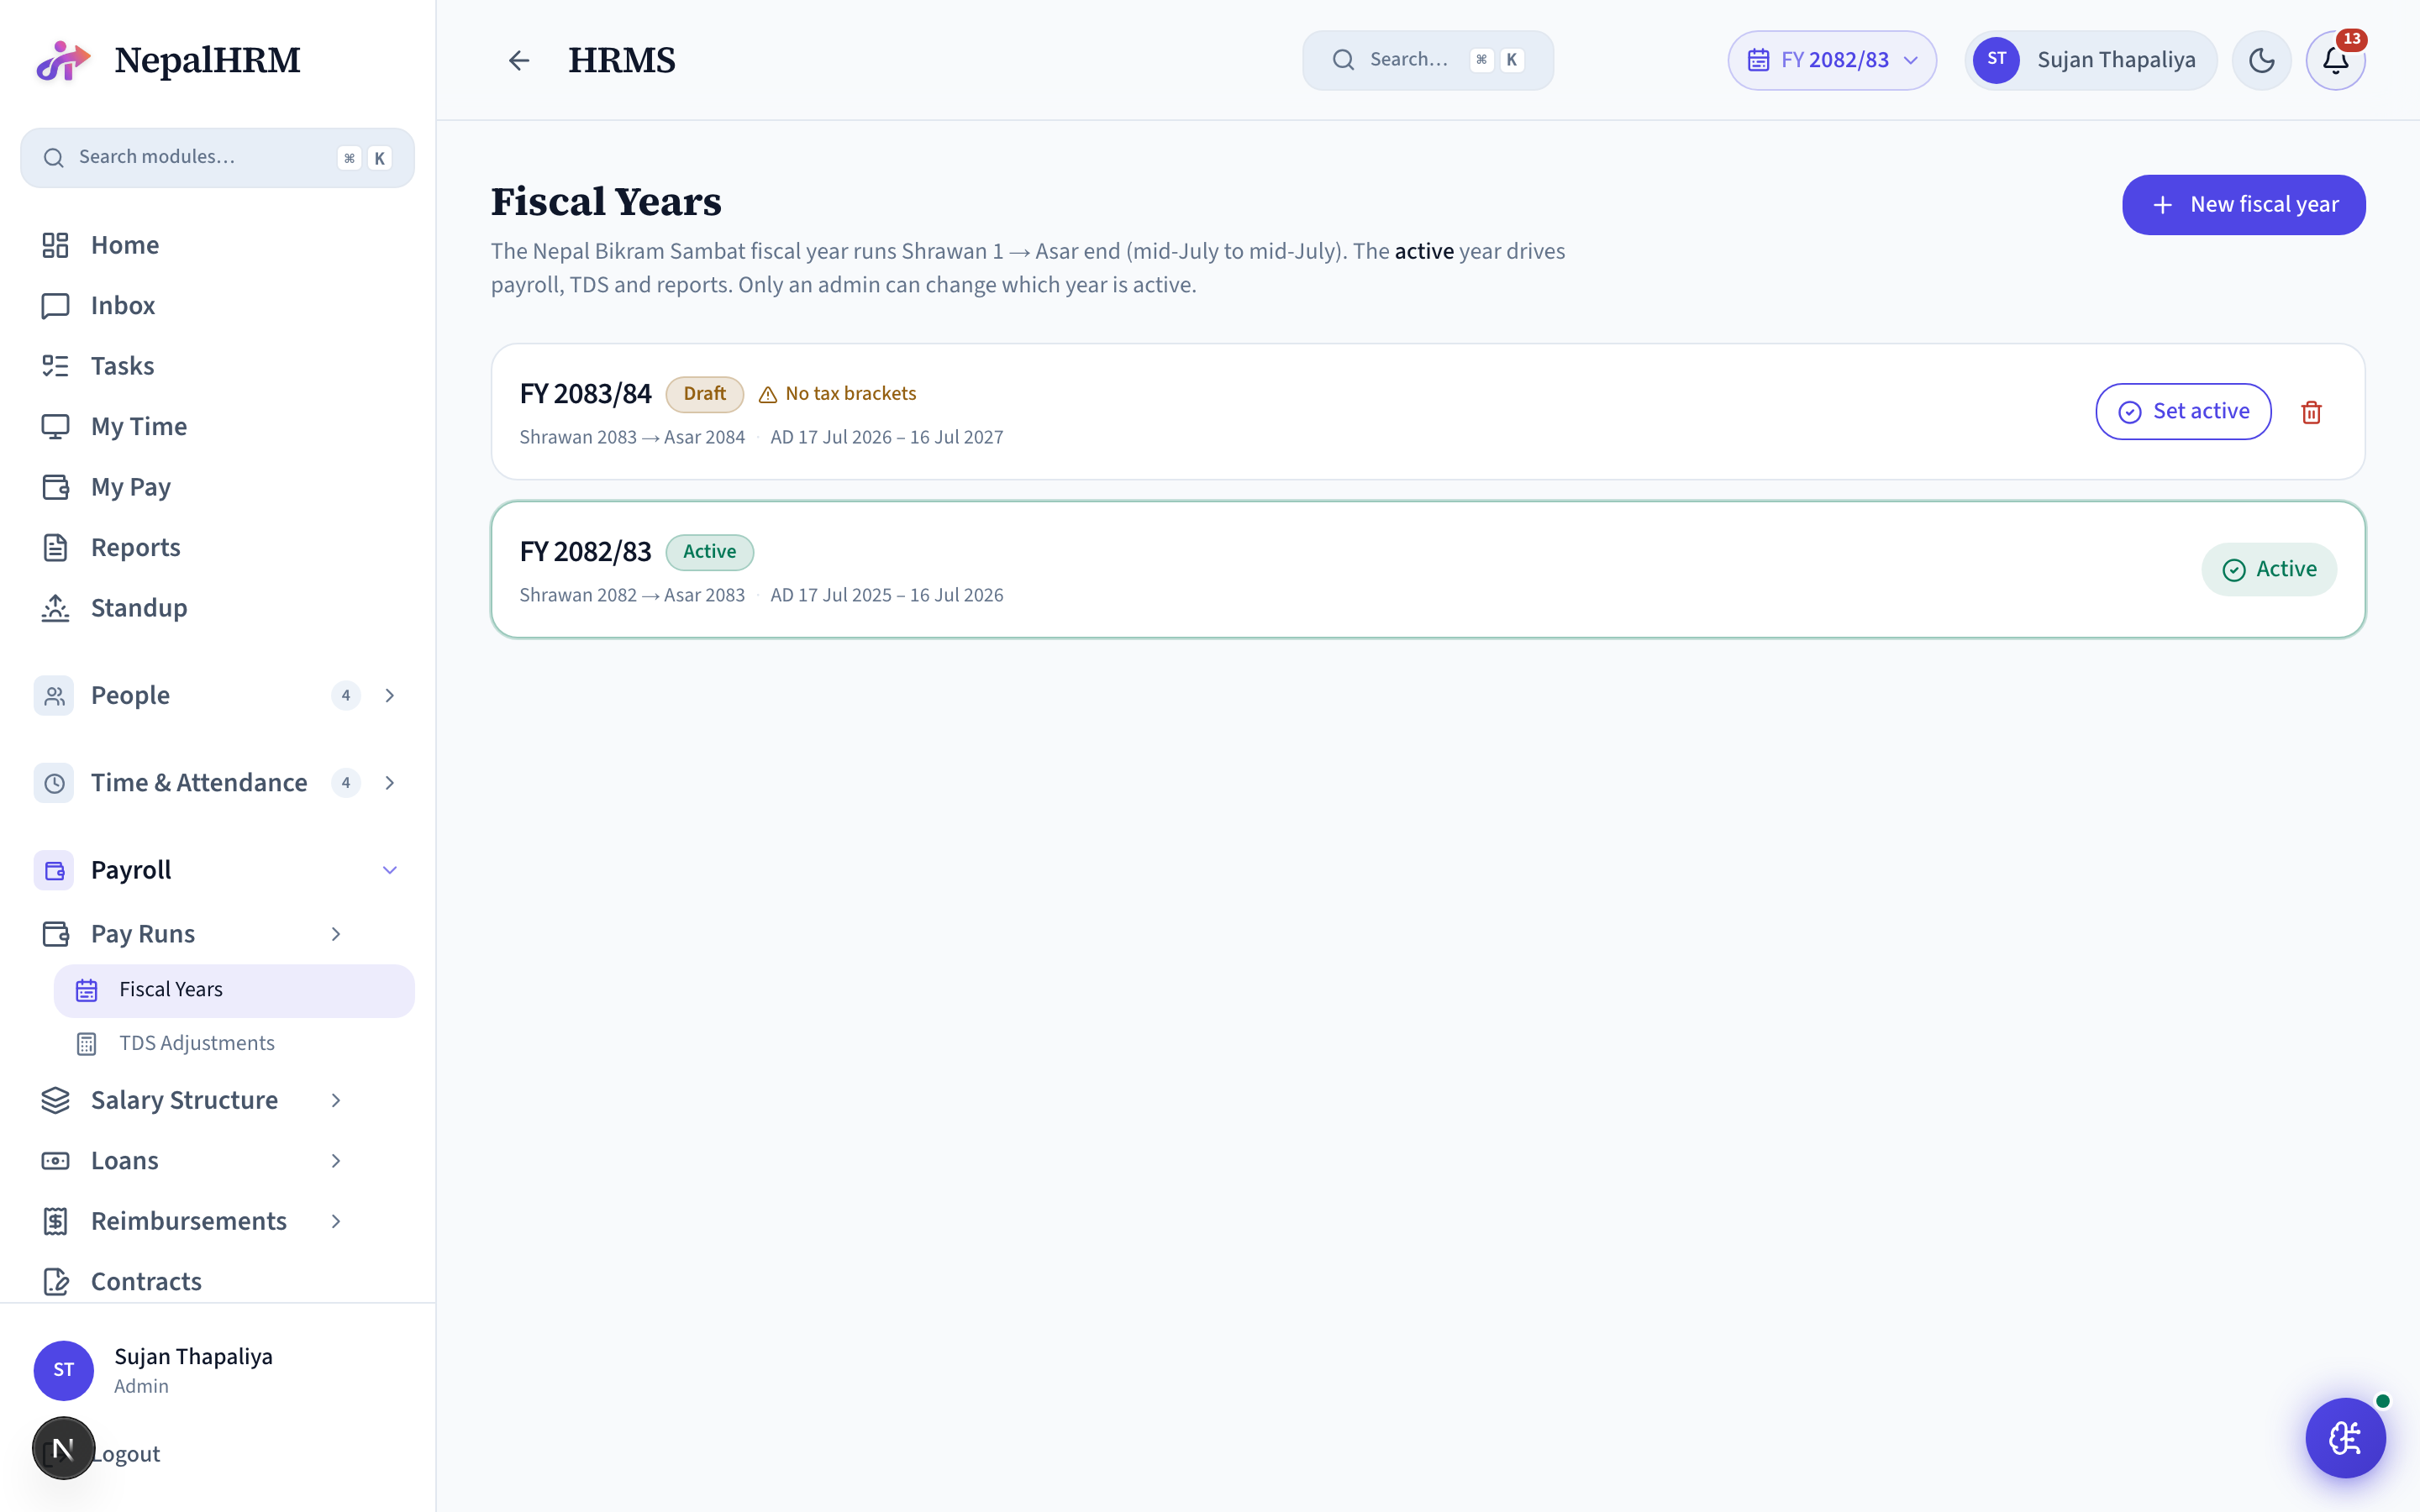
Nepali fiscal years (Bikram Sambat) and their tax slabs - the BS calendar that drives tax brackets, reports and year-end.
Setup
- Confirm the active FY (e.g. 2082/83) and its tax brackets.
Day-to-day operations
- Roll over at year-end; the platform pushes updated statutory slabs.
TDS Adjustments
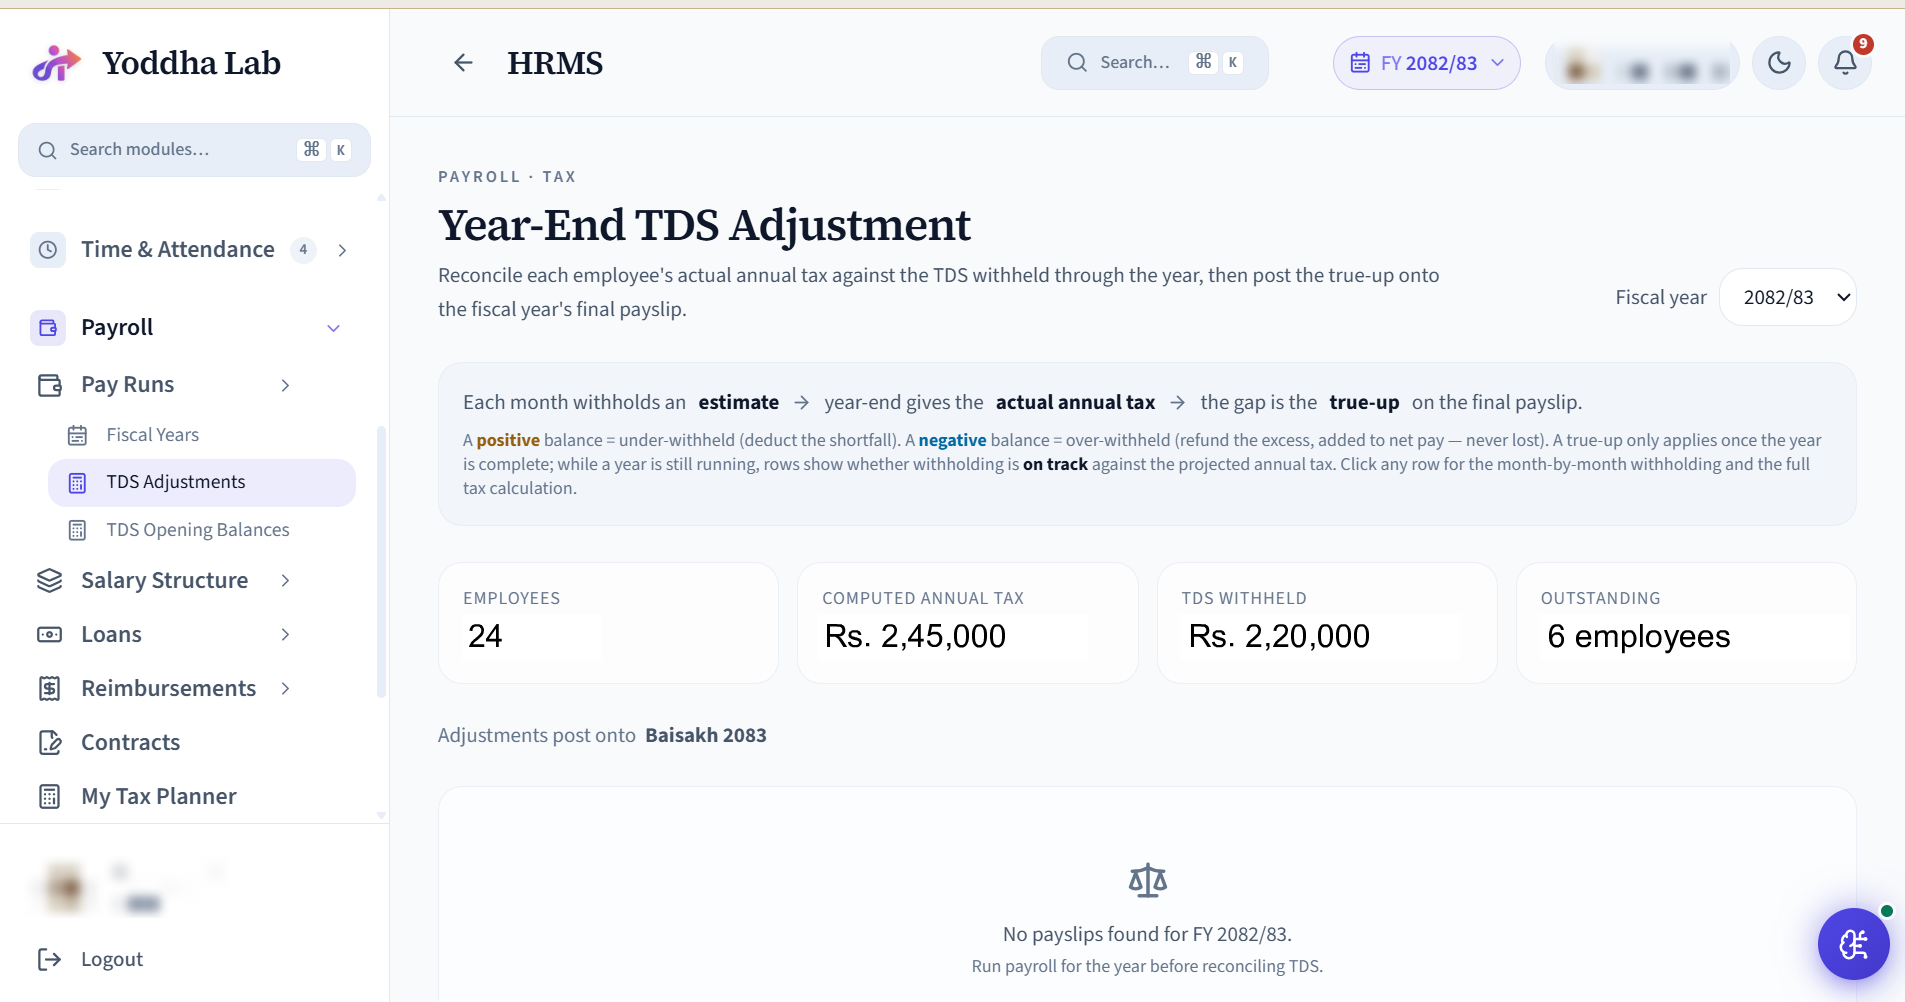
Year-end TDS true-up - reconcile over- or under-withheld tax per employee and post adjustments before the final payroll run.
Setup
- Nothing to configure up front - it works off the year's payroll data.
- Finish Payroll Settings (PAN, tax slabs) and all monthly runs before you reconcile.
- Run it near fiscal year-end, before the final payroll, so refunds / recoveries post in the right month.
Day-to-day operations
- Review the annexure, post refunds / recoveries, then finalize eTDS.
TDS Opening Balances
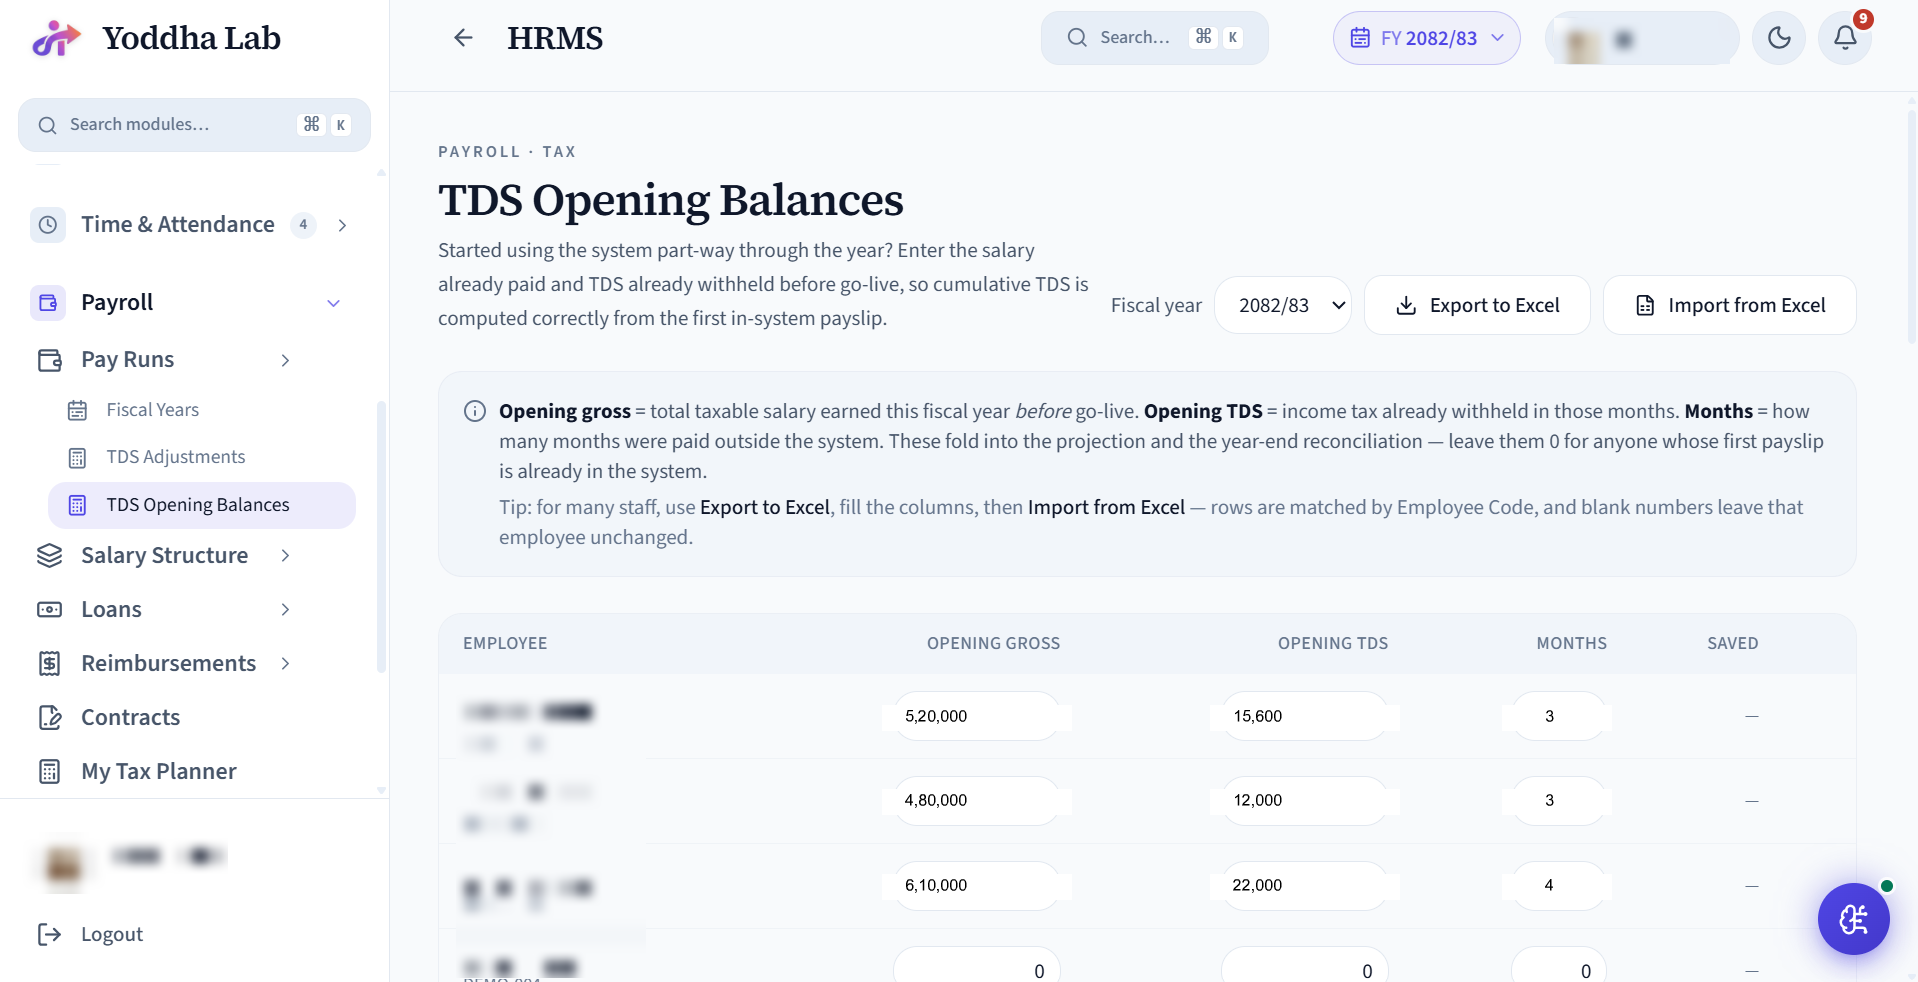
For tenants going live partway through a fiscal year. Enter each employee's tax already deducted and earnings to date from their old system, so NepalHRM's cumulative (year-to-date) TDS picks up from the correct figure on day one instead of taxing them as if the year started fresh. A one-time migration step at go-live.
Setup
- Enter, per employee, the prior-months gross + TDS already withheld this fiscal year (import or type).
- Set the as-of month so the running totals continue from the right point.
Day-to-day operations
- Once set, leave it - the next payroll run blends these openings into each cumulative tax calculation.
- Only revisit if you correct a migration figure.
Salary Structures
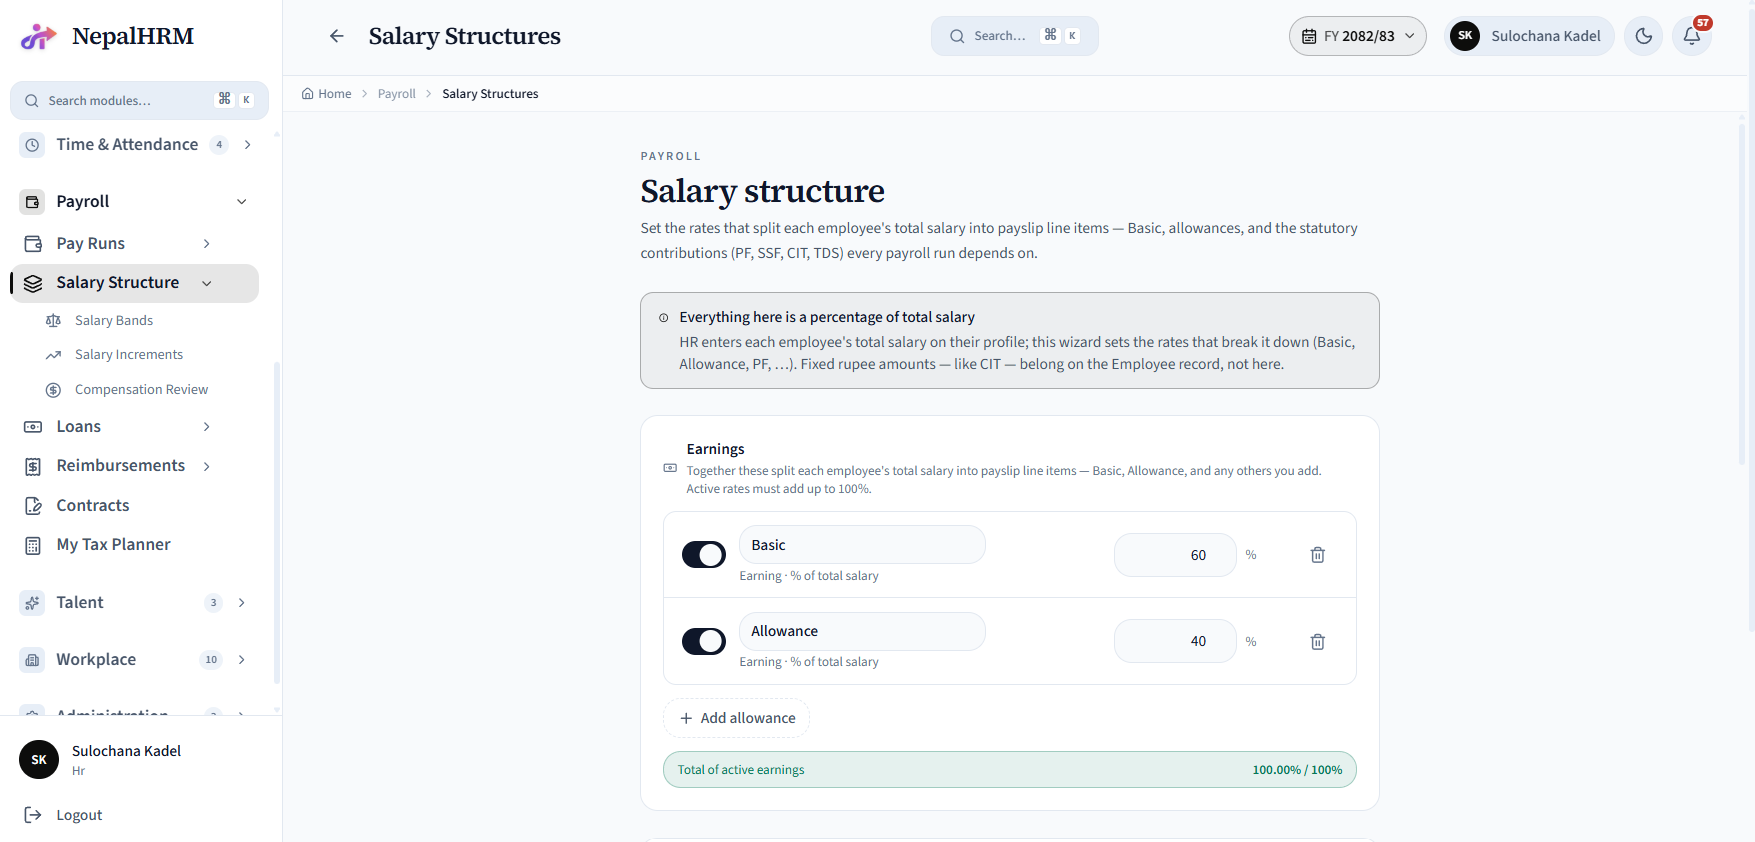
Templates that assemble a paycheck from components (Basic, HRA, DA, Transport, PF, Tax). One structure per role / band; assign employees to a structure to inherit its components.
Setup
- Components: Salary Structures → Components → define Basic / HRA / DA / Transport / PF / Tax with calculation type (fixed or % of basic/gross/ctc).
- Pay Groups: bundle employees by pay schedule (monthly full-time, monthly contractor).
- Employee Salary: assign each person a structure + CTC; components compute on every payroll run.
- Advance Salary: handles ad-hoc advances that get deducted from a future payslip.
Day-to-day operations
- Edit a structure → next payroll run picks up the new component automatically.
- Bulk assign: Salary Structures → row → "Apply to All" or filter by department.
Salary Bands
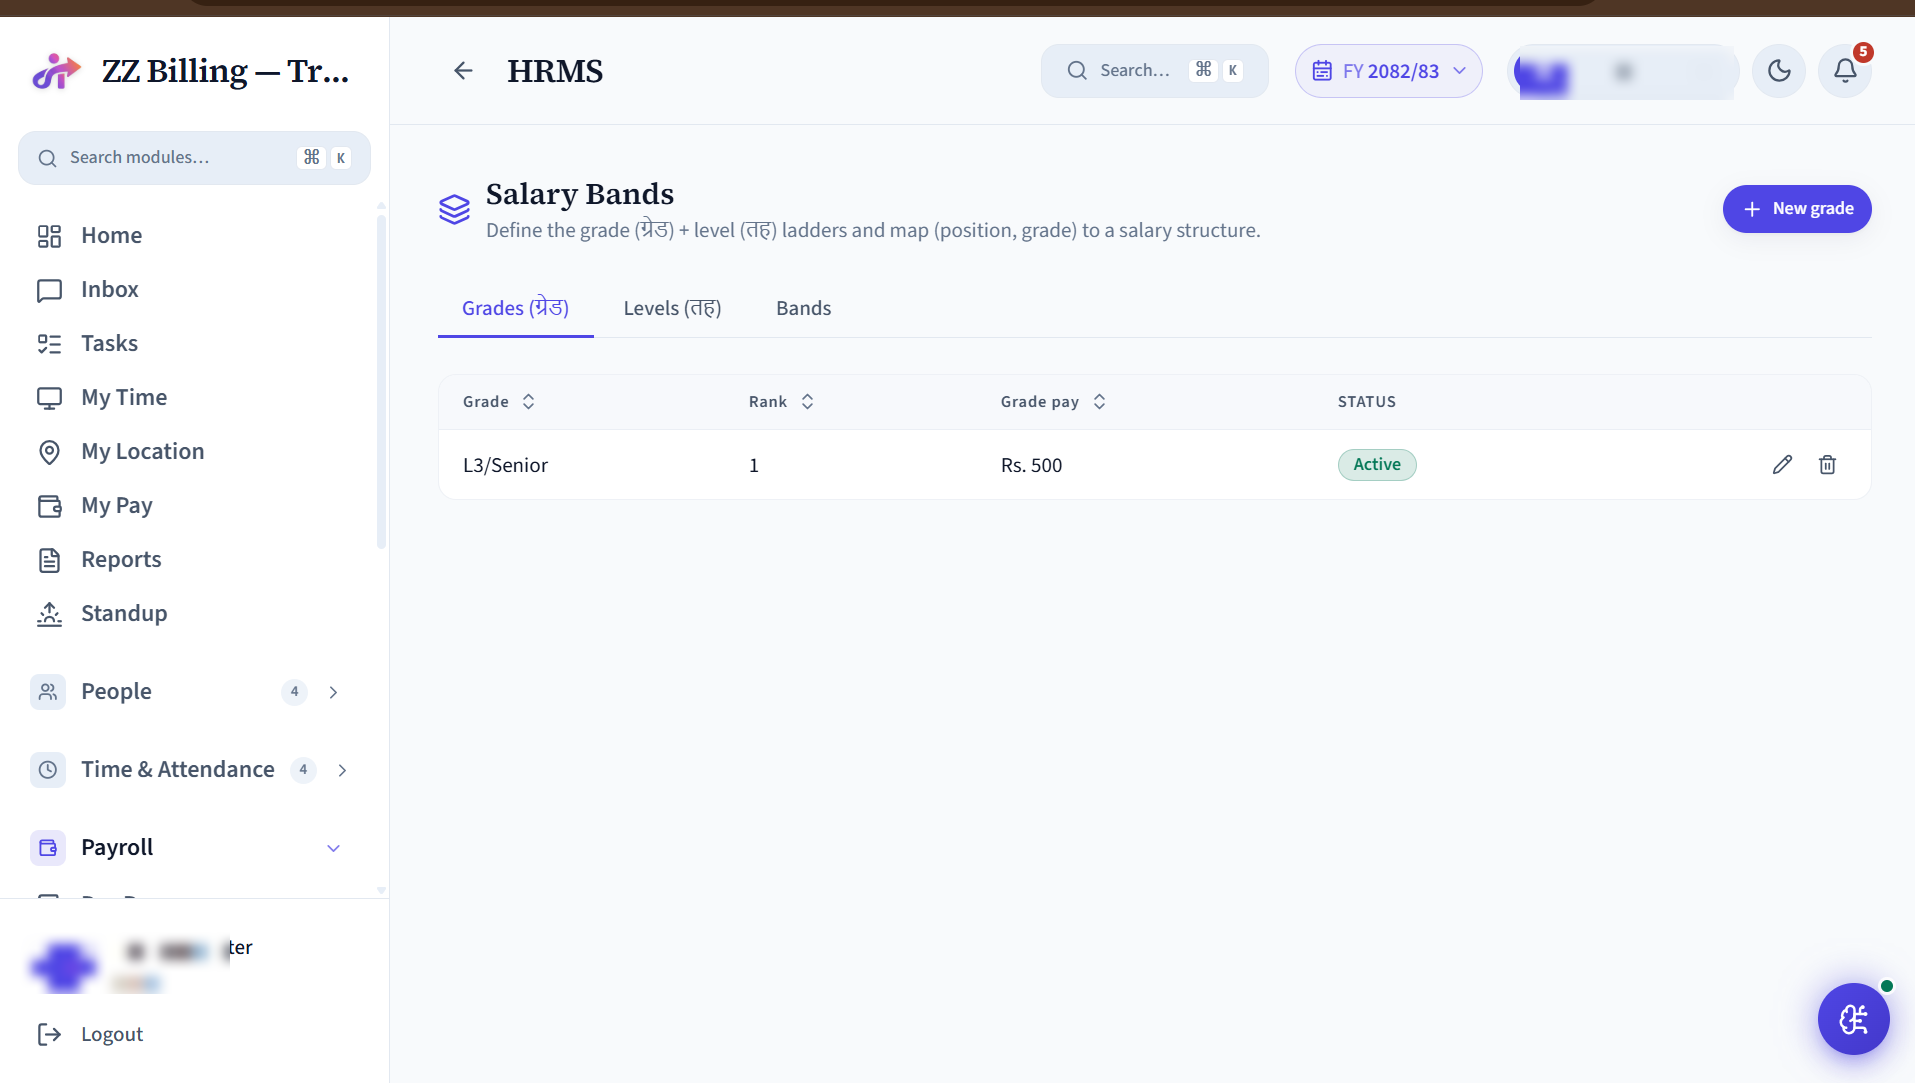
Grade-based pay scales - define bands and ranges per position so salaries stay consistent and within policy.
Setup
- Create bands with min / mid / max per grade or position.
Day-to-day operations
- Check offers and increments against the band before approving.
Salary Increments
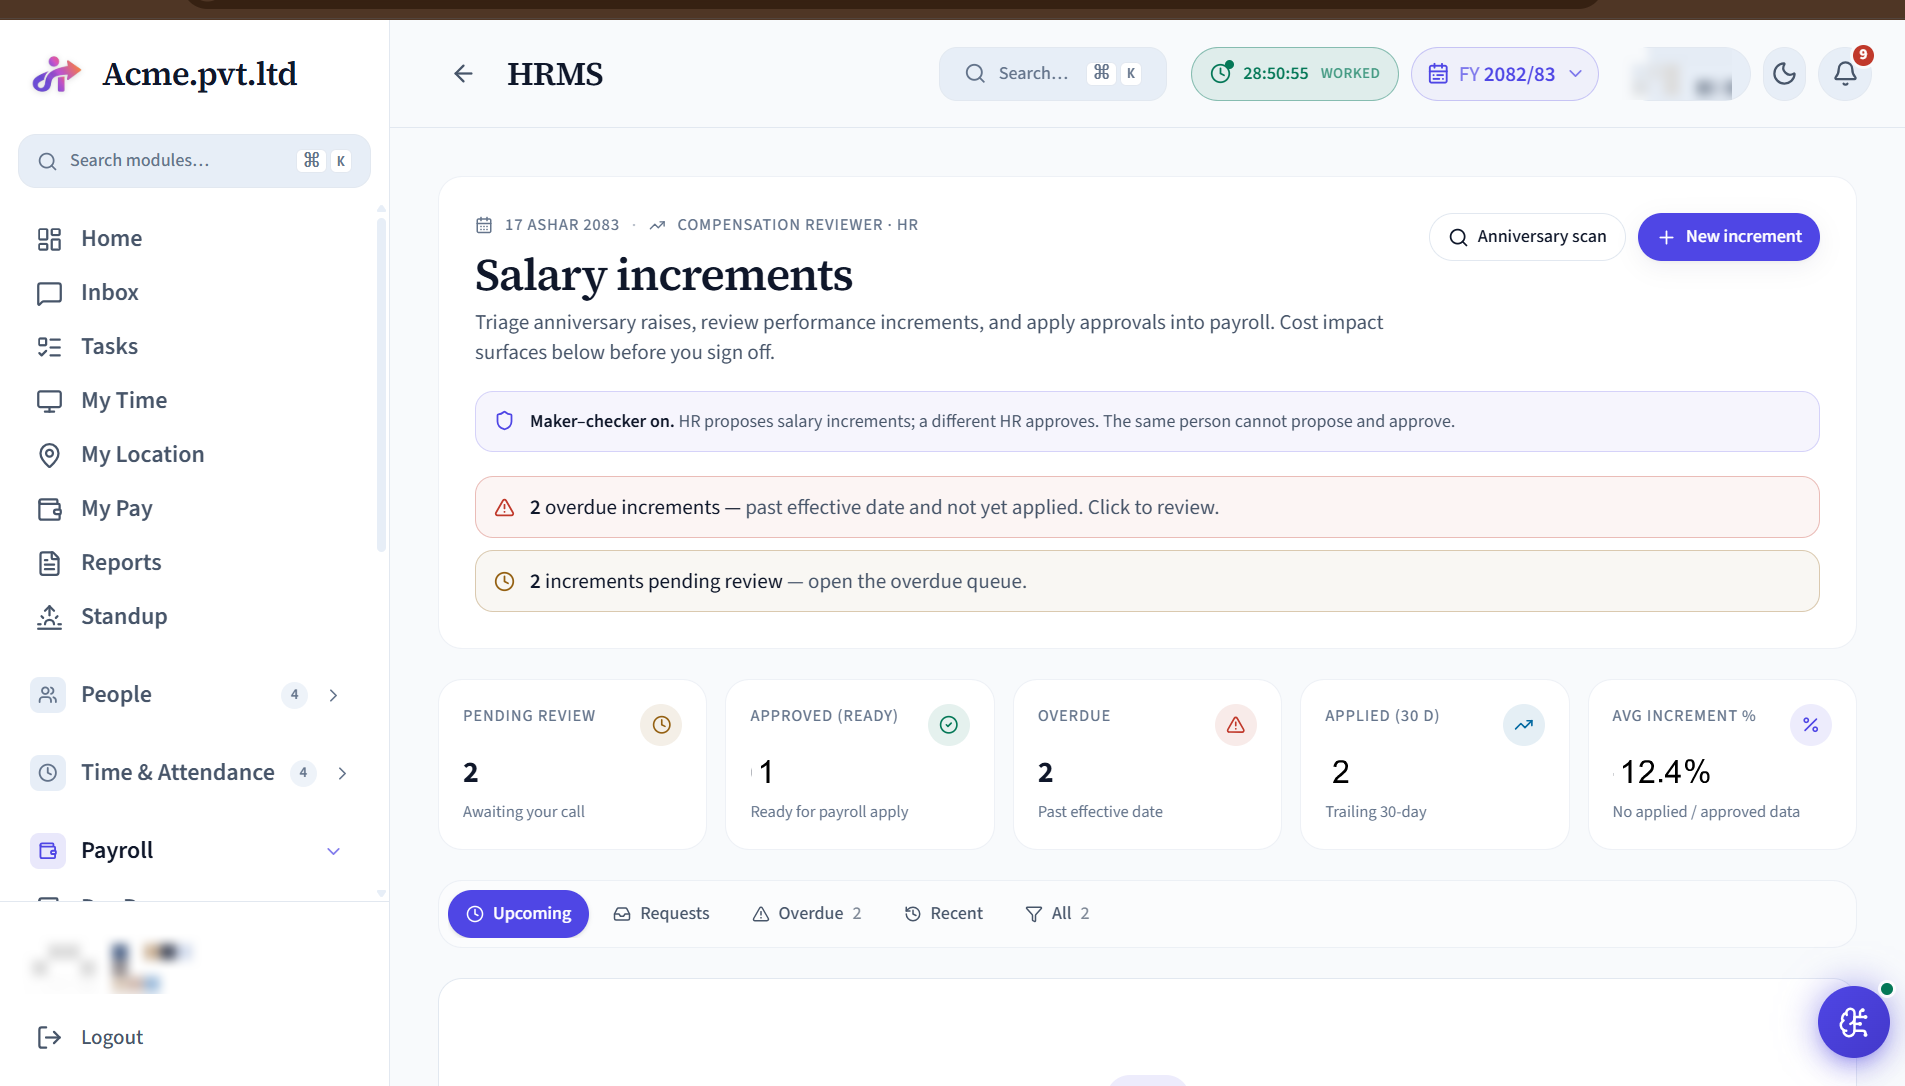
Yearly + performance + promotion increments. Workflow: Requested → Approved → Applied. The dashboard surfaces increments overdue (more than N days past the proposed effective date) so HR doesn't miss them.
Setup
- Payroll Settings → set the increment cycle (anniversary-based or January cohort).
Day-to-day operations
- Run Anniversary Scan: surfaces every employee whose increment is due in the next 30 days.
- Request Increment: HR / manager files with old + new salary + effective date.
- Approve → Apply: the new salary takes effect from the proposed date; old contract supersedes.
Compensation Review
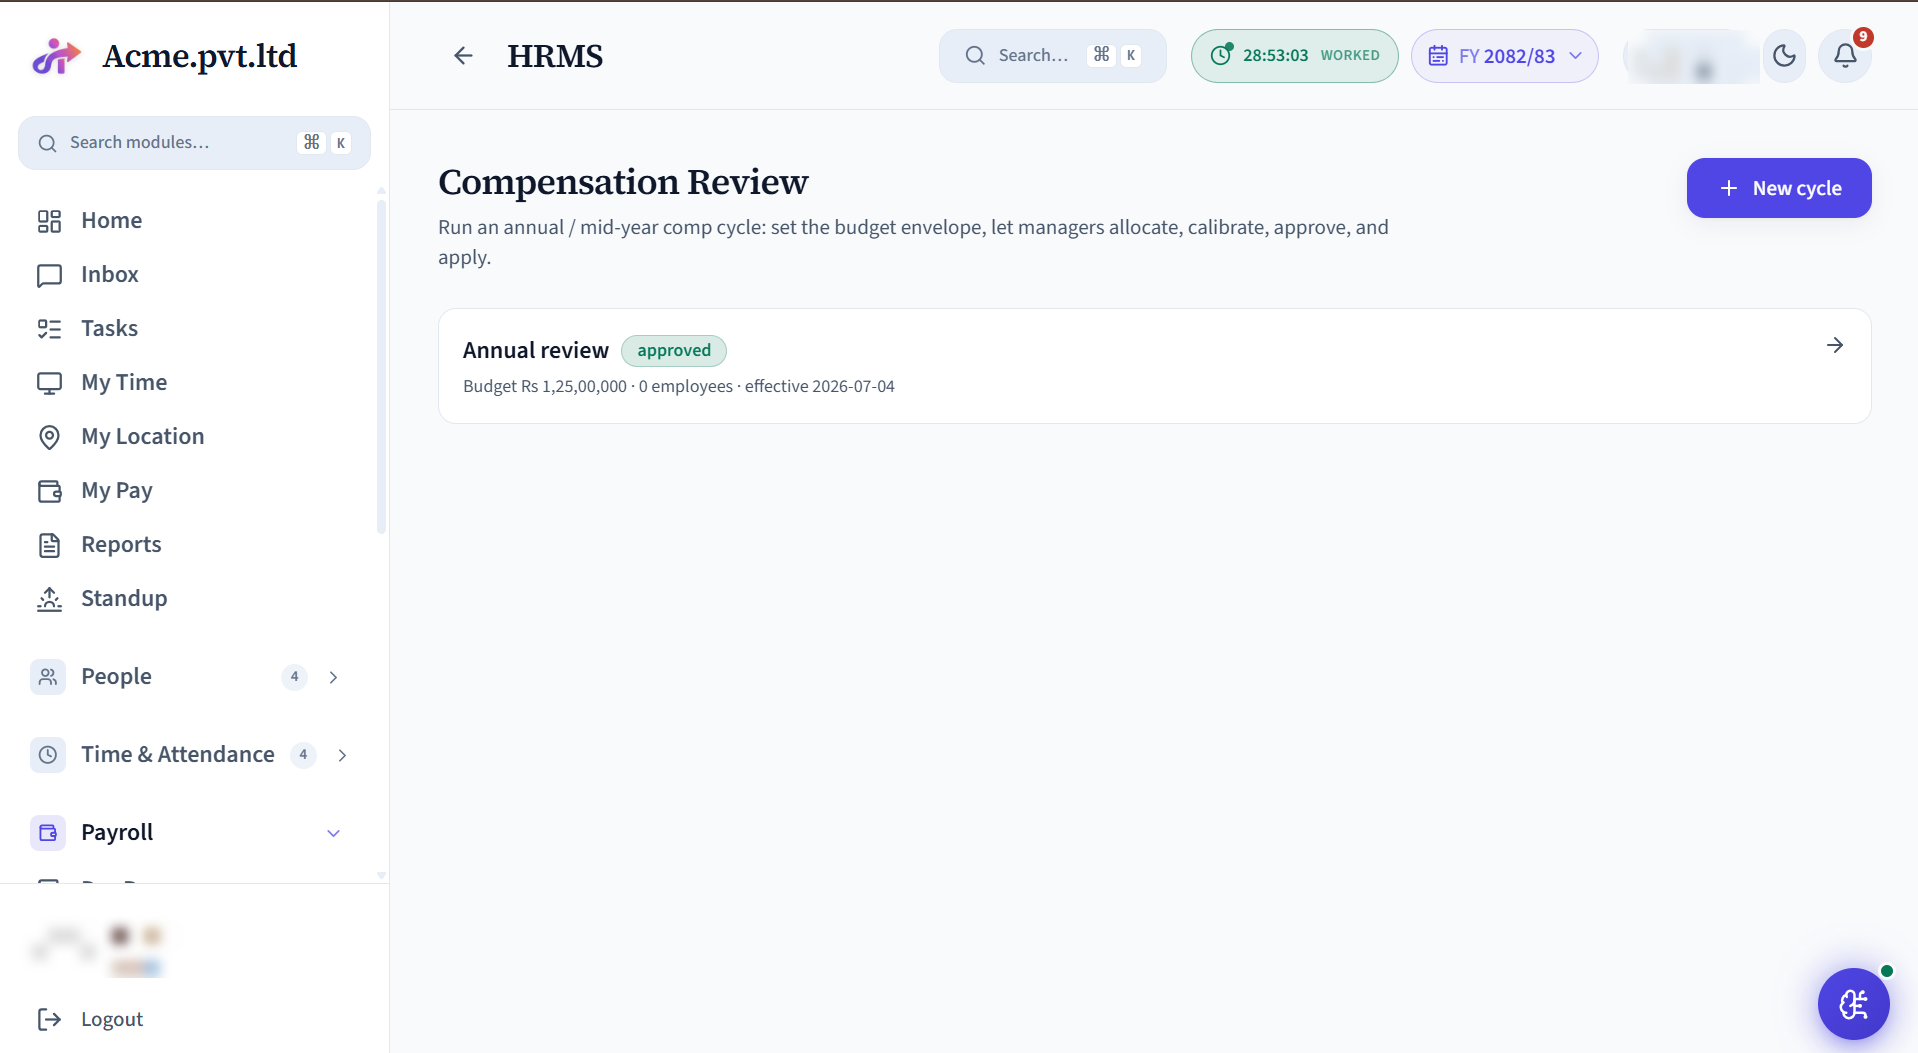
The increment / calibration cycle - run a comp review against a budget envelope, calibrate raises across the team, then approve.
Setup
- Open a cycle and set the budget envelope.
Day-to-day operations
- Managers propose, HR calibrates, approve → increments post to payroll.
Loans
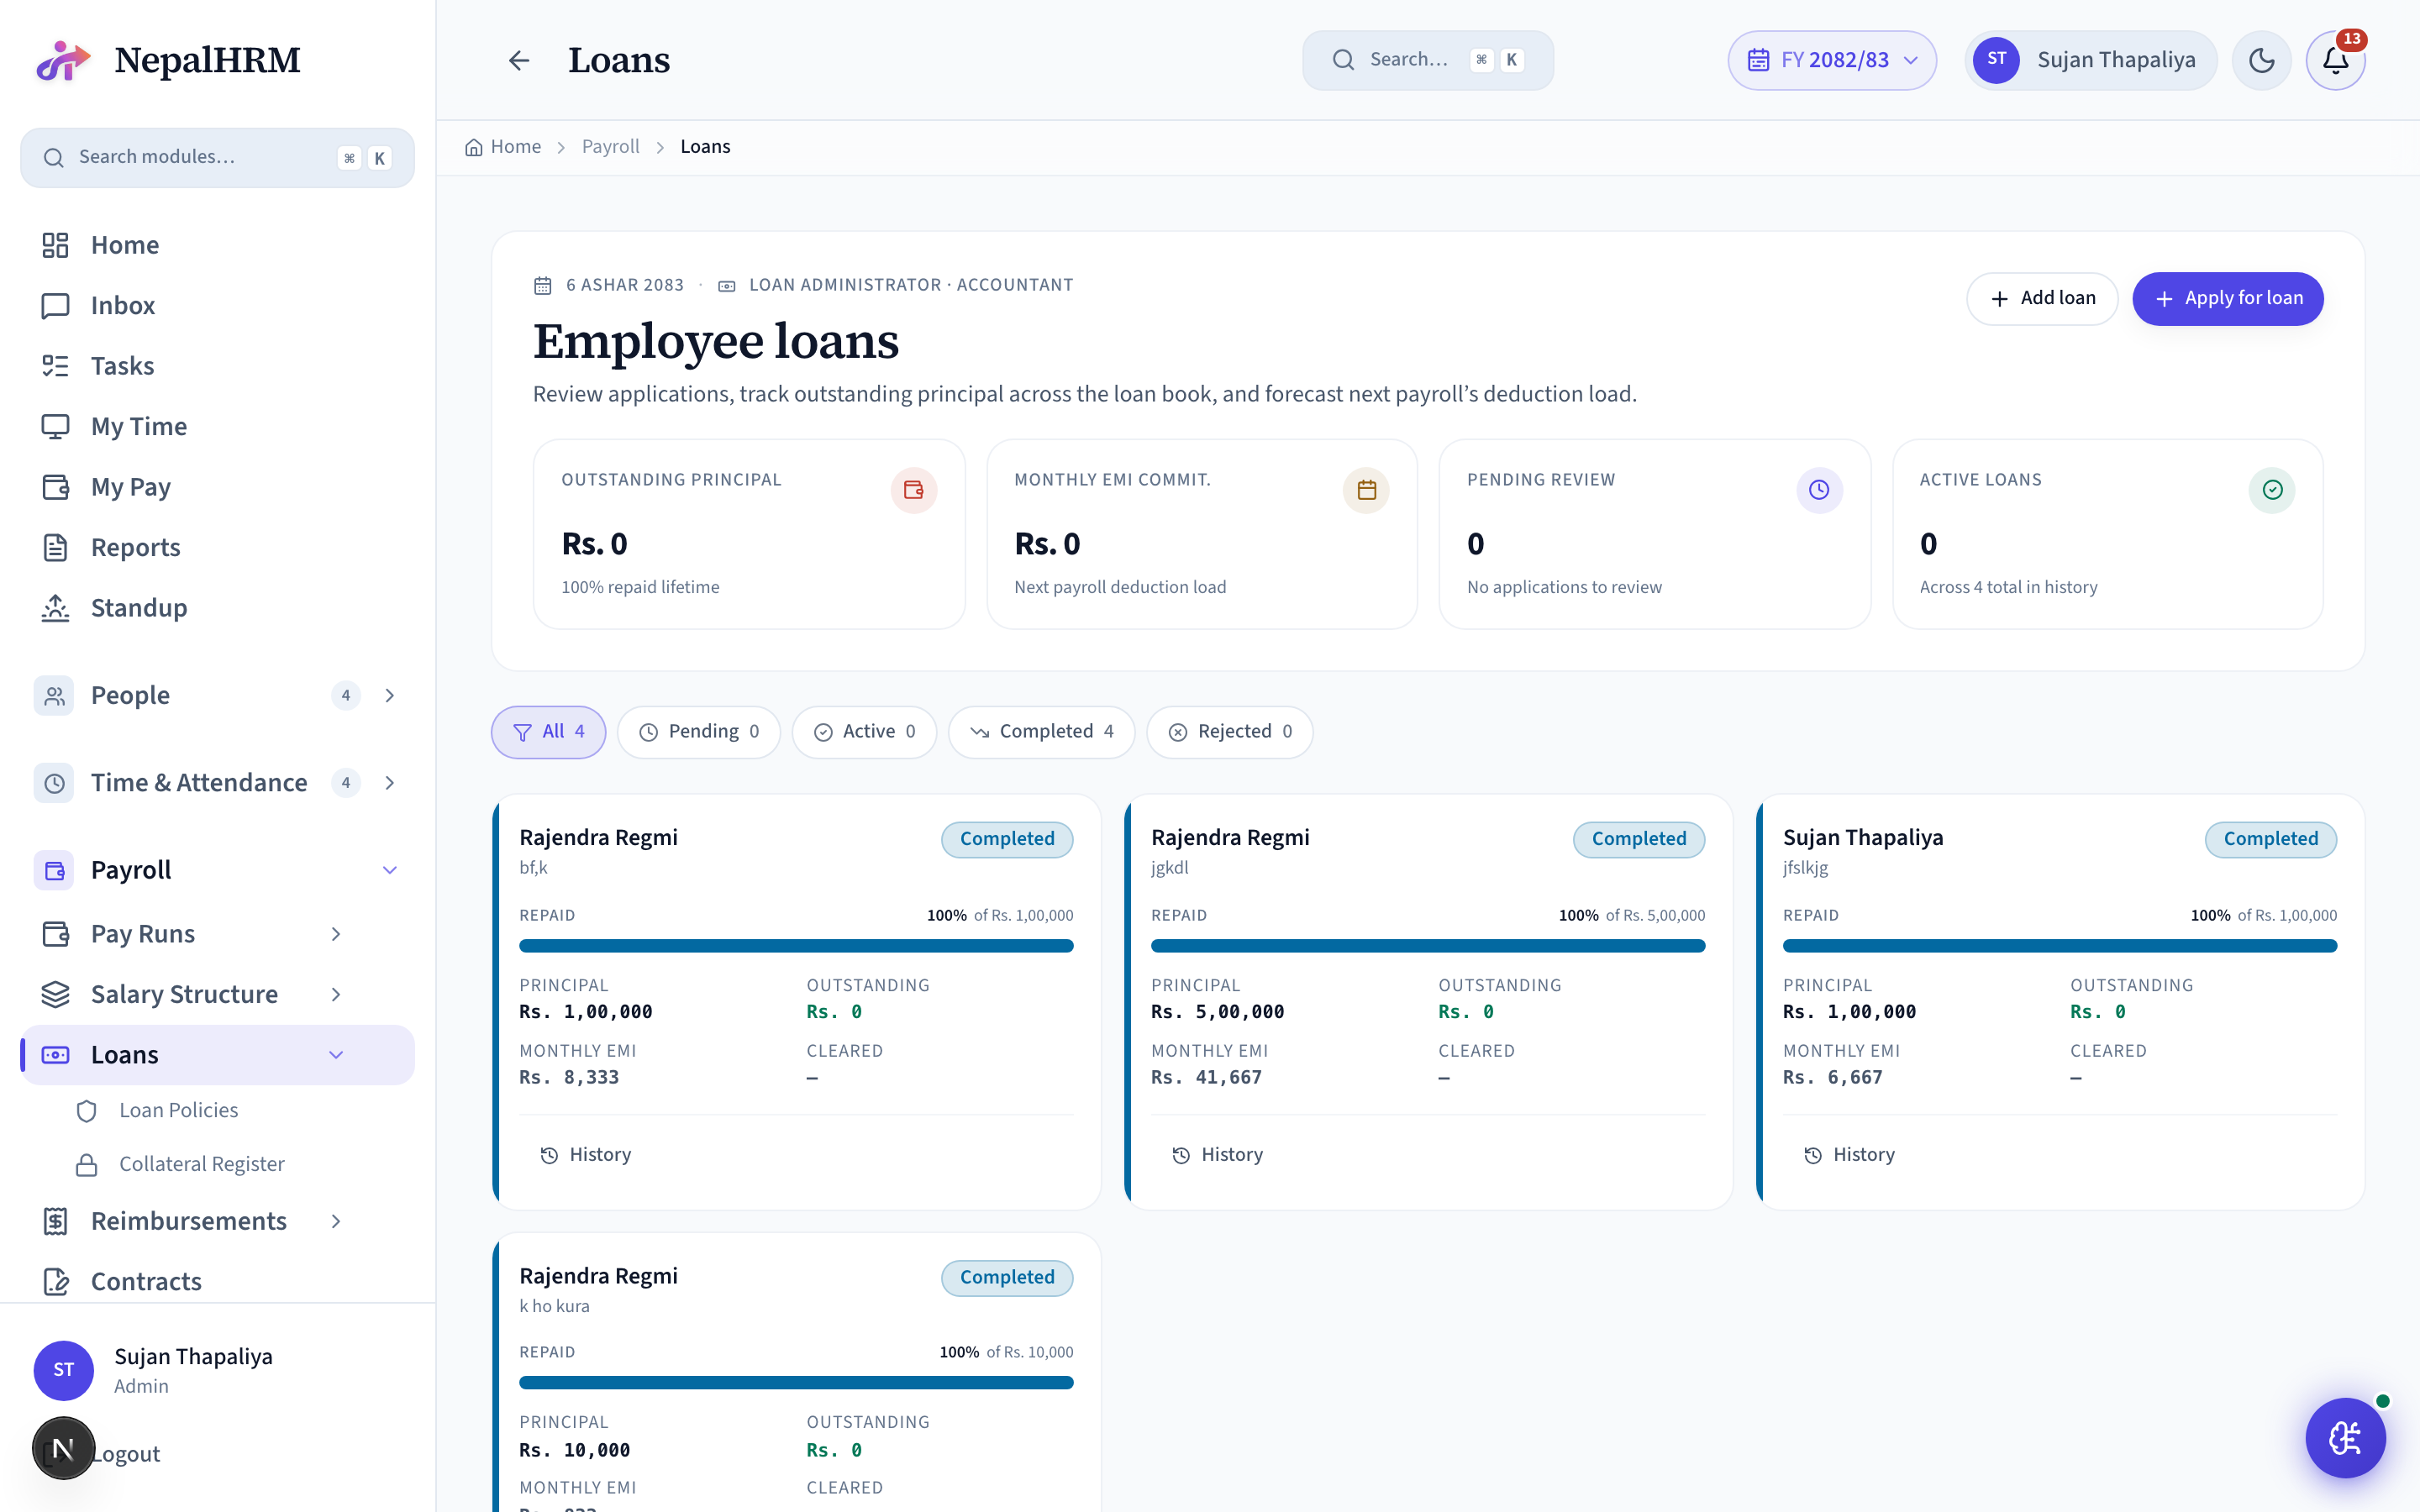
Employee loans (housing, education, family medical) with monthly EMI deductions. HR approves; payroll deducts the monthly amount automatically until the remaining balance hits zero.
Setup
- Salary Structures → enable Loan Deduction component if not already.
Day-to-day operations
- Employee applies: My Loans → Request → amount + reason + repayment period.
- HR approves; the EMI starts in the next payroll run.
- Track remaining balance per employee from the Loans list.
Loan Policies
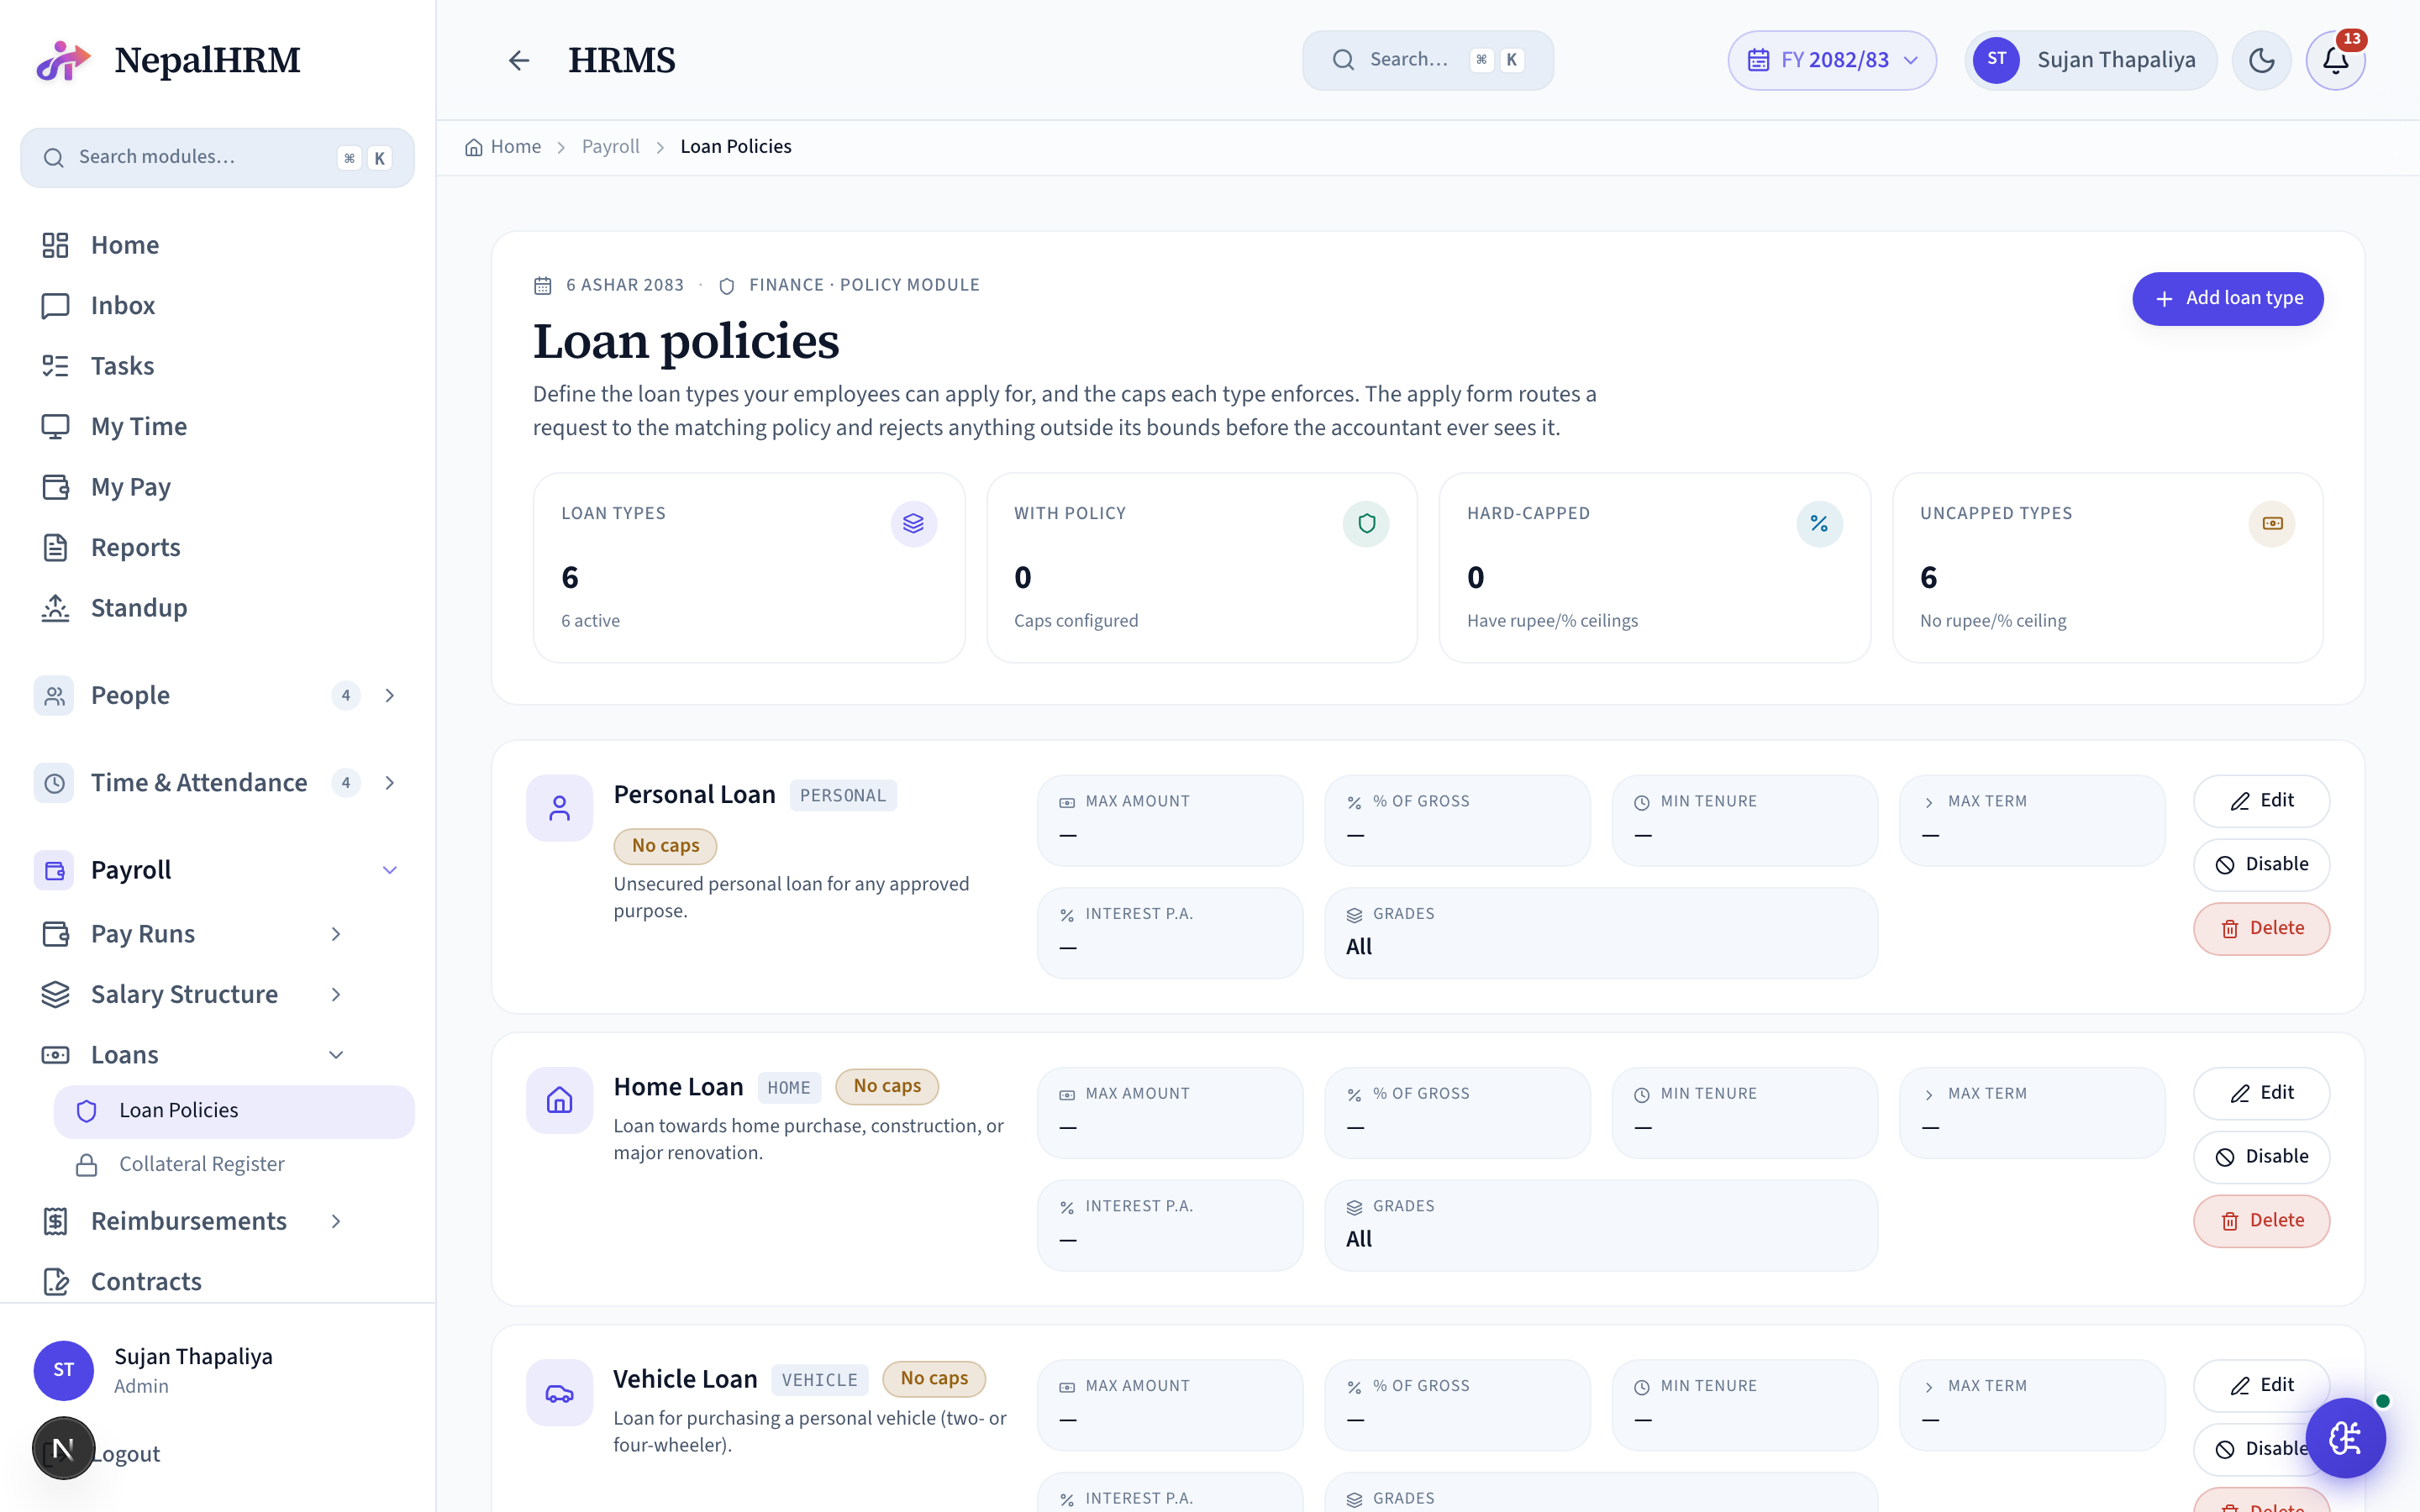
The catalogue of loan types and the per-type caps the apply form enforces - home, personal, festival advance, medical, education.
Setup
- Define each loan type with its caps, tenure and interest.
Day-to-day operations
- Employees apply within policy; approvals enforce the caps automatically.
Collateral Register
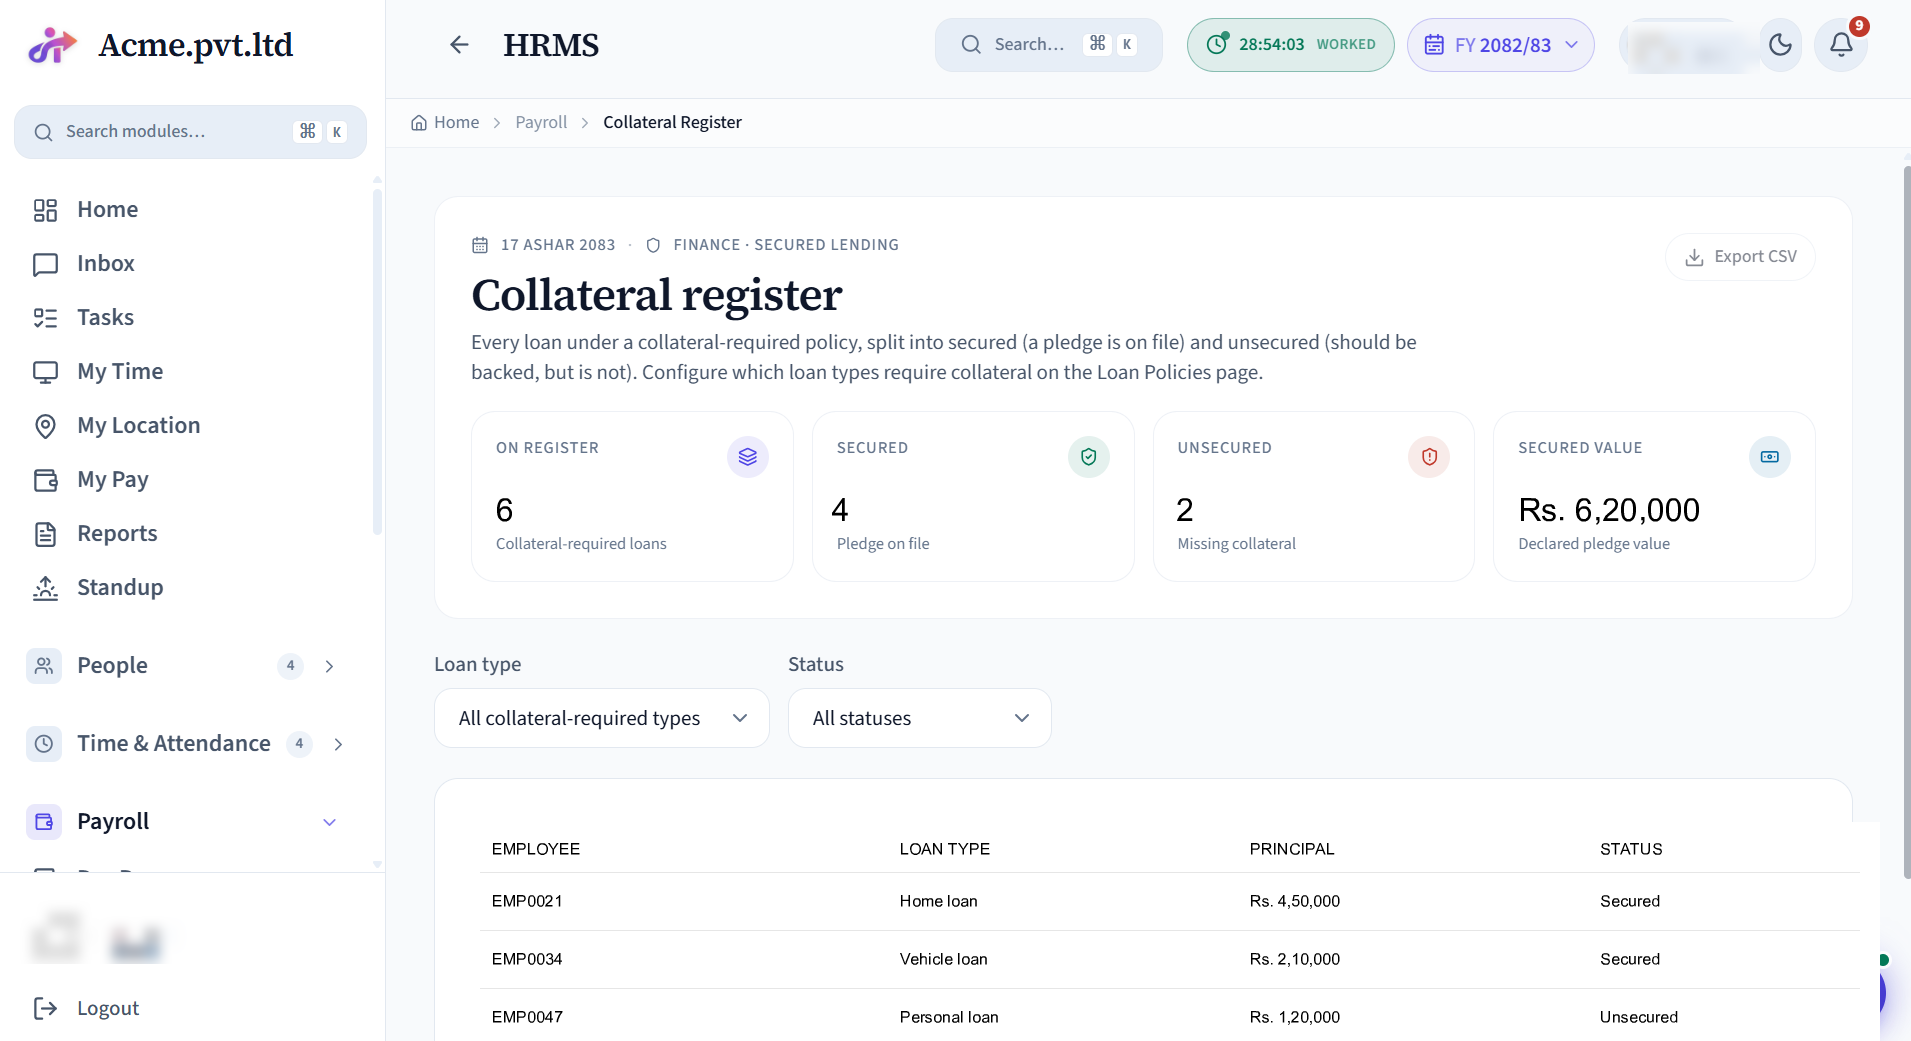
Finance’s secured-lending control list - the collateral pledged against loans.
Setup
- Nothing to configure - it's a register you fill as secured loans are issued.
- Use it with Loans: when a loan is backed by collateral, record the pledged item here.
Day-to-day operations
- Record collateral per secured loan; track it and release on settlement.
Reimbursements
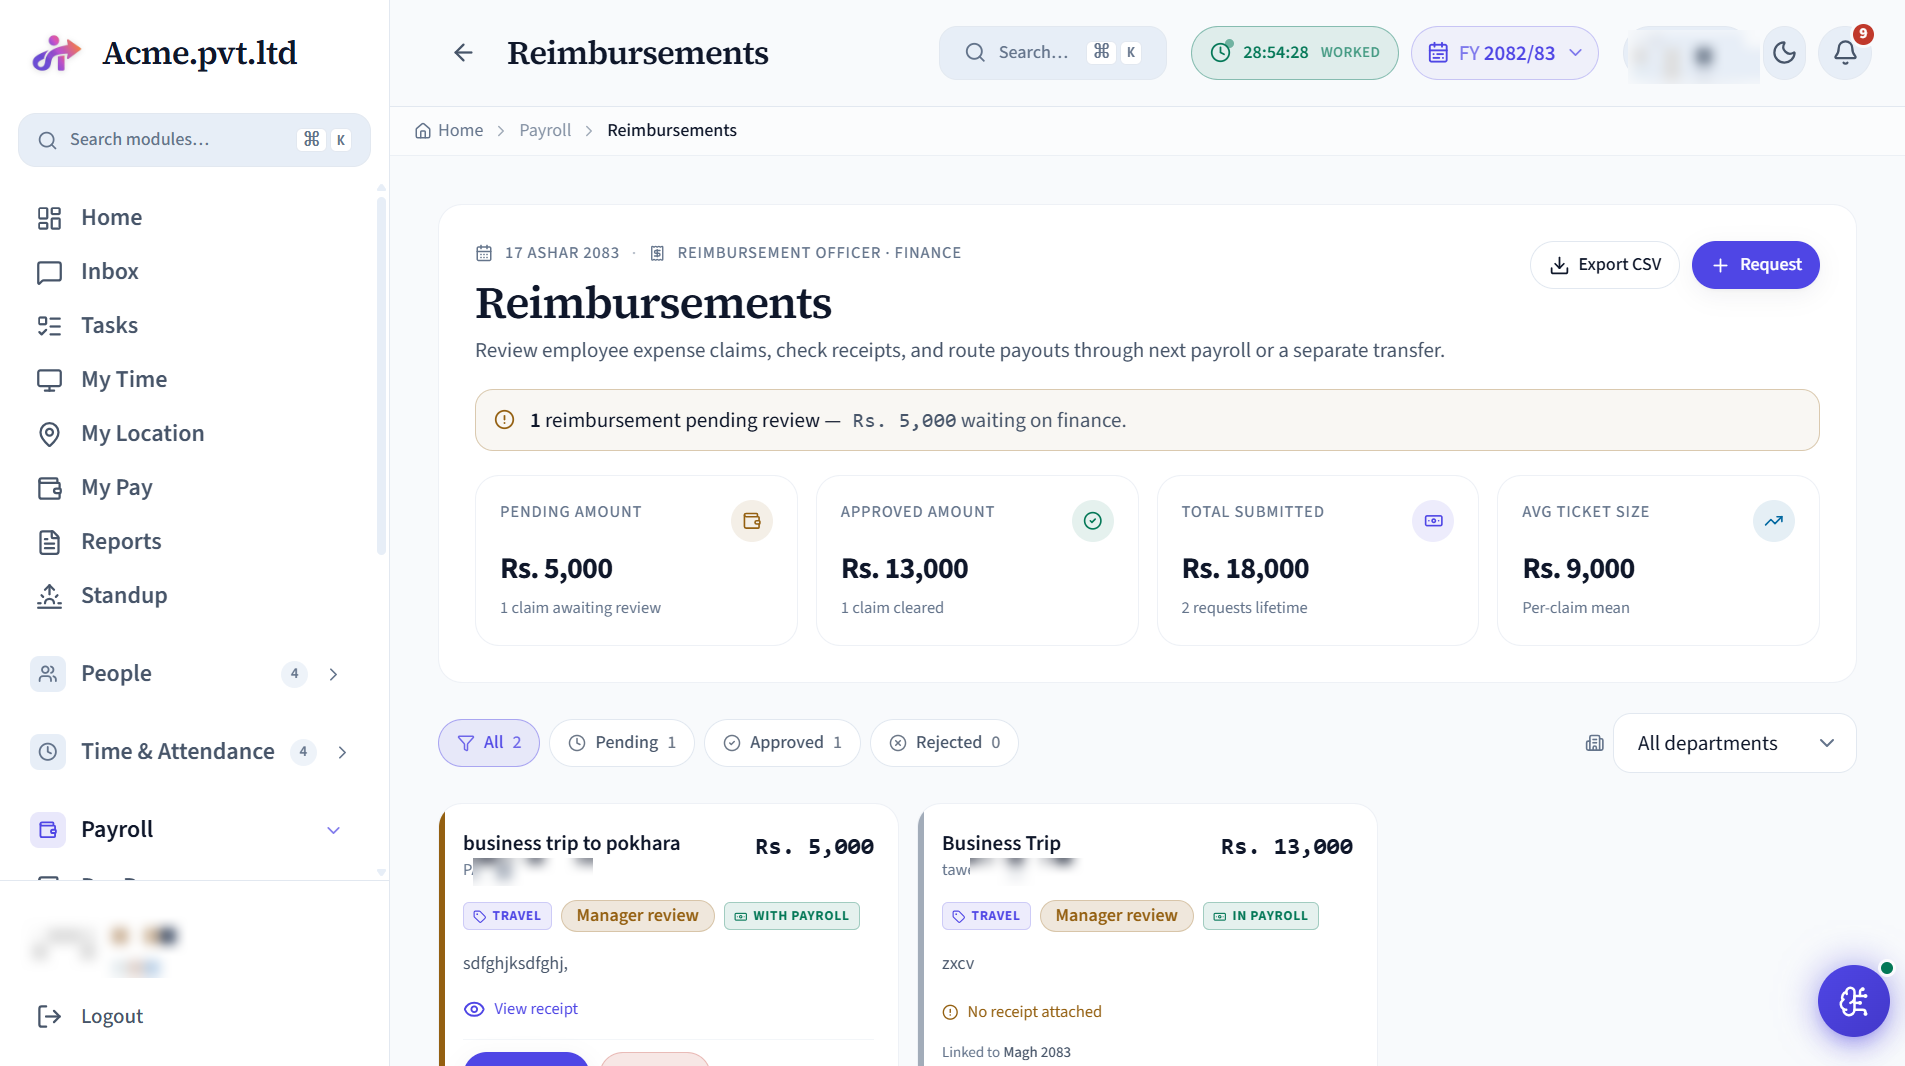
Out-of-pocket expense claims: client lunches, taxi, mobile recharge, training, software subscriptions. Employee uploads receipt; HR approves; amount lands in the next payslip OR via direct bank transfer.
Setup
- Salary Structures → ensure Reimbursement component is in the structure for affected employees.
Day-to-day operations
- Employee files: My Reimbursements → Request → title + amount + receipt photo.
- The reporting manager / team leader can approve or reject from their queue before it reaches HR.
- HR approves with payout method (With Payroll | Direct Transfer).
- Approved reimbursements show on the next payslip; rejected come with a reason note.
Expense Claims
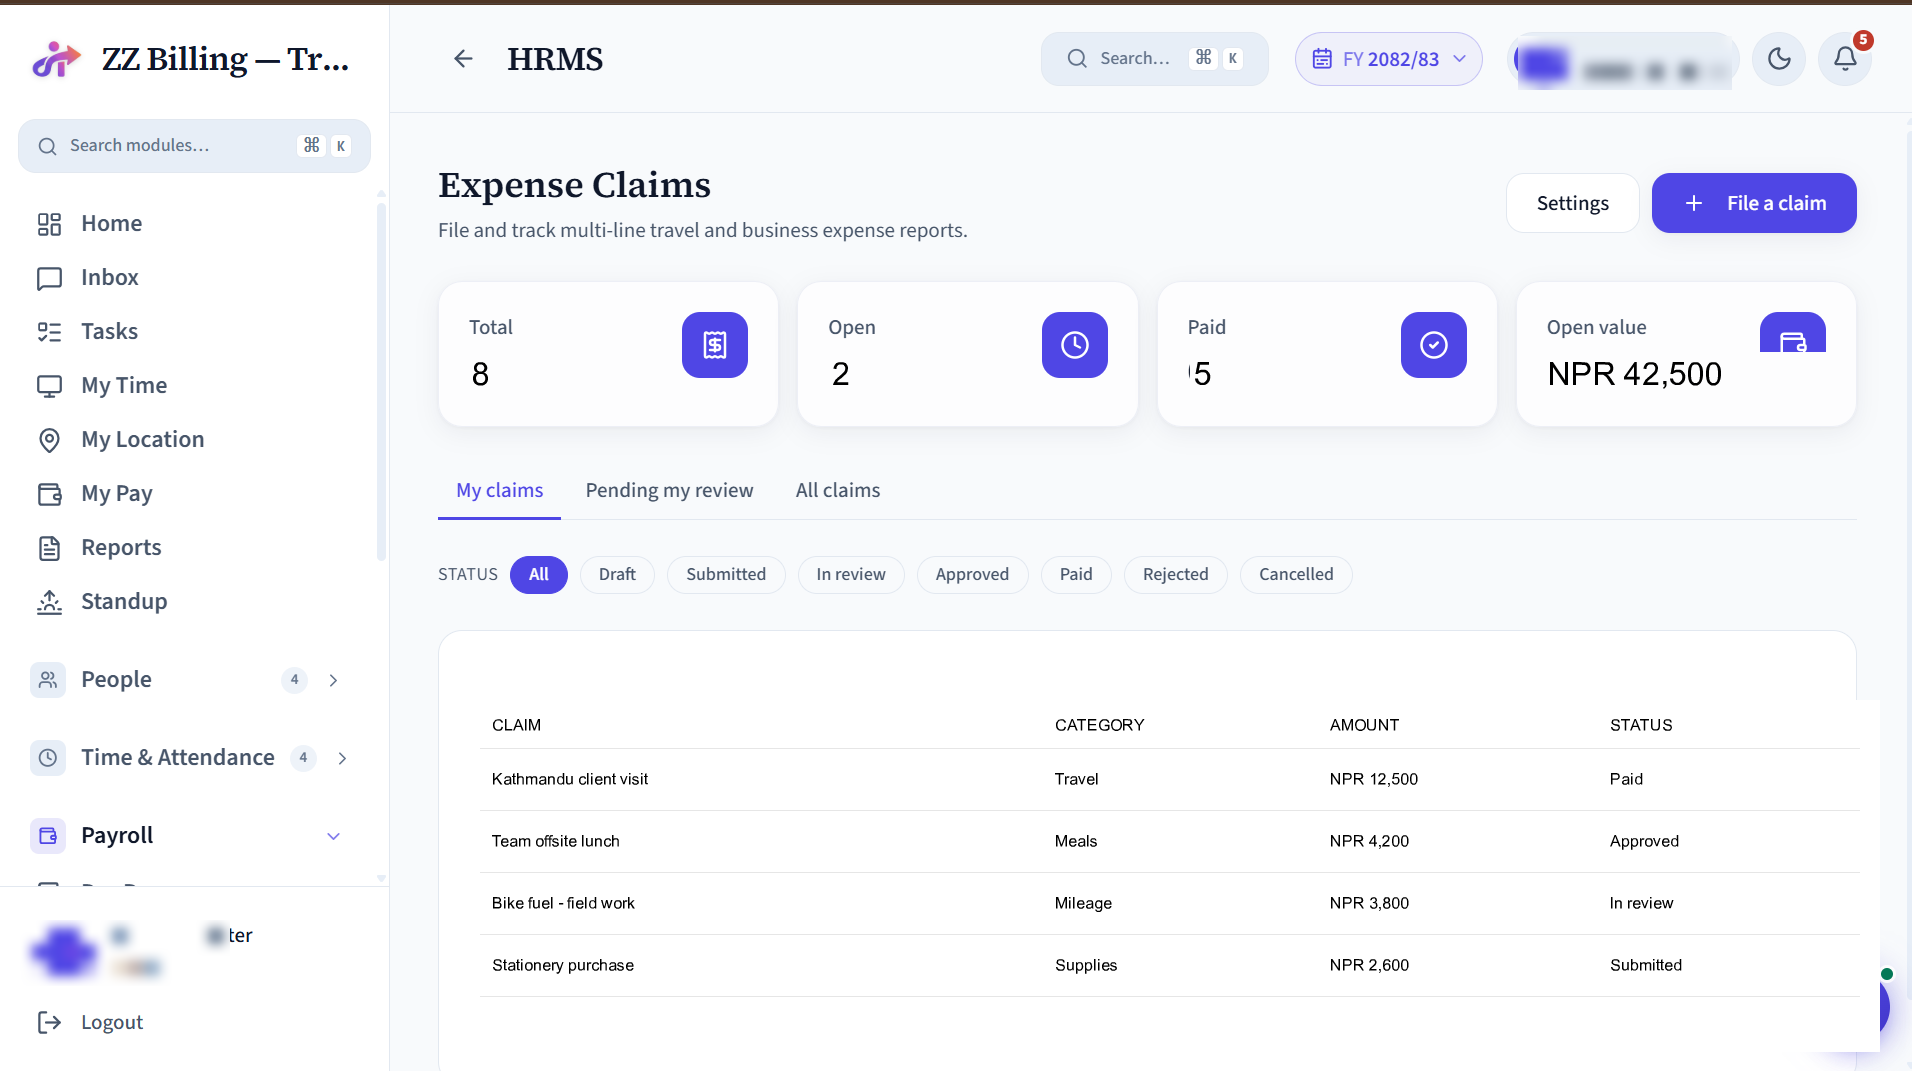
Travel and out-of-pocket expense claims - per diem, mileage and trip costs - with approval and payout through reimbursement / payroll.
Setup
- Define expense categories and the approval chain.
Day-to-day operations
- Employees file with receipts; approve; pay out with the next run.
Contracts
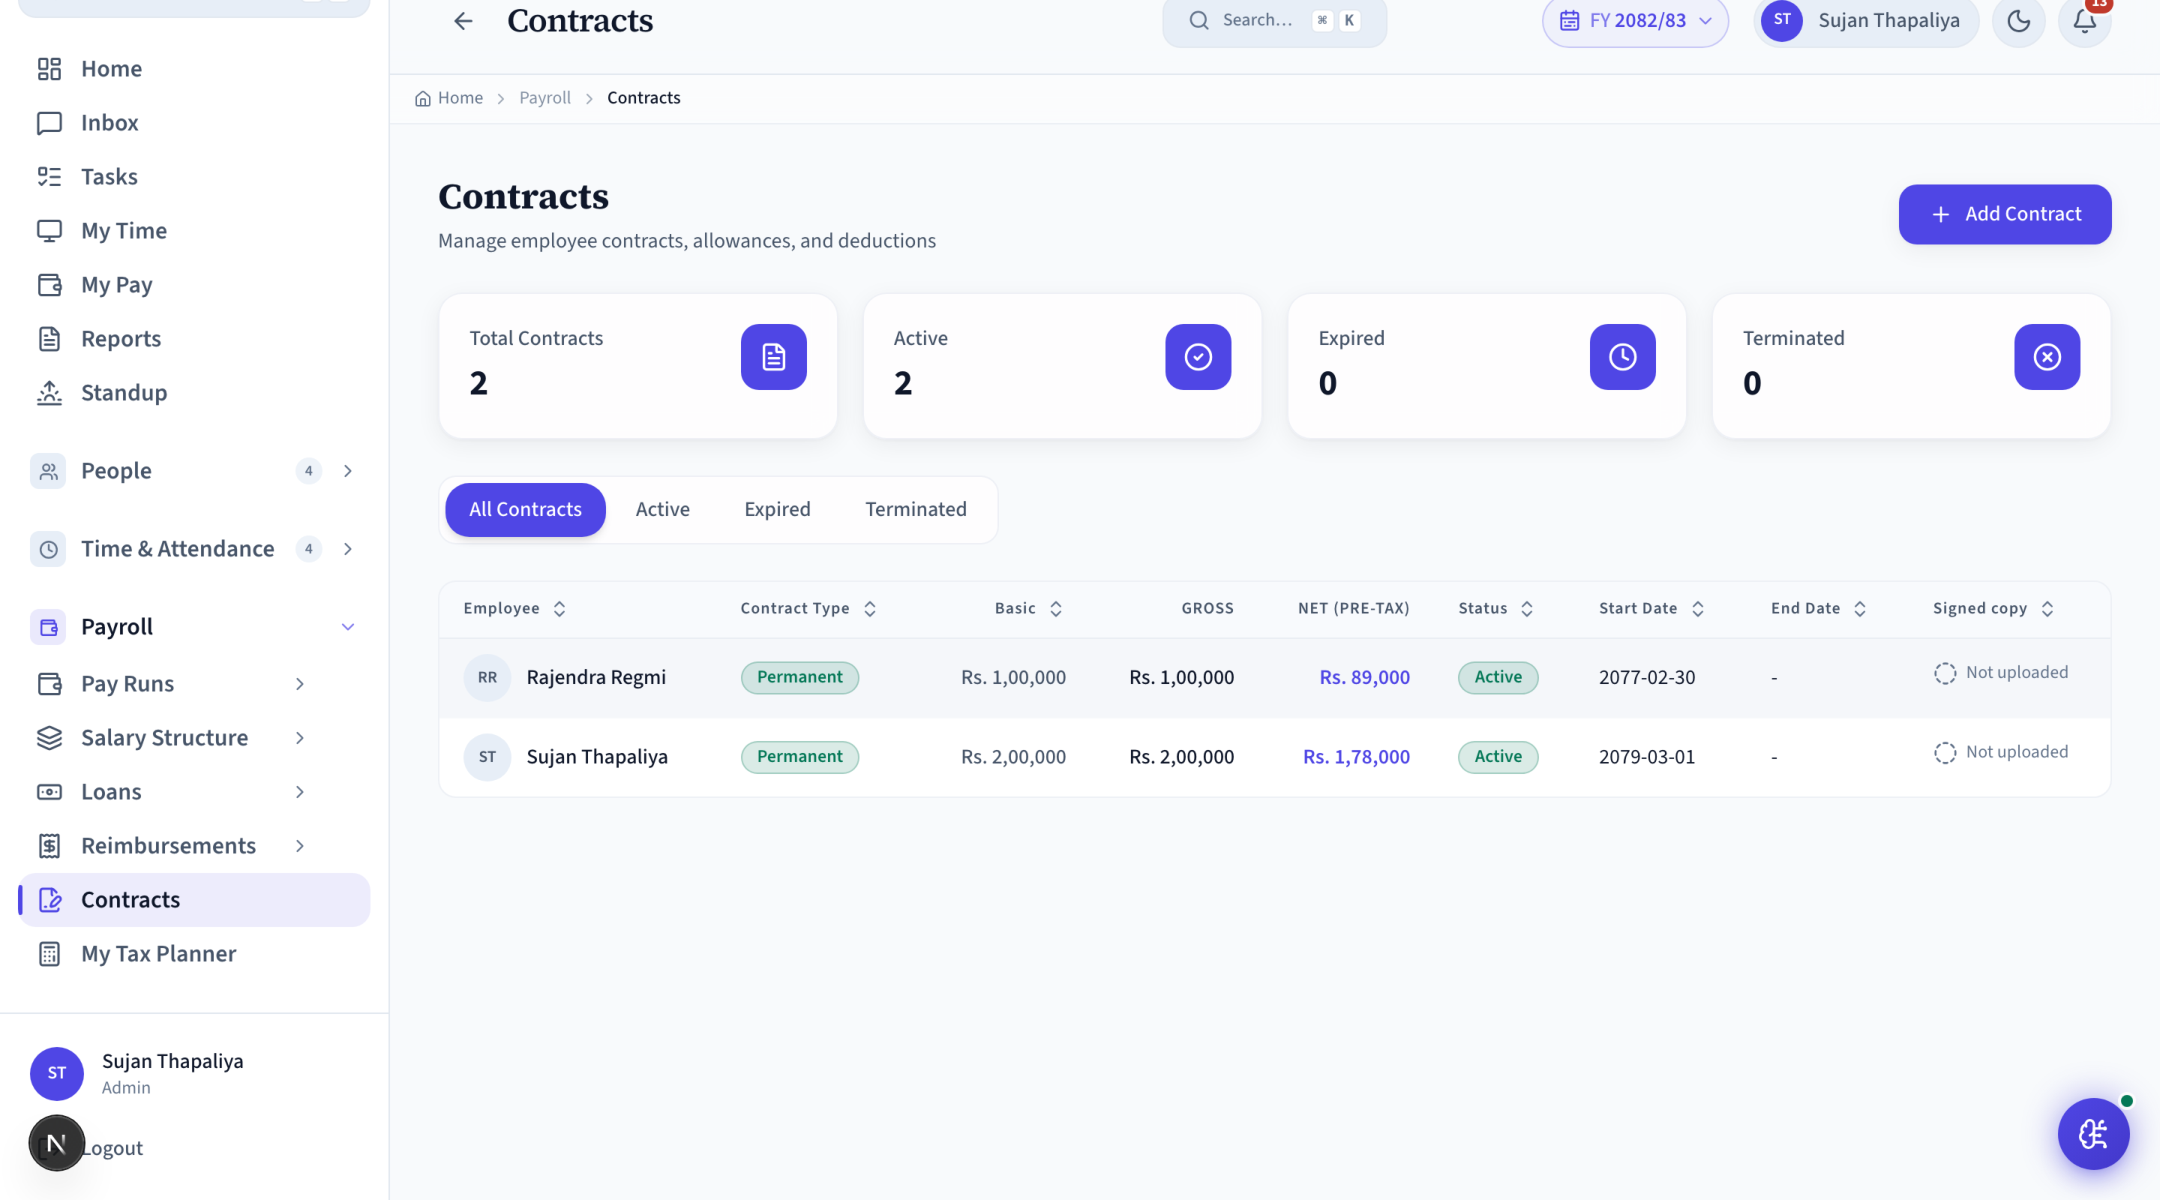
Employment contracts (Permanent, Fixed-term, Probation) with start / end dates, basic salary, allowances, and a link to the signed copy. One active contract per employee; older ones are marked superseded automatically when a new one is created.
Setup
- Contracts → Add Contract → pick employee + type + dates + salary.
- Upload PDF: link the signed copy.
Day-to-day operations
- Track expiring fixed-terms from the Contracts → Expired tab.
- Renew: "Add Contract" with same employee → old one auto-supersedes on save.
My Tax Planner
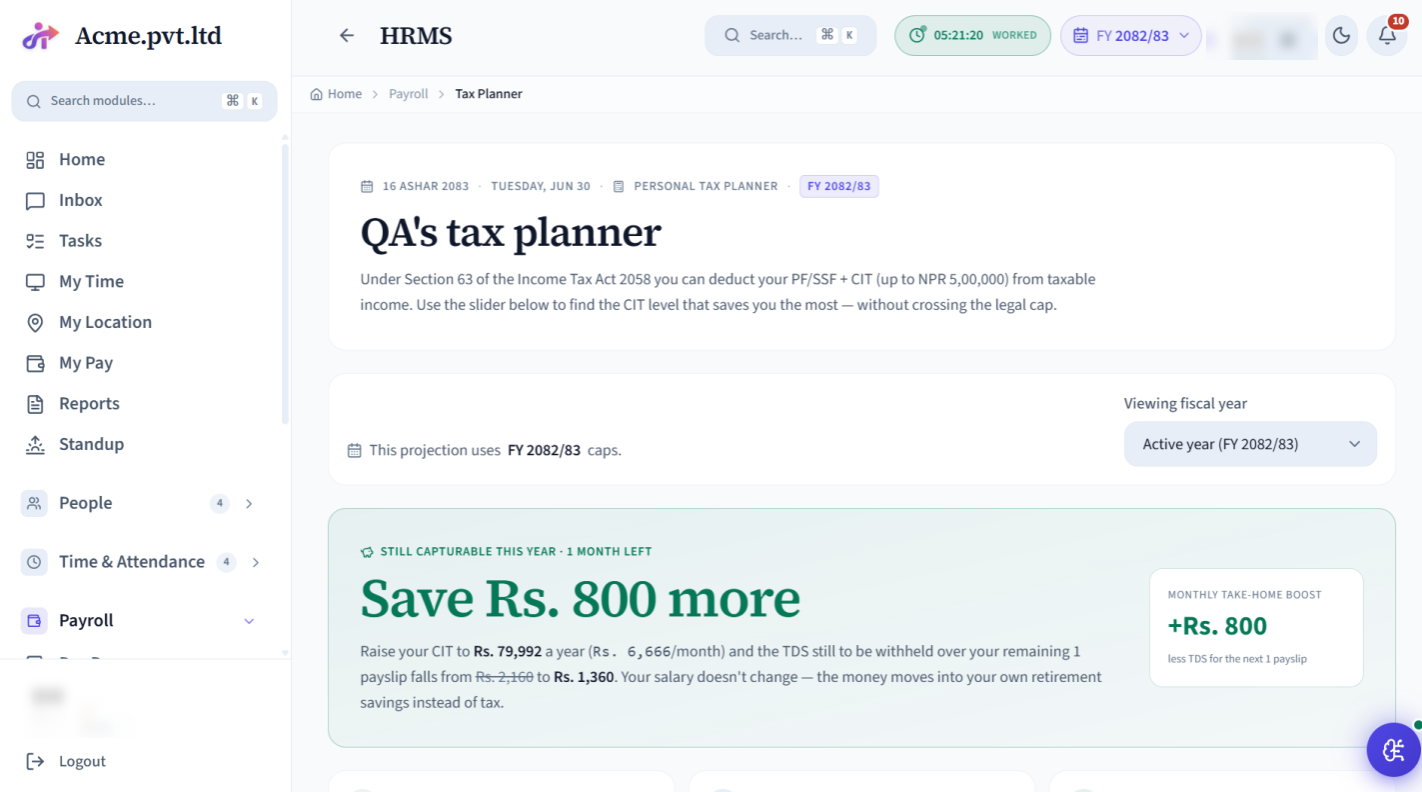
Your own tax planner - self-service. Project your annual income tax for the fiscal year, model the rebates and investments you plan to declare (insurance premium, CIT / retirement contributions, donations), and see the effect on your monthly take-home before you submit declarations to payroll.
Setup
- No setup - open it any time during the fiscal year.
- Have your planned figures ready (insurance premium, CIT / retirement, donations) to model the rebate.
Day-to-day operations
- Enter planned deductions / investments → see projected annual tax and monthly take-home.
- Submit declarations so payroll picks them up in the cumulative tax calculation.
Recruitment
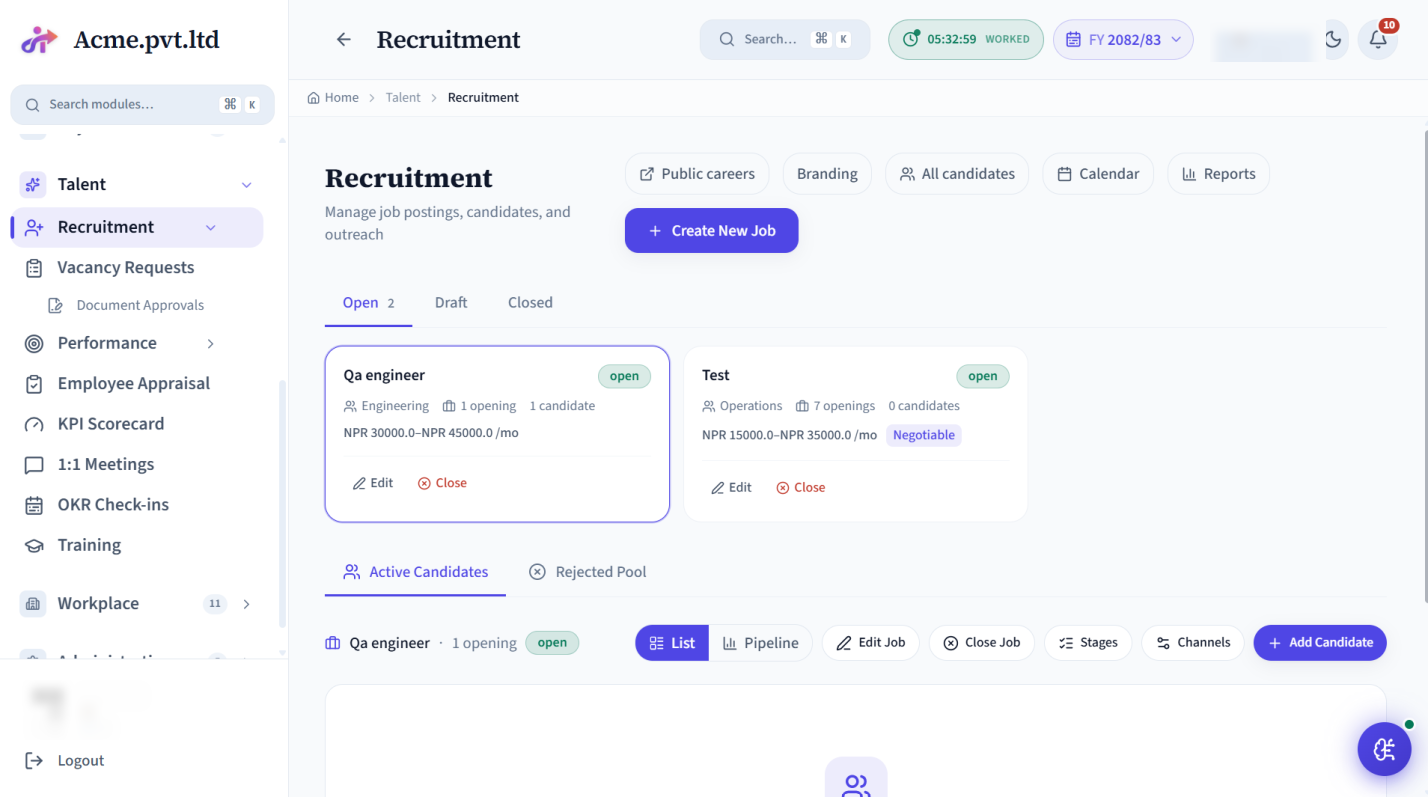
Hiring pipeline. Open requisitions, candidate kanban (Applied → Screening → Interview → Offer → Hired), interview scheduling with calendar integration, evaluation forms with criteria scoring, offer letters, public career page. A new Resume Insights panel reads each uploaded CV and suggests field values - name, email, skills, experience - that you accept one-by-one to fill the candidate record fast.
Setup
- Public career page: Settings → Career Page → enable + branding + about-us copy.
- Add a job: Recruitment → New Job → title + JD + posting period.
- Configure stages: Recruitment → Stages (defaults are Applied / Screening / Interview / Offer / Hired).
Day-to-day operations
- Candidates apply via your public career page, or HR adds them manually.
- Open a candidate → Resume Insights → accept the auto-filled suggestions per field.
- Drag candidates across stages on the kanban.
- Schedule interview → interviewers get a calendar invite.
- Send offer → candidate accepts → onboarding case auto-creates.
Document Approvals
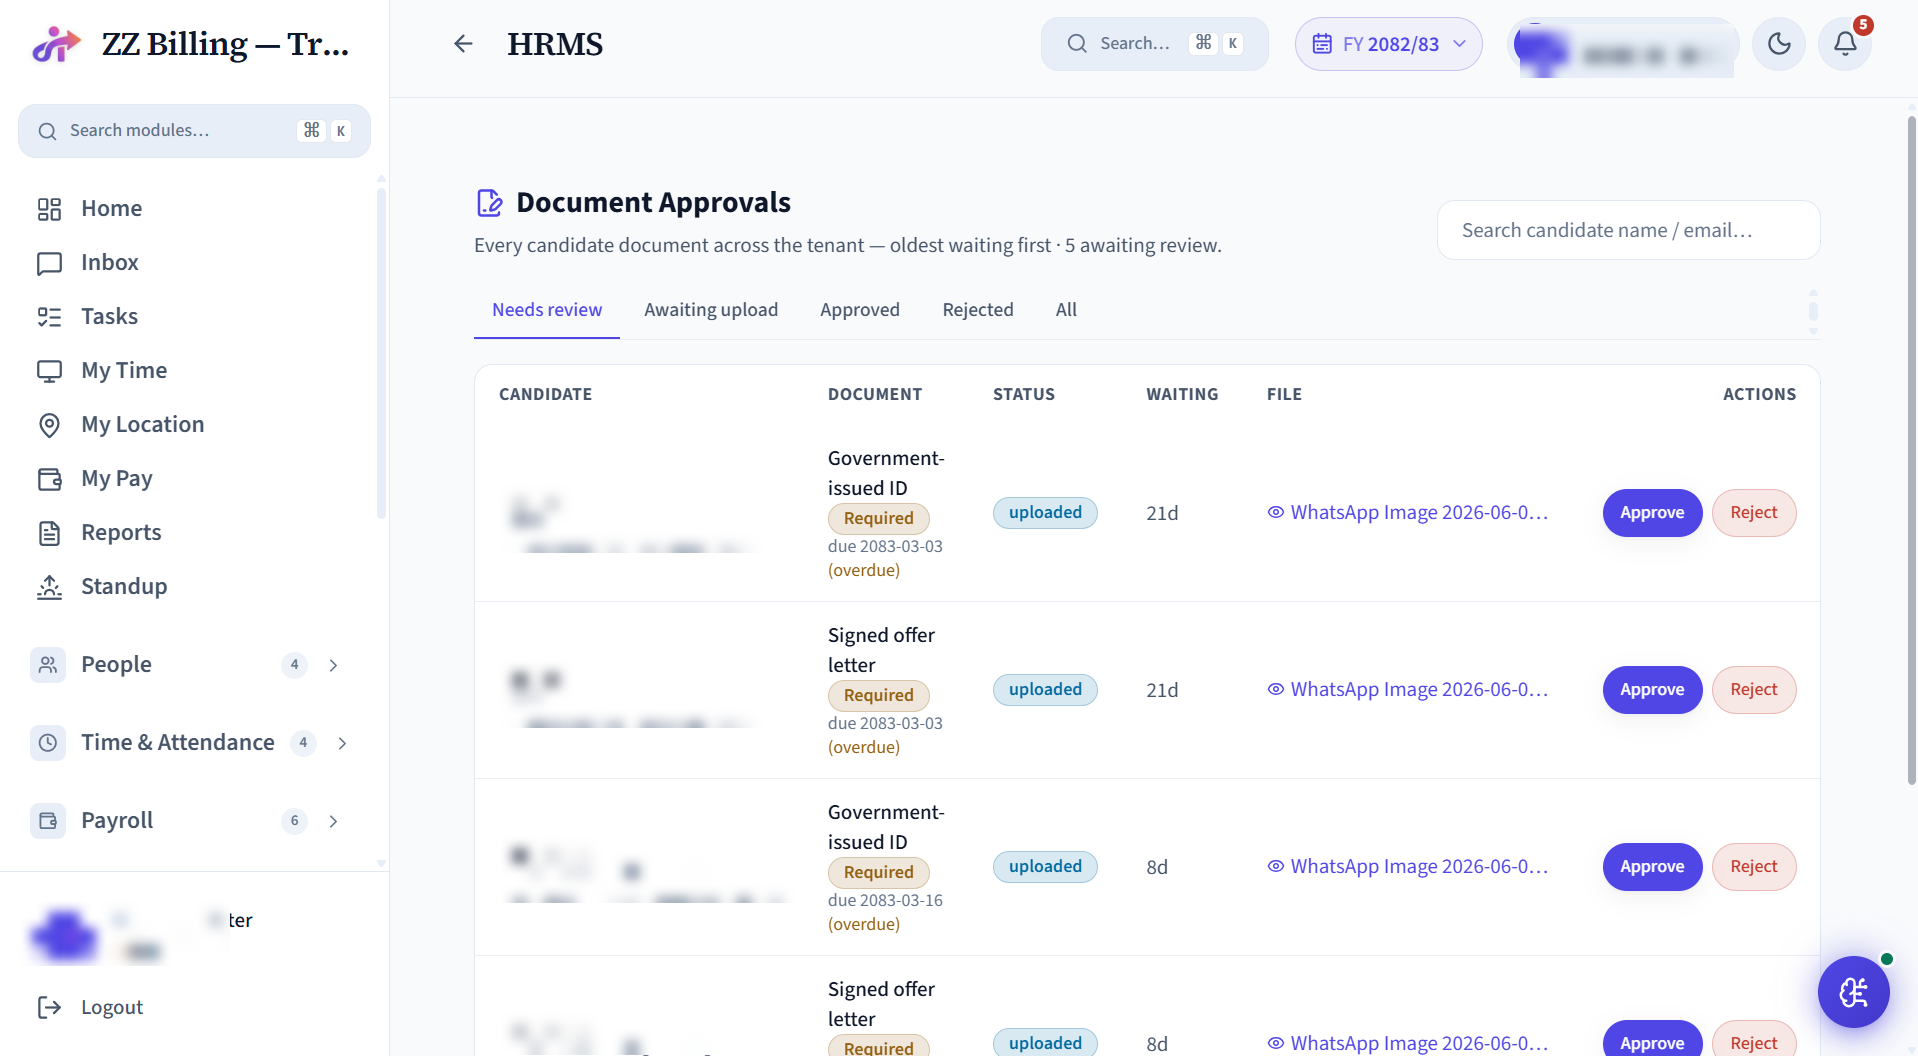
HR’s cross-candidate review queue for uploaded documents (citizenship, PAN, certificates) during hiring and onboarding.
Setup
- Define the required document requests on the role / candidate.
Day-to-day operations
- Review and approve uploads; request a re-upload when something is wrong.
Vacancy Requests
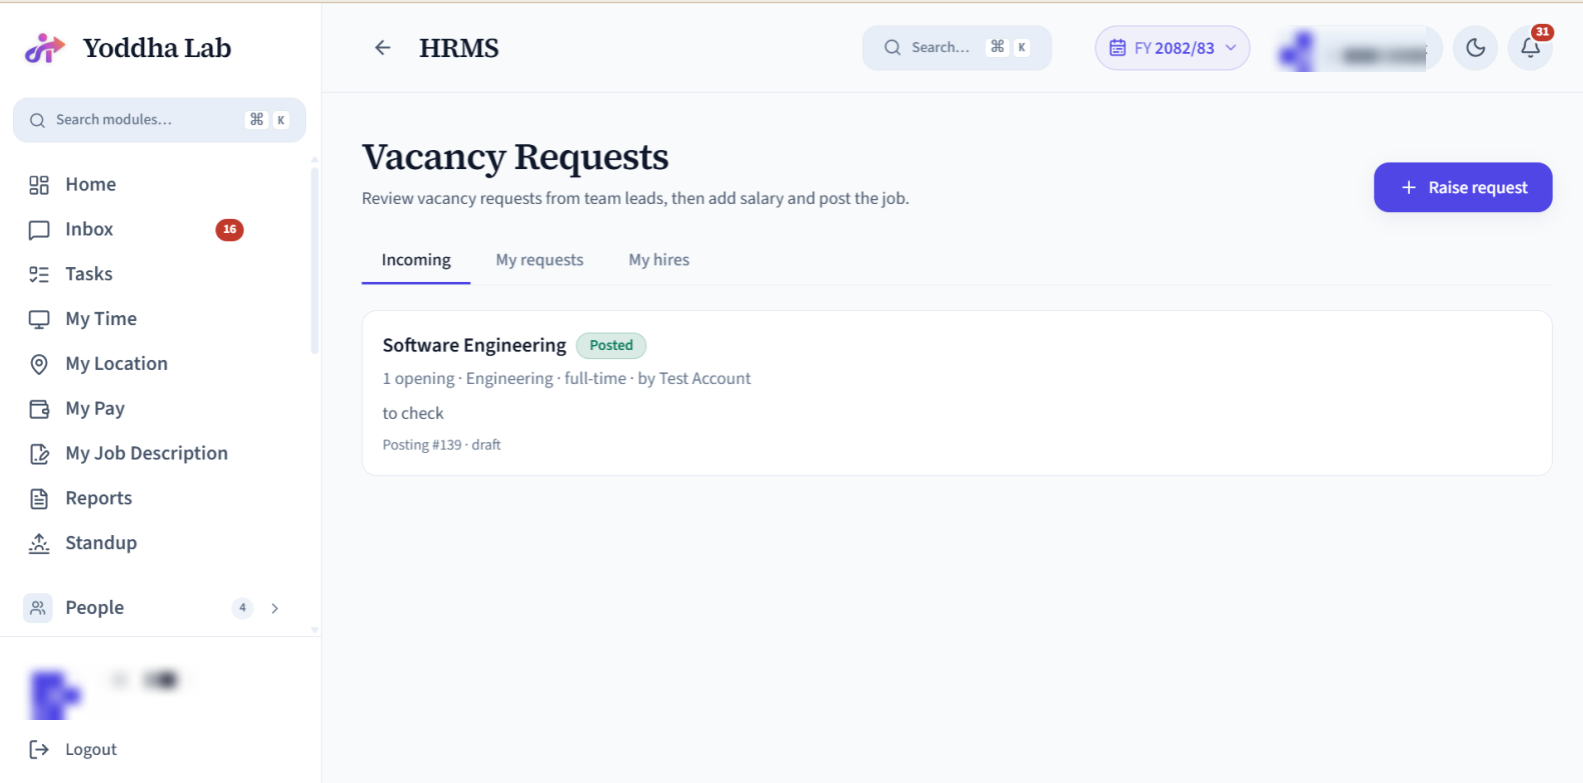
The intake step before a job is posted. A manager raises a request to open a position - role, headcount and justification - and HR reviews it in one inbox. Approving turns the request into a draft job posting (add salary, then publish to the pipeline); HR can also reject or request changes, which bounces it back to the requester to edit and resubmit. Managers see only their own requests; HR sees the whole queue.
Setup
- Ships with Recruitment - no separate switch.
- Set reporting lines (Employees → Work Info) so the right managers can raise and track requests.
- Access: HR sees the full inbox; any team manager sees and raises their own.
Day-to-day operations
- Manager raises: Vacancy Requests → New → position + headcount + reason.
- HR reviews the inbox → Approve / Reject / Request changes (with a note).
- On approve, a draft job is created - add salary, then post it to the candidate pipeline / career page.
- Rejected or change-requested items return to the requester to edit and resubmit.
- Use the “Mine” tab to follow your own requests and the hires they lead to.
Performance
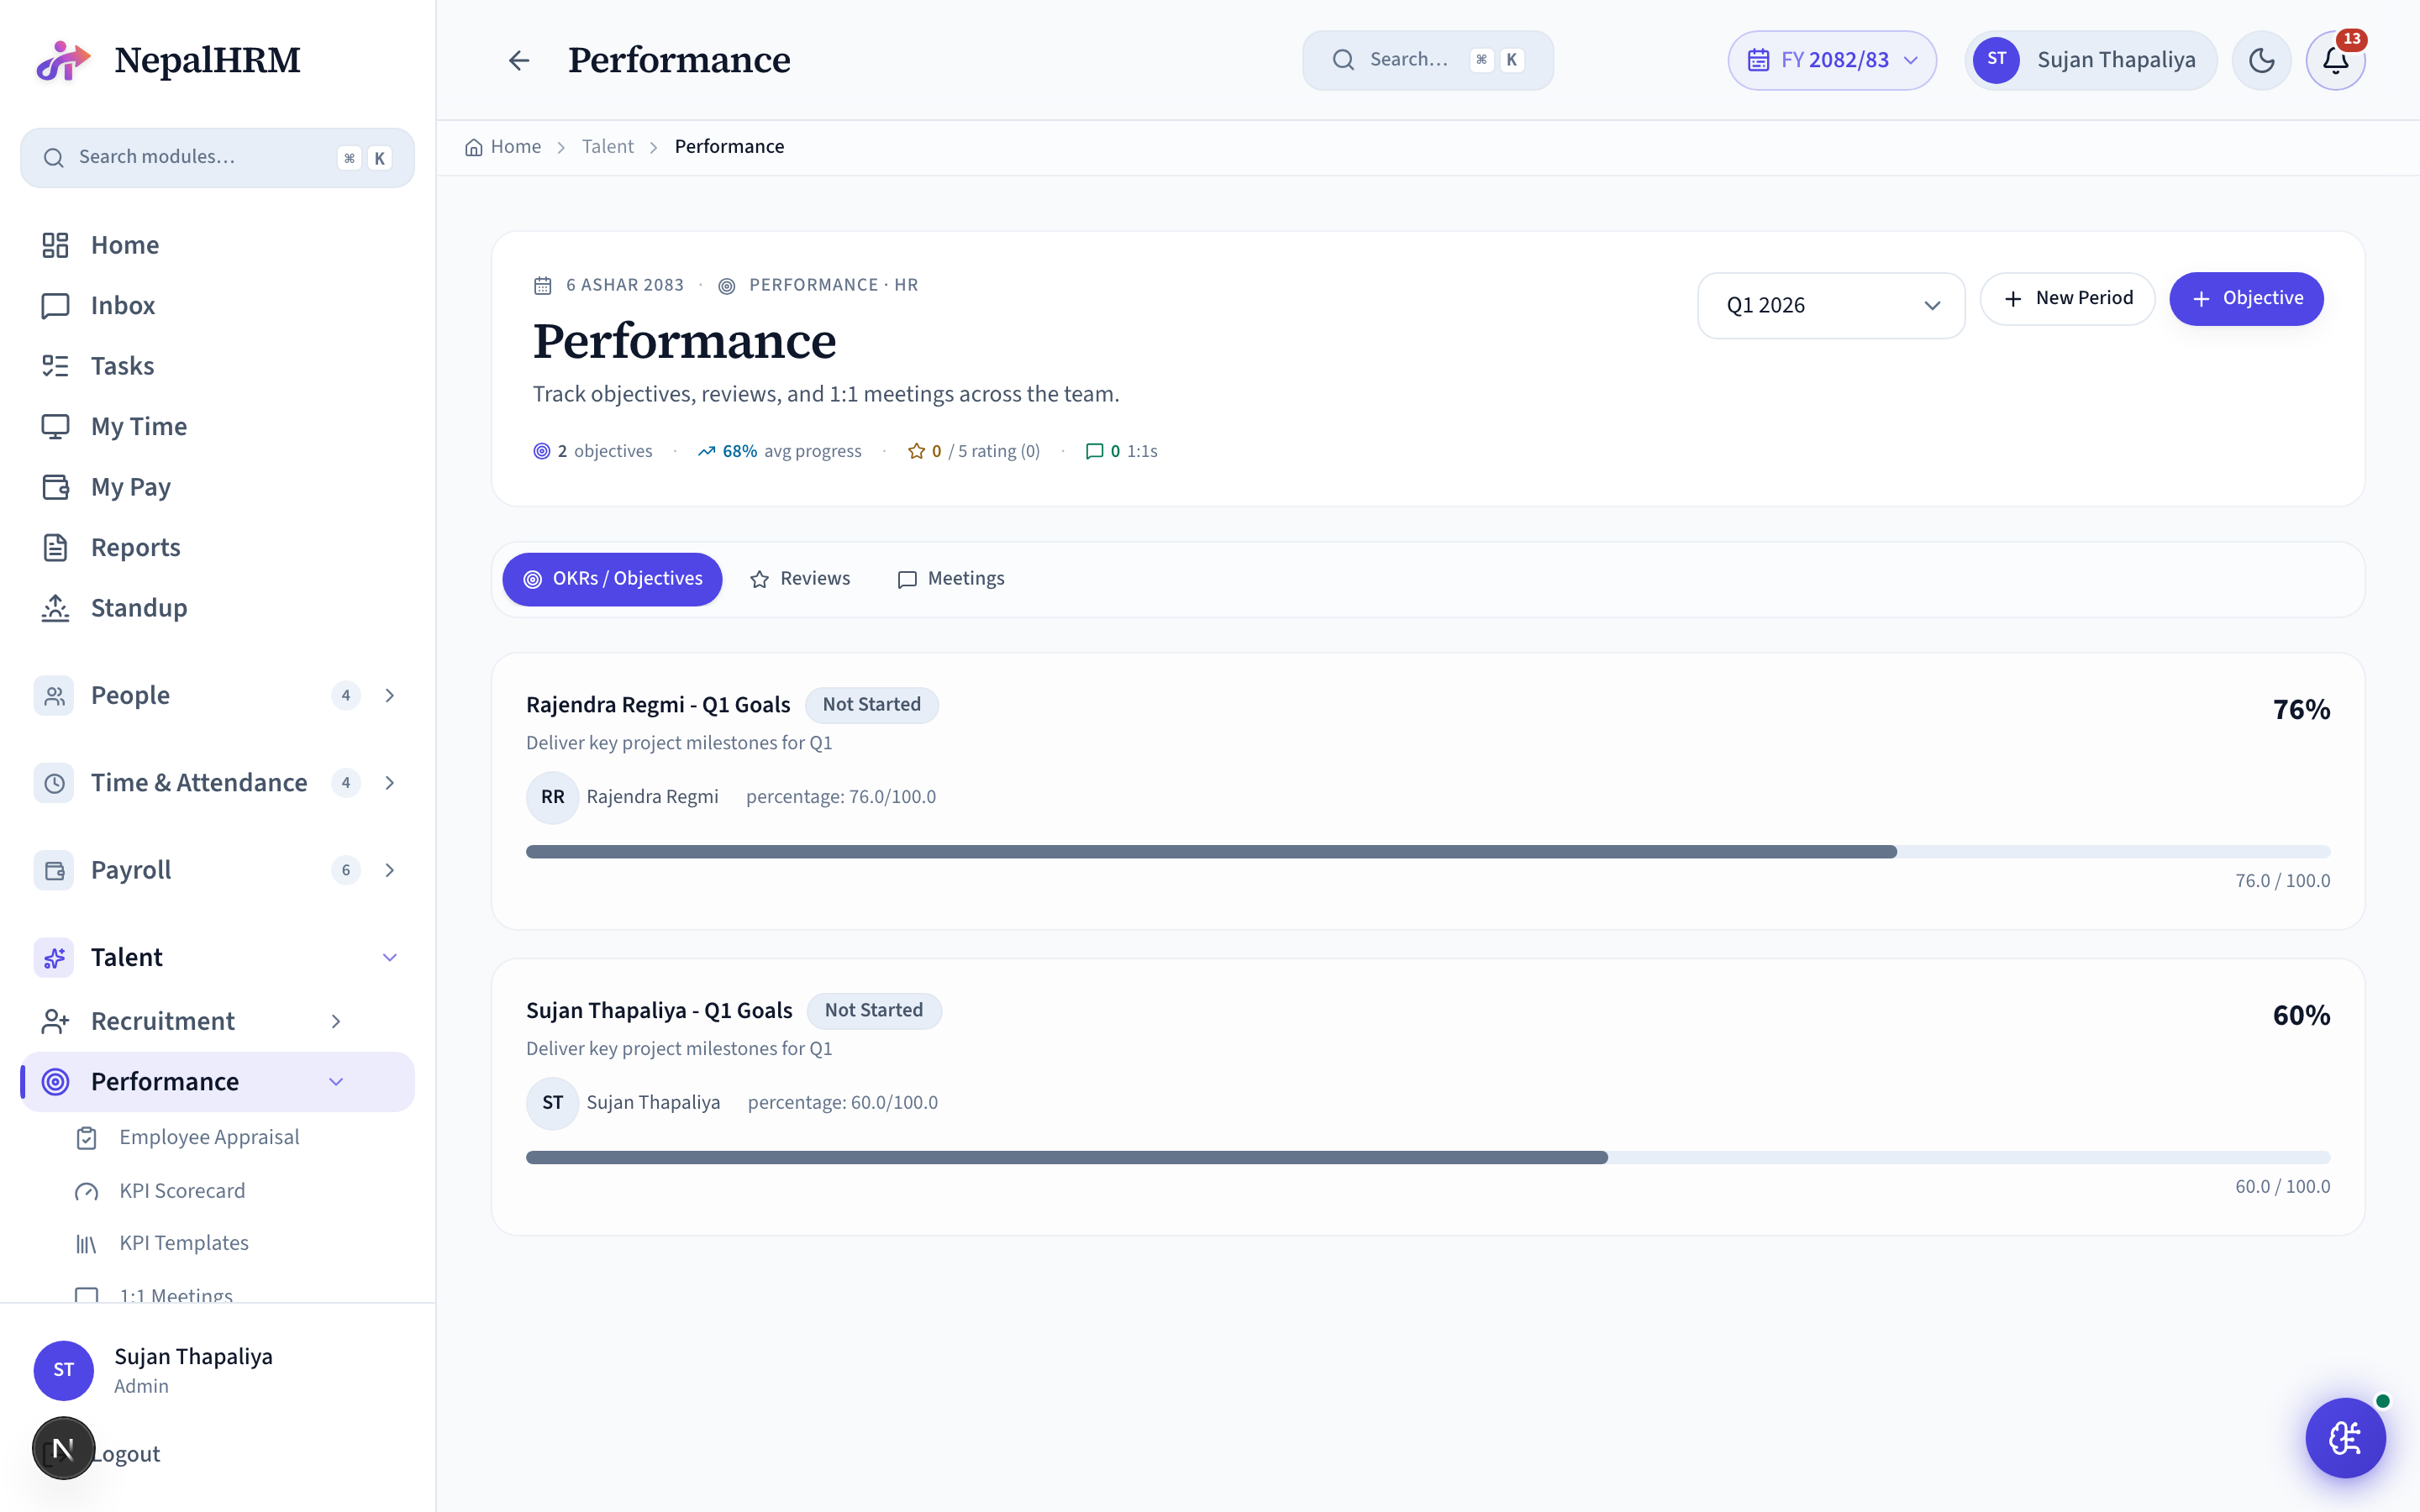
Quarterly performance reviews with manager / self / peer feedback. Each performance period (e.g. Q1 2026) holds multiple review_types per employee. Reviews go through Pending → Submitted → Acknowledged so HR can see who's behind on the cycle and chase manager reviewers.
Setup
- Define periods: Performance → New Period → name + start + end + status.
- Define evaluation criteria once per period.
- Auto-launch on Day 1 of each period - managers see pending reviews on their dashboard.
Day-to-day operations
- Reviewer fills the form → Submit.
- Employee acknowledges the review (or appeals).
- Performance Reviews list filters by status / period - chase outliers from there.
- Export for HR records: per-period CSV.
KPI Templates
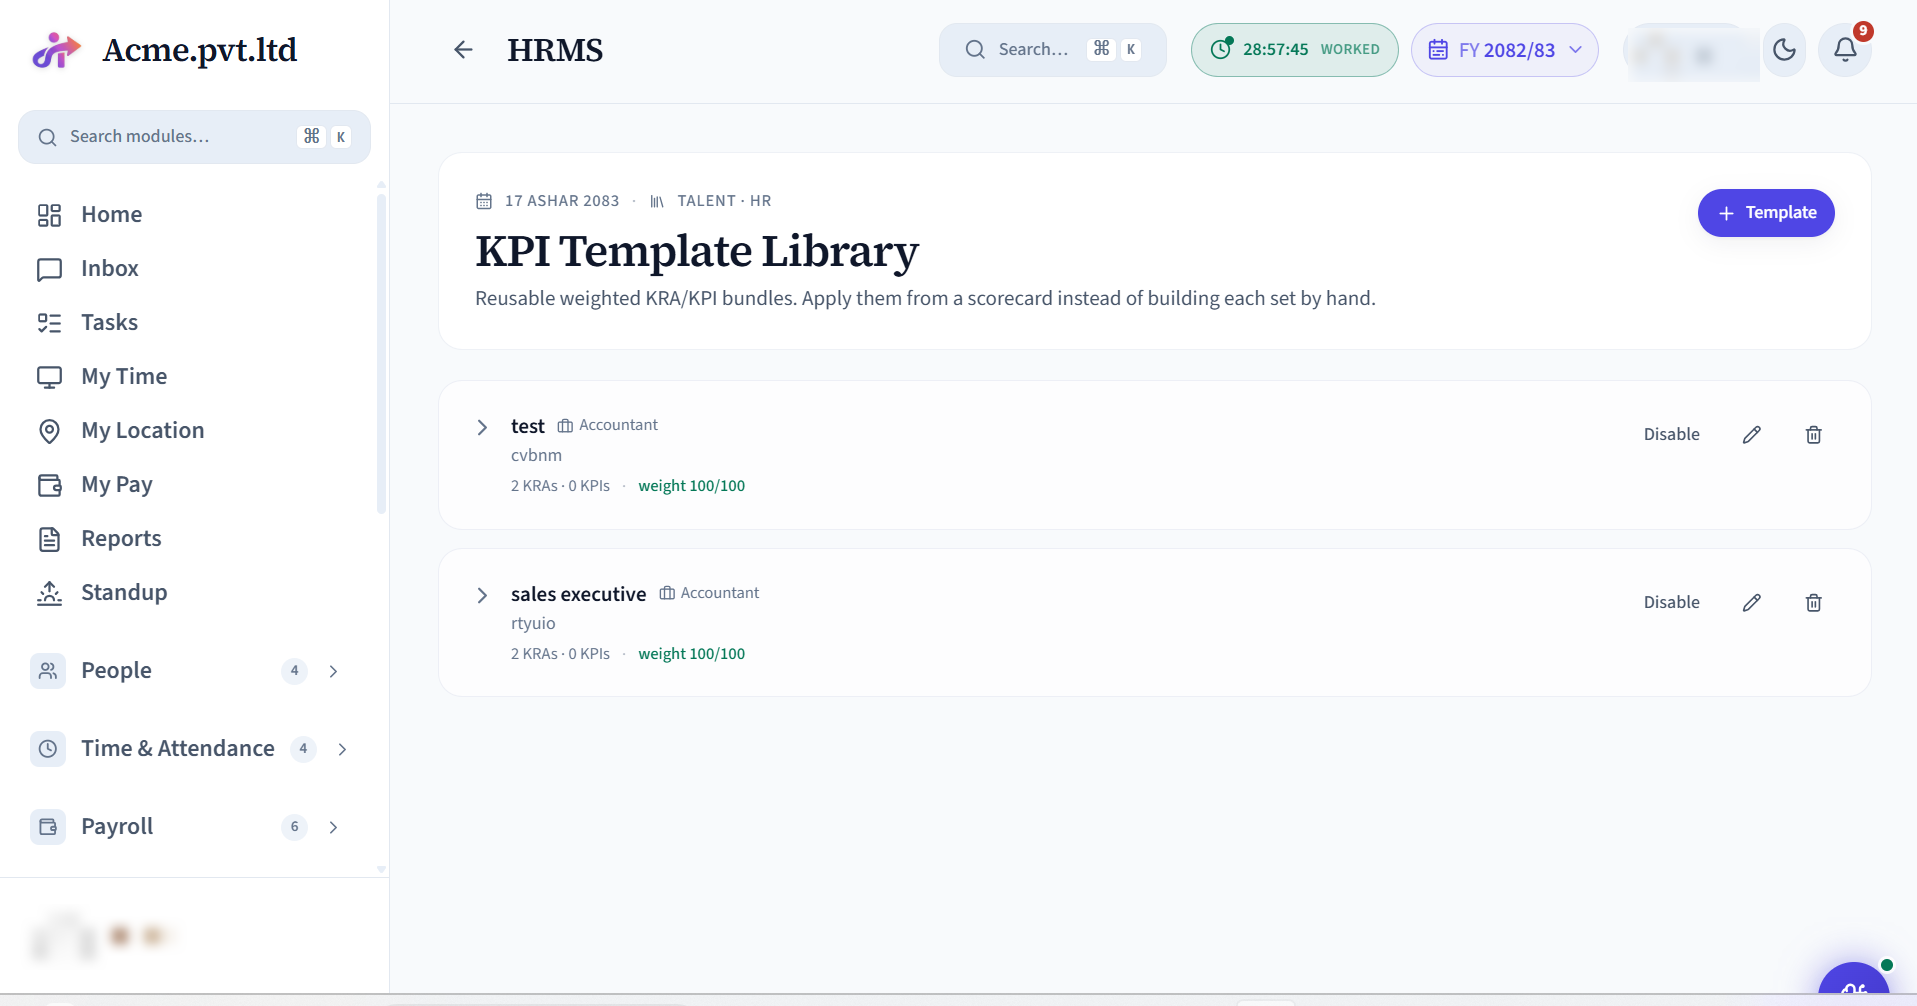
Reusable KRA / KPI bundles - a goal library HR maintains so scorecards are built from consistent, role-based templates.
Setup
- Author templates per role or track.
Day-to-day operations
- Apply a template when assigning KPIs to save re-keying.
Succession
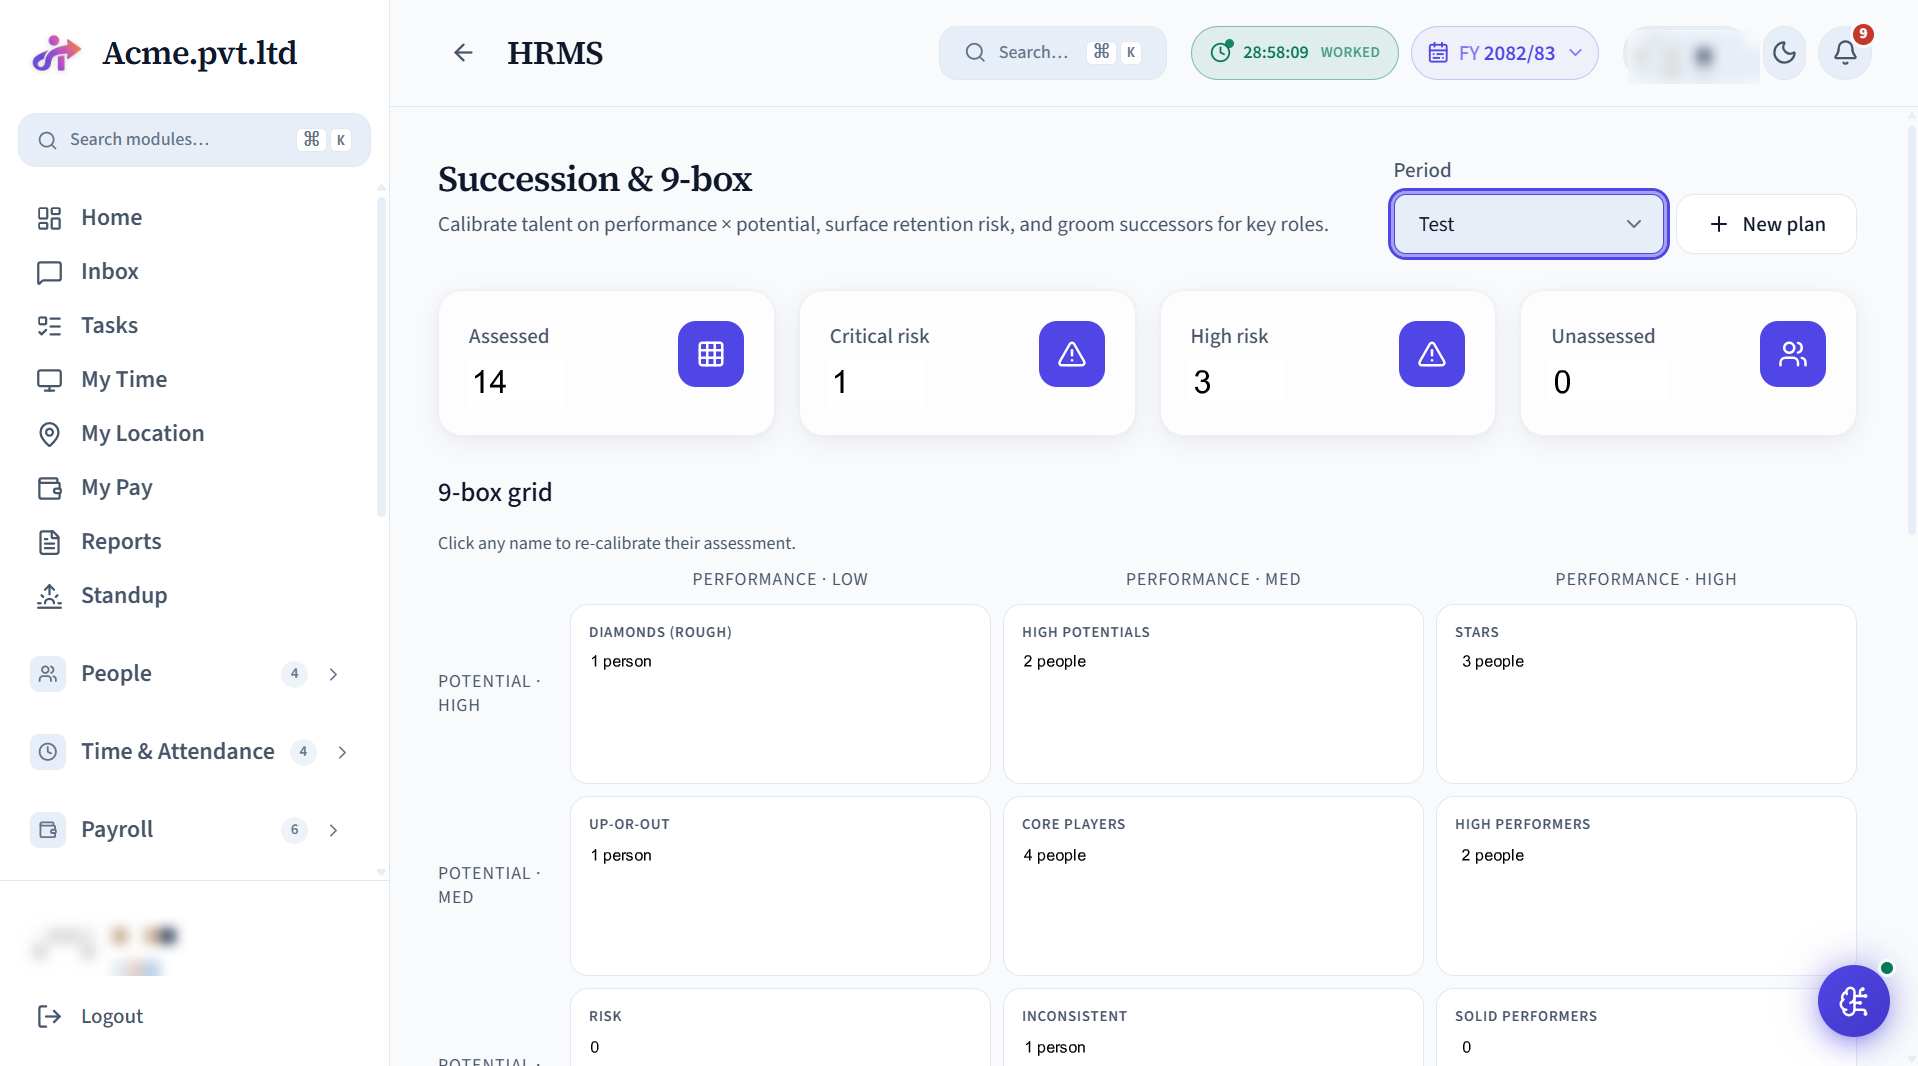
9-box talent mapping - plot people on performance × potential to spot successors, retention risk and development needs.
Setup
- Nothing to configure - the 9-box grid reads your performance and potential ratings.
- Run at least one Performance cycle so people have ratings to plot.
- HR-only; tag the key roles you want succession cover for.
Day-to-day operations
- Place people on the grid; flag risk; plan development moves.
Employee Appraisal
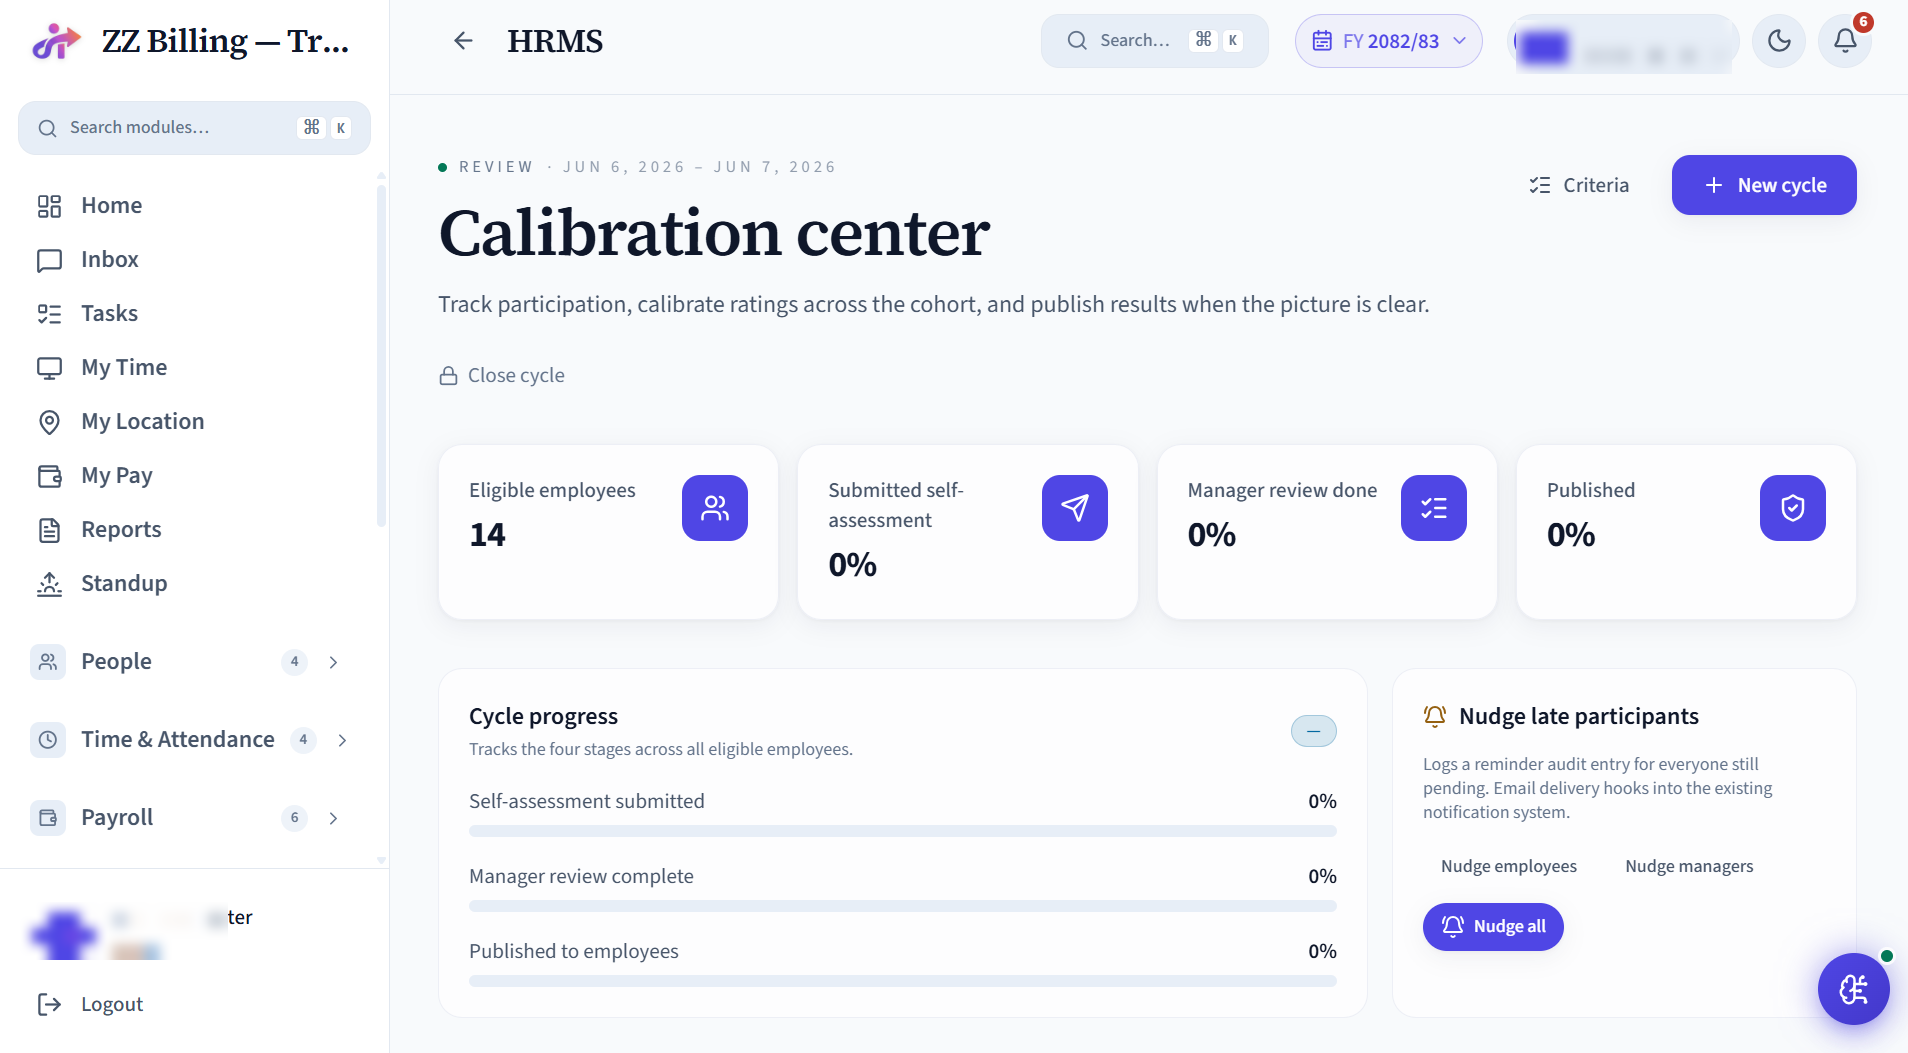
Evaluation forms and scoring within a performance cycle - rate against criteria, leave comments and roll up to a final rating.
Setup
- Build the appraisal form and attach it to a cycle.
Day-to-day operations
- Managers score, employees acknowledge, then finalize ratings.
KPI Scorecard
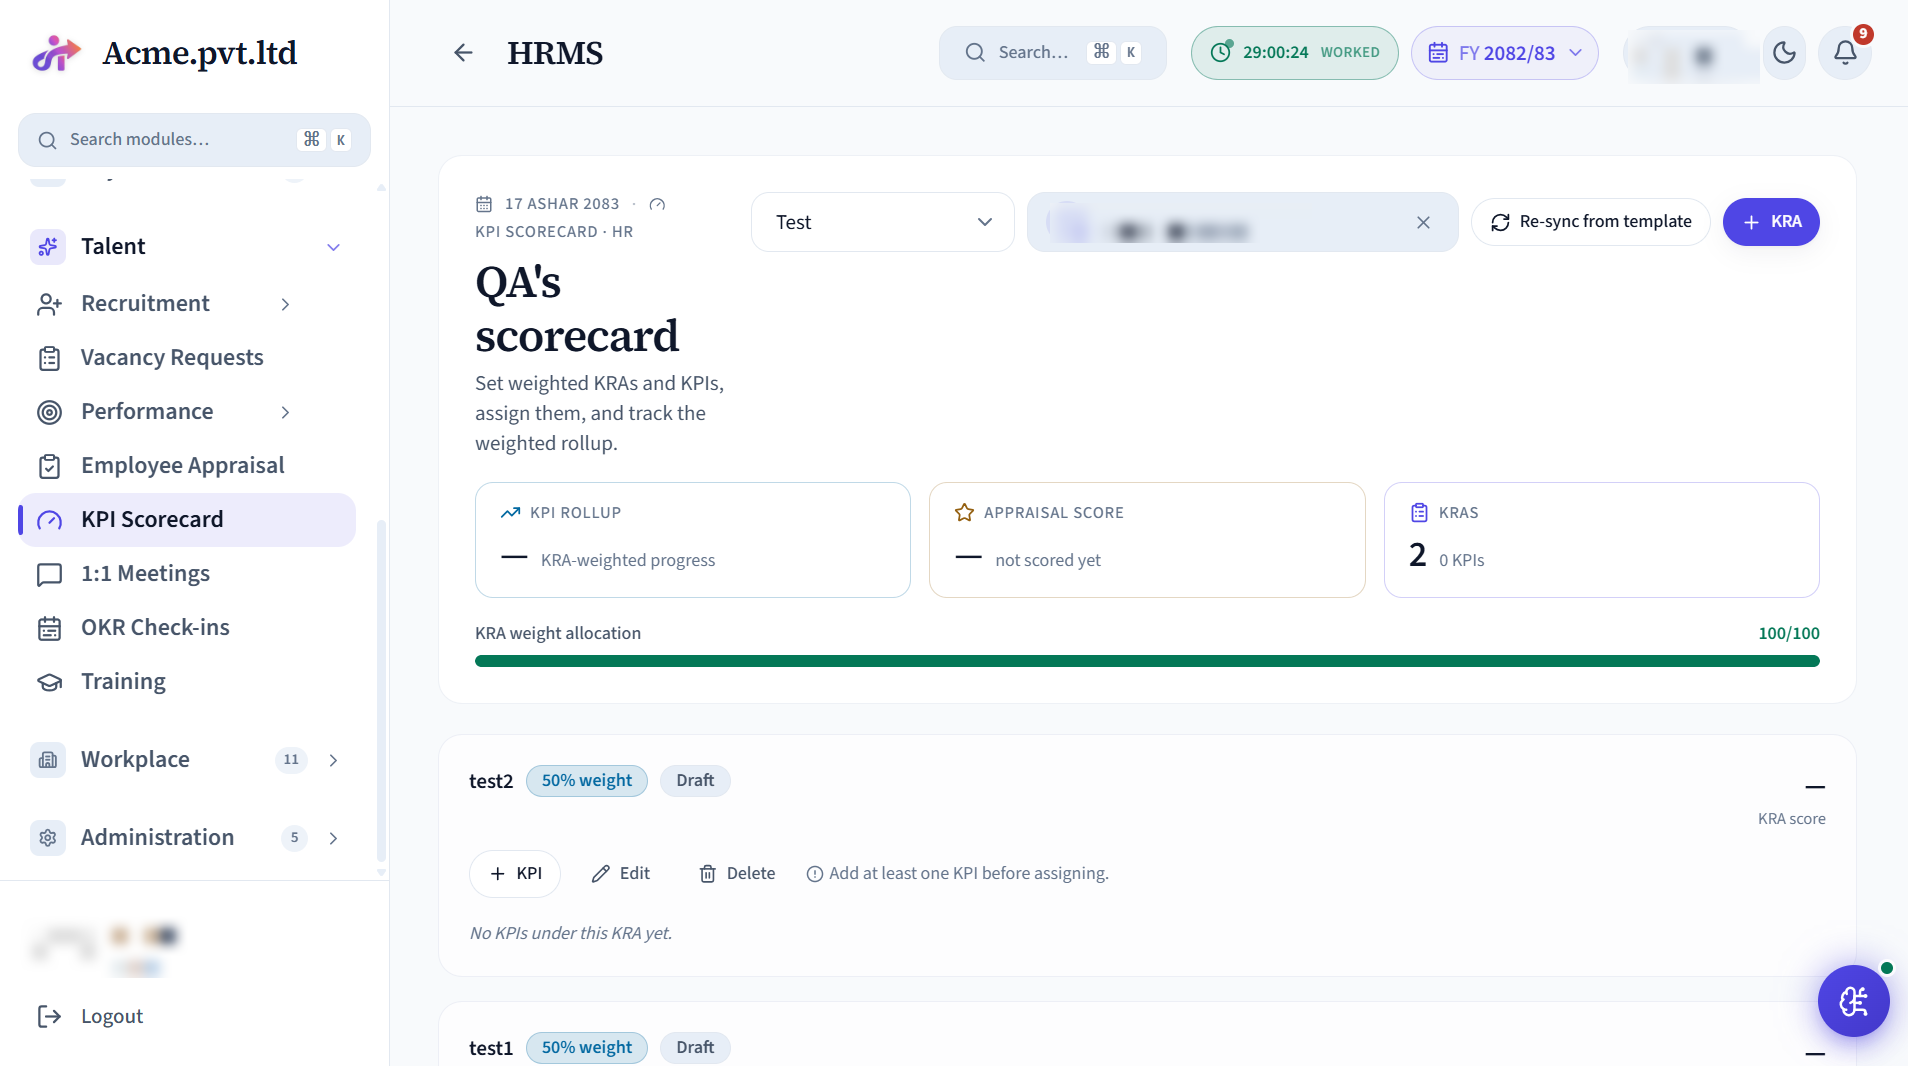
The weighted KRA / KPI engine - assign weighted key result areas, run the assign → acknowledge handshake, and track a rollup scorecard per person.
Setup
- Build KRAs / KPIs (or apply a template), then assign and weight them.
Day-to-day operations
- Employees acknowledge and track their own; scores roll up automatically.
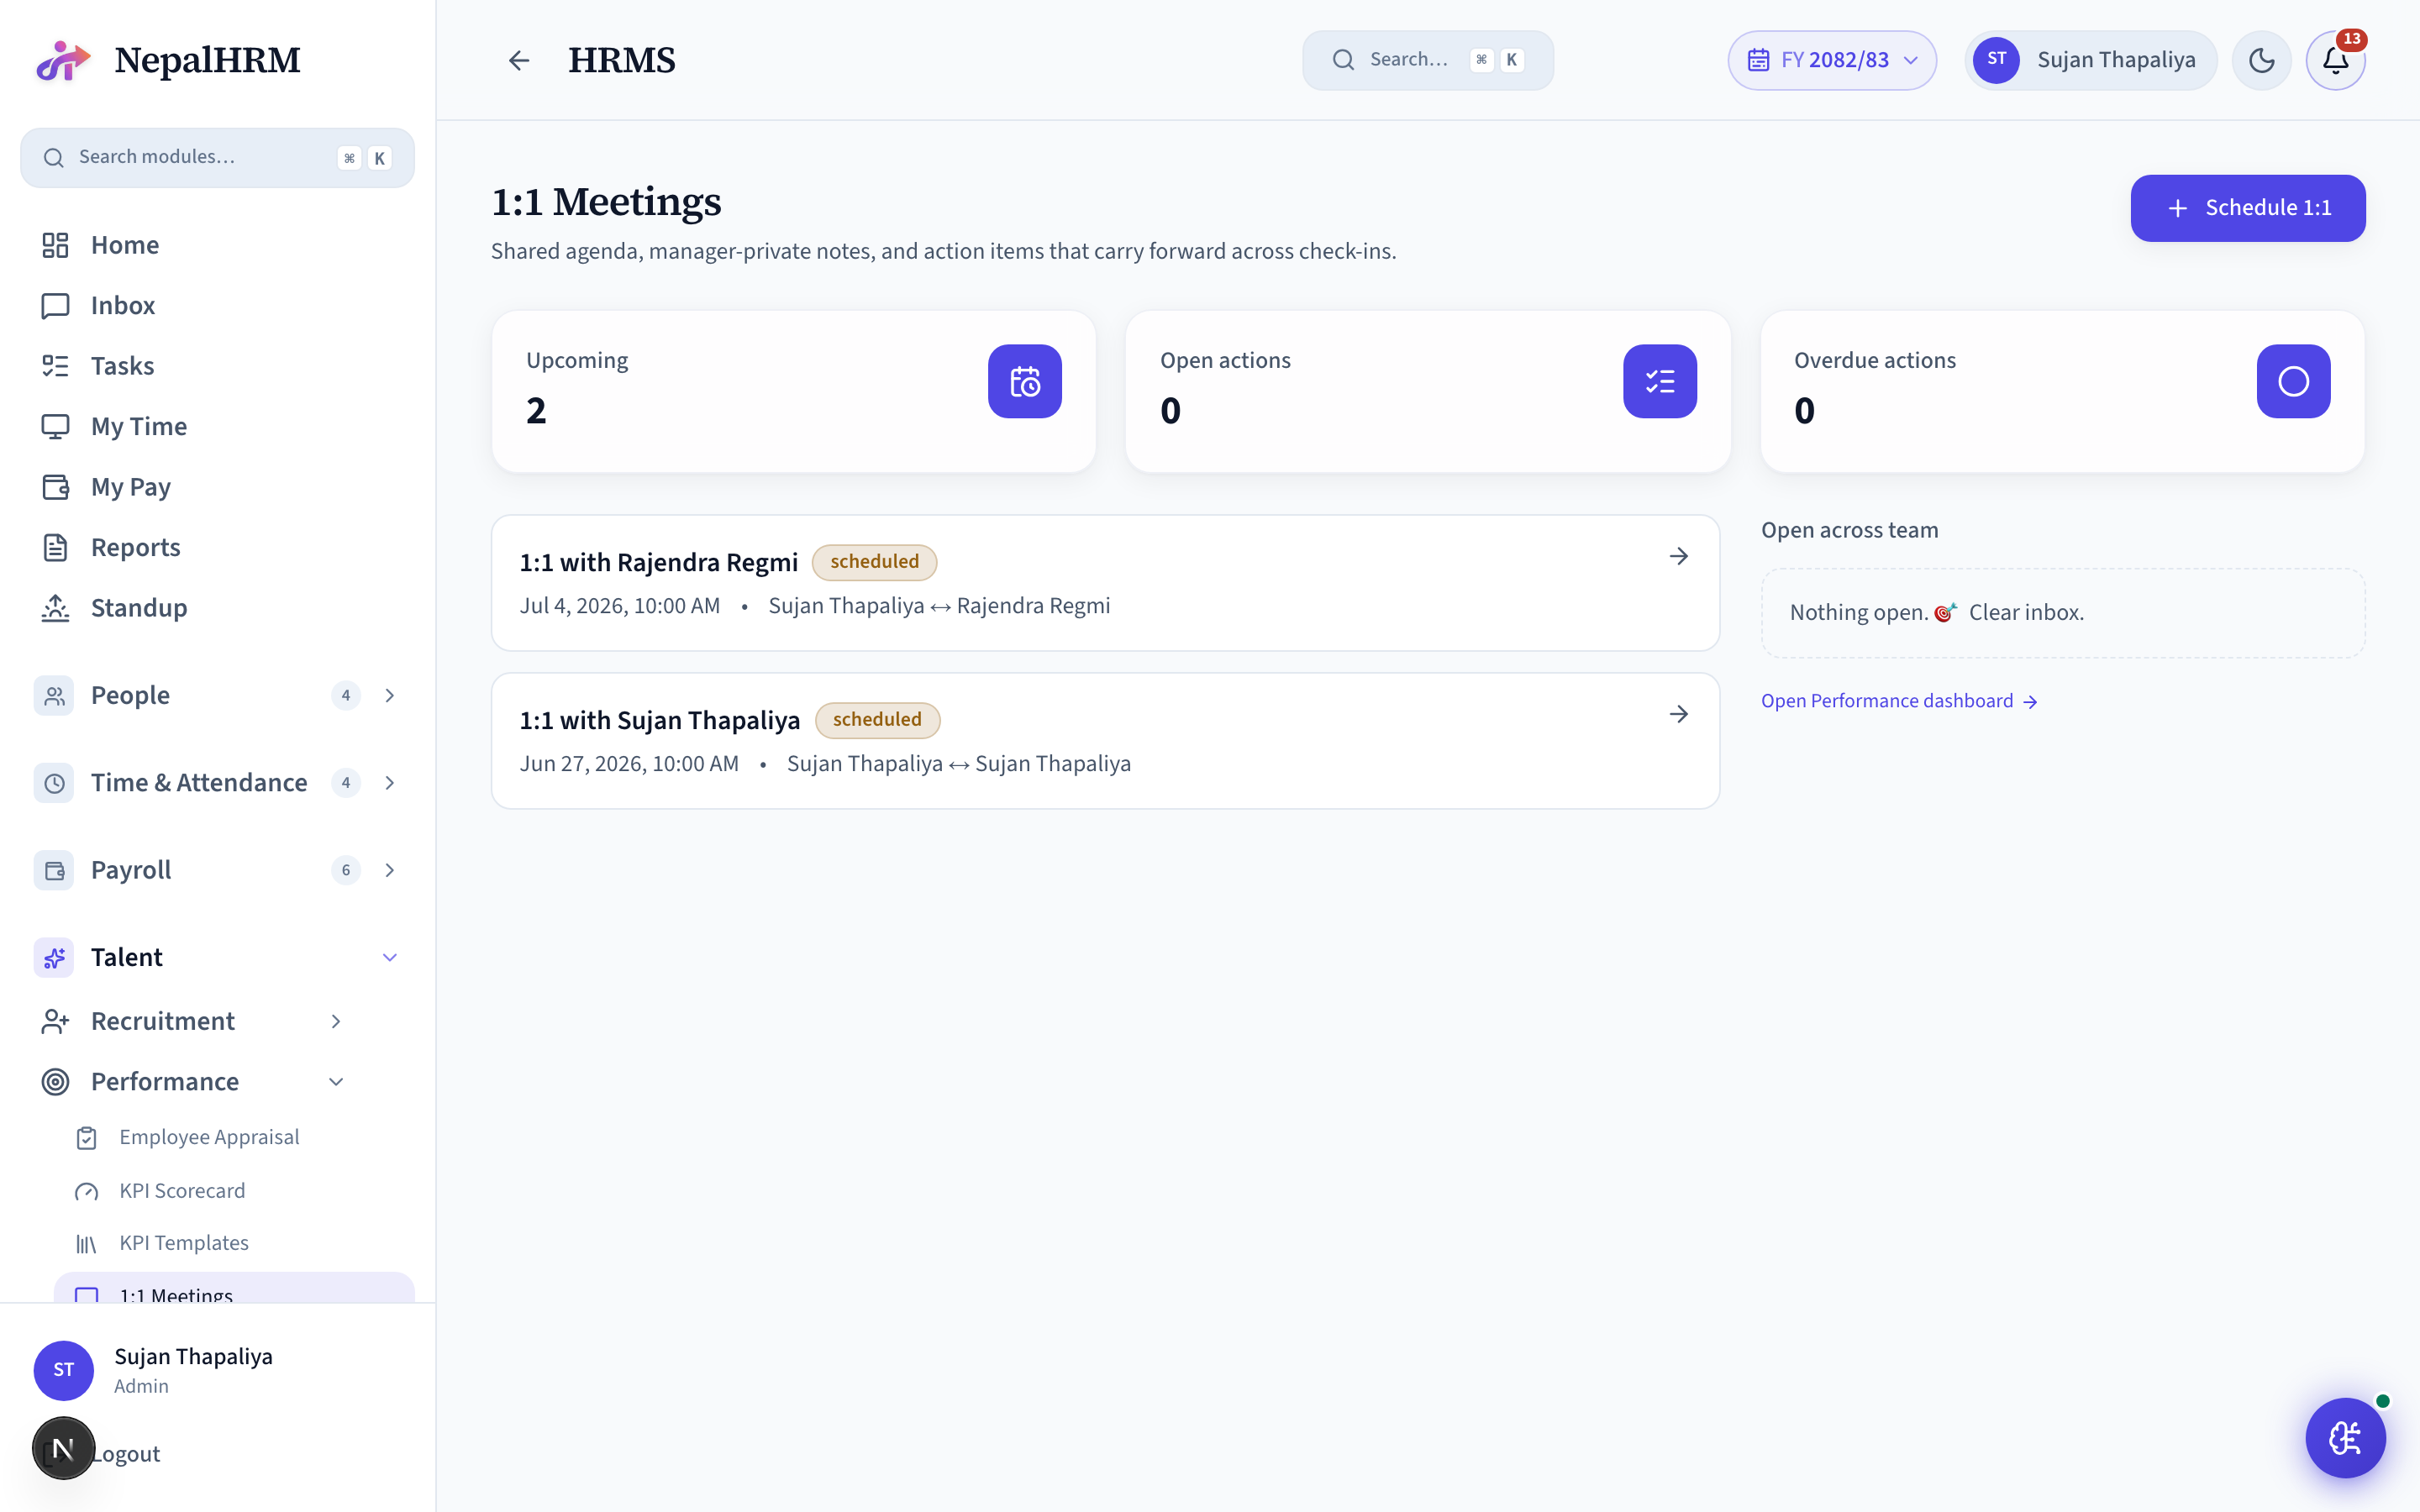
1:1 Meetings
Structured one-on-ones - a shared agenda, talking points, action items and notes between a manager and their report.
Setup
- Nothing to configure - any manager and report can start a 1:1 immediately.
- Pair each employee with a reporting manager (Employees → Work Info) so the right people are matched.
- Optional: agree a cadence (weekly / fortnightly) with your team.
Day-to-day operations
- Schedule, build the agenda, capture action items and track follow-through.
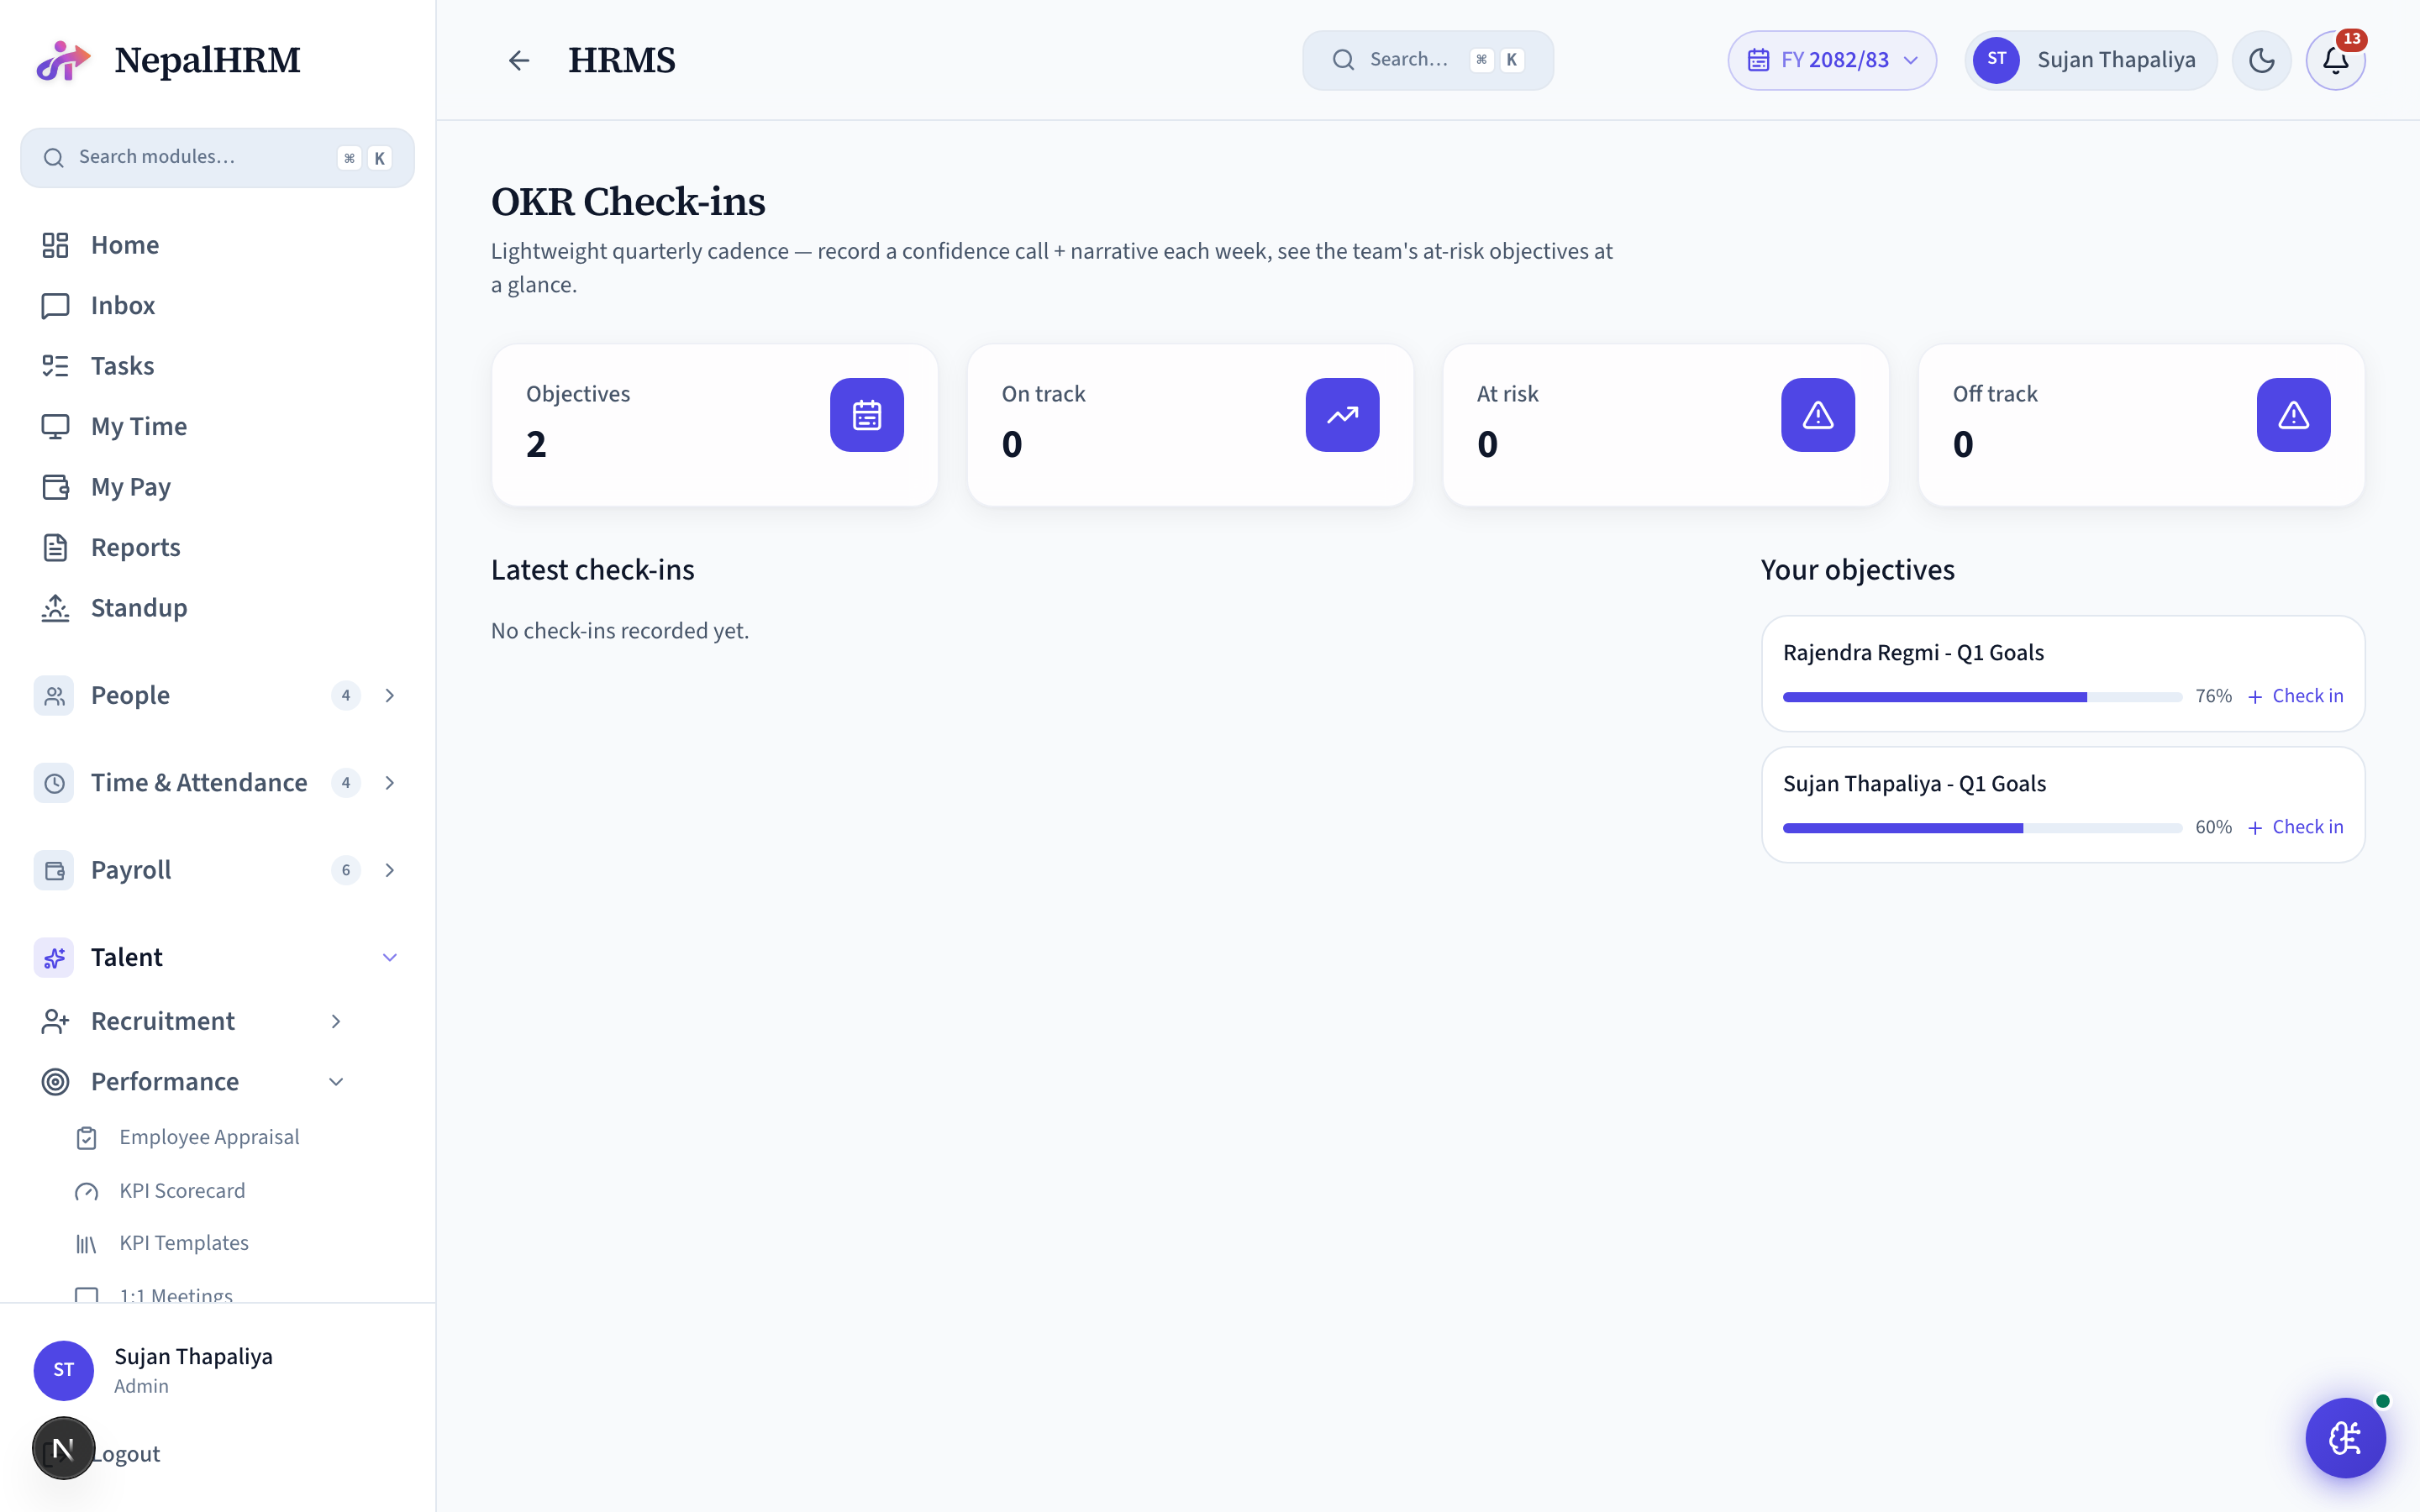
OKR Check-ins
Objective check-ins on a cadence - record progress against OKRs each quarter or period with a confidence signal.
Setup
- Define objectives and key results.
Day-to-day operations
- Log check-ins; track progress and confidence across the cycle.
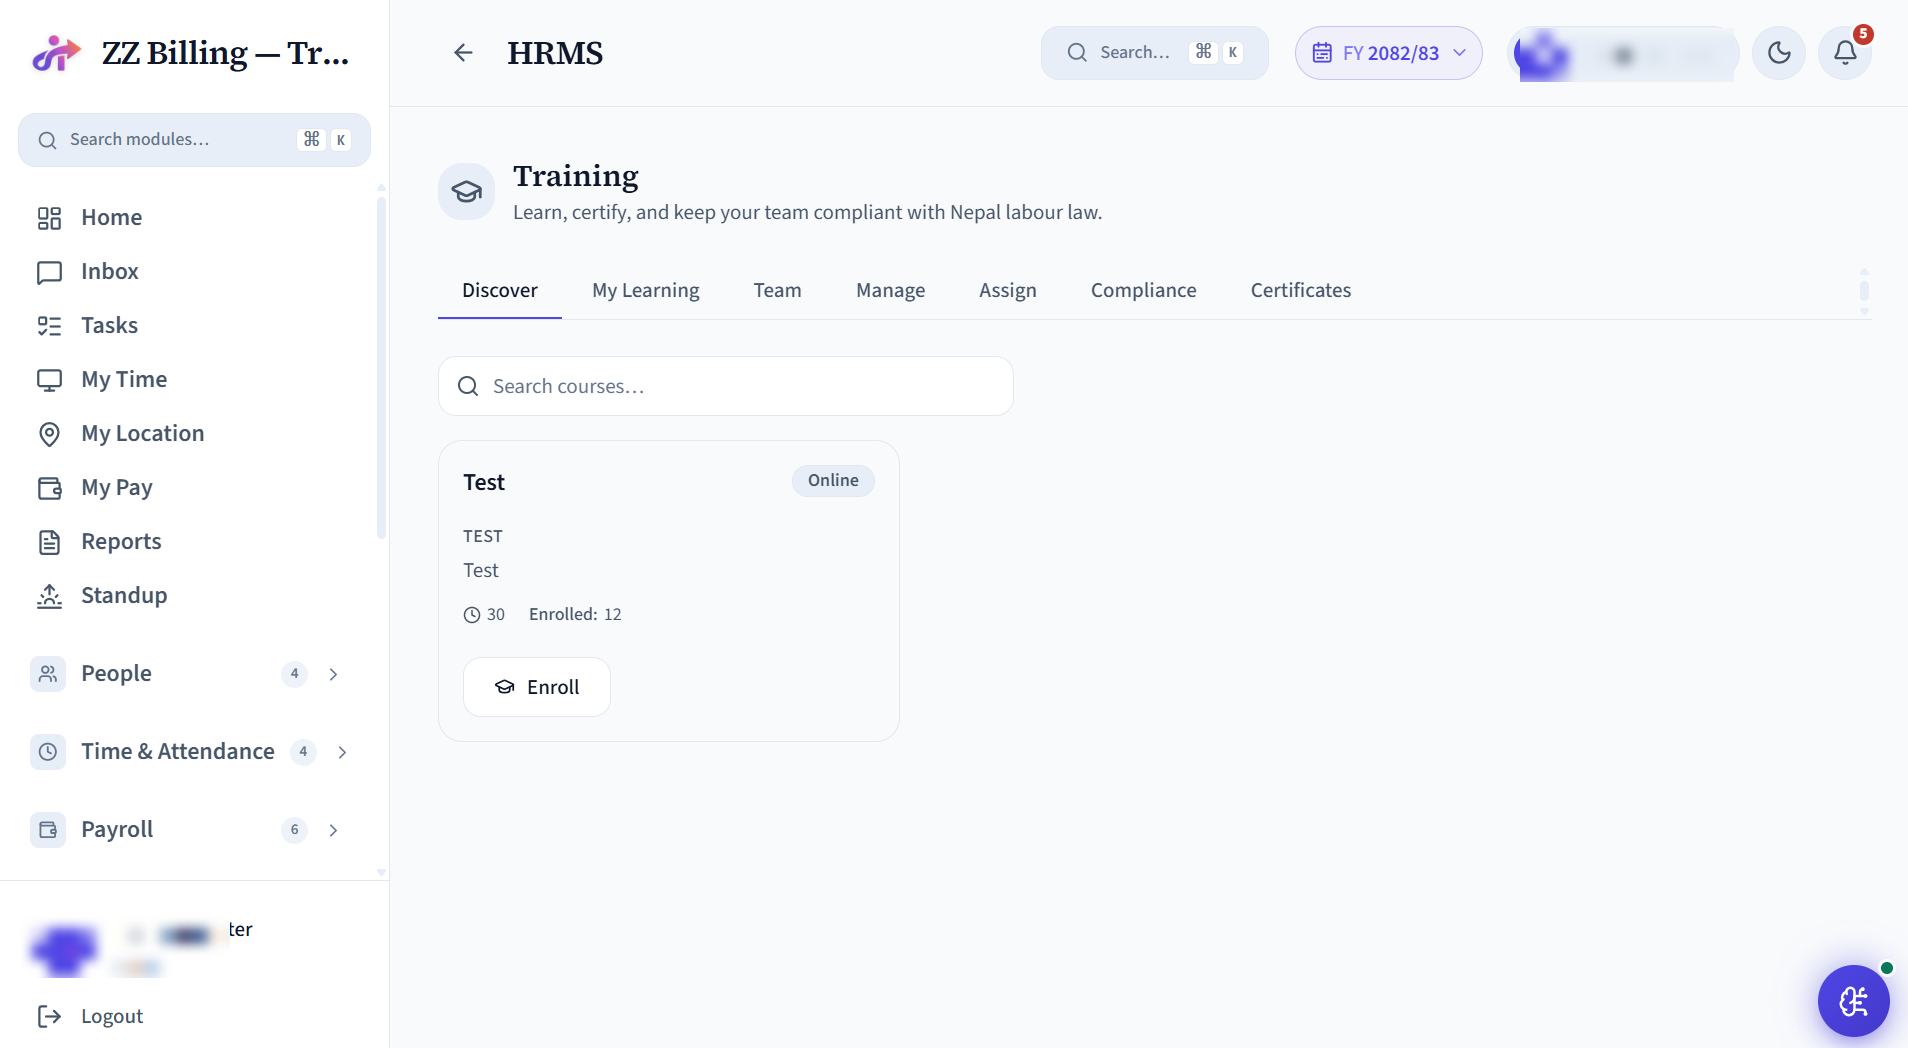
Training
Learning & development - a course catalogue, enrolment and per-employee training records, with team progress for managers.
Setup
- Build the catalogue and mark any required courses.
Day-to-day operations
- Employees enrol and complete; track completion and L&D coverage.
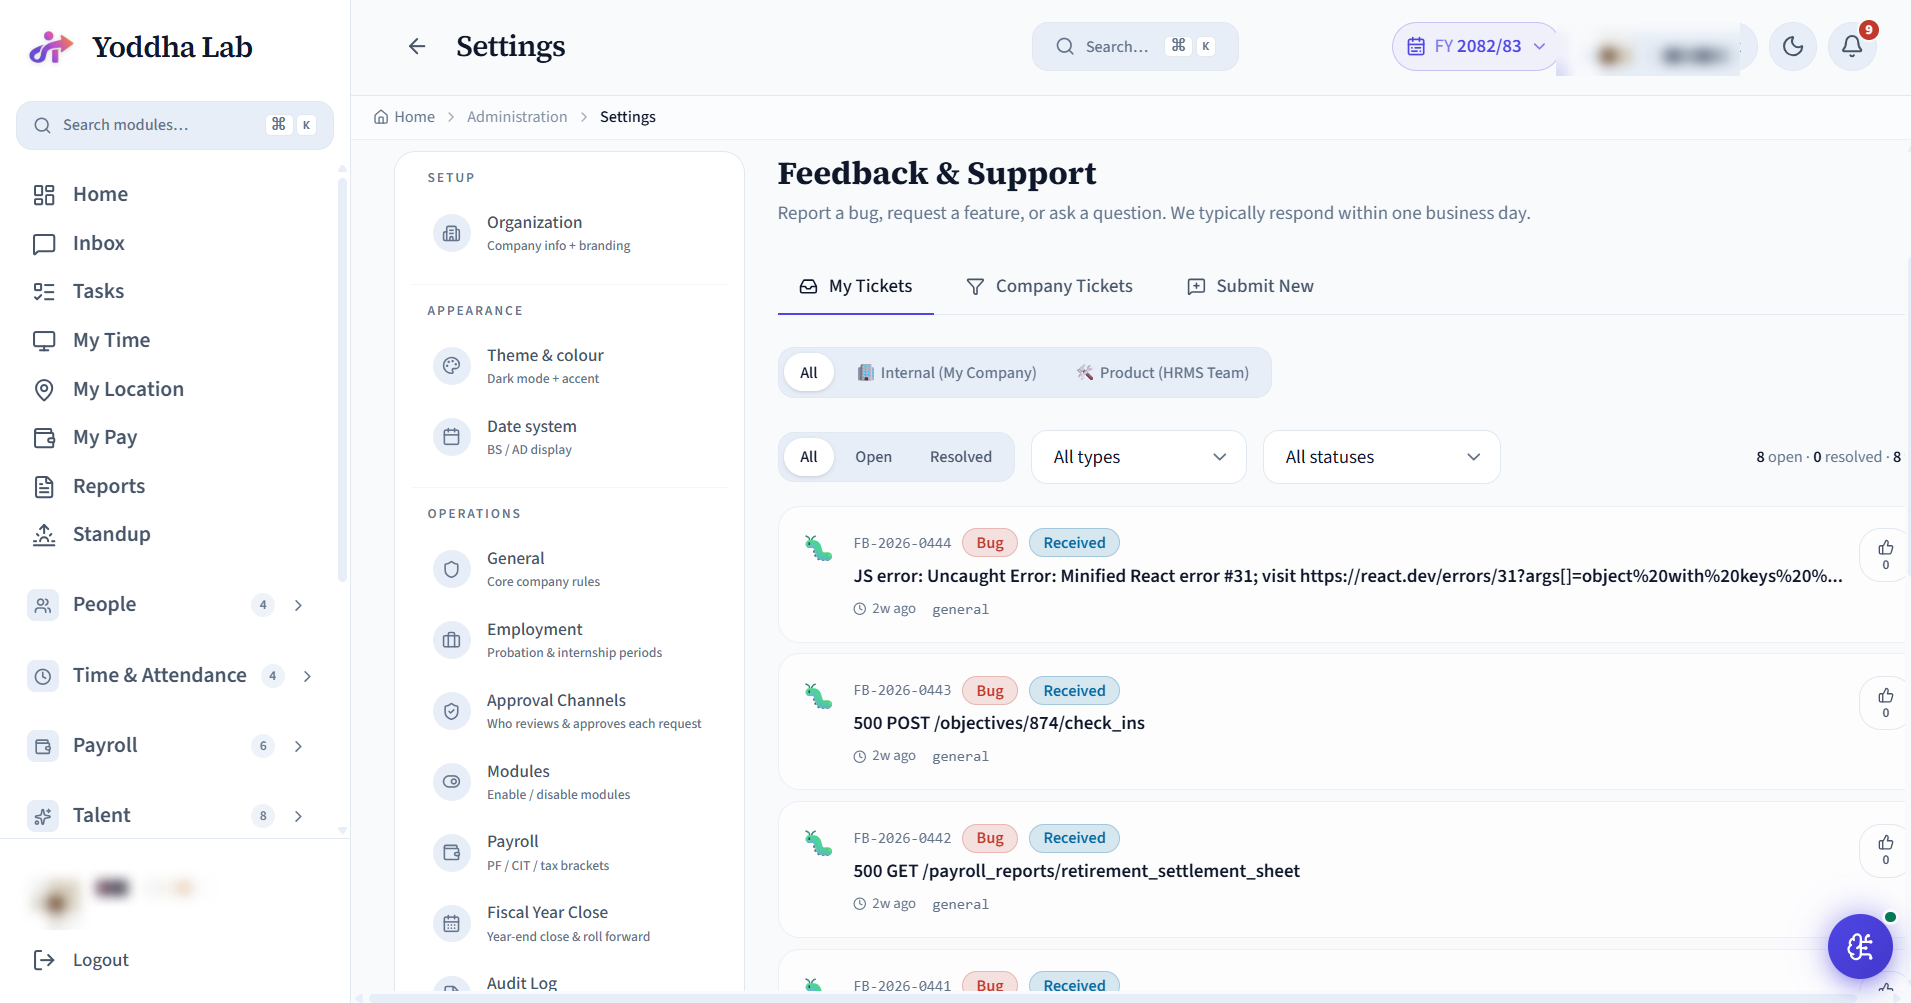
Feedback
System / app feedback channel - bug reports and feature requests from every user surface here as tickets. Platform team triages by priority (urgent / high / medium / low), assigns owners, and resolves with audit trail.
Setup
- Built-in and open to everyone - the Feedback & Support button sits in the header and in Settings.
- No config to send feedback; the platform team works the incoming queue to triage it.
- Tell staff it's the channel for bugs and feature requests (keeps them out of email).
Day-to-day operations
- User clicks Feedback → describes issue + screenshot.
- Platform team: Feedback → triage → status (new / in_progress / resolved).
- Status updates email the original reporter so they know it landed.
Assets
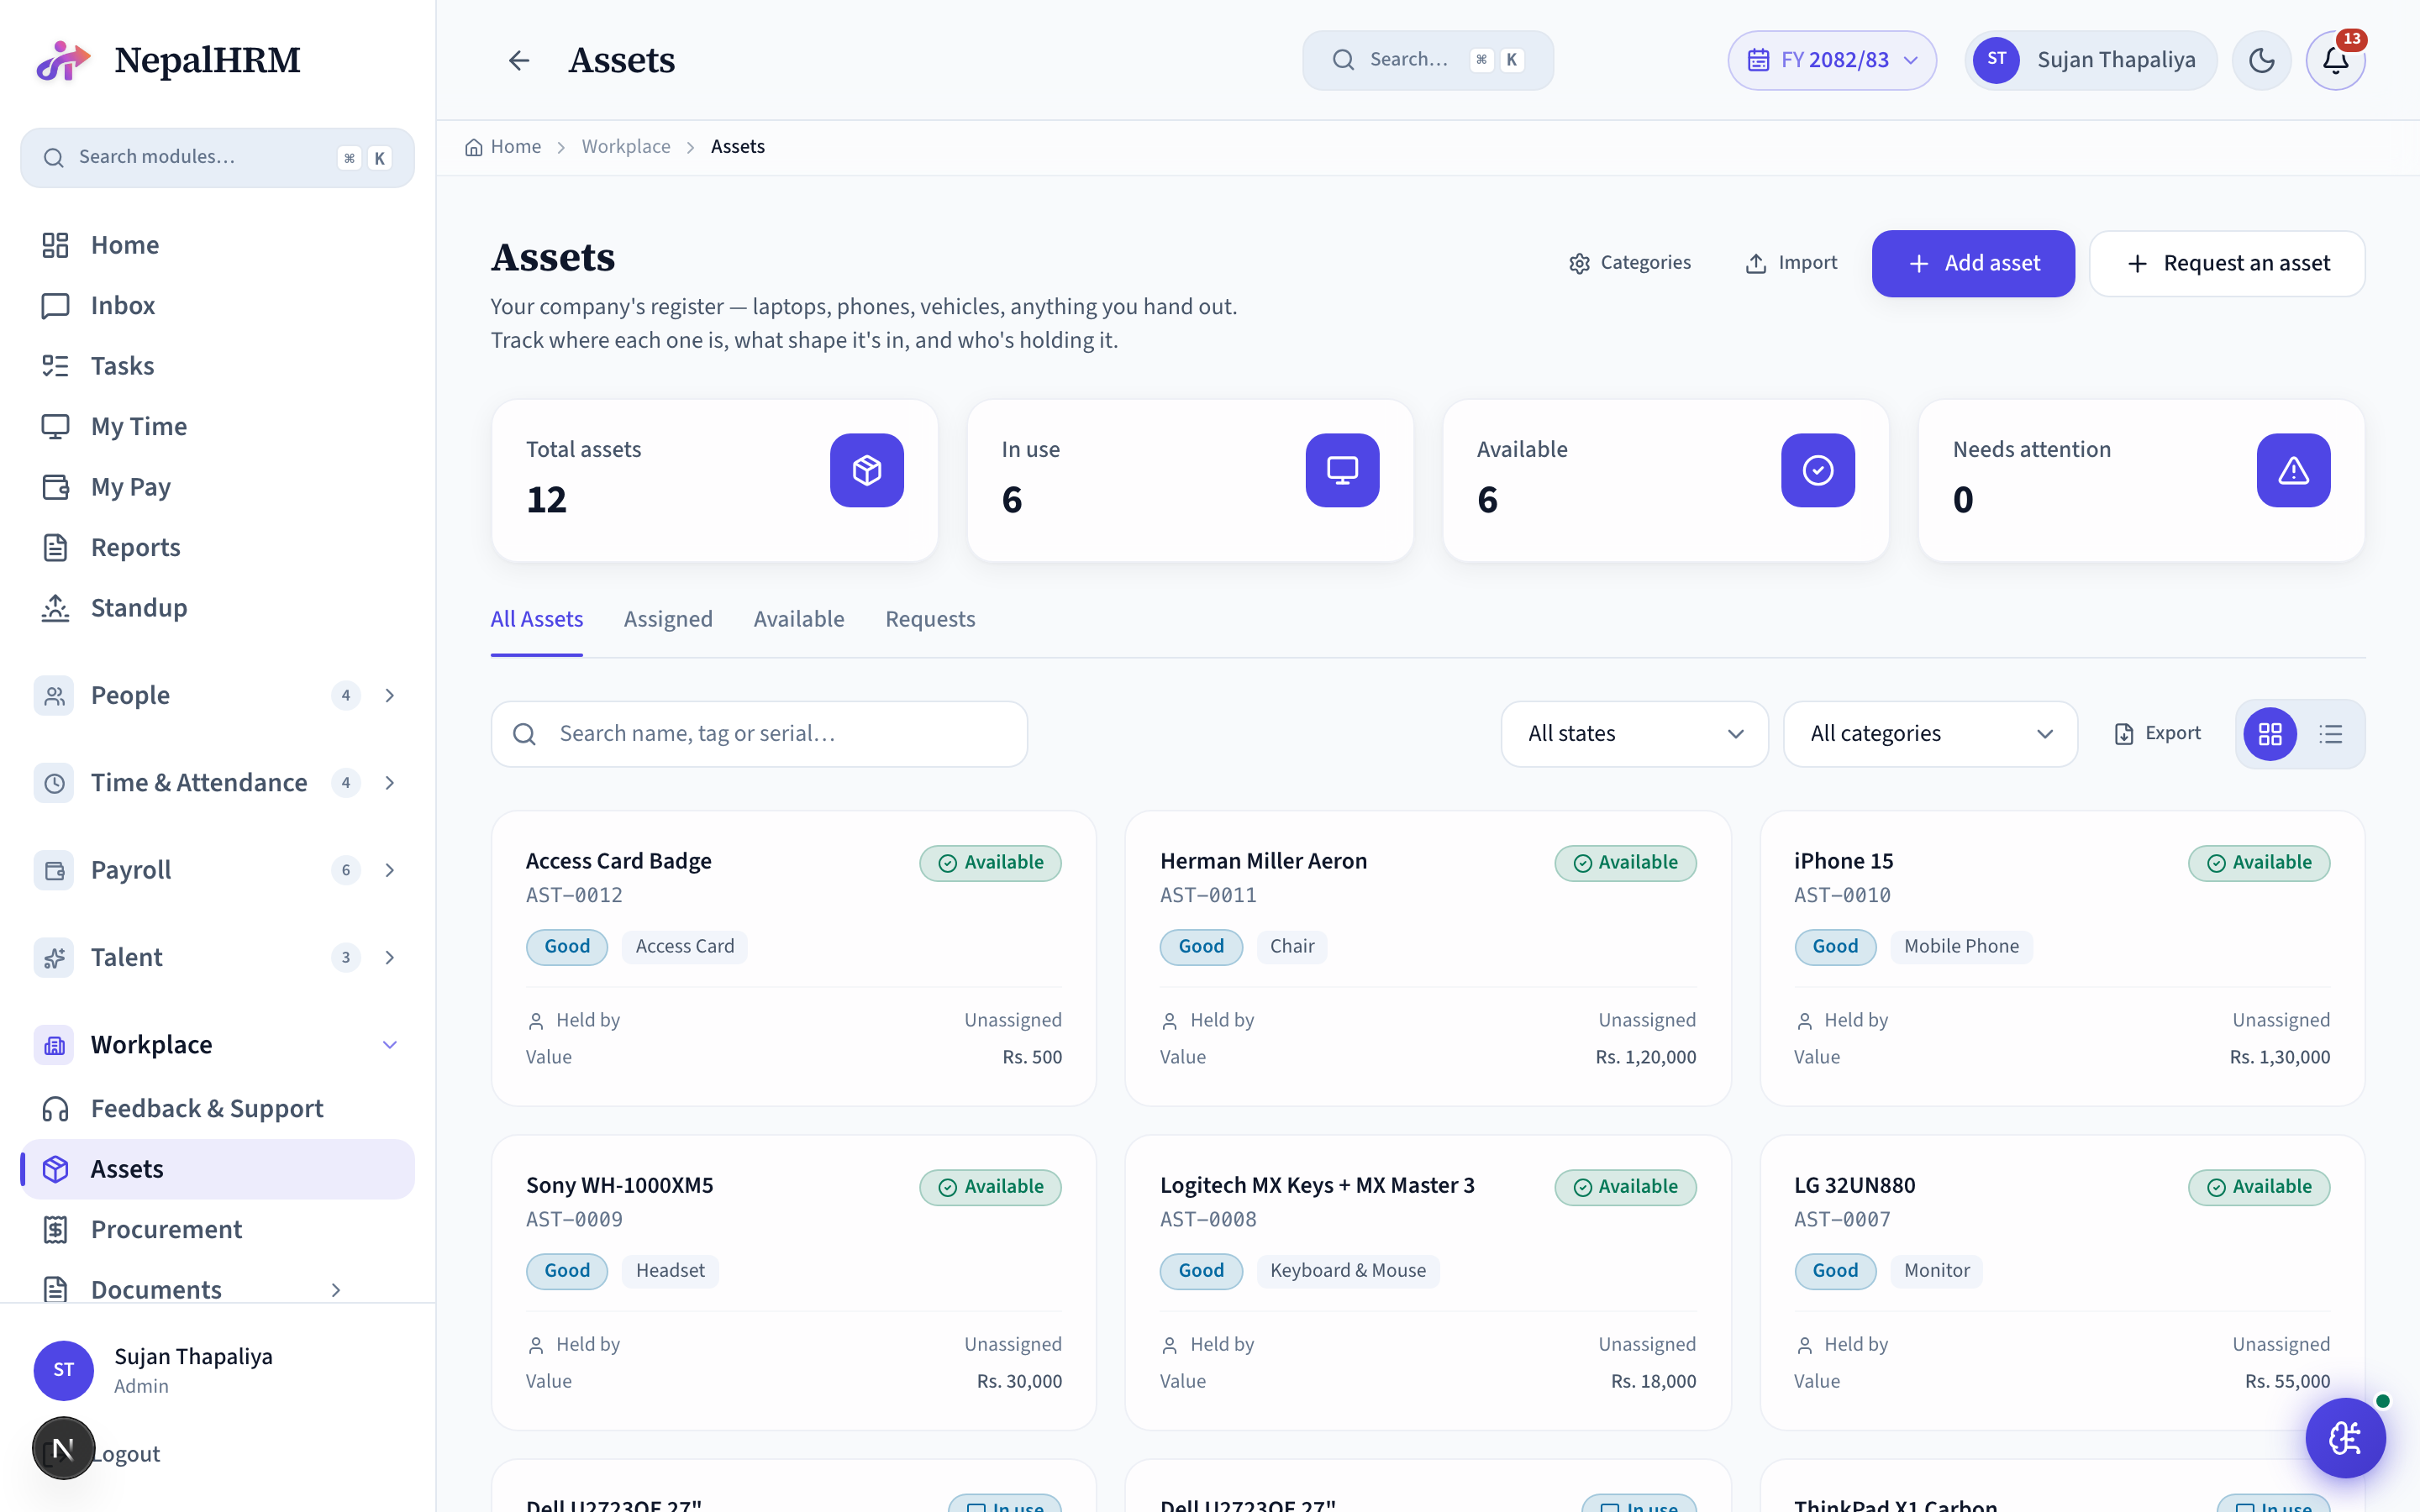
Track every laptop, phone, badge, headset, and physical asset the company owns: serial number, purchase date, warranty, current assignment, and condition. Assignments to / unassignments from employees show on each profile's Assets tab. Useful for IT operations and the offboarding return checklist.
Setup
- Categories: Assets → Categories → Add (Laptops / Phones / Monitors / Furniture / ID Cards).
- Bulk import: Assets → Import → CSV with serial / category / purchase_date / cost.
- Add one at a time: Assets → New → fill the form.
Day-to-day operations
- Assign to employee: row → Assign → pick employee → effective date.
- Unassign on return: row → Unassign → adds the return note + condition.
- Filter by status (Available / Assigned / Retired / Lost) from the toolbar.
- Offboarding kanban surfaces "Return laptop" tasks automatically when an employee with assigned assets is offboarded.
Procurement
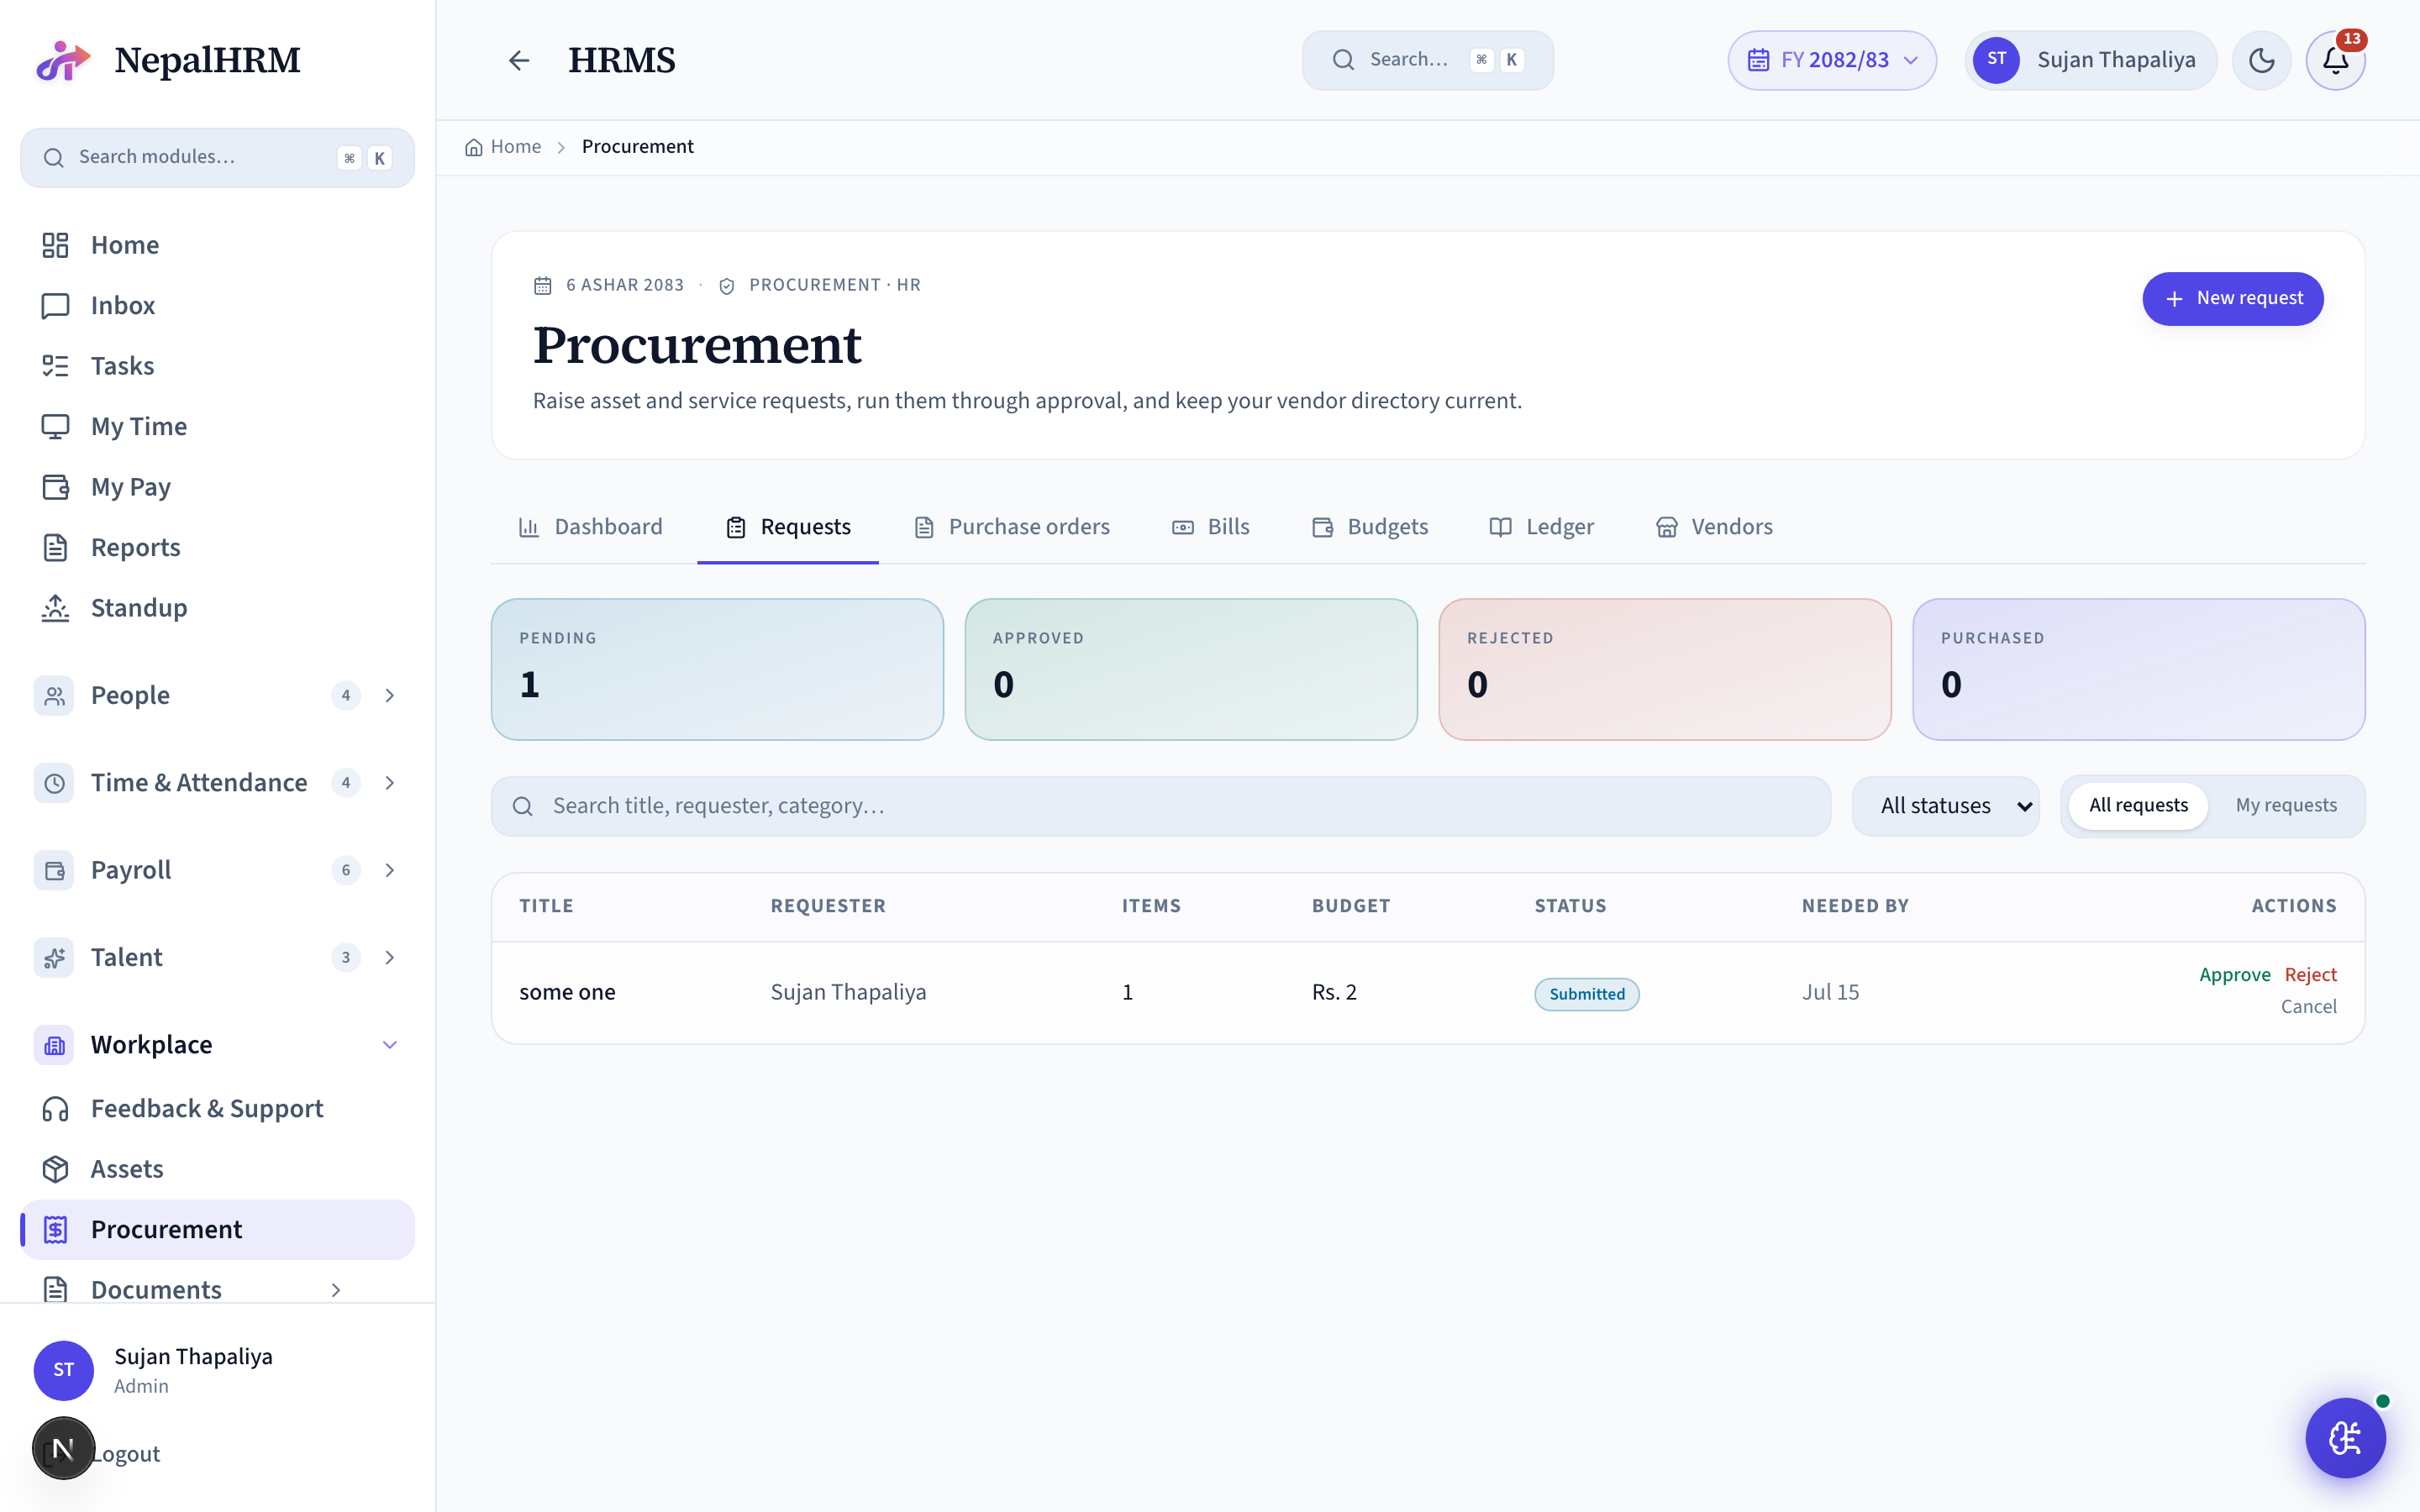
Request → Approve → Order → Receive workflow for assets and supplies. Employees raise procurement requests; HR / admin approve; approved requests turn into purchase orders against vendors; receiving marks them delivered.
Setup
- Vendors: Procurement → Vendors → Add (name + contact + payment terms + rating).
- Approval policy: who approves over what amount (one-step or two-step).
Day-to-day operations
- Employee: Procurement → New Request → title + quantity + expected cost + preferred vendor + needed-by date.
- Approver reviews; on approve, a draft PO is created against the chosen vendor.
- Issue PO to vendor → mark Issued.
- On delivery: mark Delivered + upload invoice.
Documents
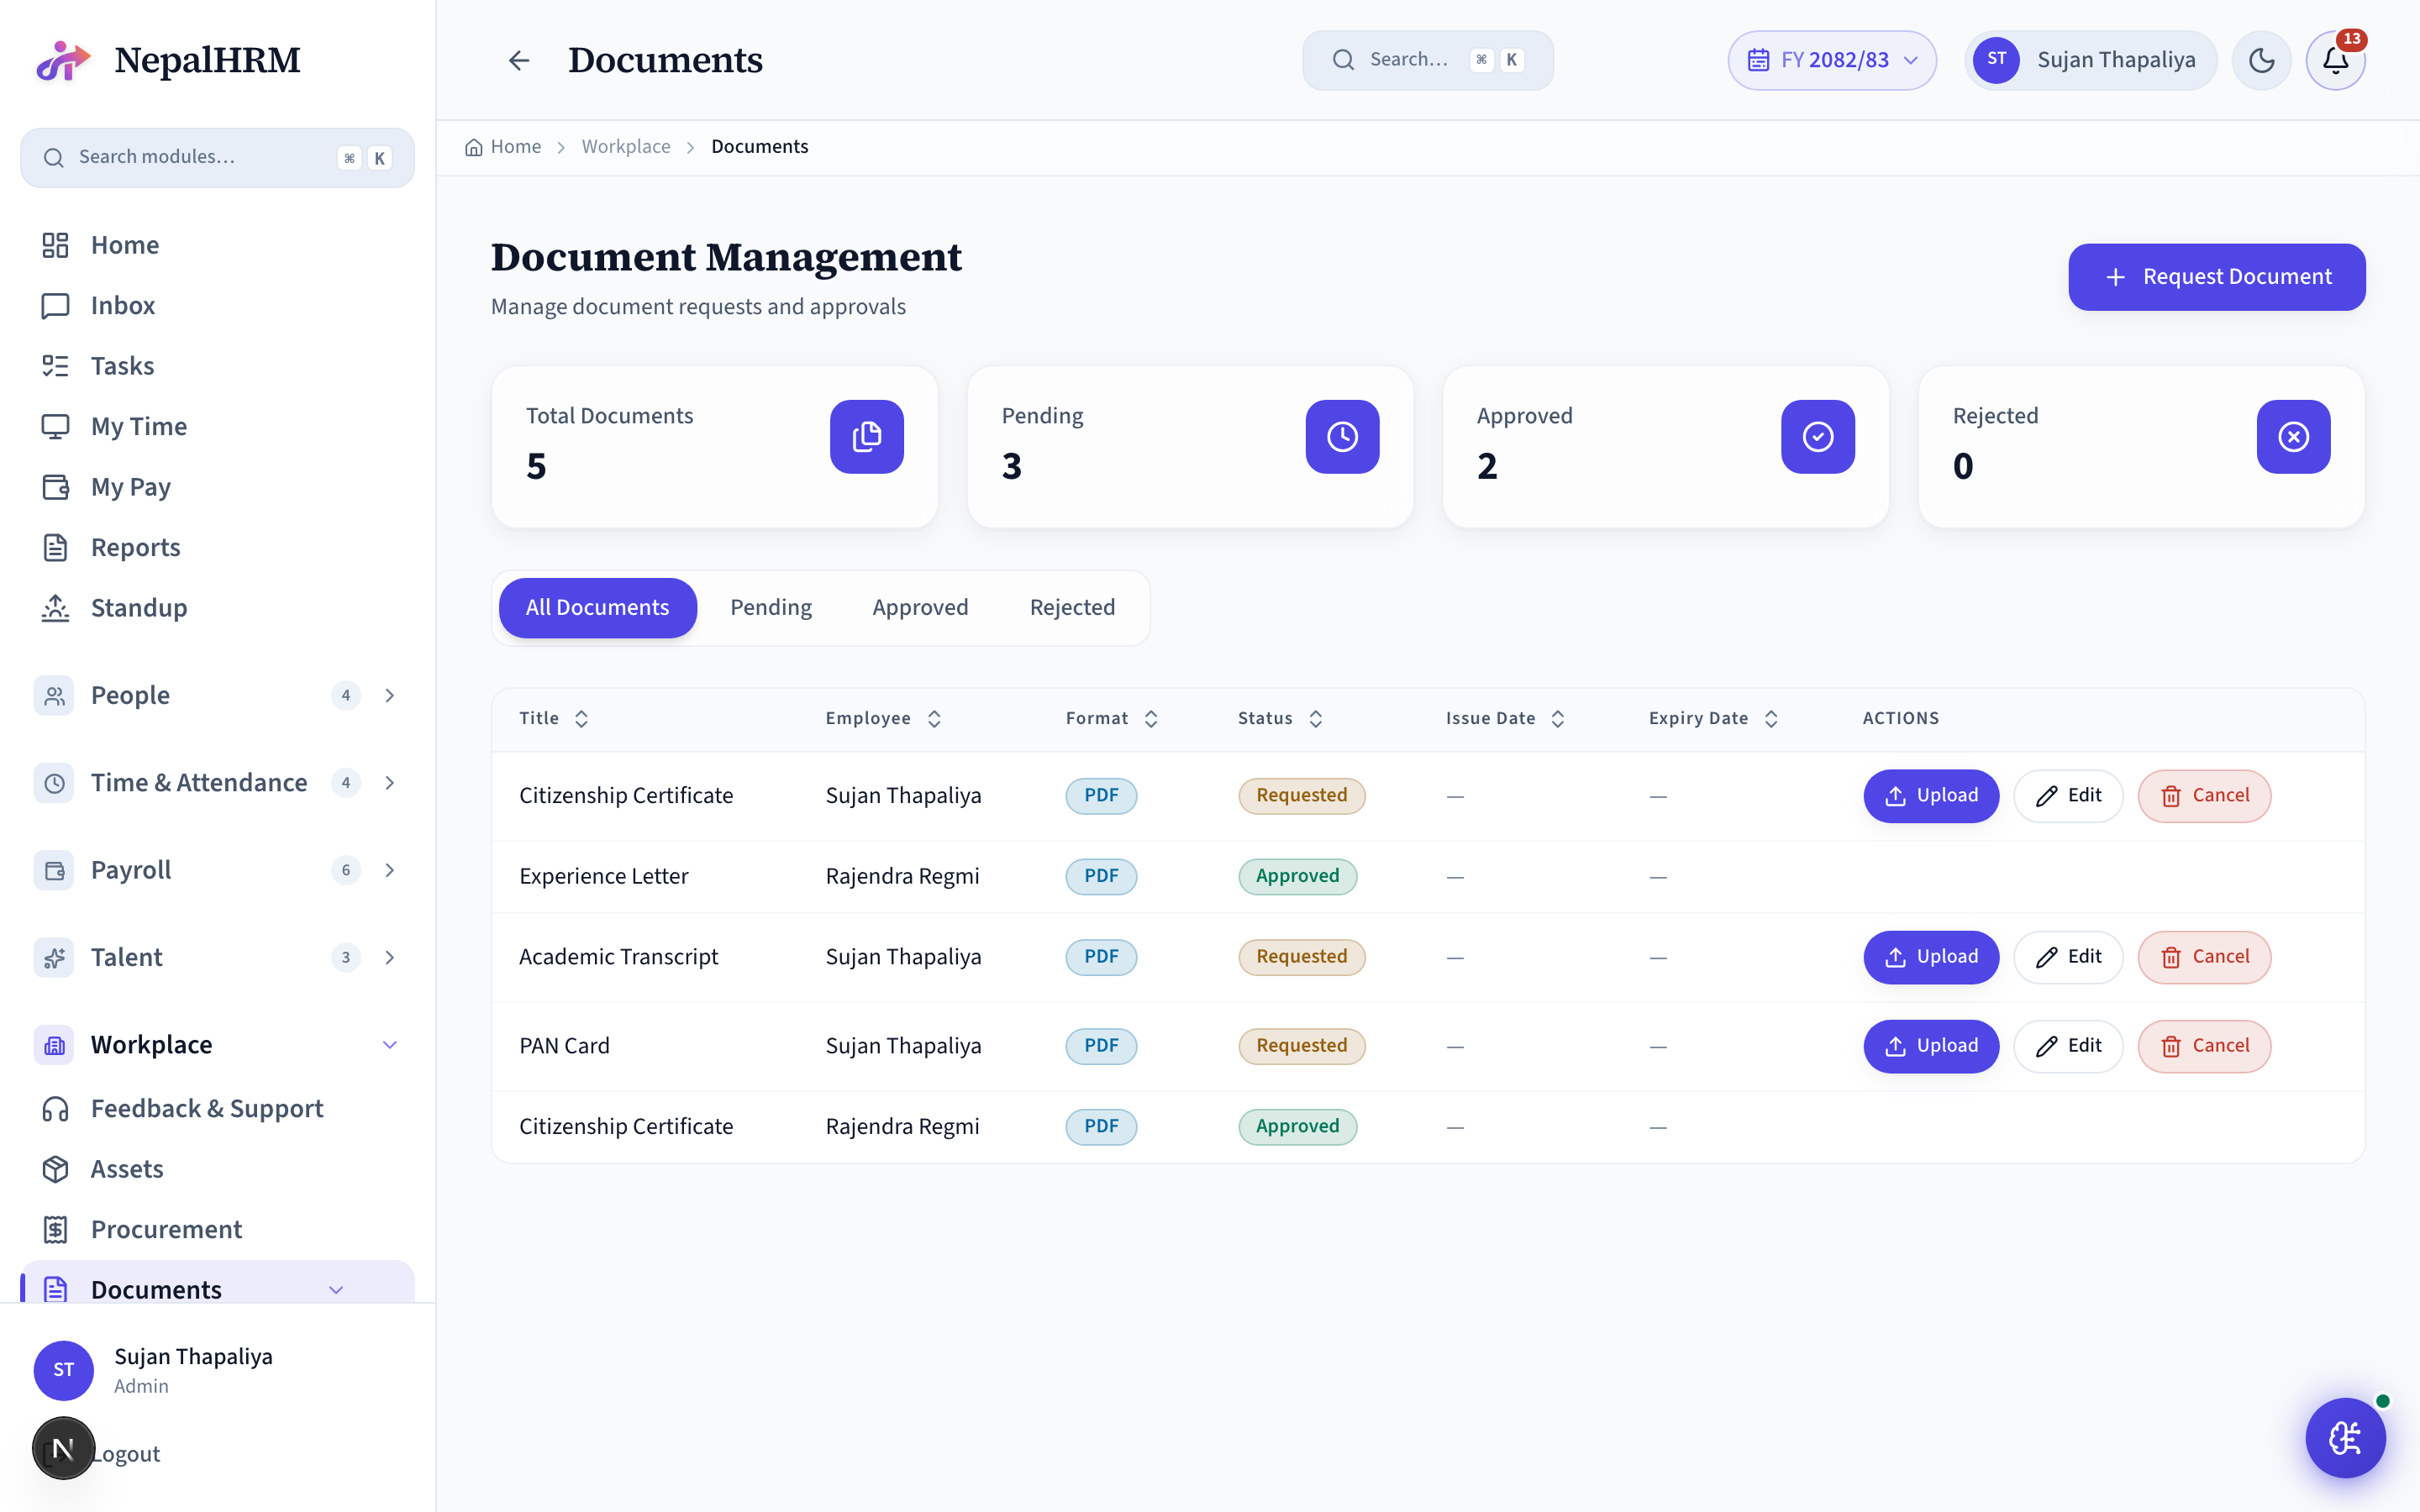
Central library of company documents + per-employee document requests. HR requests a document from an employee (PAN, citizenship, signed offer); employee uploads; HR reviews + approves. Audit trail per upload.
Setup
- Documents → Templates seeds the common types (Offer, Joining, Experience, Relieving, Salary Cert, NDA).
Day-to-day operations
- Request: Documents → New Request → pick template + employee.
- Employee uploads from their My Documents tab.
- HR reviews → Approve / Reject (with reason). Approved docs stay in the employee's profile permanently.
Policies
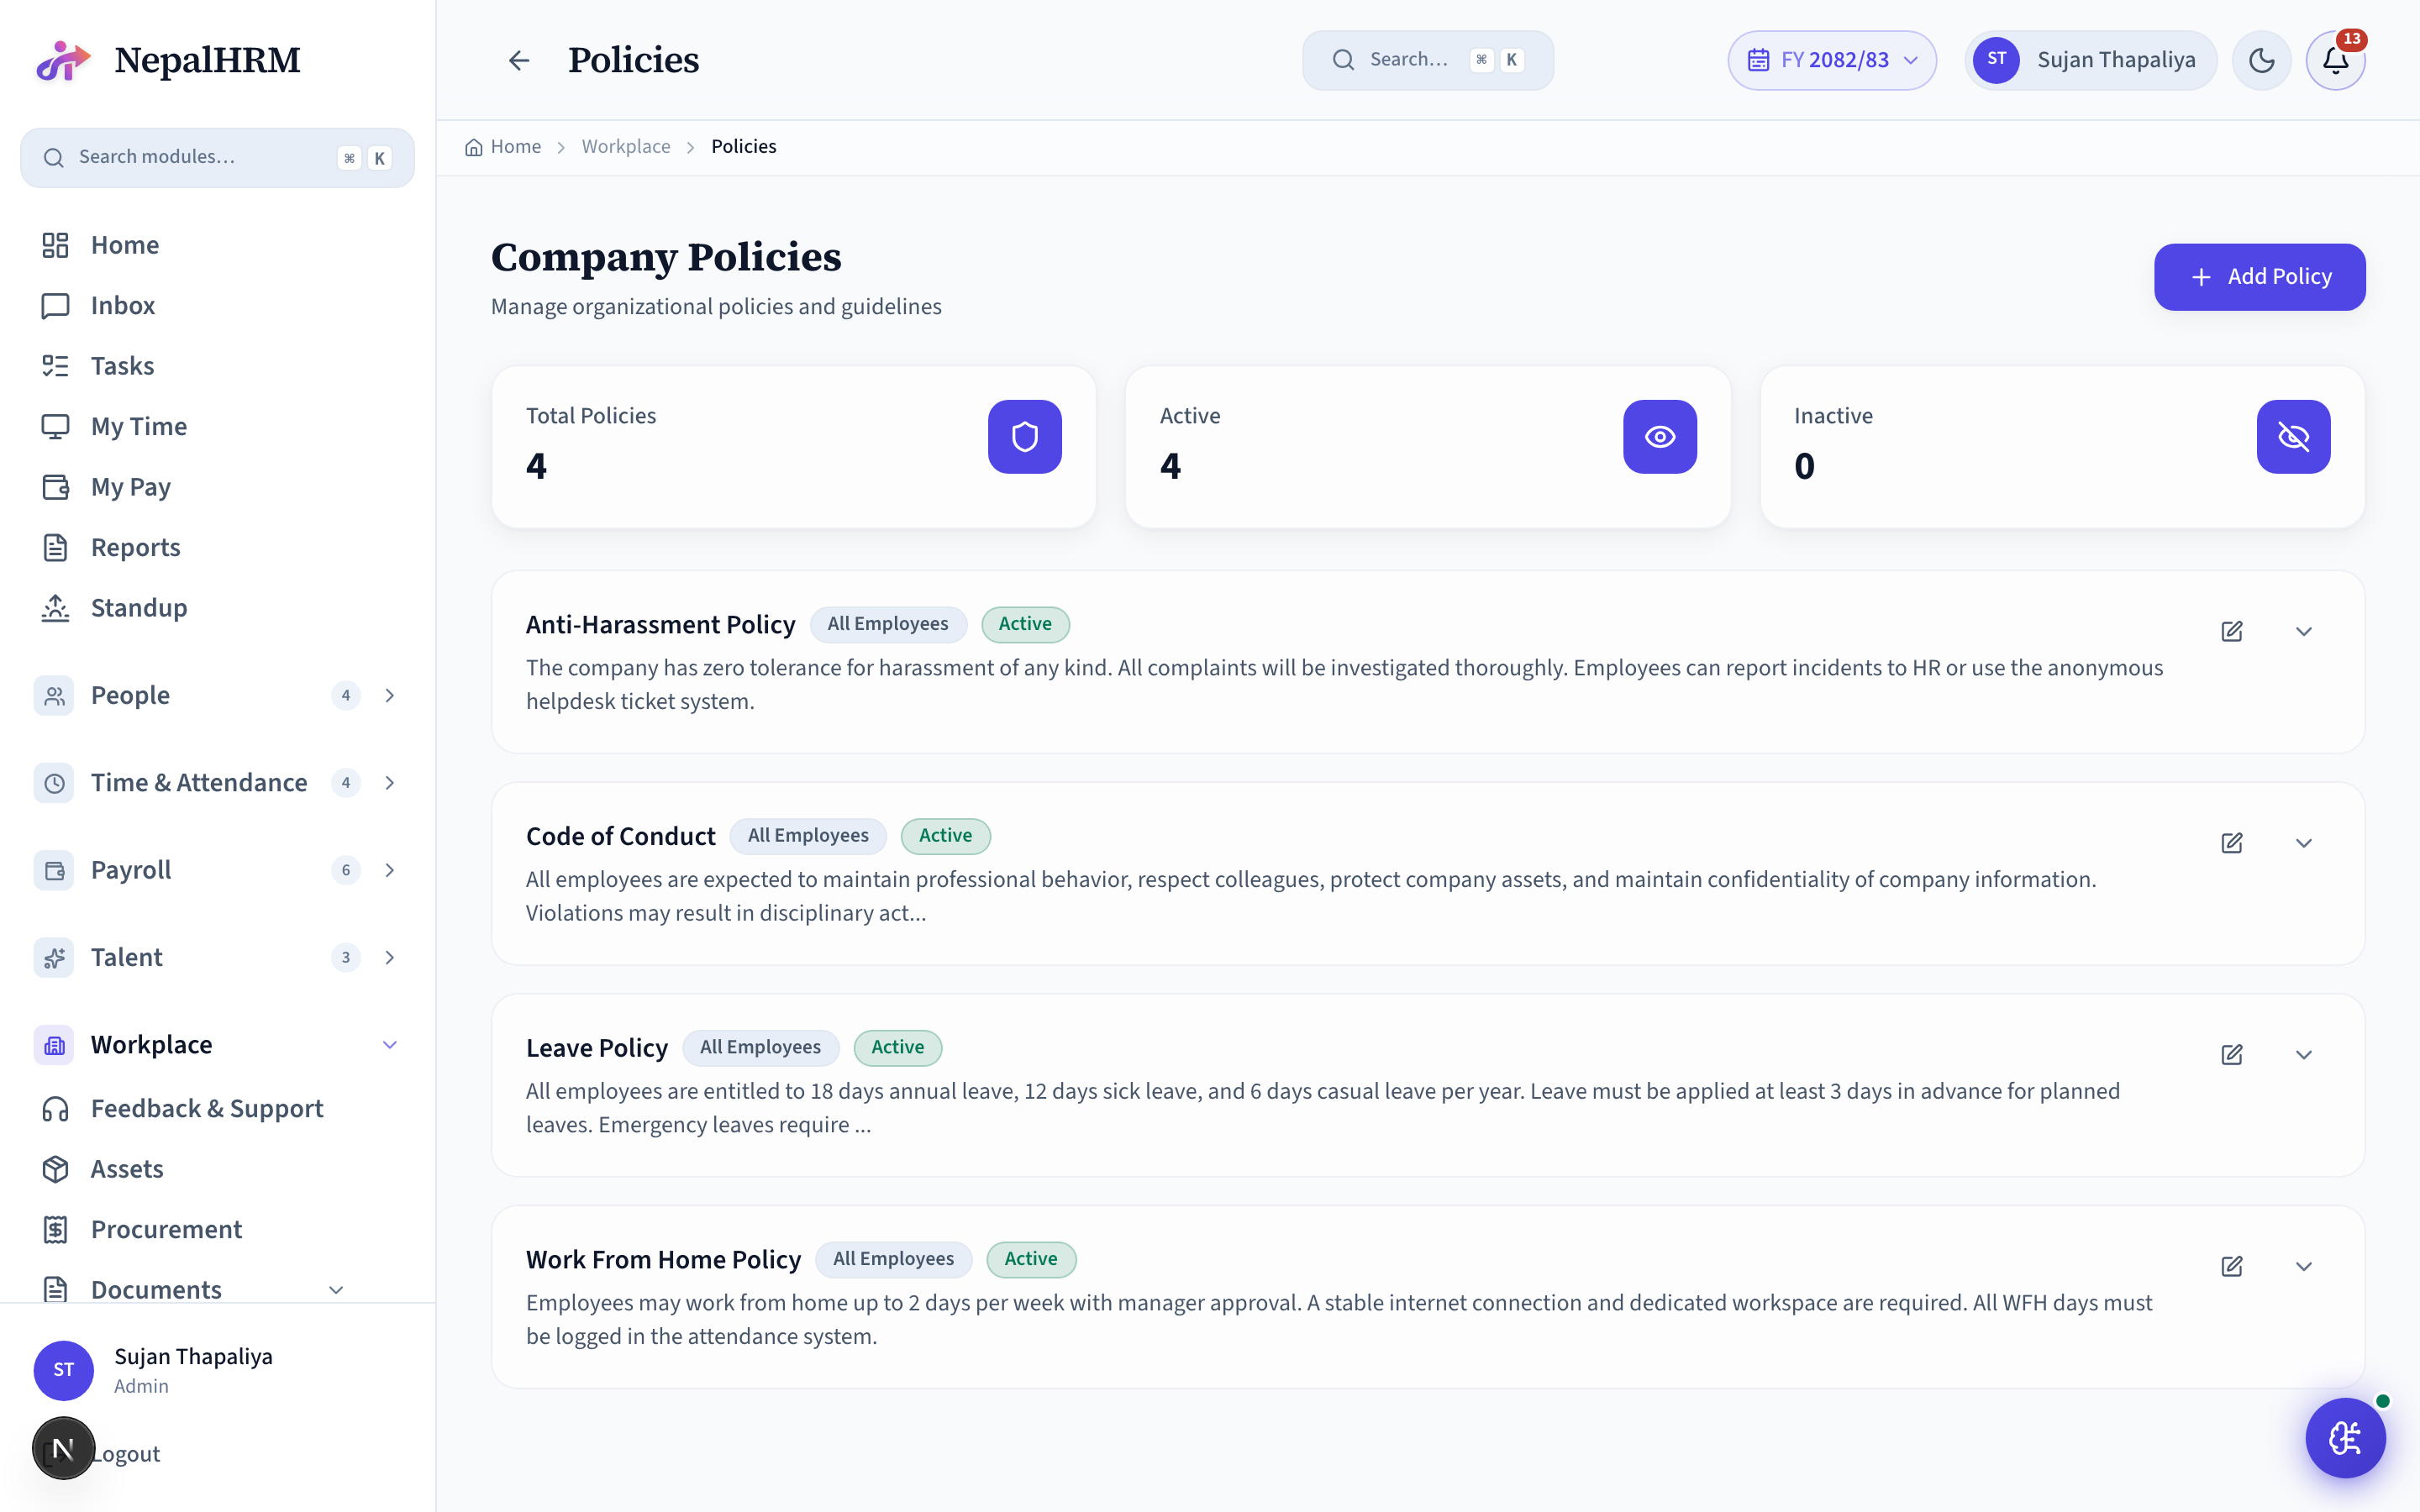
Company policy documents (Code of Conduct, Anti-harassment, Travel Reimbursement, IT Acceptable Use). HR uploads; employees acknowledge; HR sees who's pending.
Setup
- Policies → Add: title + body (markdown) + effective_from.
- Set acknowledgement deadline if you want HR to chase non-readers.
Day-to-day operations
- Employees see new policies in their dashboard's Action Needed strip.
- Acknowledge with one click.
- HR's Policies → "Pending Acknowledgements" lists who hasn't read yet.
Doc Templates
Letterhead templates with variable placeholders ({{employee_name}}, {{joining_date}}, {{salary}}) that HR uses to generate offer letters, experience certificates, relieving letters, salary certificates, NDAs on demand.
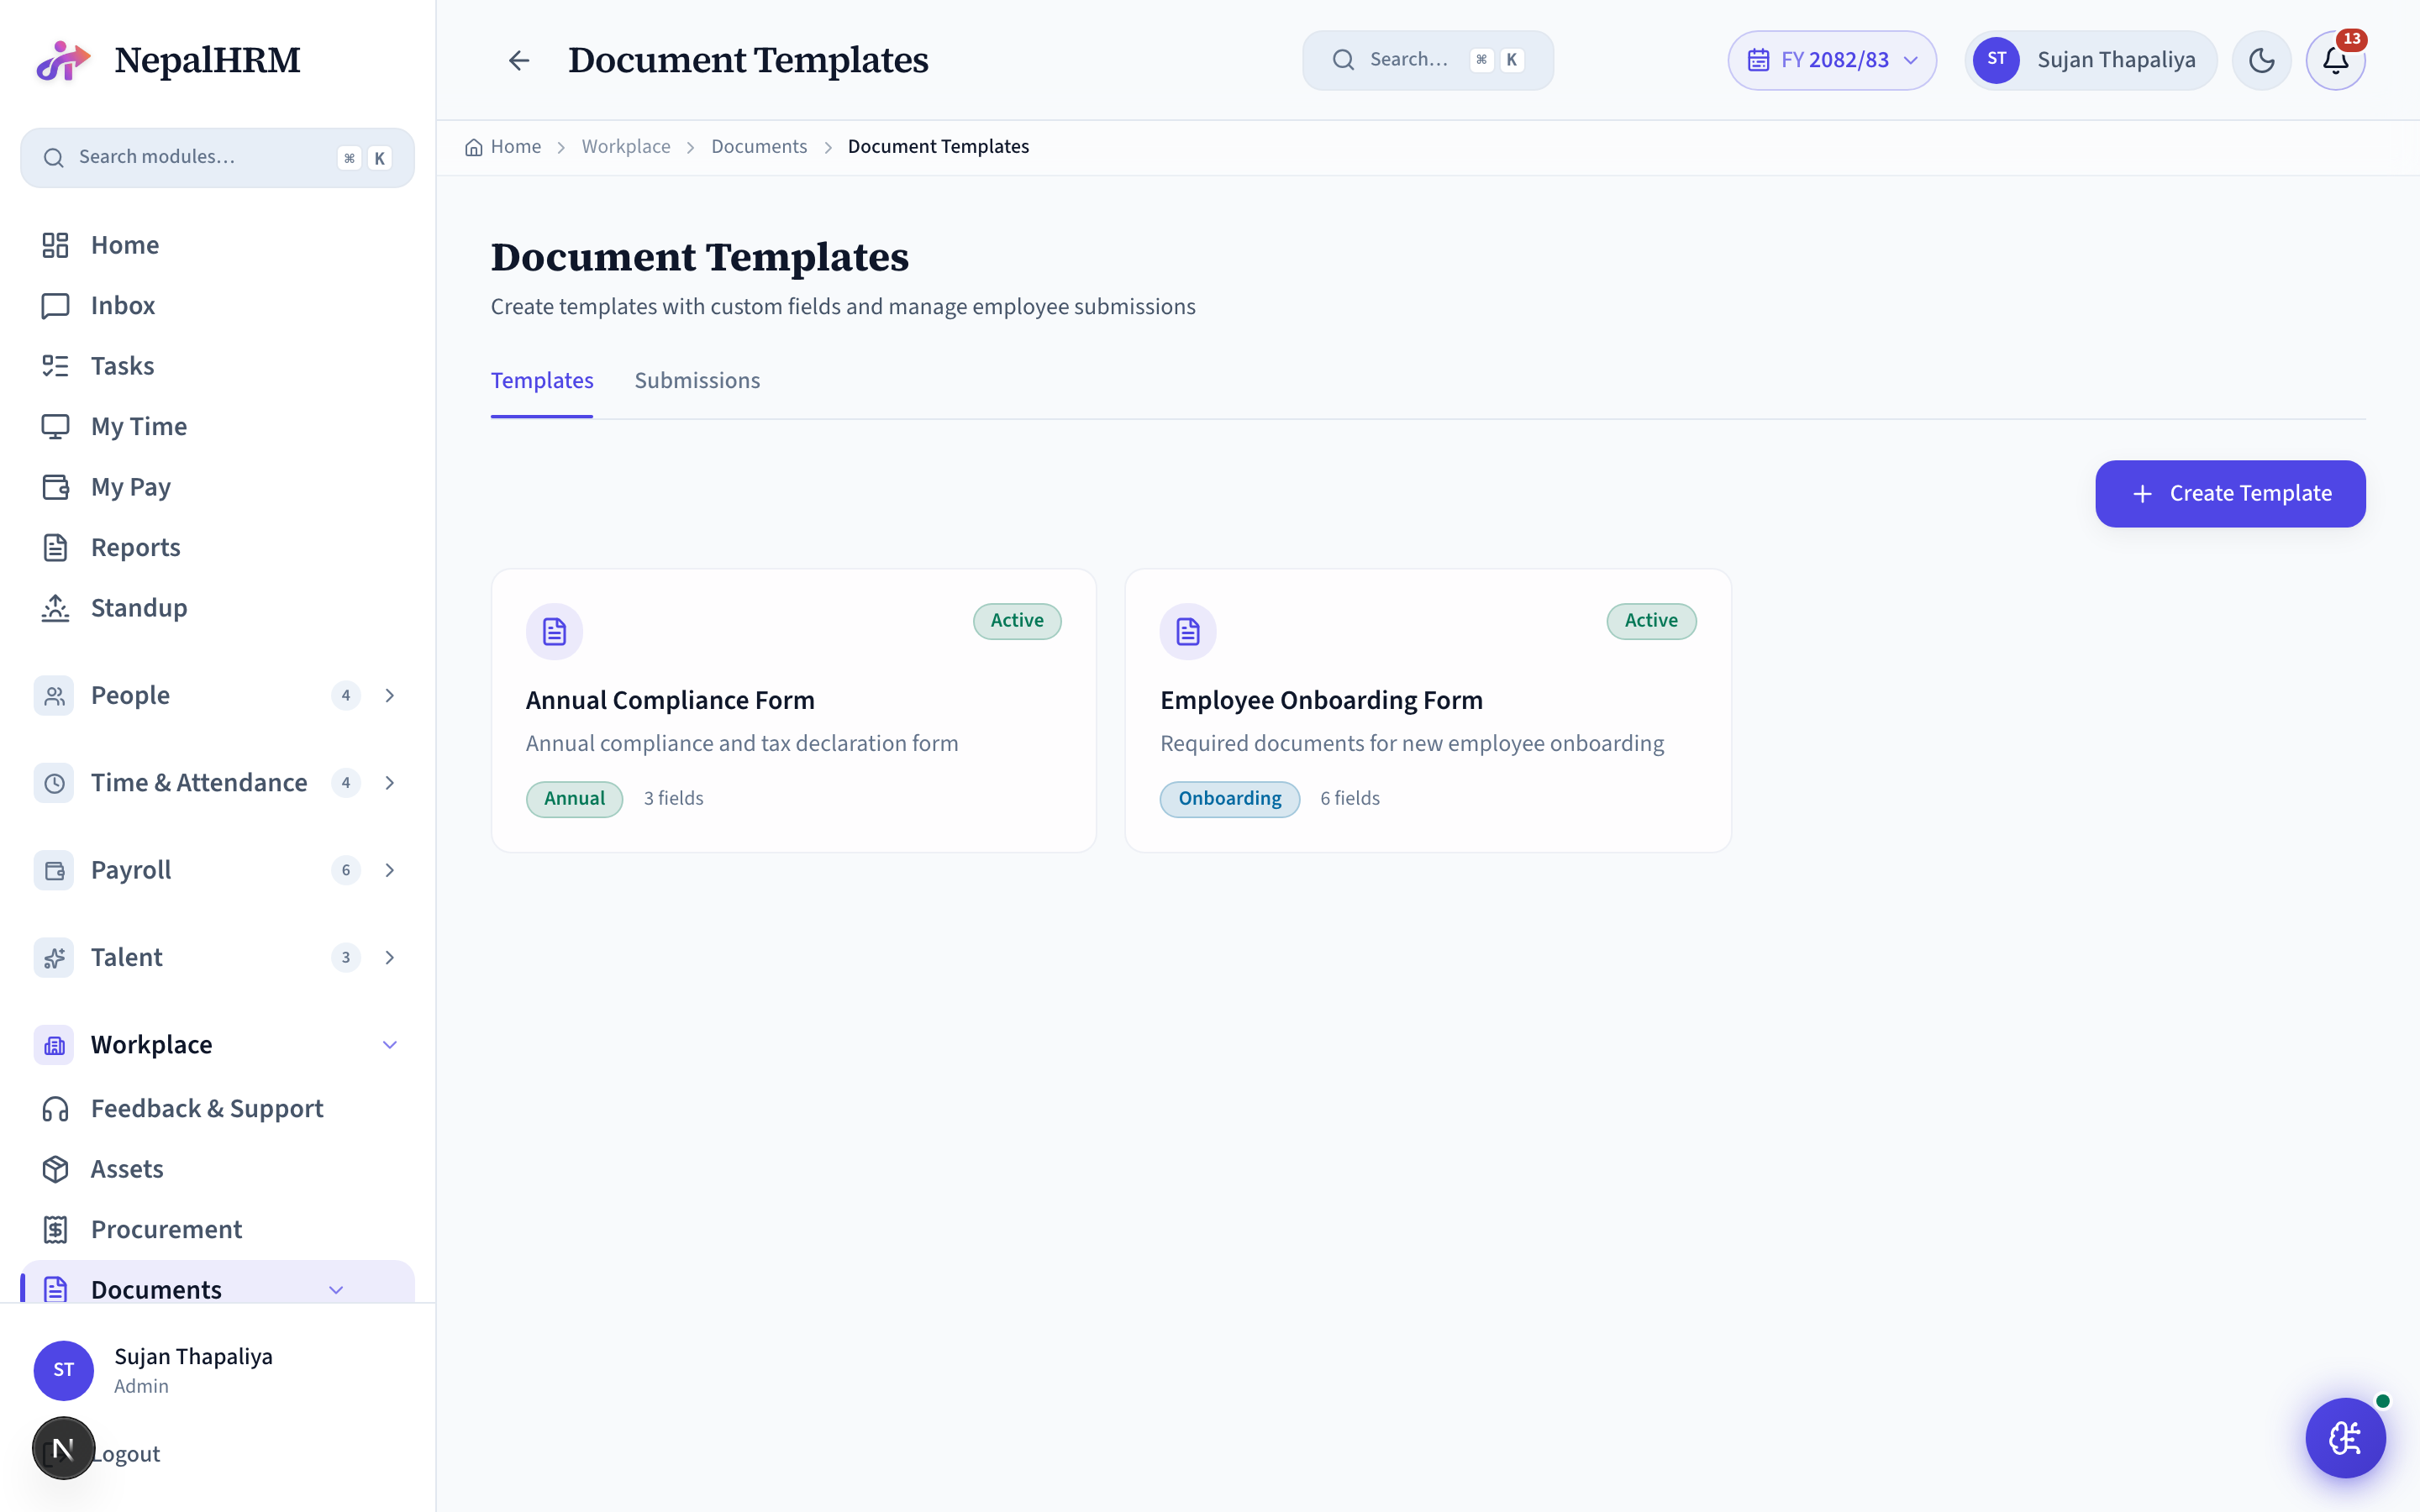
Setup
- Doc Templates → Add: name + category (onboarding / offboarding / general / annual) + body (HTML with {{vars}}).
- Test render: "Preview" with a sample employee to see the filled output.
Day-to-day operations
- Generate from a profile: Employees → row → "Generate Letter" → pick template → preview, then export as PDF or DOCX.
- Bulk-generate: Doc Templates → Generate Bulk → pick employees → zip of files.
- Letters carry an e-document disclaimer noting they’re system-generated; track issued letters in the employee's Documents tab.
Helpdesk
Internal tickets - employees raise IT / facilities / payroll-query tickets; the right team picks them up, comments, and resolves. Each ticket has priority (low → urgent), status (new → in_progress → on_hold → resolved), assignee, and a deadline. Audit trail per ticket so HR / IT can prove SLA.
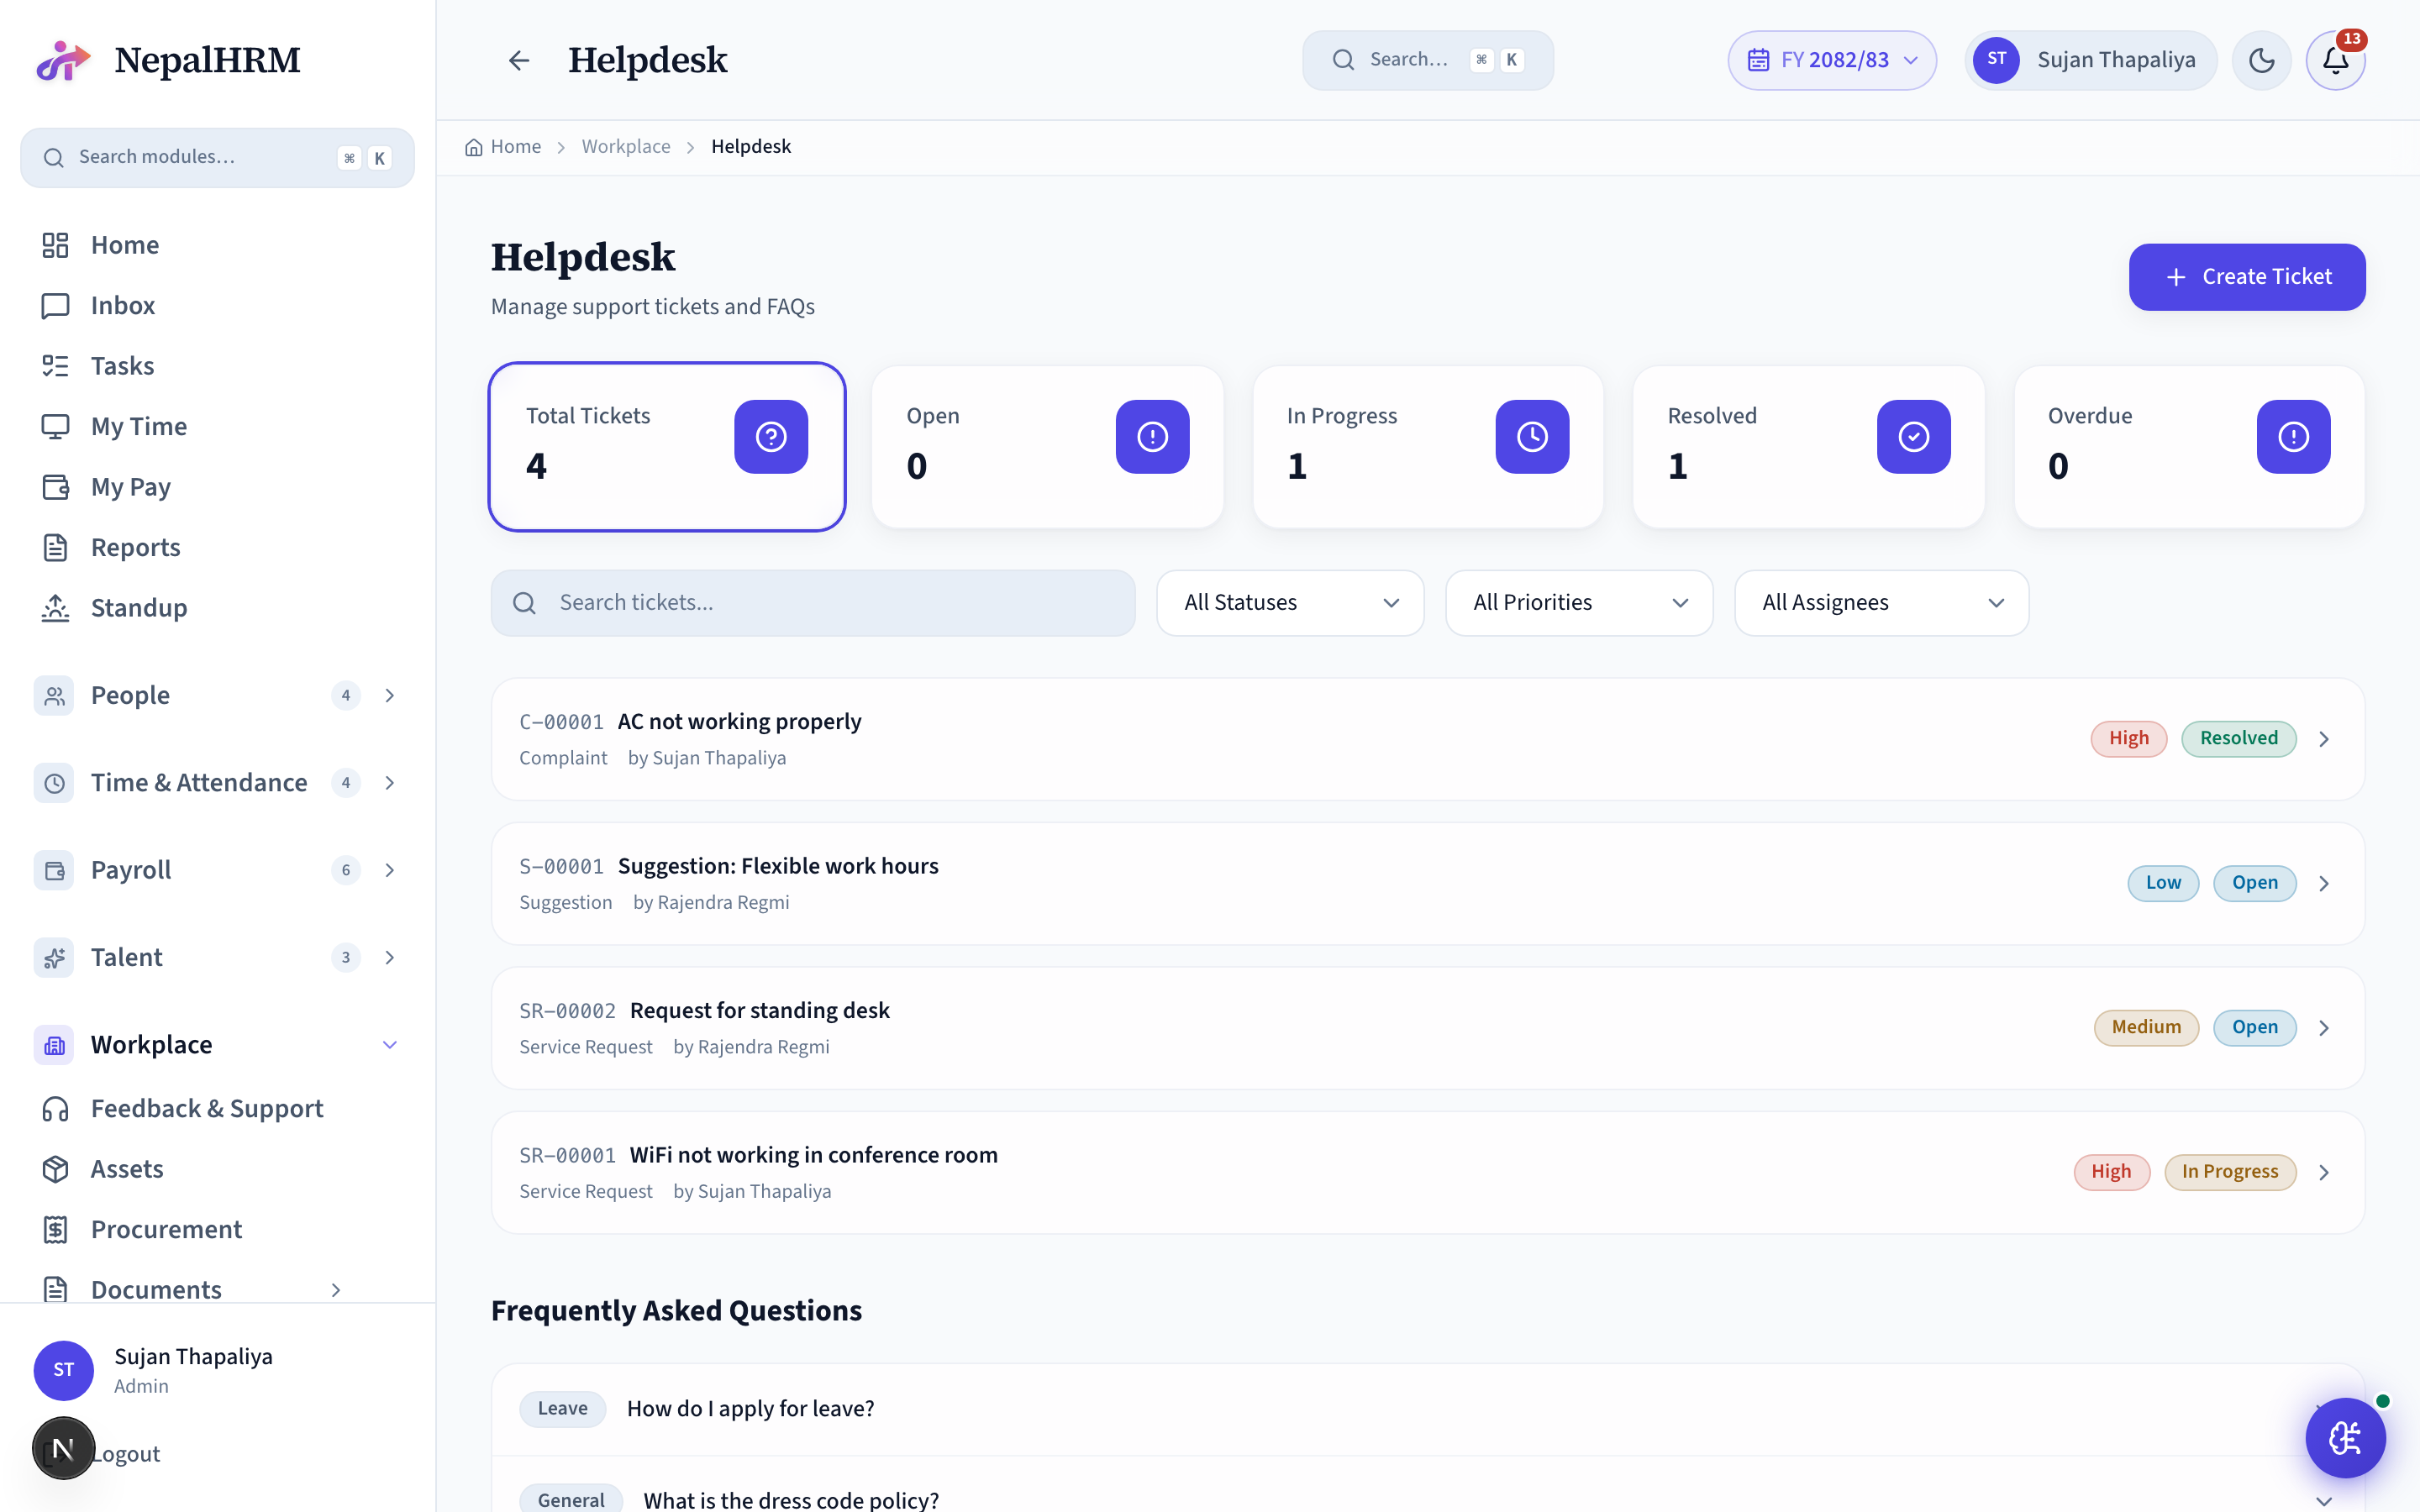
Setup
- Define ticket types: Helpdesk → Settings → Ticket Types (IT Support, Facilities, Payroll Query).
- Assign default owners per type so tickets route automatically.
- Optional: SLA per priority (e.g. urgent = respond in 1h).
Day-to-day operations
- Employee raises: Helpdesk → New Ticket → type + title + description + priority.
- Owner takes ownership → status In progress → comment thread.
- Resolve with a resolution note; the ticket archives.
- Reports: backlog by type, SLA breach count, top contributors.
Grievances
A confidential grievance channel - employees raise complaints (including harassment) routed to the right committee, with case tracking.
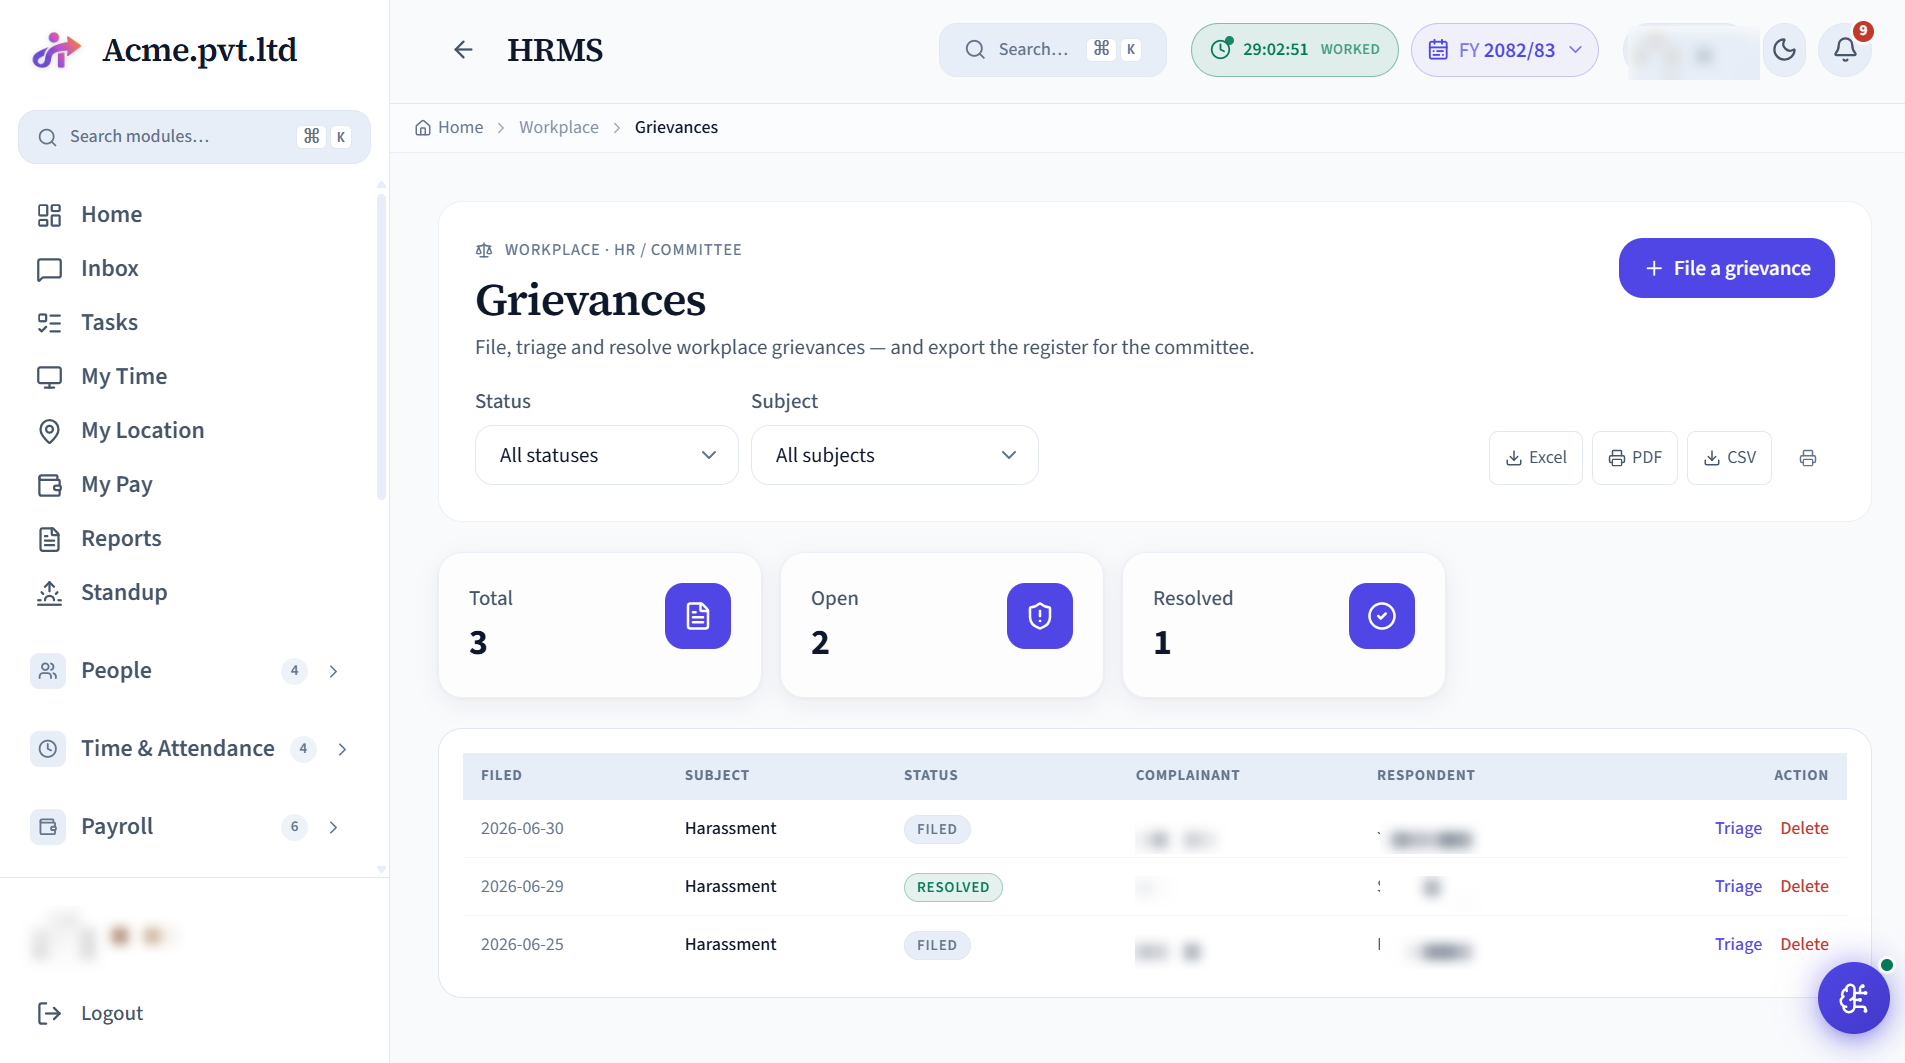
Setup
- Define grievance categories and the committee.
Day-to-day operations
- Employees file; the committee investigates and resolves with a full audit trail.
Platform Updates
The inbox for platform-wide notices from NepalHRM - maintenance windows and feature announcements - that the notification bell deep-links to.
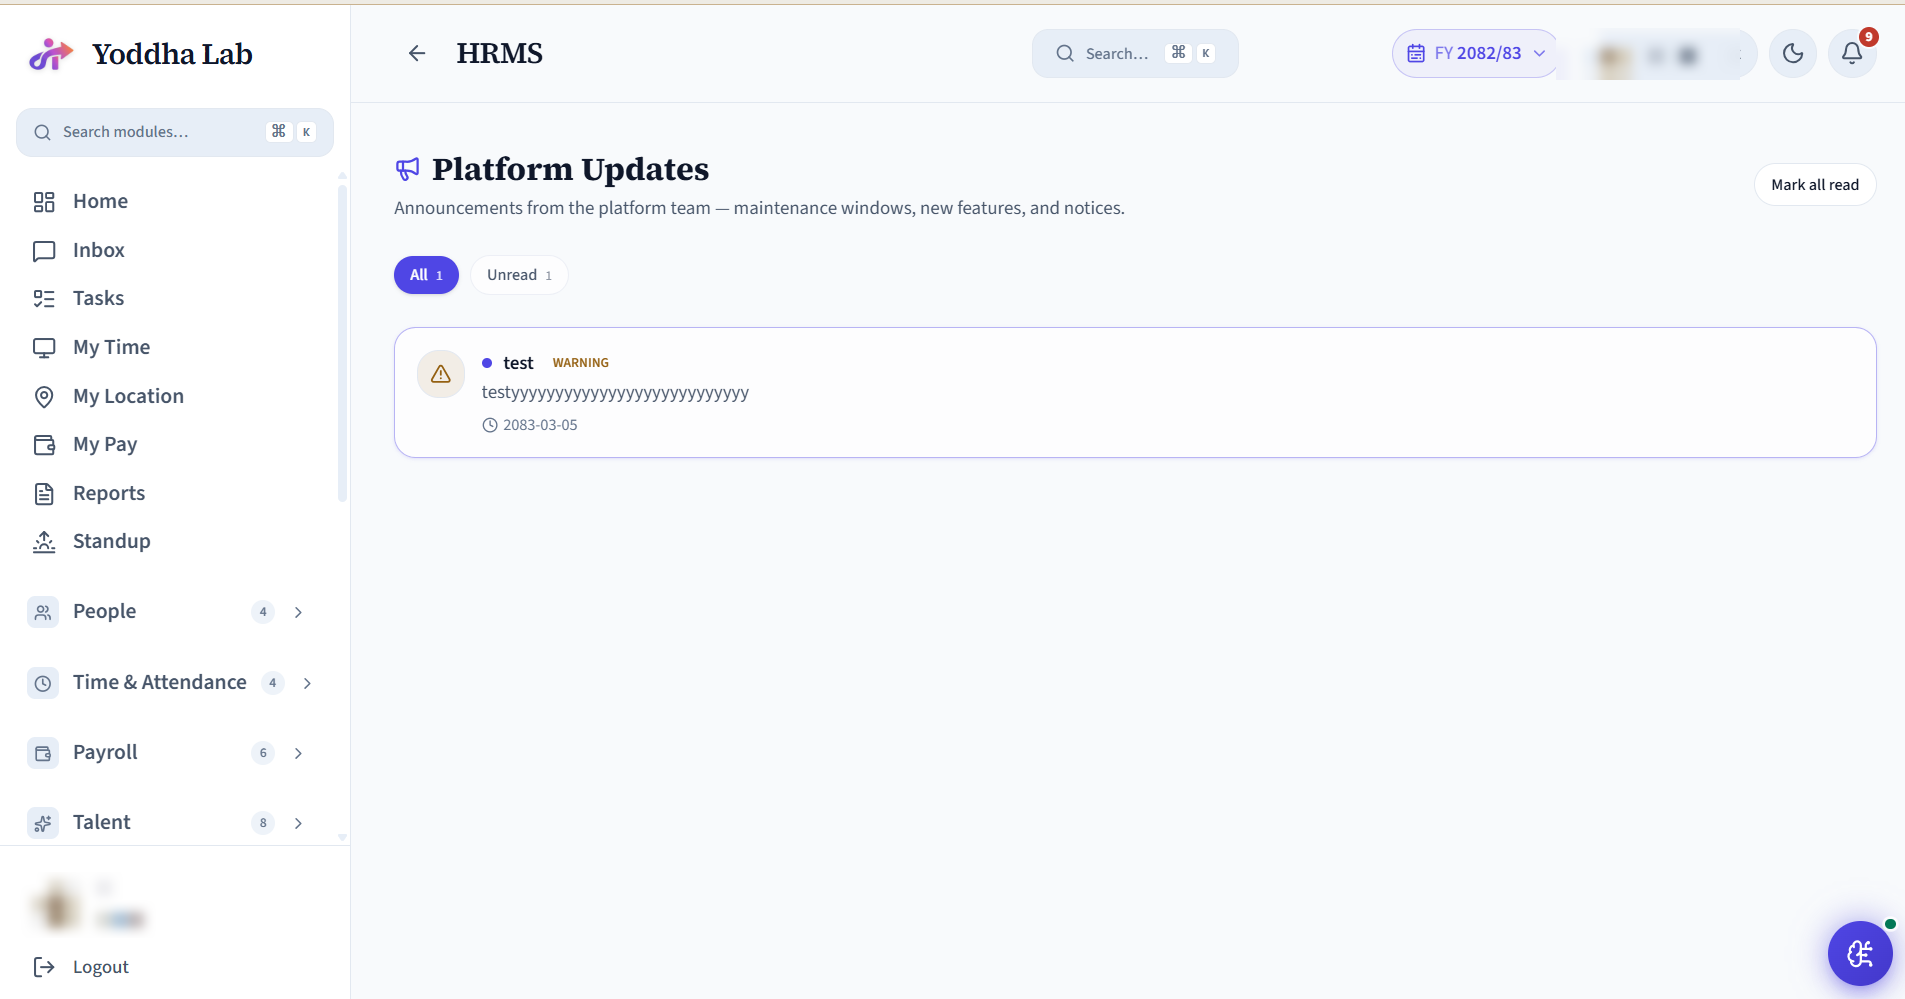
Setup
- Nothing to configure - platform updates arrive from the NepalHRM team automatically.
- Check it for maintenance windows and new-feature notices; use Mark all read to clear them.
Day-to-day operations
- Read updates as they arrive; awareness only, nothing to action.
Surveys
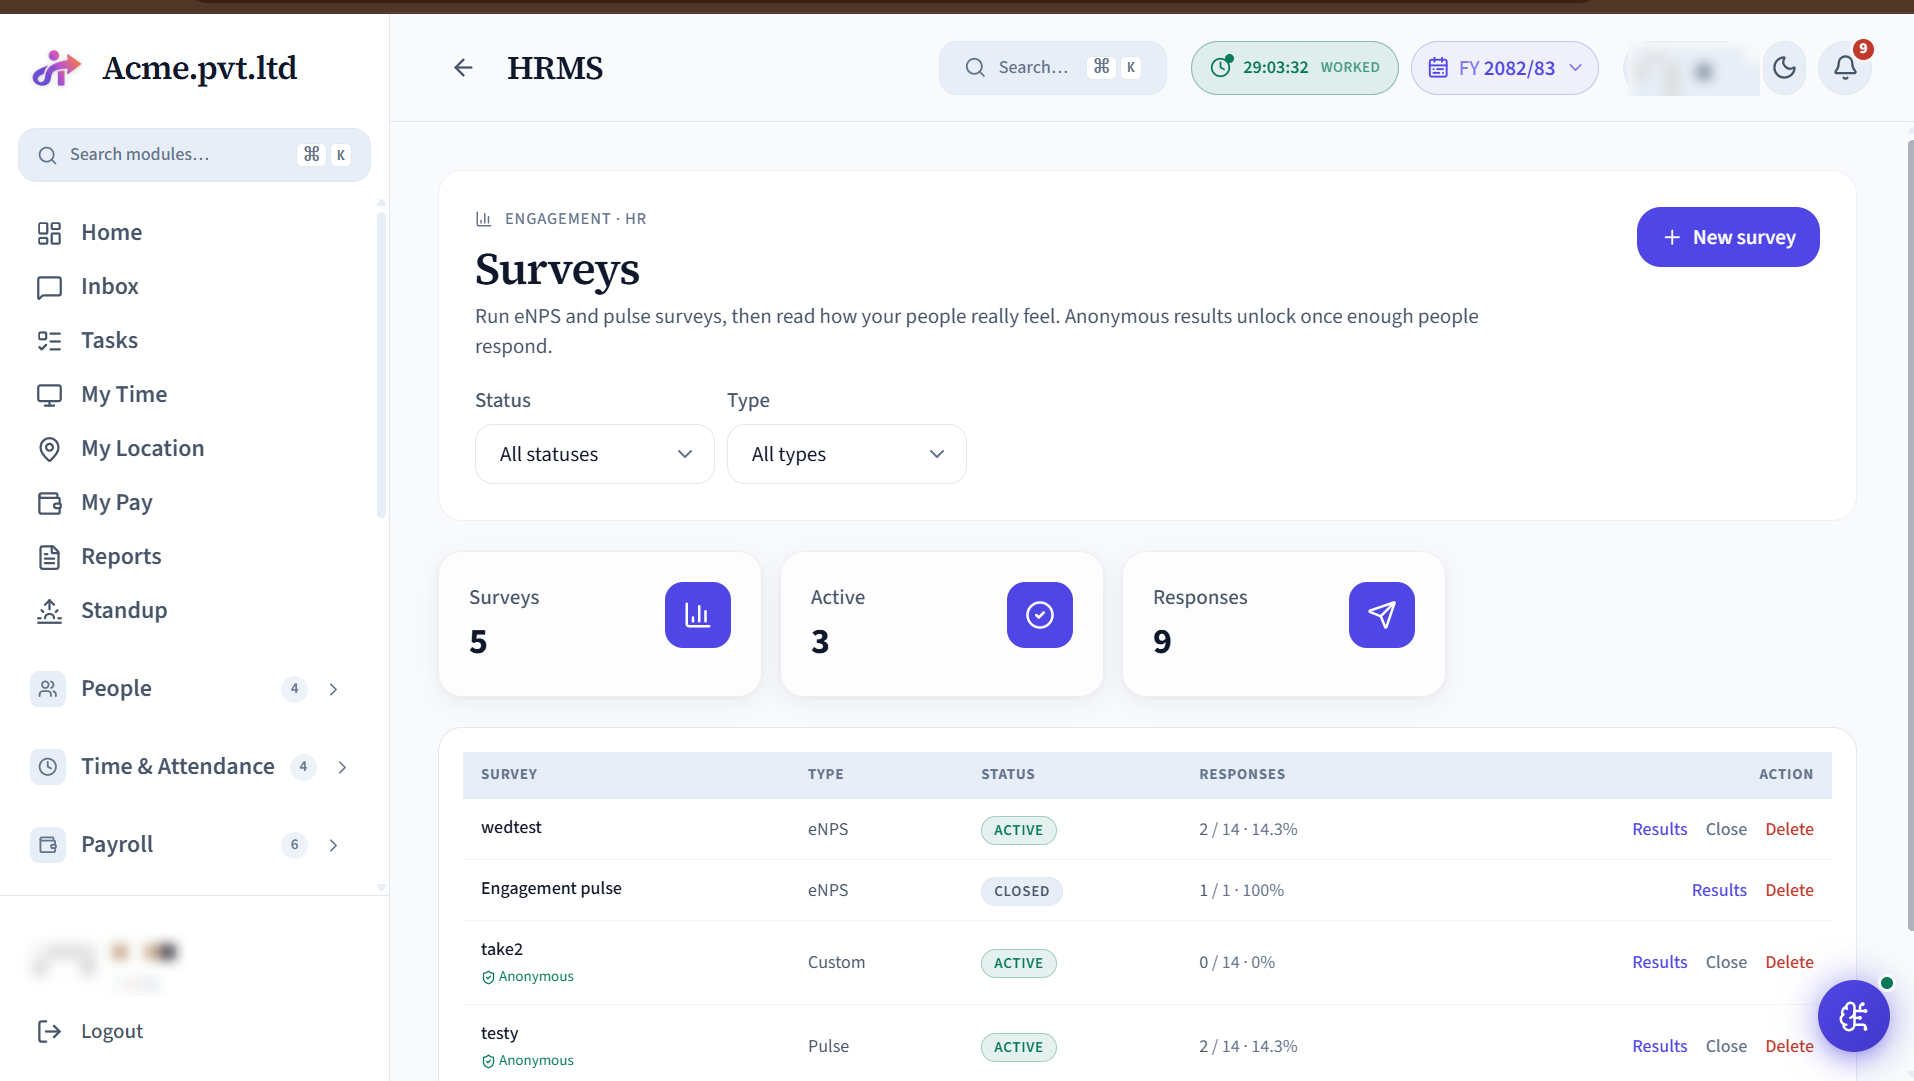
Engagement and pulse surveys - eNPS, sentiment and custom questionnaires with anonymous responses and trend reporting.
Setup
- Build a survey, set the audience and anonymity.
Day-to-day operations
- Launch, collect responses, then read the rollup and trend.
Announcements
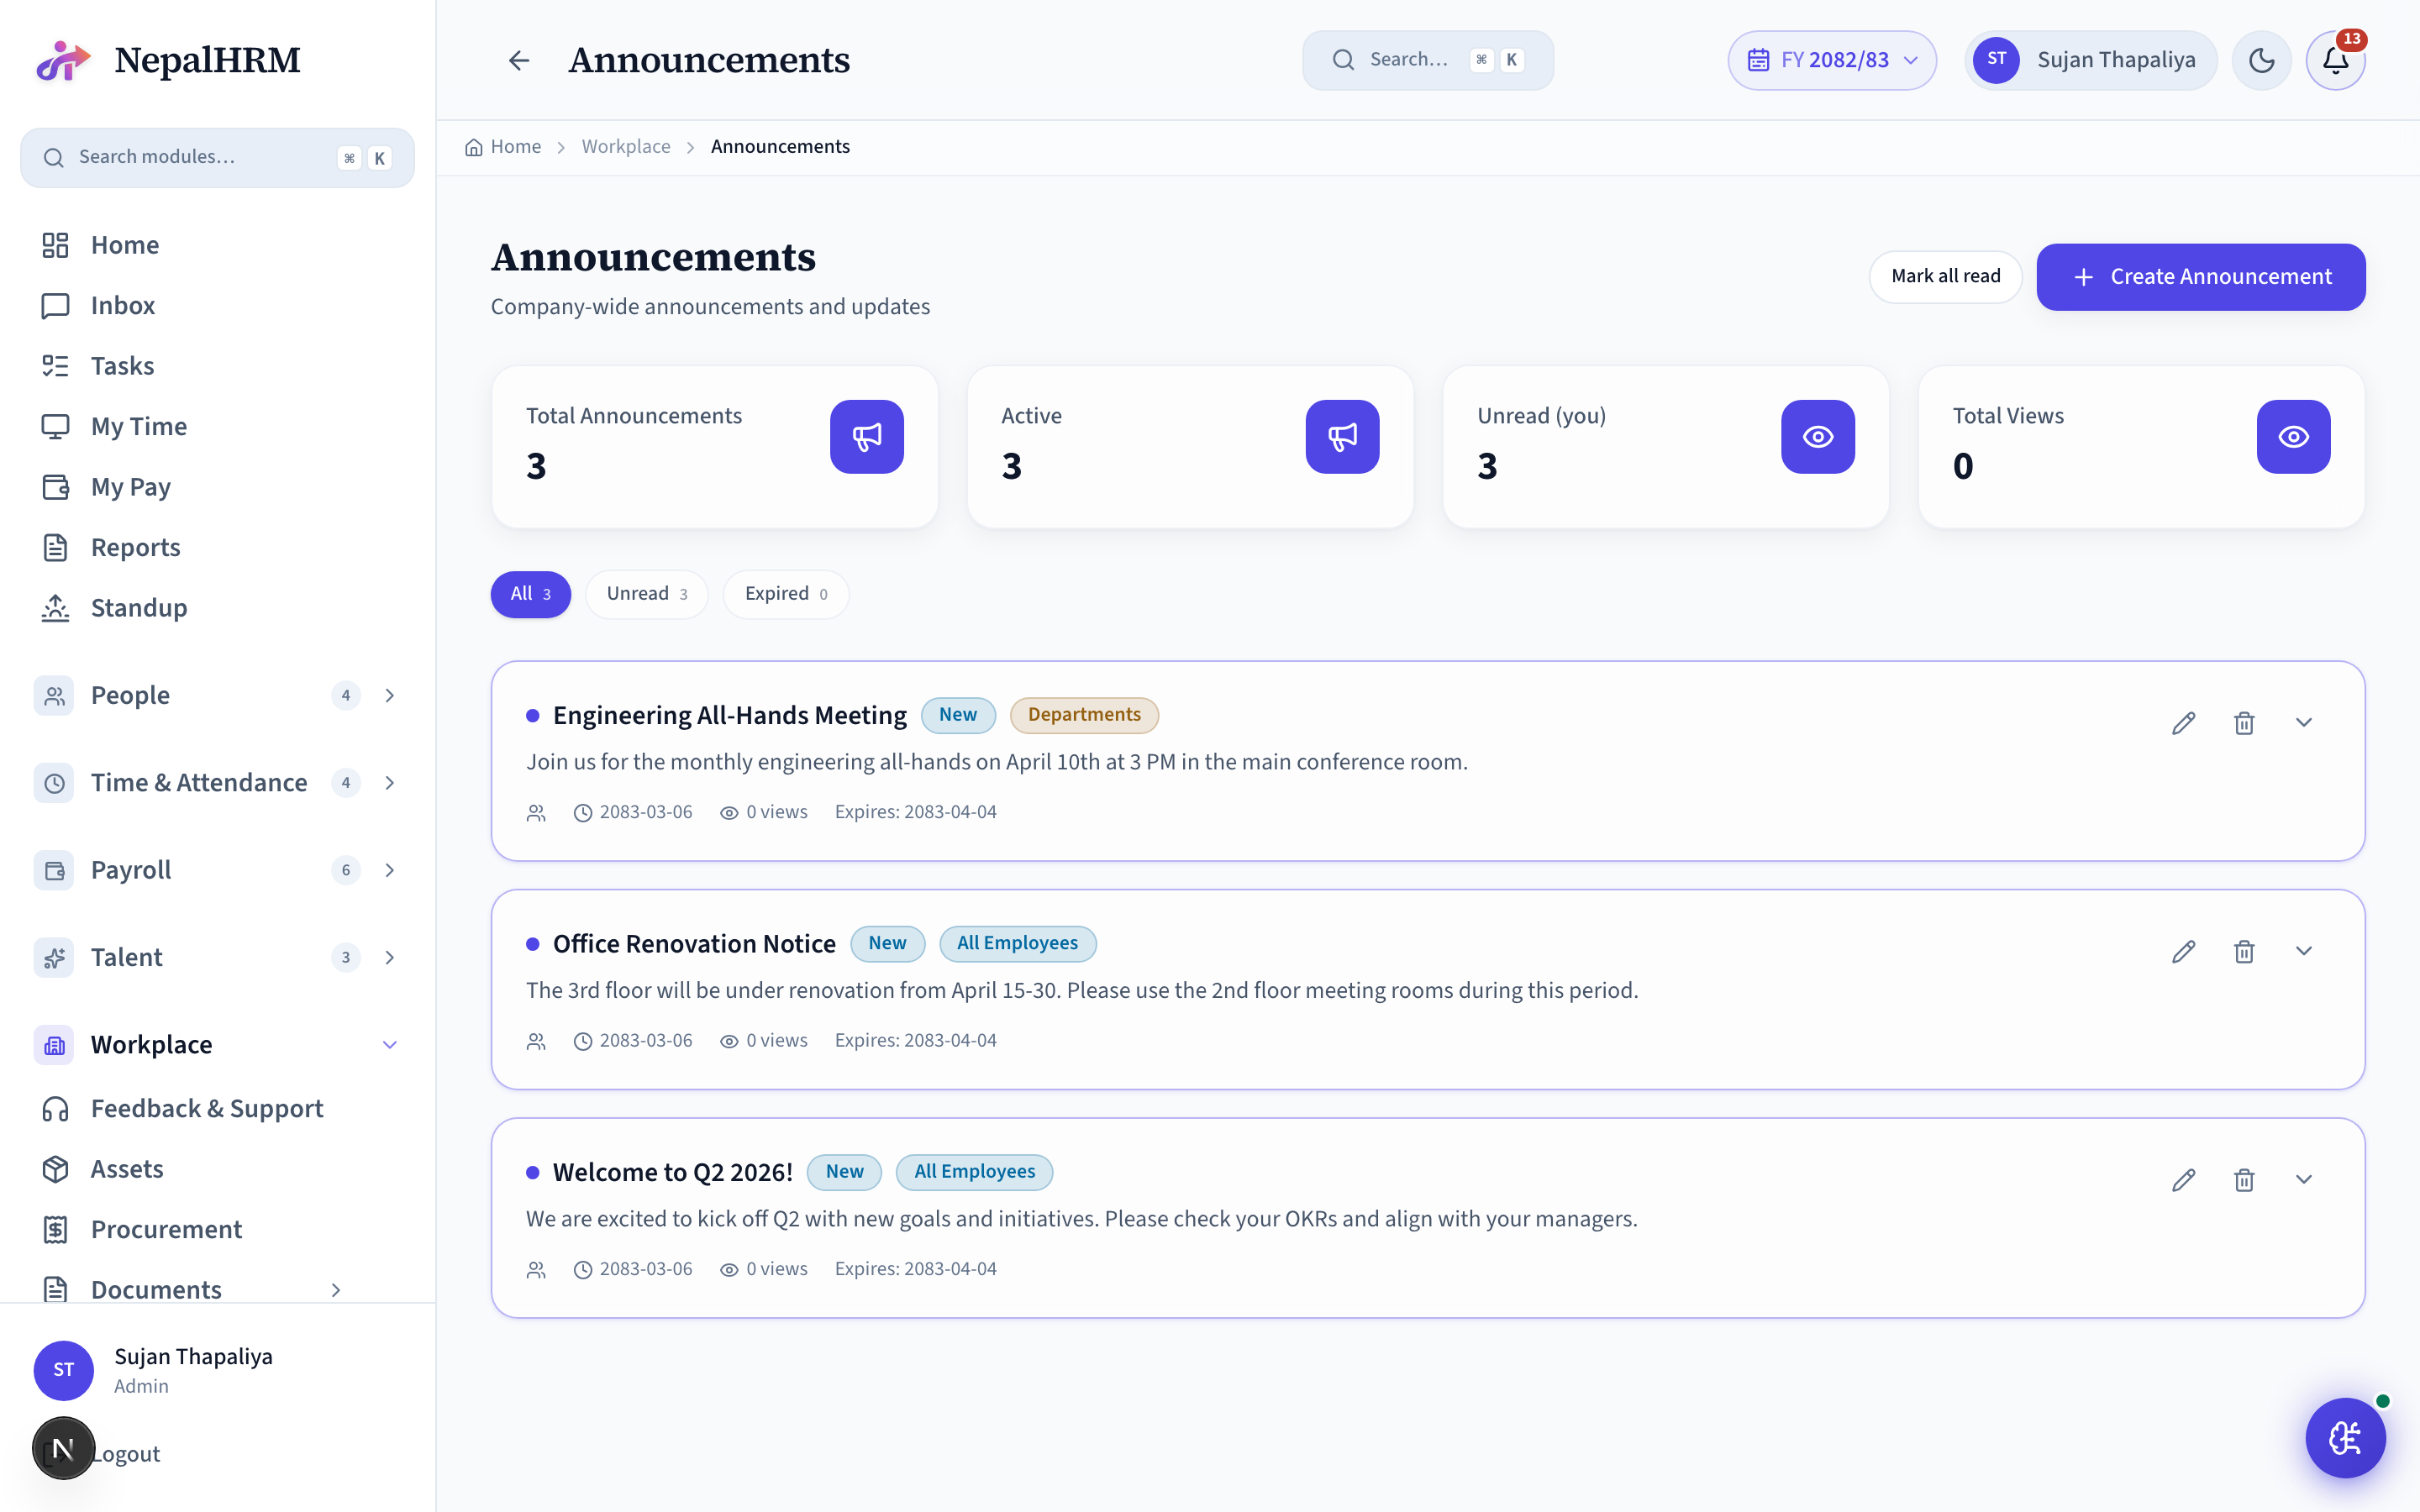
Company-wide broadcasts: holiday notices, policy updates, all-hands invites. HR posts to #announcements channel (write-restricted to HR/admin) and the message also surfaces as a dashboard banner for the duration HR specifies.
Setup
- Built-in - the Announcements space is created for you; only HR/admin can post.
- Decide who may post and whether an announcement needs acknowledgement before you send the first one.
Day-to-day operations
- HR: Announcements → New → title + body + (optional) acknowledge-required + expiry.
- Acknowledge-required announcements track who's read them; HR sees the gap.
- Reactions / comments allowed; reduces the email-blast follow-up clutter.
Activity Tracker
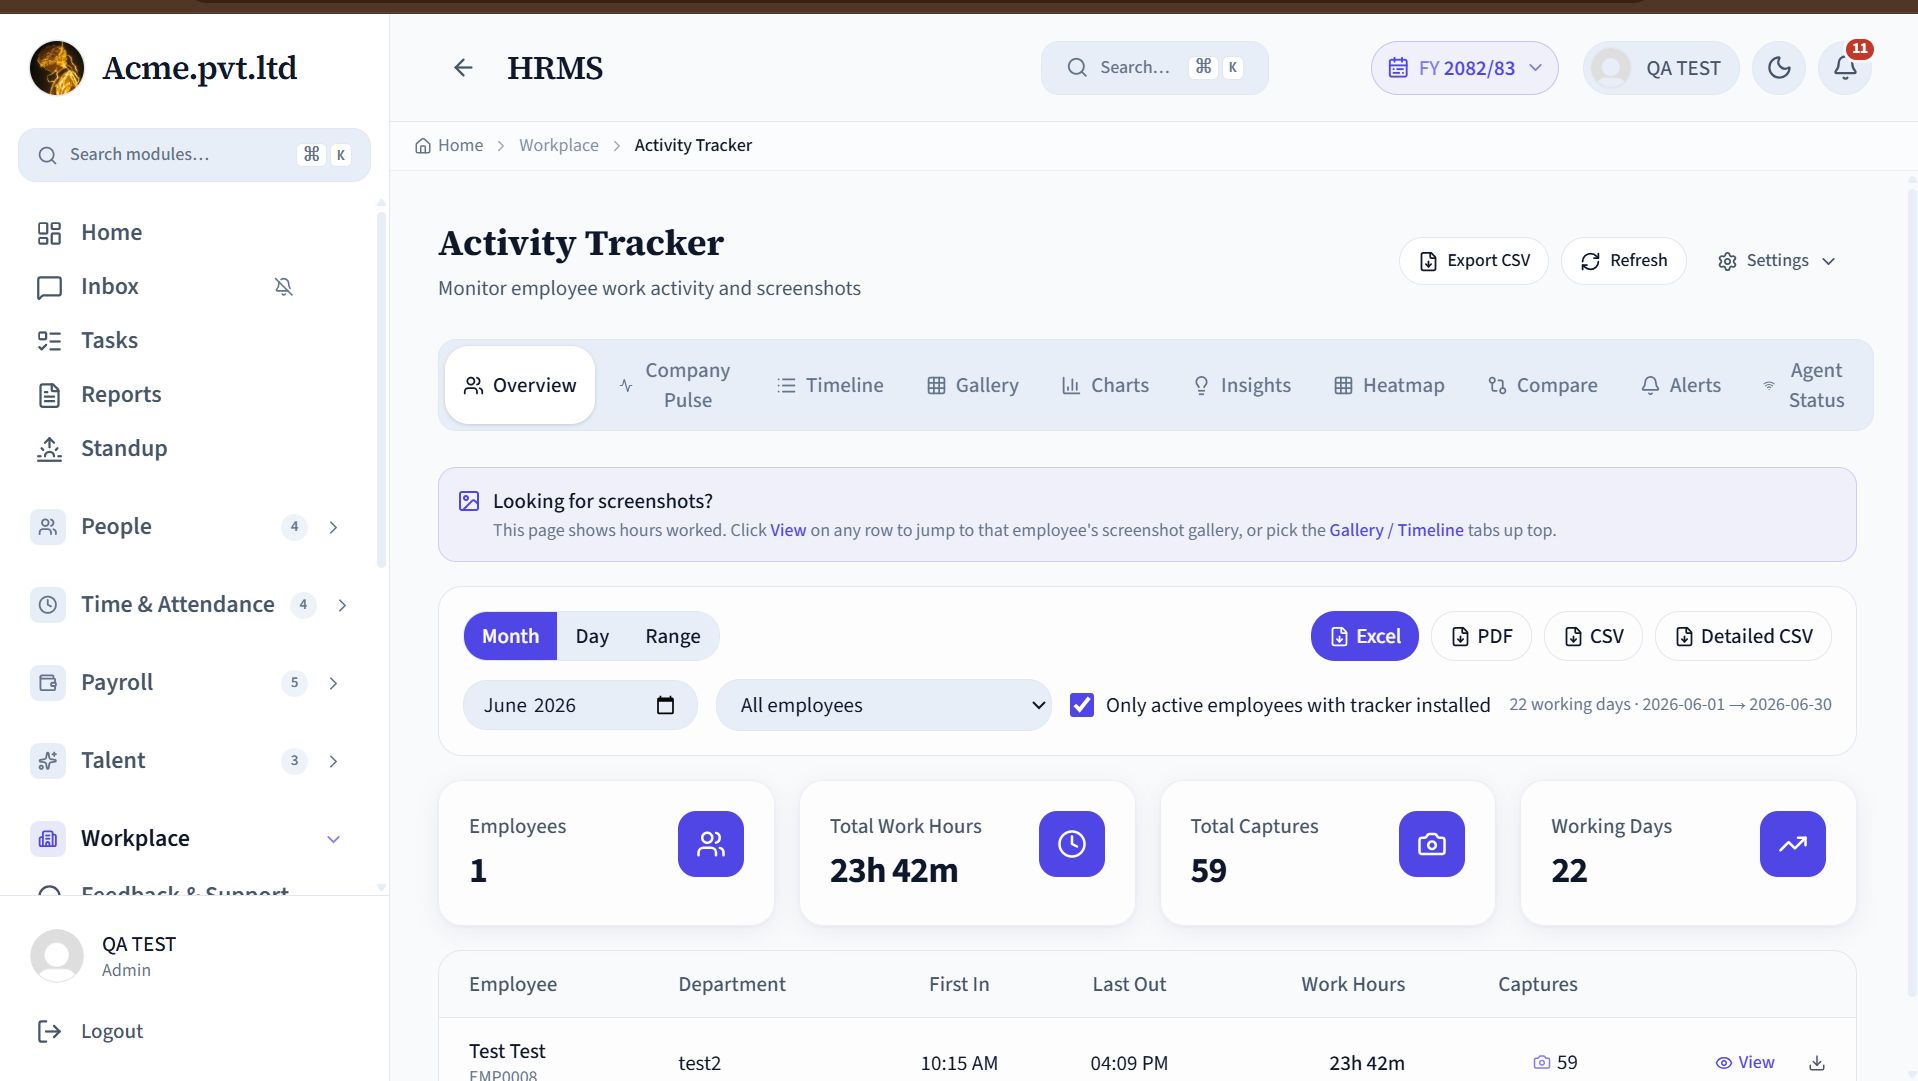
Optional desktop agent that captures screenshots + keyboard / mouse activity at 30-minute intervals for tracked employees (typically remote / contractor staff). HR sees per-employee daily timelines, screenshot galleries, and activity scores. Captures are attributed to the day the shift STARTED (so night-shift screenshots land under Friday when the shift started Friday 23:00).
Setup
- Activity Tracker → Settings → enable for the tenant.
- Issue per-employee agent tokens: Activity Tracker → Employees → row → "Generate Token".
- Employee installs the macOS / Windows agent and pastes the token at first launch.
Day-to-day operations
- Daily review: open an employee → see screenshots in 30-min buckets across the shift.
- Activity score (0–100) summarises engagement; <30 flags low activity.
- Privacy: each employee can pause capture during personal time; screenshots redacted for archived employees.
Locations
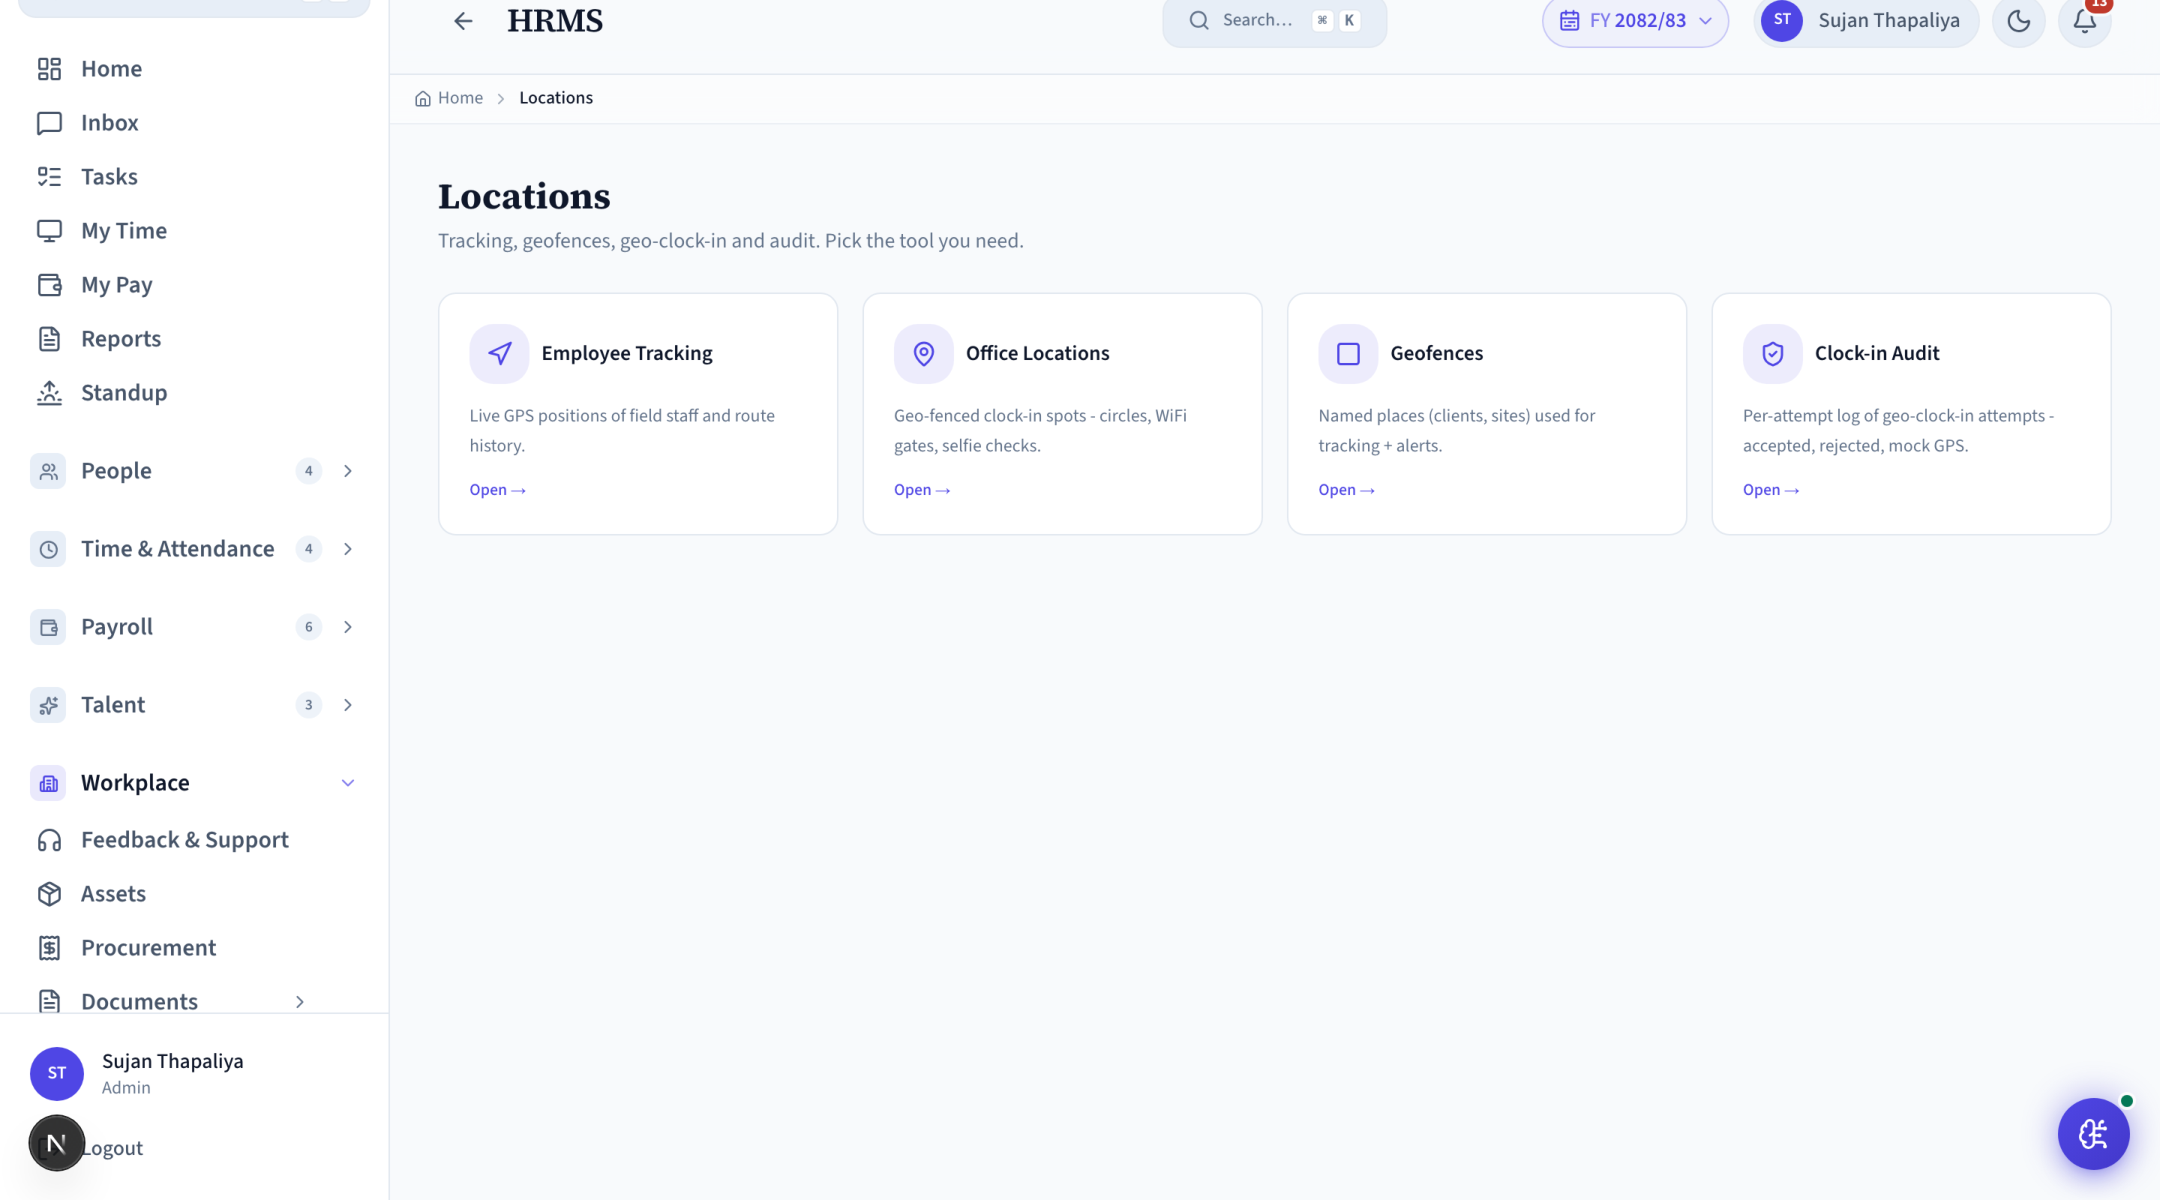
Office locations with GPS coordinates + radius. Used by mobile attendance check-in to verify the employee is on-site (geofence), and by HR for the company directory.
Setup
- Locations → Add: name + lat / lng + radius (default 100m) + address.
- Toggle "Require selfie" on the location to force a face capture during mobile check-in.
Day-to-day operations
- Mobile users see their nearest office; check-in if inside the radius.
- Outside-radius punches get flagged for HR review.
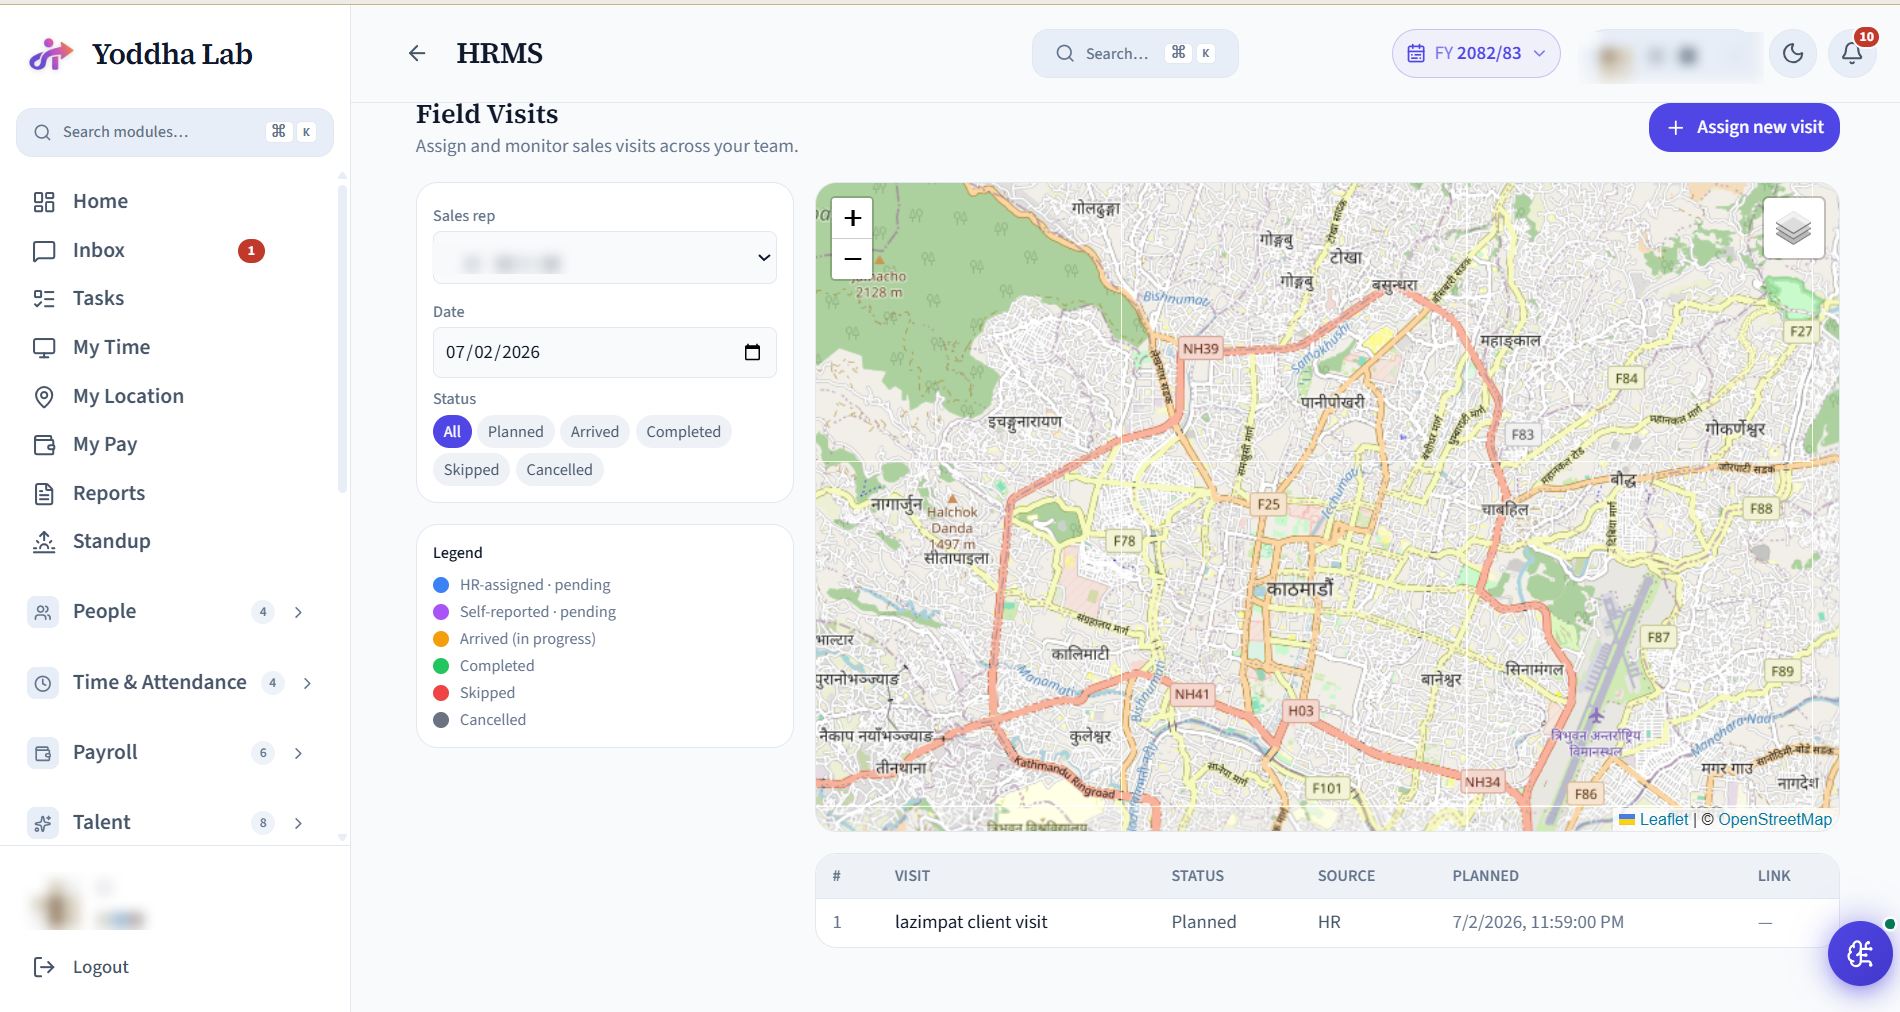
Field Visits
For field and sales staff - plan and assign client visits, check in on-site with GPS, and track routes and outcomes.
Setup
- Enable GPS tracking and define visit types.
Day-to-day operations
- Assign visits; reps check in / out on mobile; review routes and outcomes.
Setup - start here
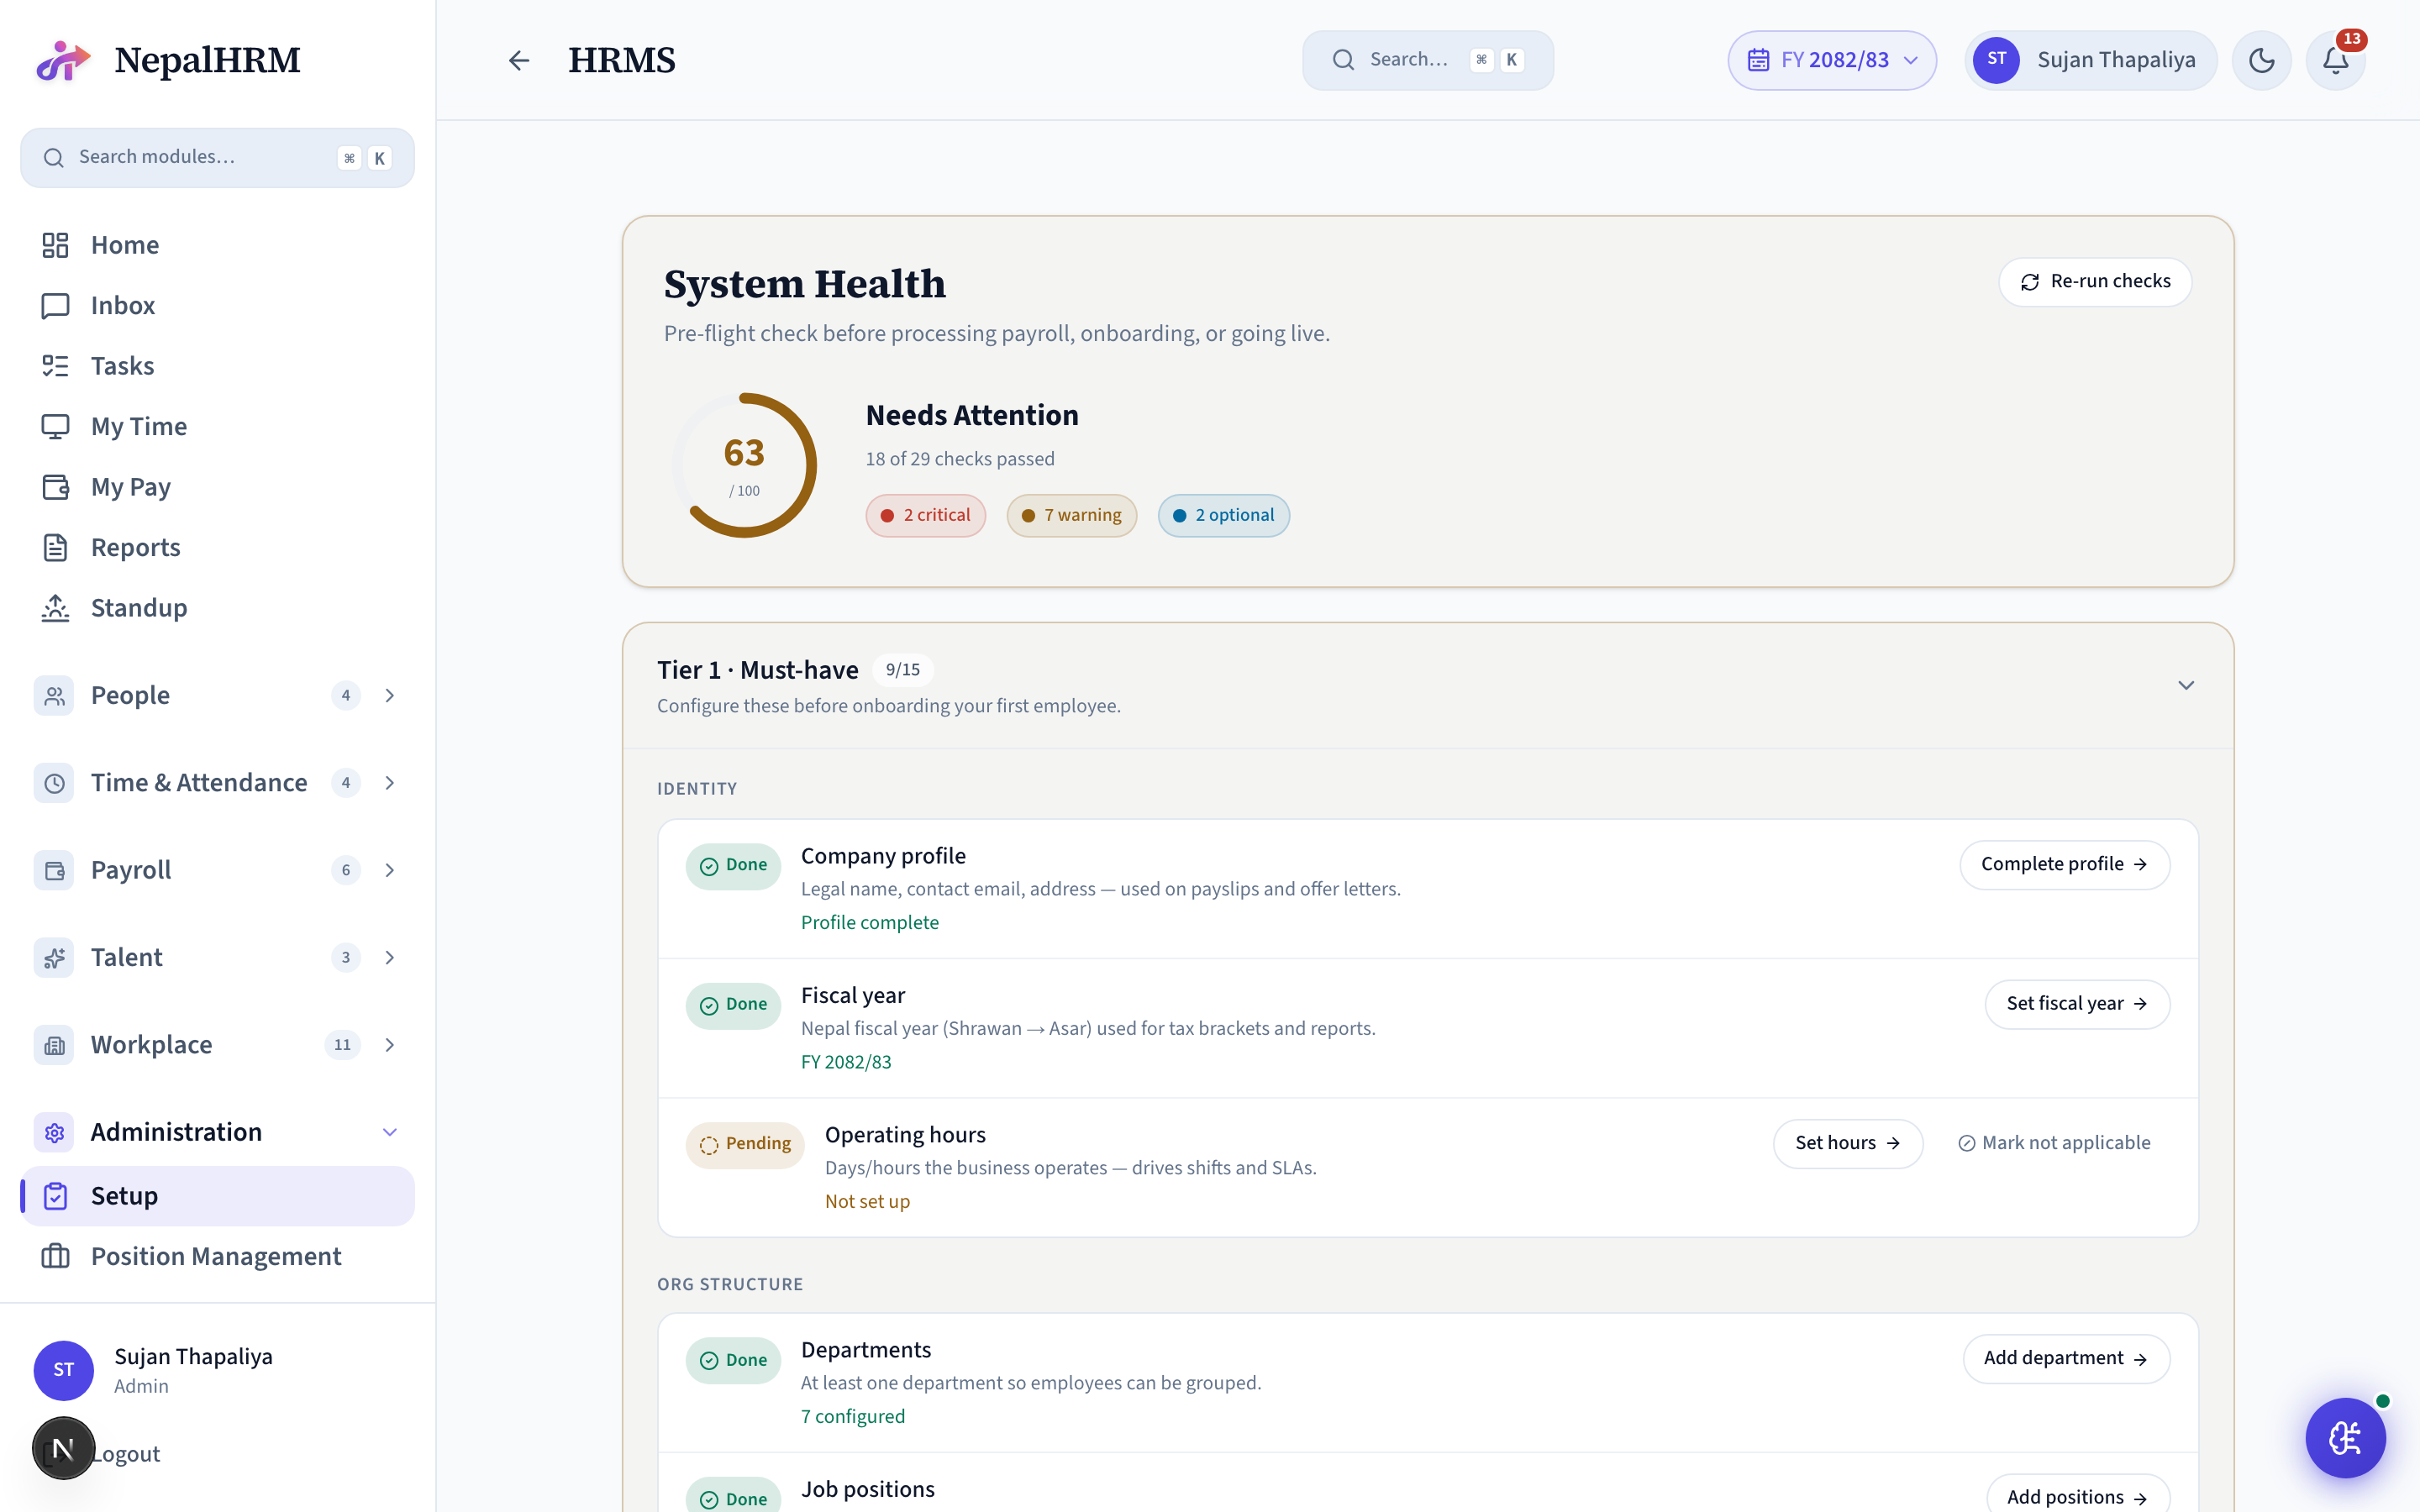
Every NepalHRM workspace is configured from one place: the Setup → System Health module. It is a tiered pre-flight checklist - Identity, Org Structure, Time & Attendance, Leave and Payroll - with a live readiness score. This is always your first stop: the system blocks employee creation until the Tier 1 “Must-have” checks pass, so you cannot add a single employee until setup is complete. Every item links straight to the screen that fixes it, and the score updates as you go.
Setup
- Open Setup from the sidebar and review your System Health score.
- Clear the demo data first (Settings → Clear demo data) so you start from a clean slate.
- Work top-down through Tier 1 · Must-have: Identity → Org Structure → Time & Attendance → Leave → Payroll. Use each item’s Configure → button; the check flips to Done automatically.
- Then complete Tier 2 · Recommended (approvals, lifecycle, policies, communication, access) and Tier 3 · Advanced (module-specific).
Day-to-day operations
- Tier 1 must read 100% before you can add employees or run payroll - finish it before anything else.
- Re-run checks before each payroll run, onboarding batch, or go-live.
- The sections that follow mirror this Setup flow, in the exact order you work through it.
Position Management
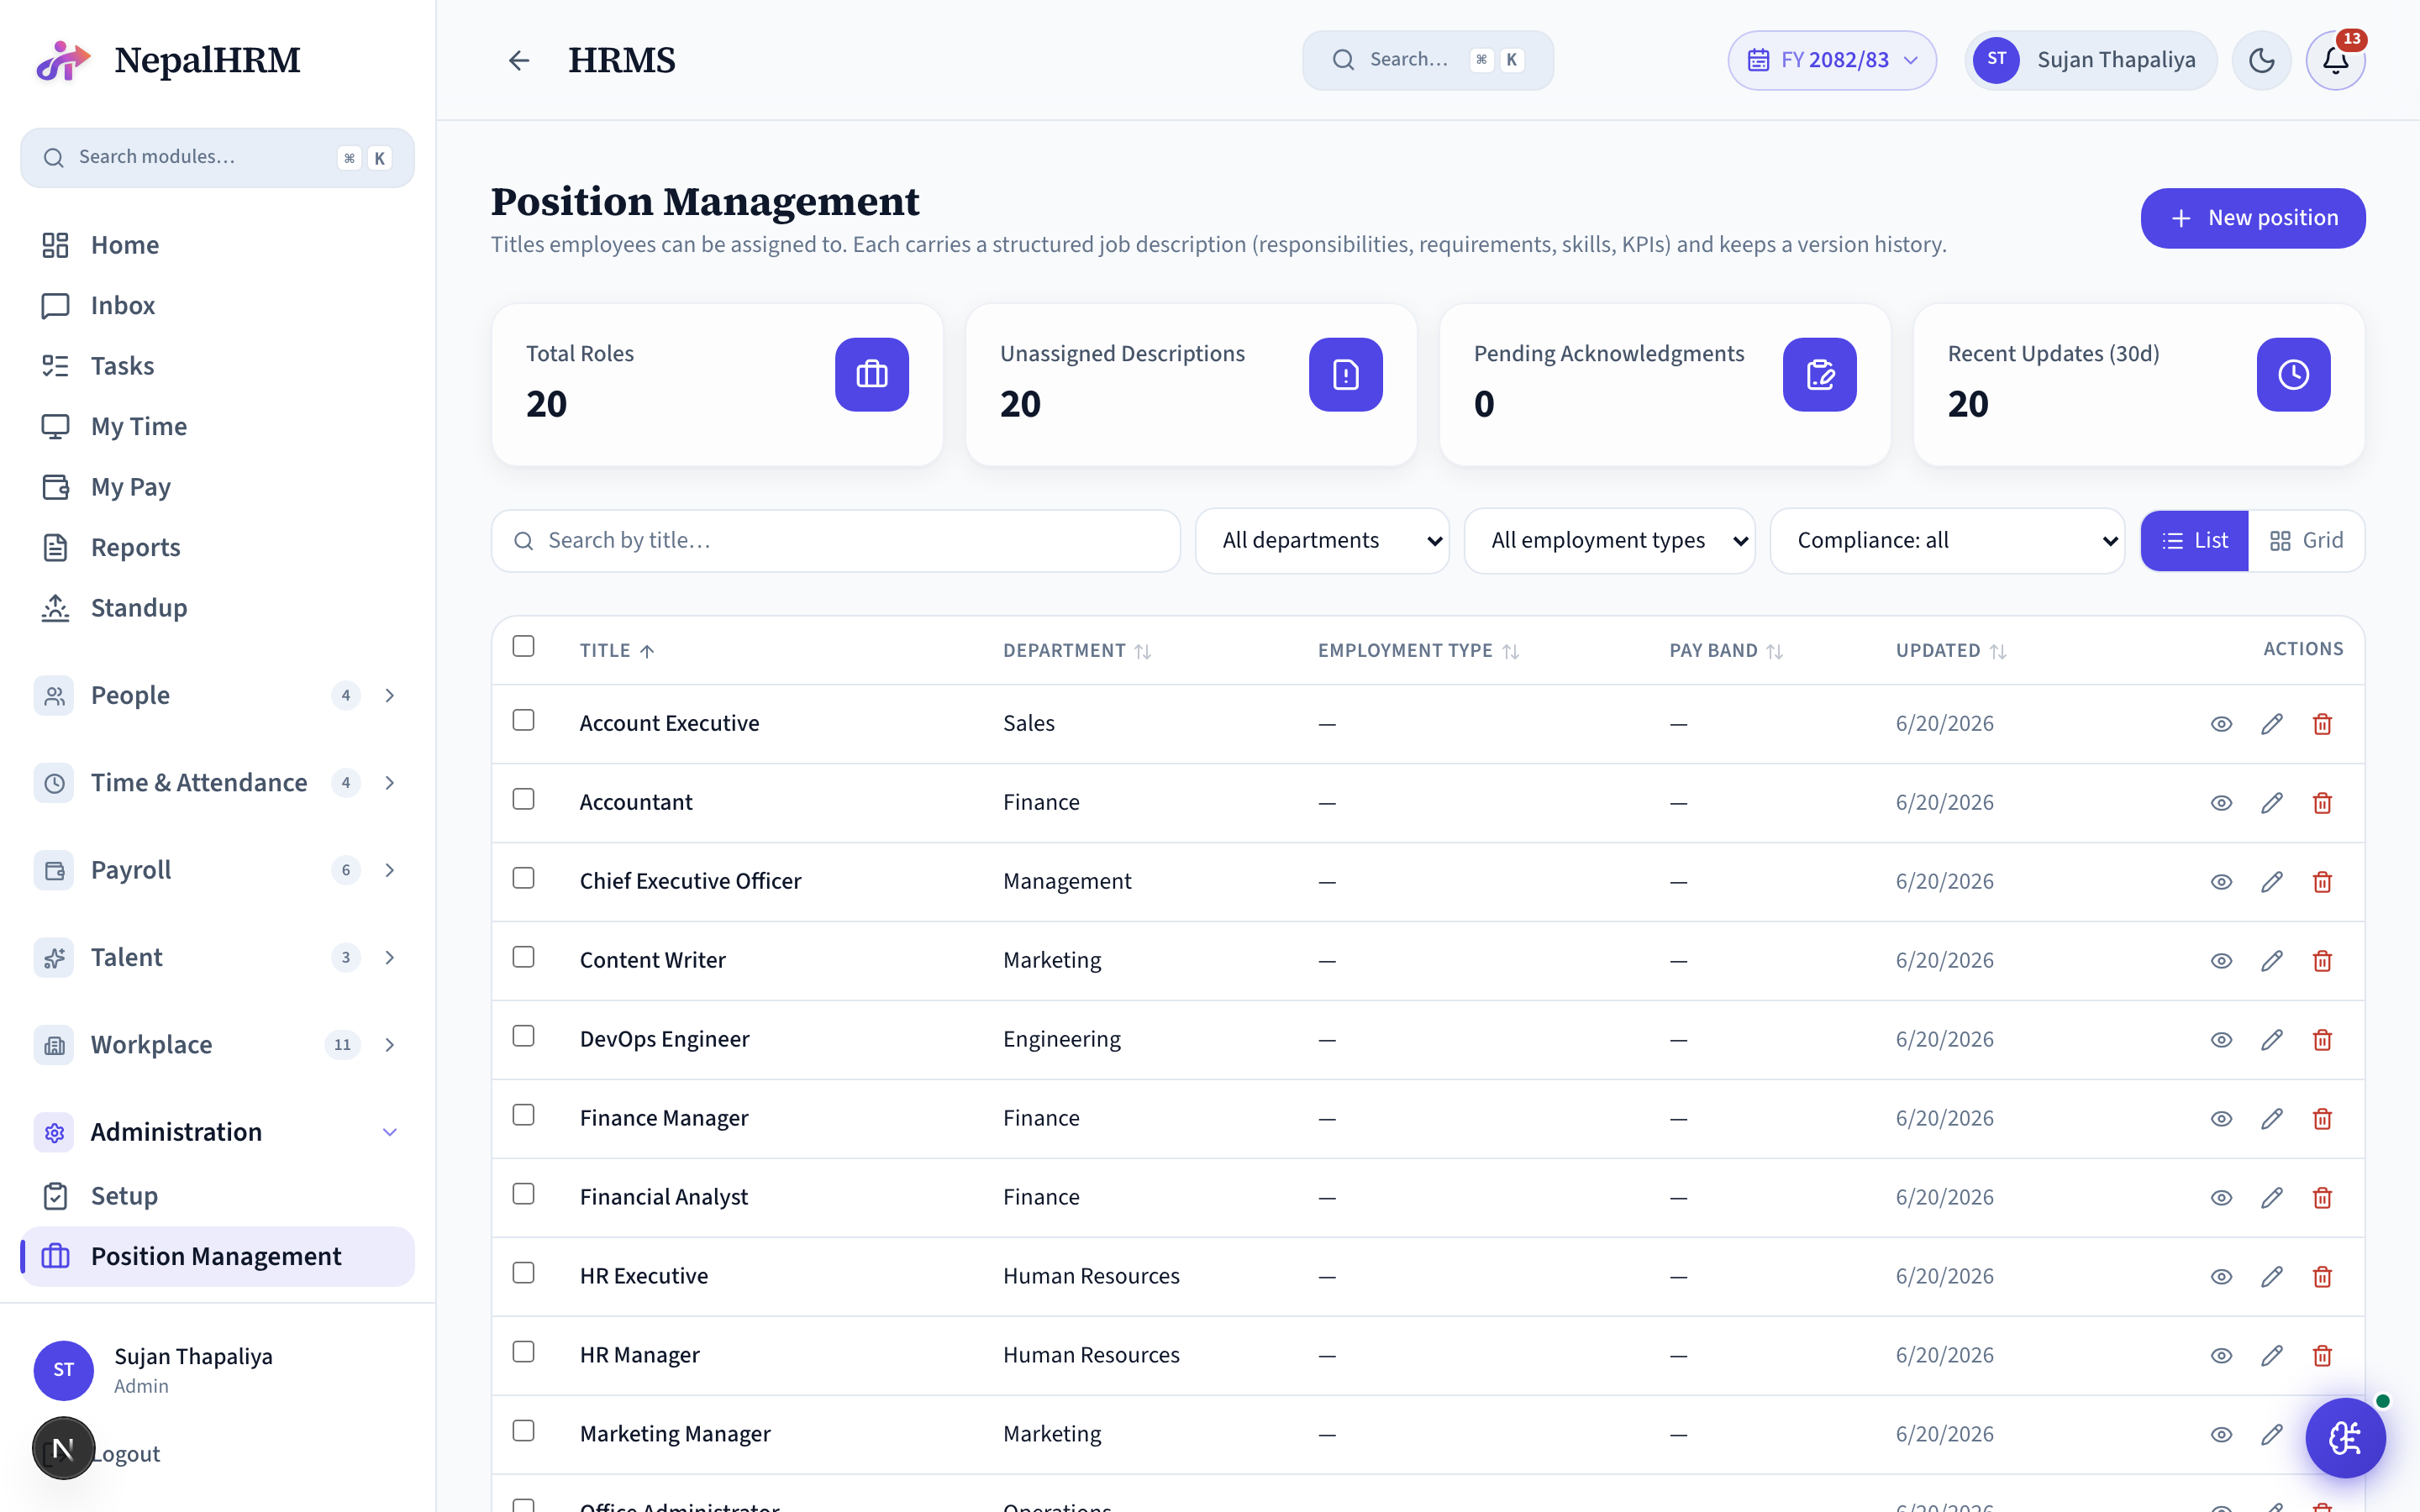
The company’s job positions and their structured job descriptions - responsibilities, requirements, skills, KPIs and revision history - that employees are assigned to. The management screen is data-rich: headline metrics (filled vs open roles, headcount per position), switchable list / grid views, search + filters, and bulk actions.
Setup
- Define positions and their JDs before importing employees.
- Switch between list and grid view, filter by department / status, and bulk-edit or export from the toolbar.
Day-to-day operations
- Maintain JDs over time; employees acknowledge their own from My Profile.
Skills Library
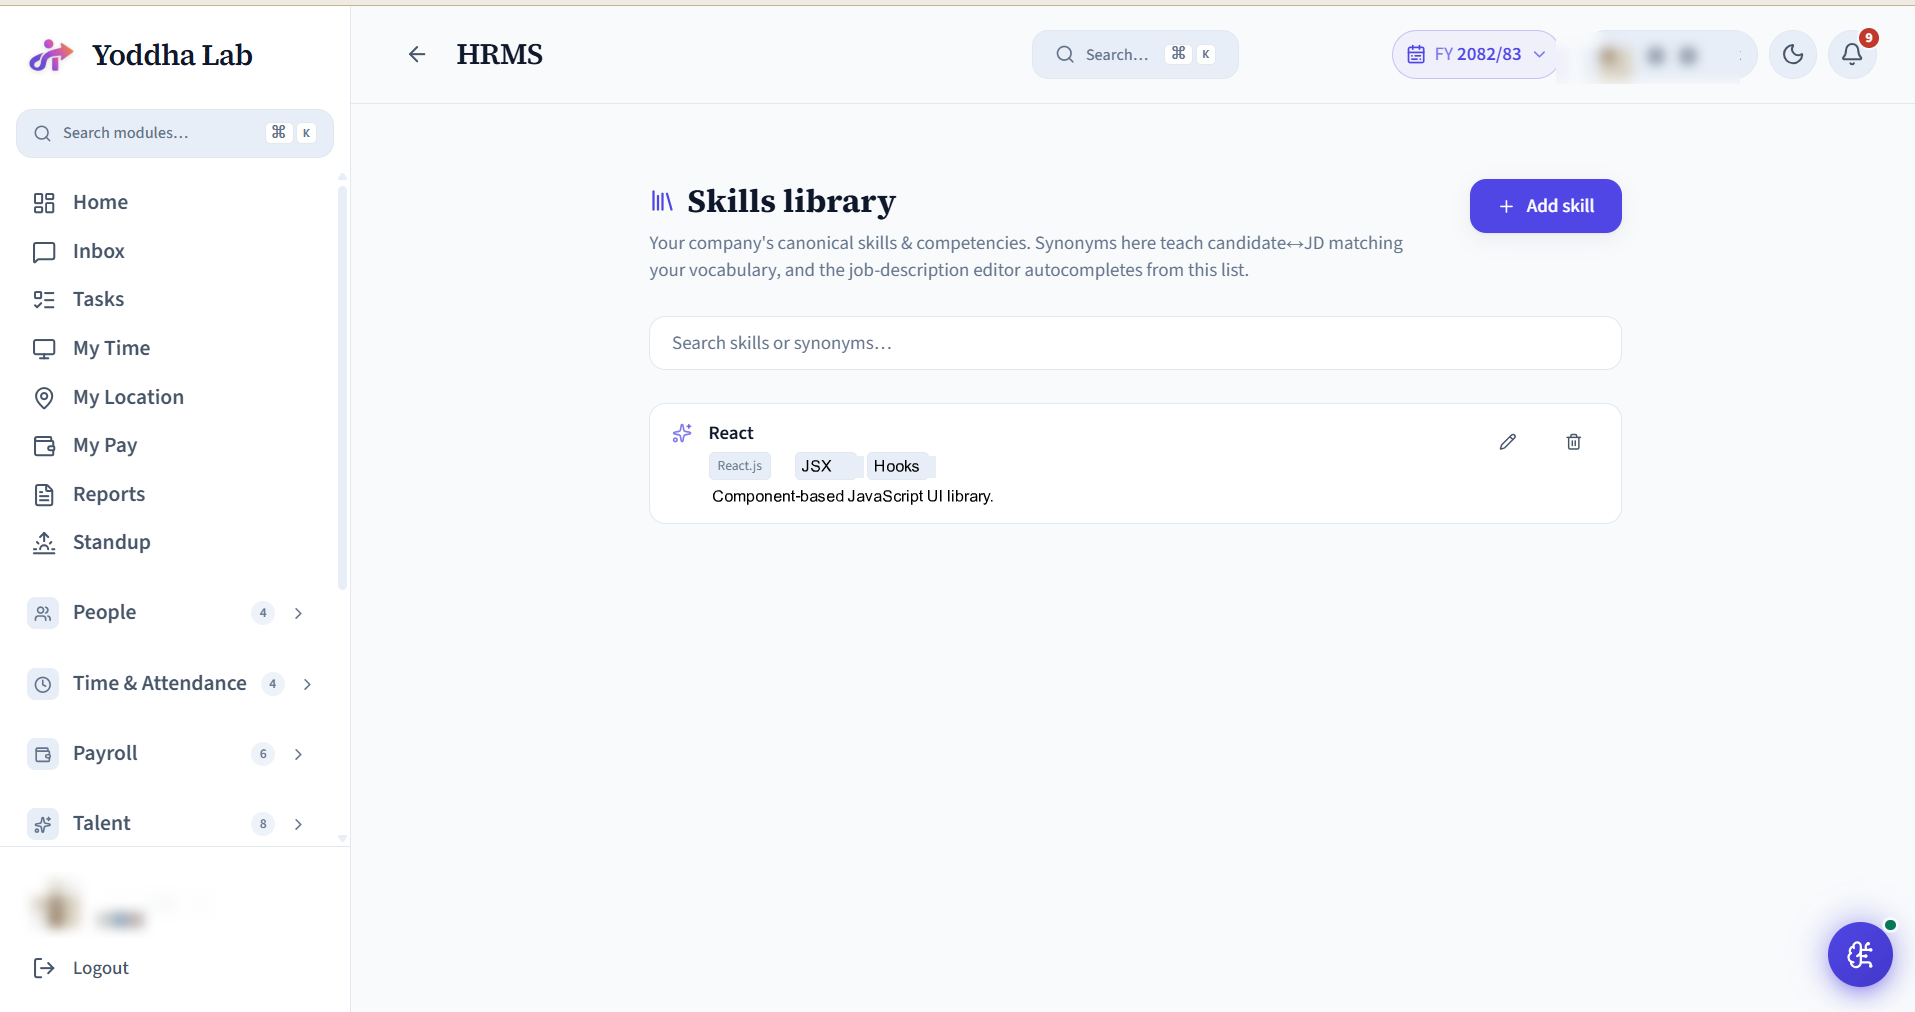
The company skill / competency taxonomy - it powers JD-editor autocomplete and the candidate ↔ JD matcher’s synonyms.
Setup
- Seed your skills and competencies plus their aliases.
Day-to-day operations
- Reuse them across JDs and recruitment matching.
Billing
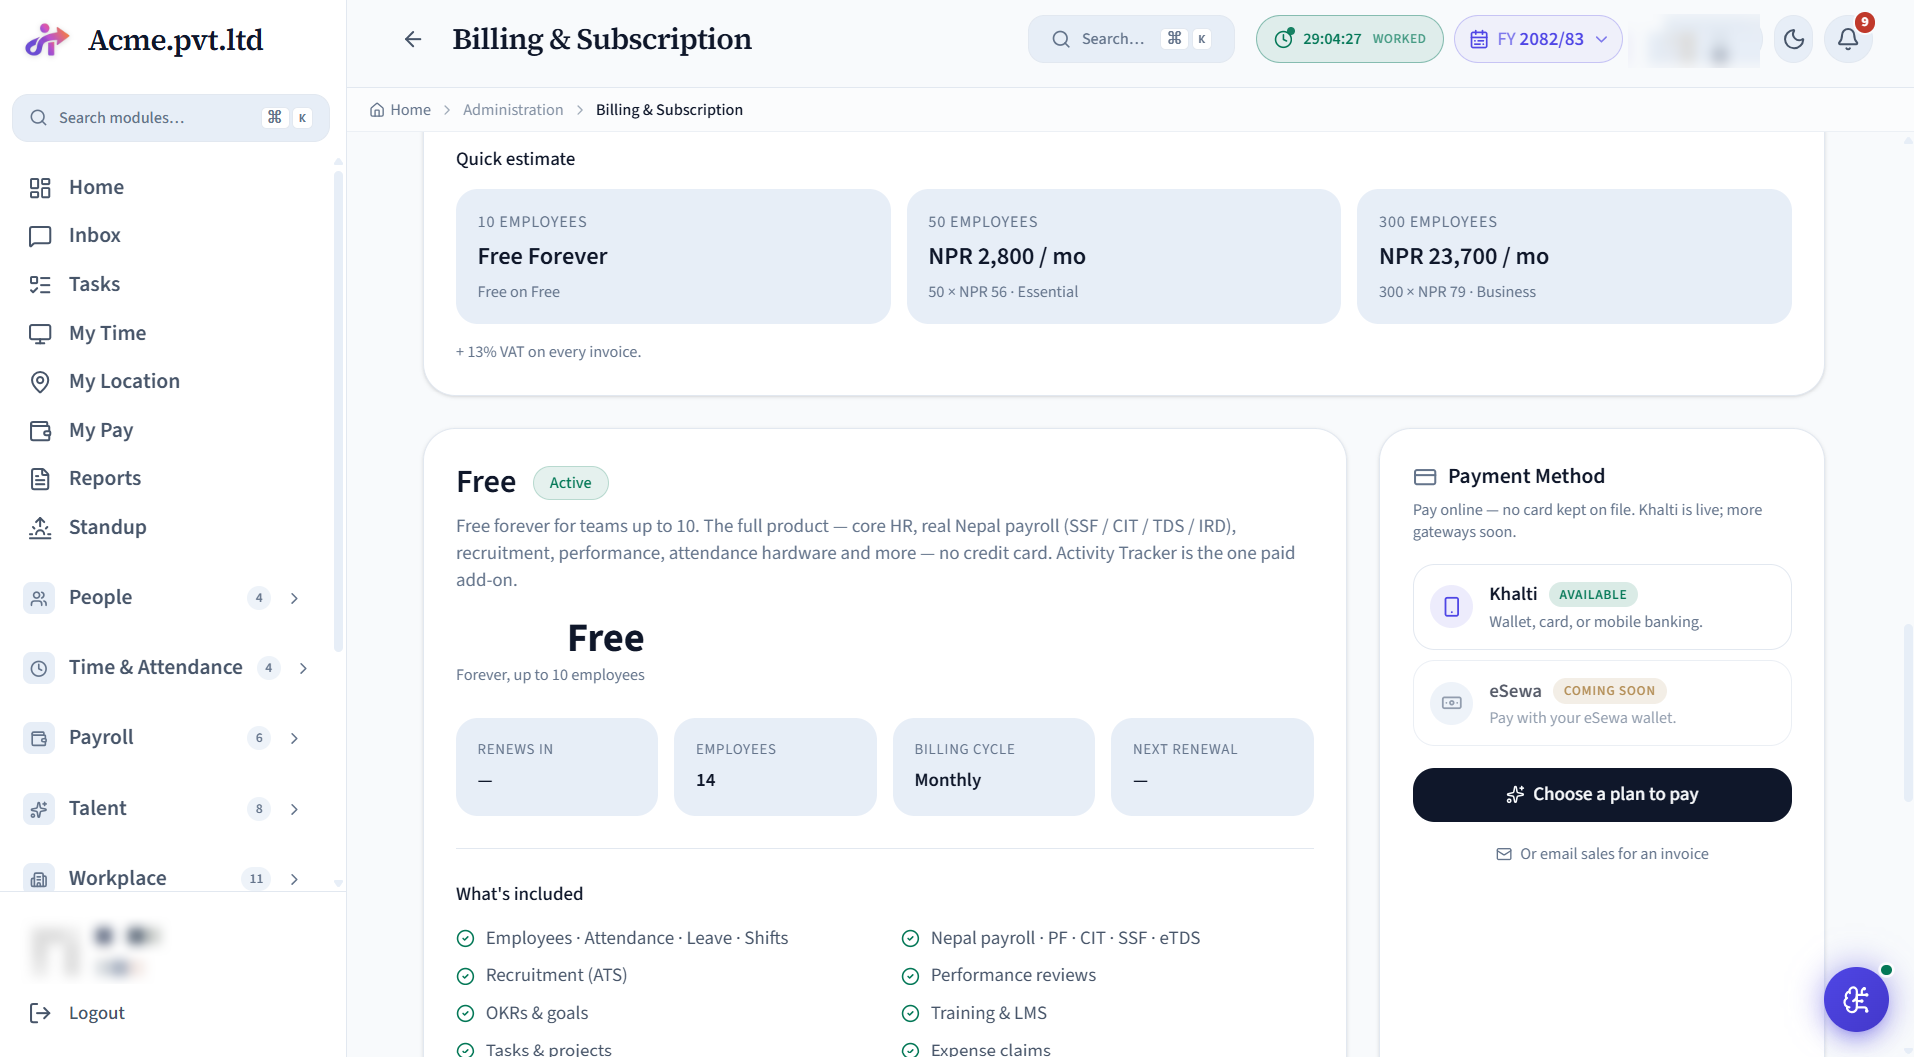
Your subscription and invoices - current plan, payment method (Khalti / eSewa) and full billing history. Plan cards show volume-discount tiers (bigger teams pay less per seat), and checkout suggests the best-value plan for your headcount.
Setup
- Choose a plan and add a payment method.
- Review and sign the service agreement when prompted - it’s saved against your account.
Day-to-day operations
- View invoices, upgrade or downgrade, and pay online or request an invoice.
Settings
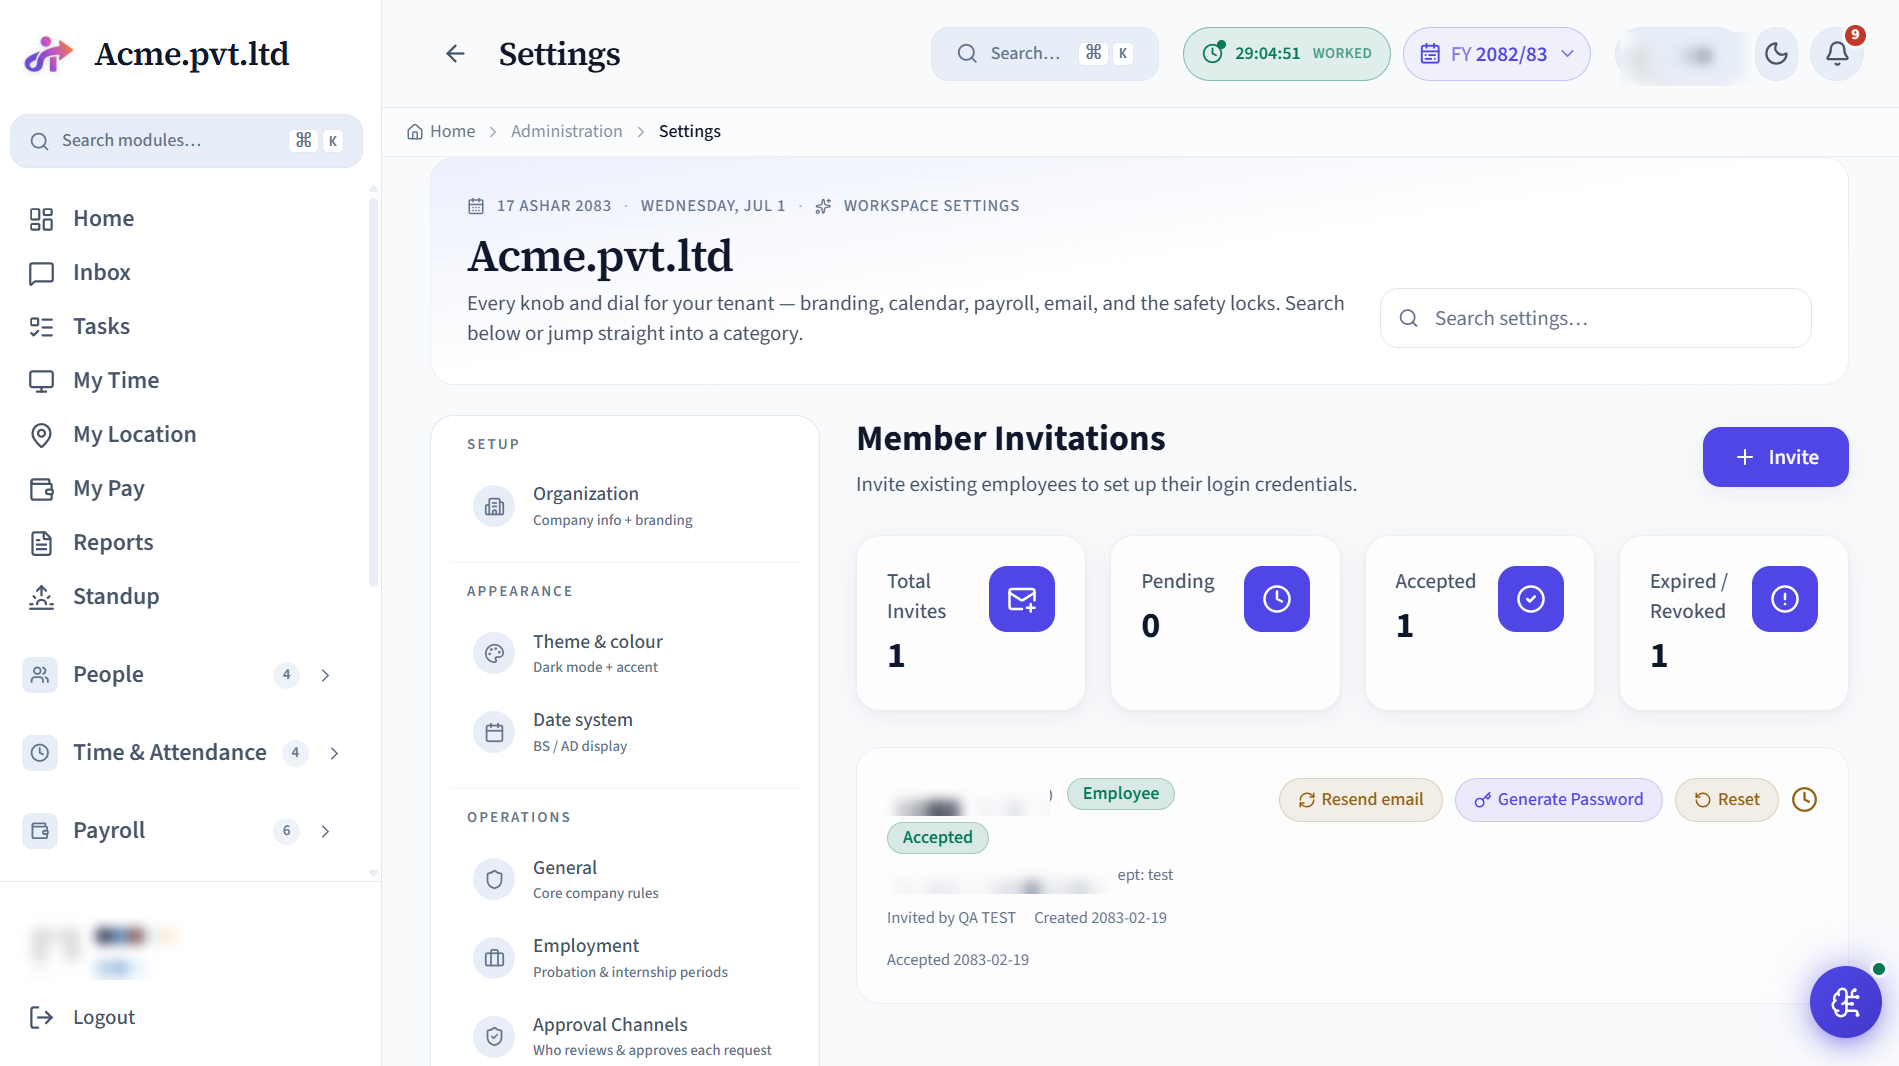
Tenant-level configuration. Company name + logo, address, timezone, currency, SMTP, branding, integrations, billing, language. The single page admins go to for everything else.
Setup
- Settings → General → company info + logo (stored privately for your company).
- Settings → Email → SMTP credentials + sender address verification.
- Settings → Localisation → timezone (Asia/Kathmandu default) + currency + date format (AD / BS).
Day-to-day operations
- Adjust as needed; most settings take effect immediately, a couple (SMTP, branding) require a re-login to fully propagate.
Invitations
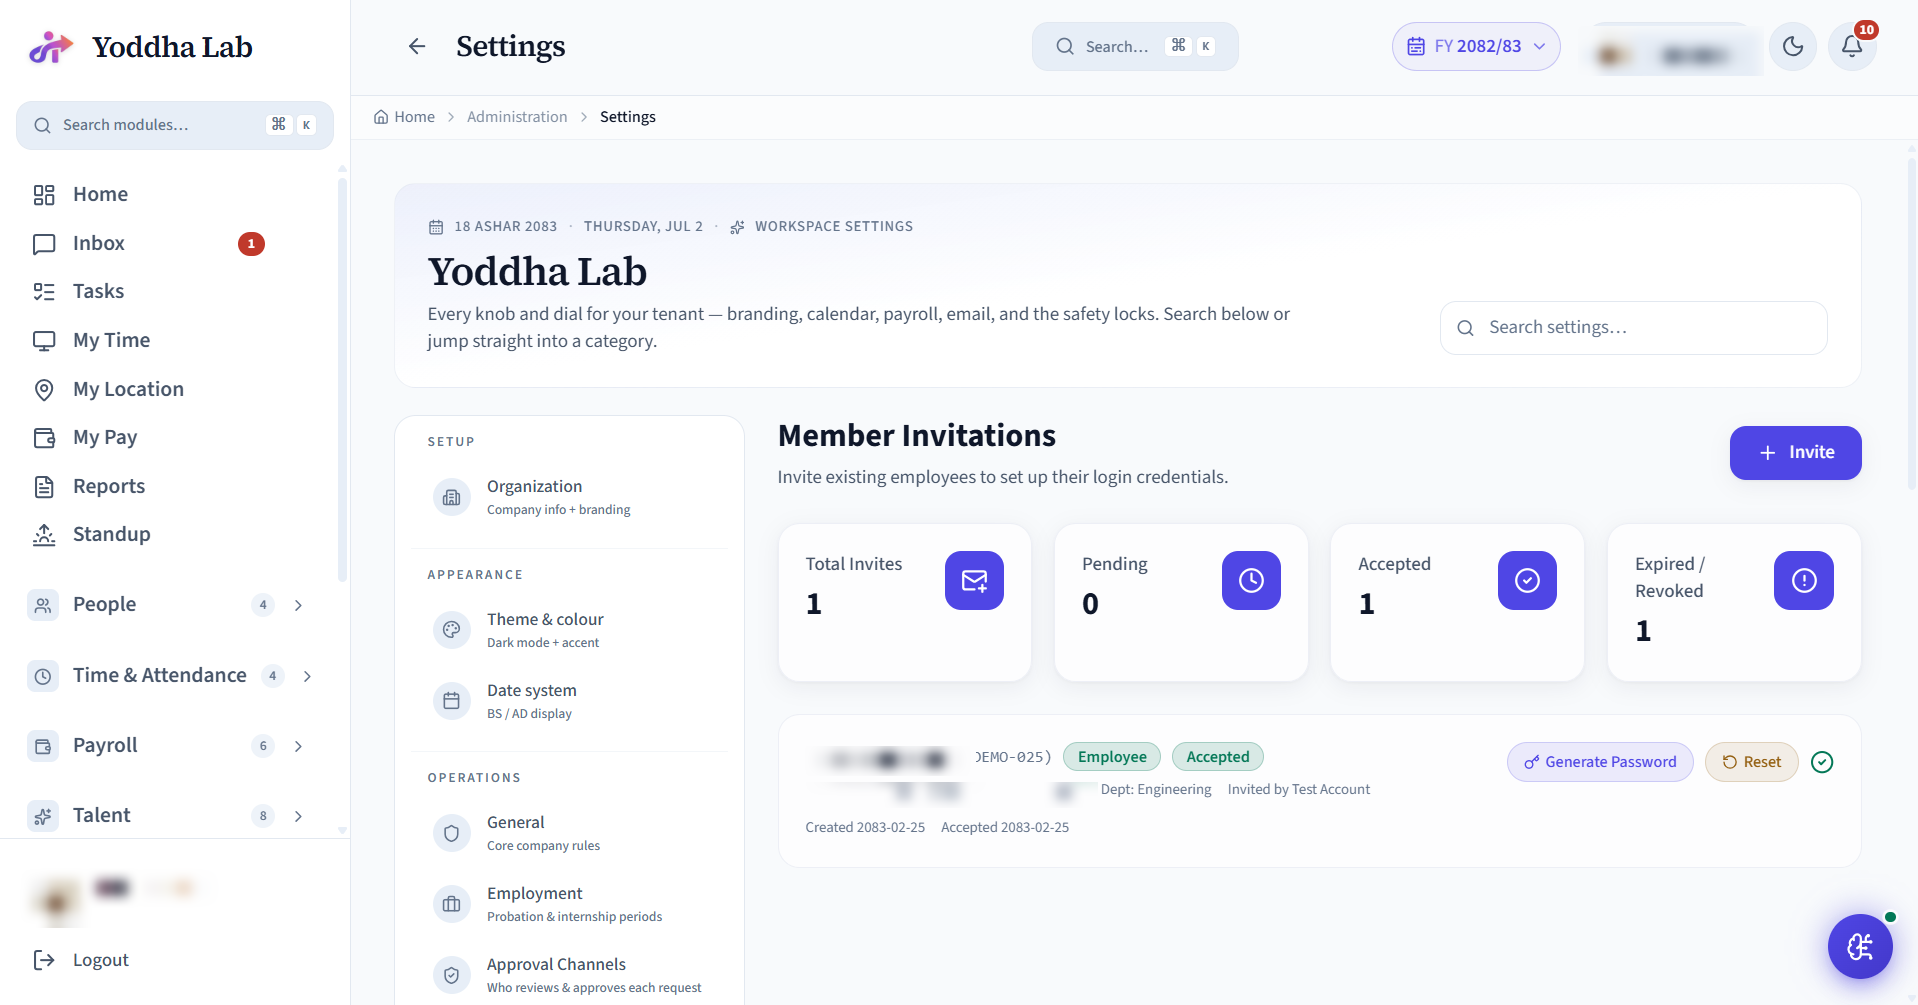
Invite a new person to join the workspace by email. They click the tokenized link, set a password, and a User + Employee row is created in one transaction.
Setup
- Built-in - no setup to send invites.
- Set up Roles / Permissions first so you can pick the right role when inviting.
- Verify your sender email (Settings → Email) so invite links don't land in spam.
Day-to-day operations
- Invite individually: Invitations → New → email + role + (optional) department.
- Bulk import: Invitations → Bulk → paste CSV (email,first_name,last_name,role,department).
- Resend an invite that expired: Invitations → row → Resend.
- Generate a one-off password (instead of letting them set one): Invitations → row → Generate Password - surfaces a one-time secret HR can share verbally.
Email Templates
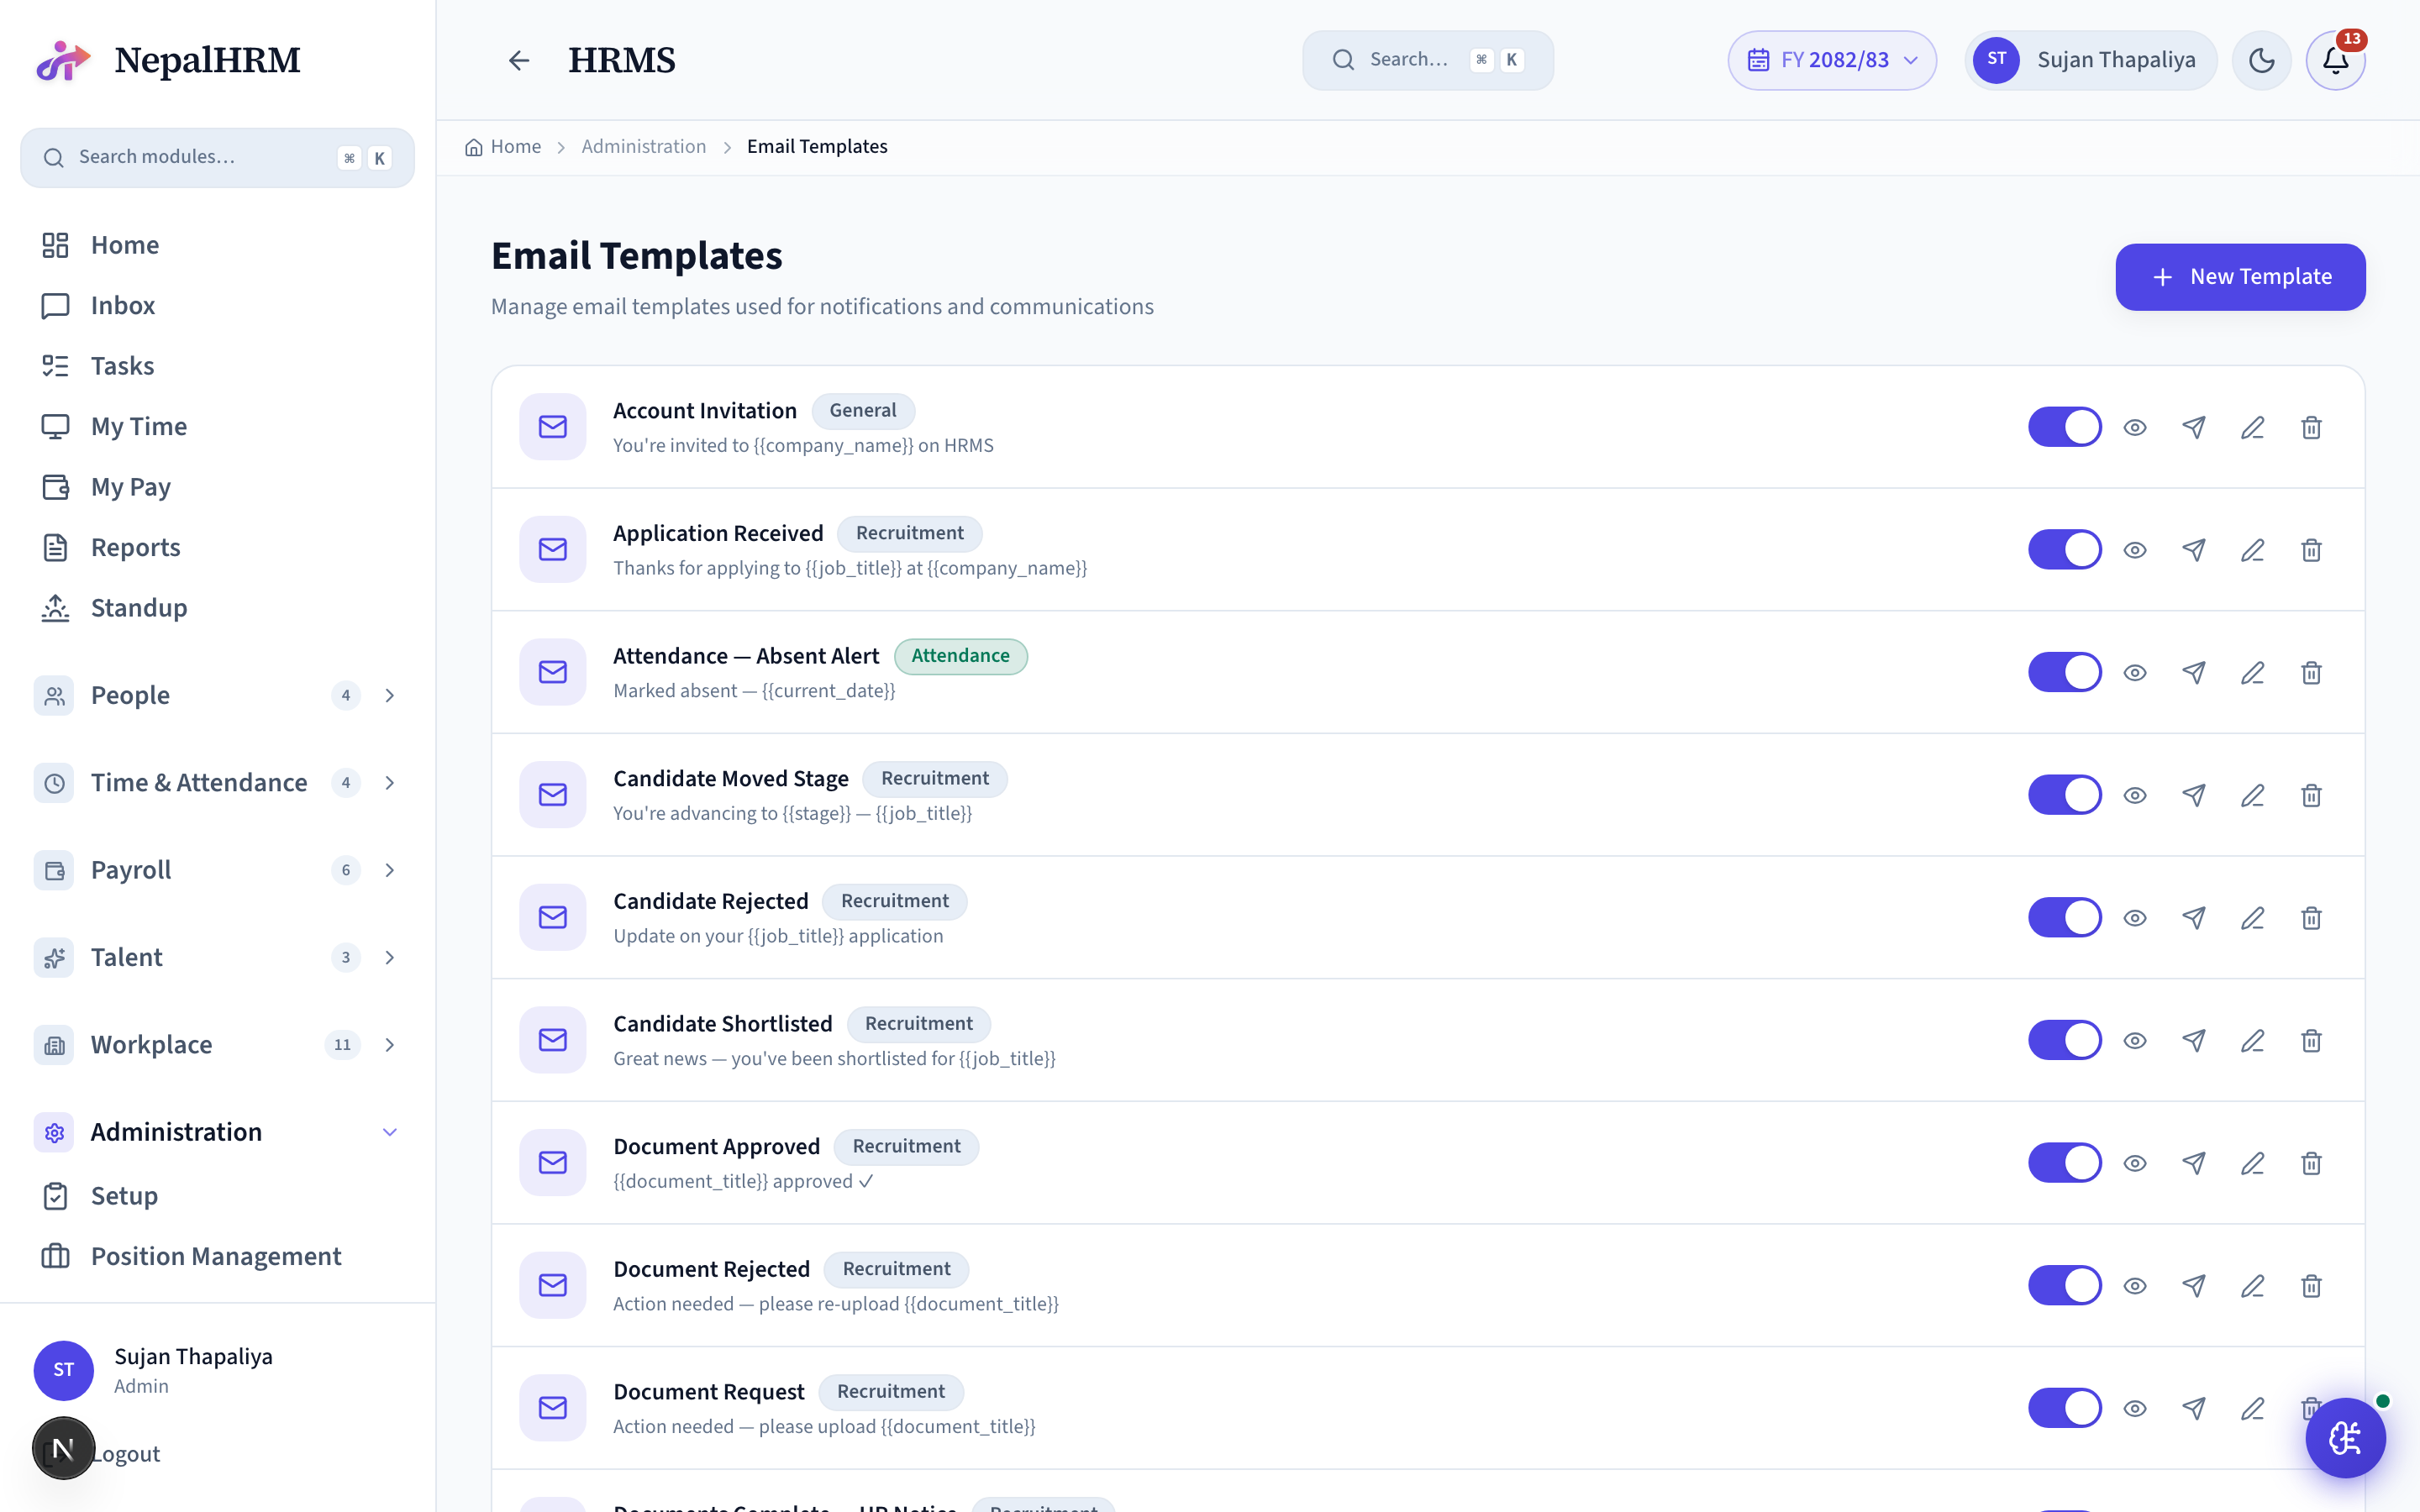
Reusable email bodies the system sends on triggers (leave approved, payslip published, joining reminder, absent alert). Per-tenant editable, with {{variables}} that the trigger fills in.
Setup
- Email Templates → pre-seeded with the standard set (Welcome, First-day reminder, Payslip published, etc.).
- Customize per tenant: edit subject + body HTML.
- Test: "Send to me" sends the rendered email to your address so you can preview.
Day-to-day operations
- Adjust tone / wording when feedback comes in.
- Toggle Active off to silence a trigger entirely.
- Email log: Email Templates → Logs → every email sent in the last 30 days with delivery status.
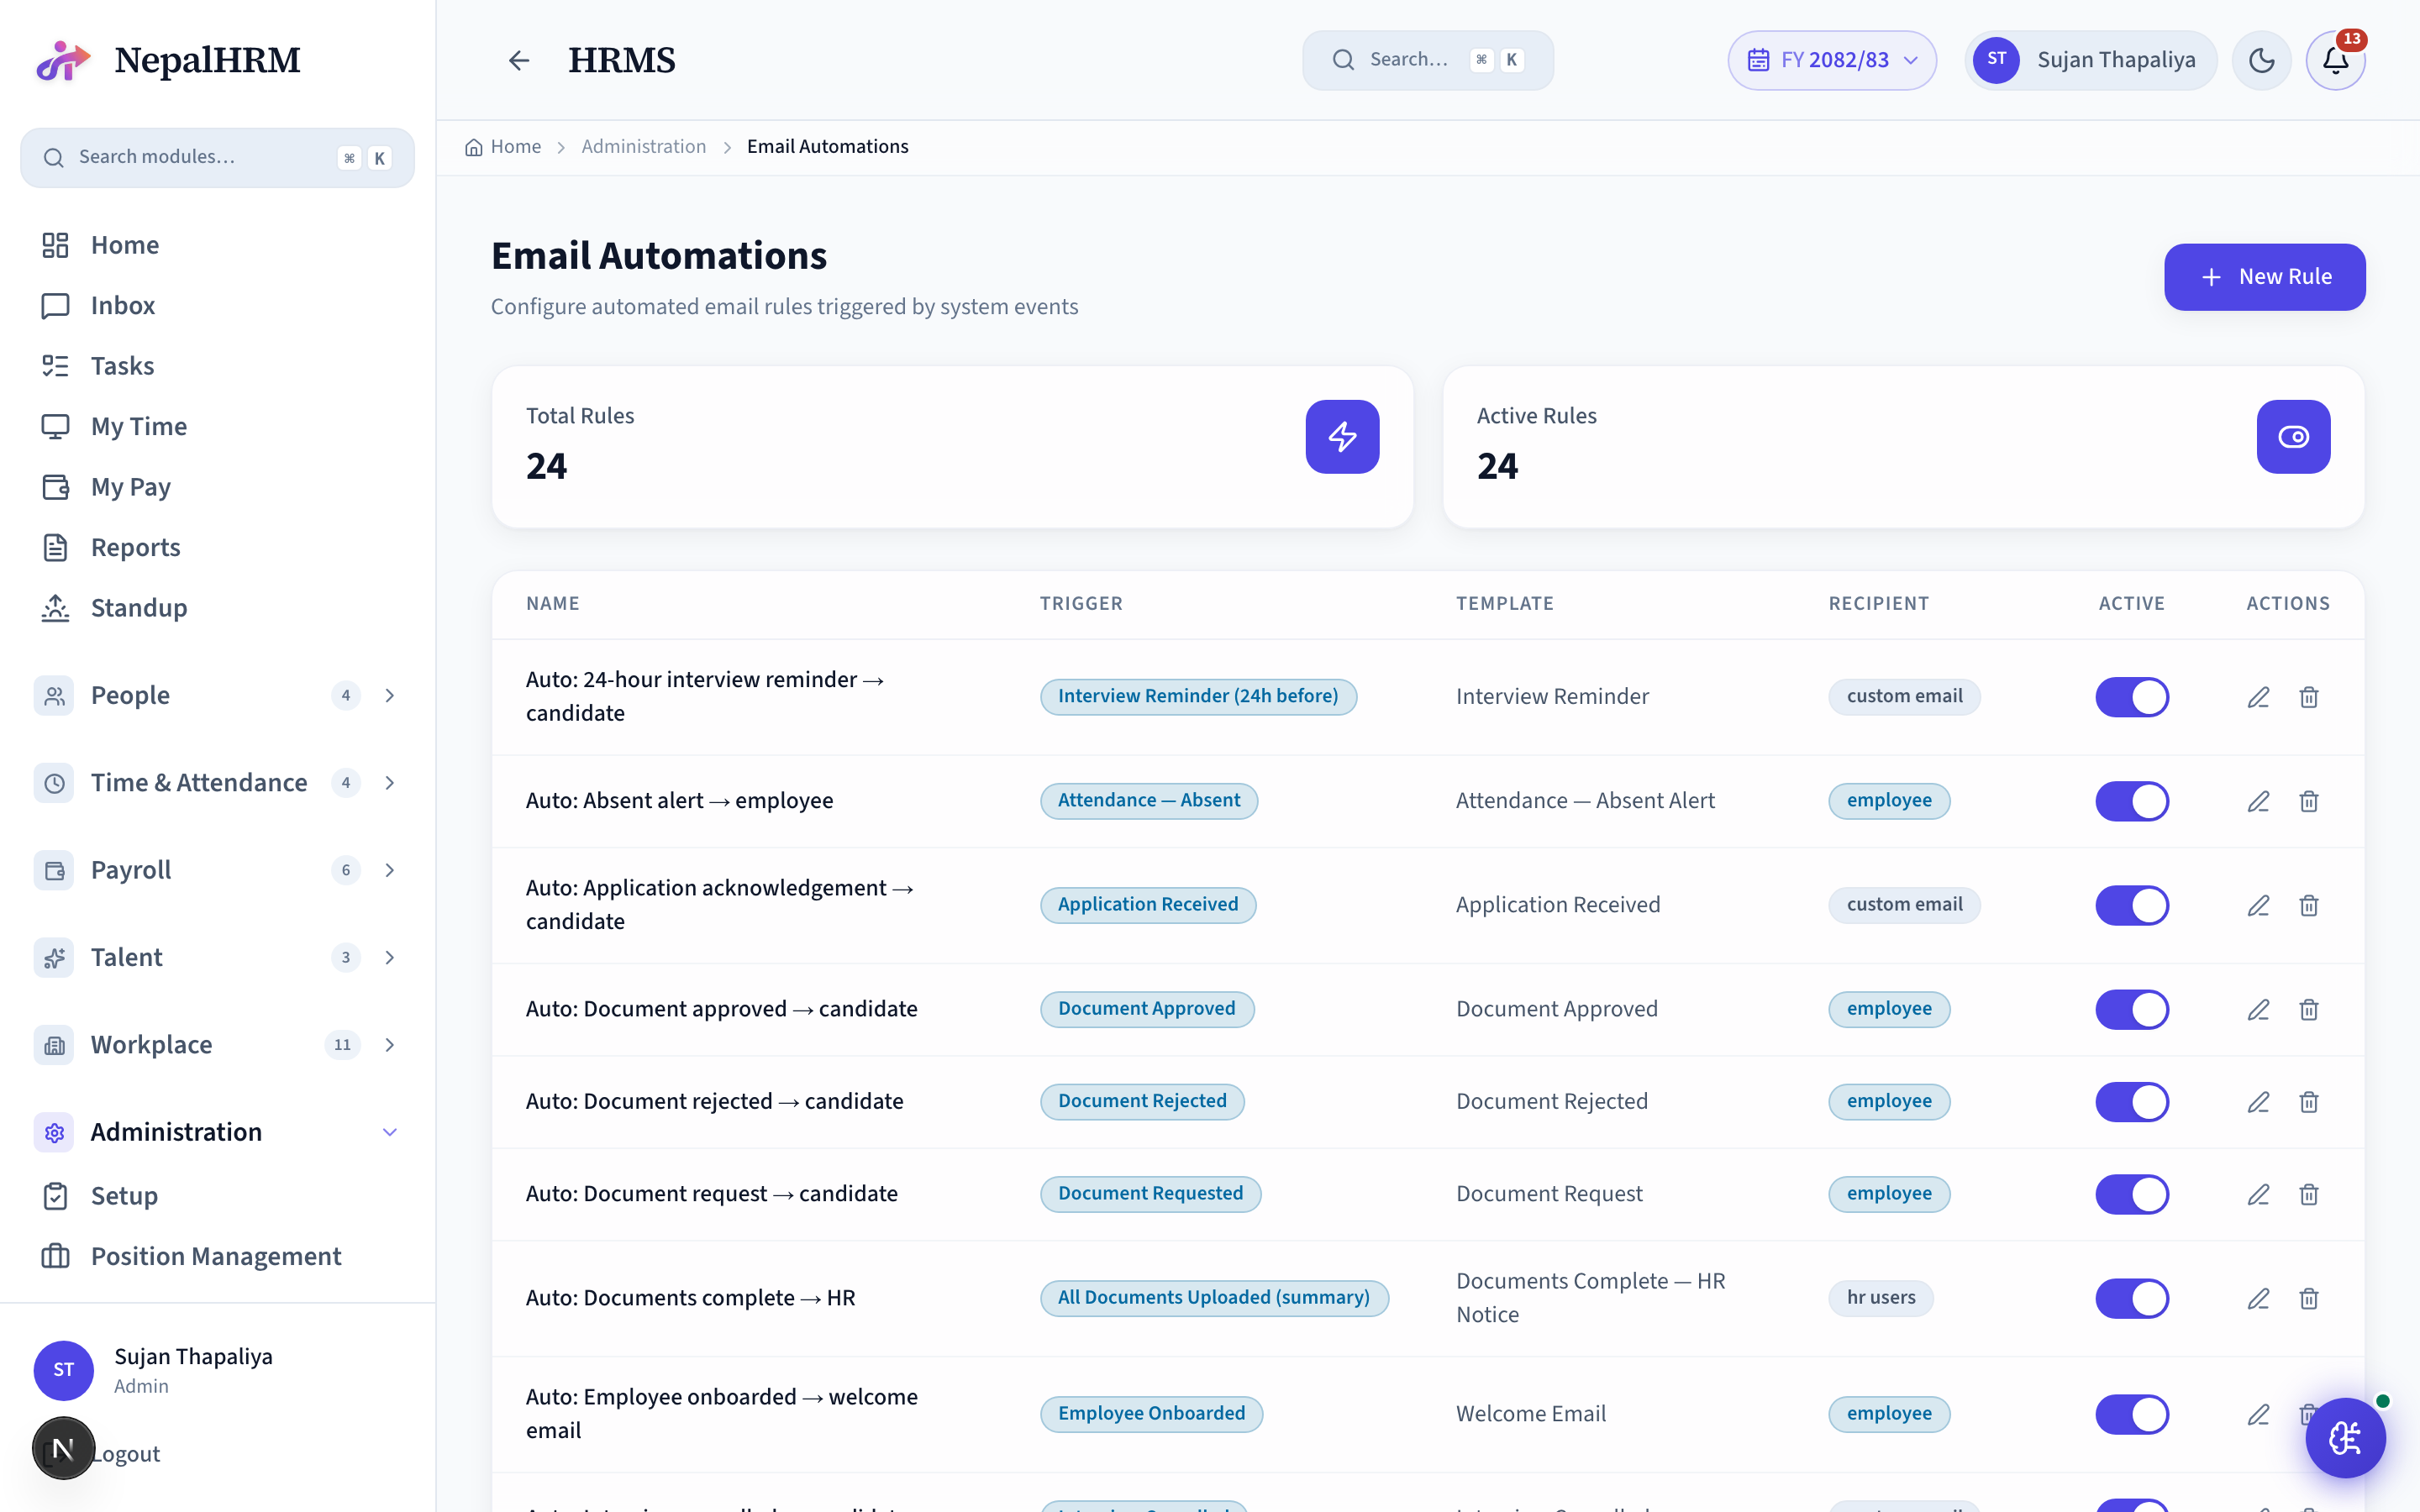
Email Automations
Trigger → Template wiring. Defines which event fires which template to which recipient (employee, manager, HR users, all). The system ships with sensible defaults; HR can override per tenant.
Setup
- Email Automations → review defaults → enable / disable per row.
Day-to-day operations
- Add a custom automation: pick the event + who receives it + which template. E.g. "When a payslip is published, send Payslip Available to the employee."
- Audit: every fired automation logged with timestamp + delivery status.
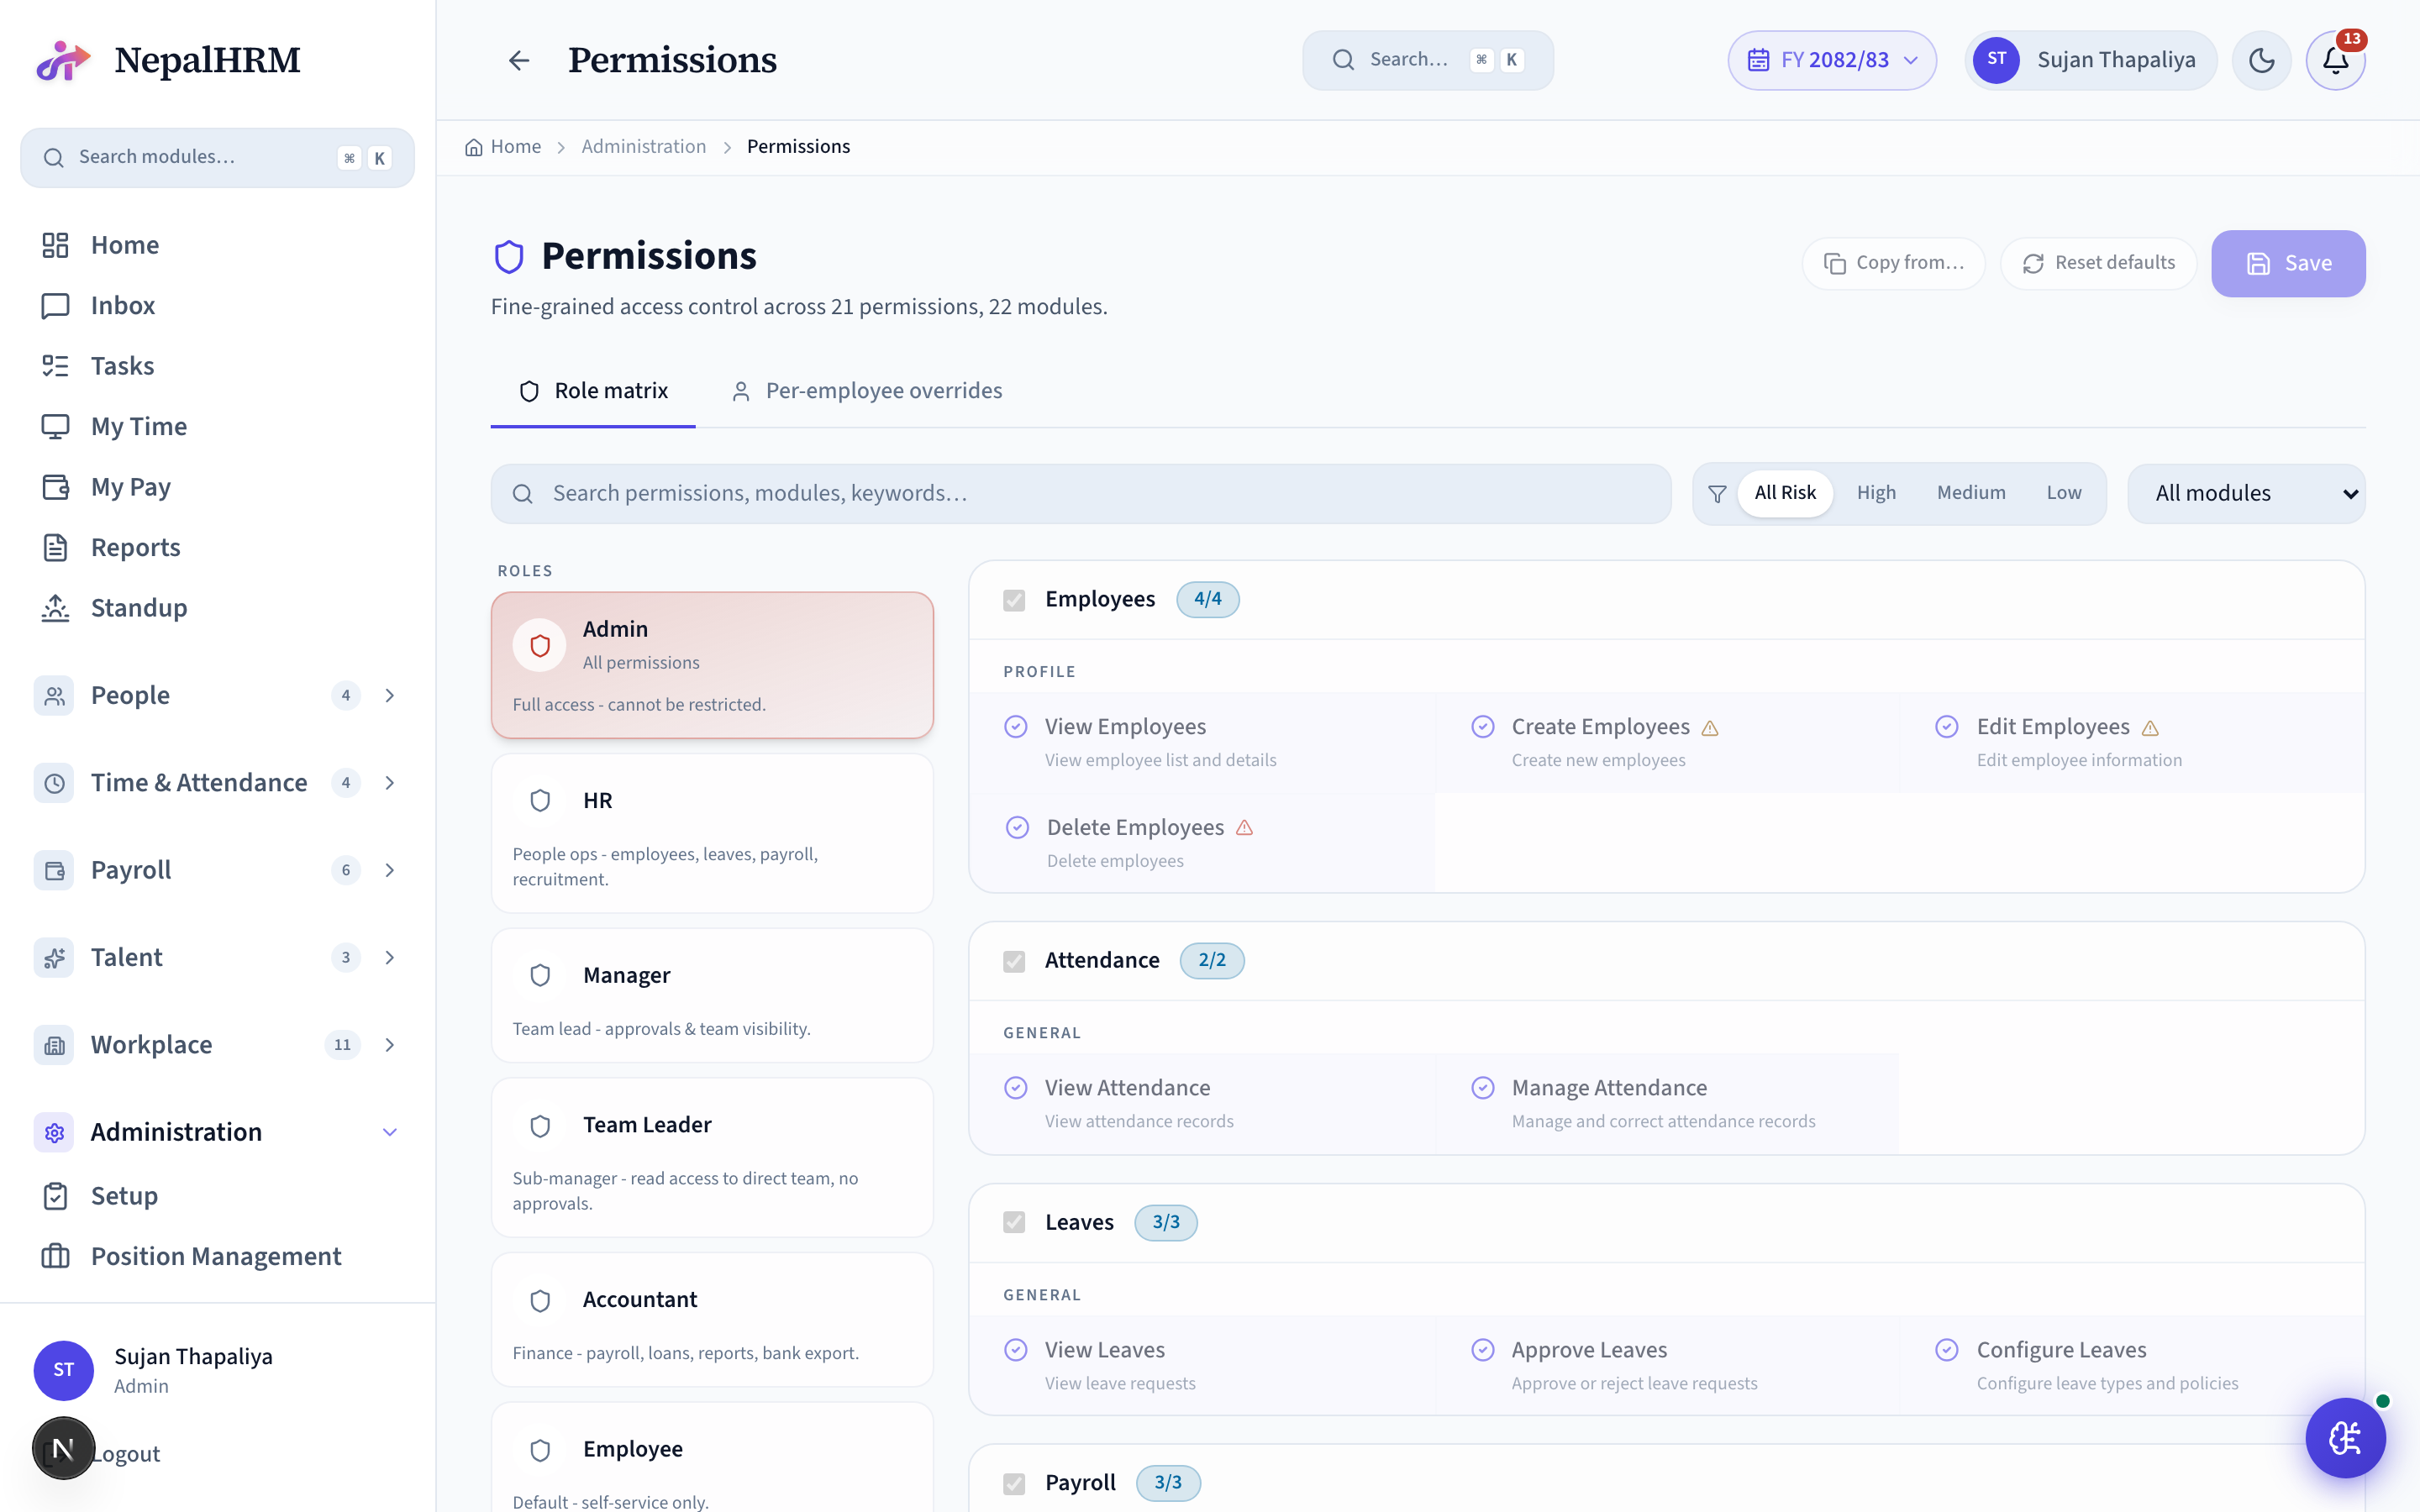
Permissions
Fine-grained permission catalog. Roles (employee / manager / team_leader / hr / admin / super_admin) have default permission sets; HR can grant / revoke individual permissions per user without changing their role.
Setup
- Roles + default permissions are seeded.
- Per-tenant: Permissions → Roles → review what each role gets out of the box.
Day-to-day operations
- Grant a one-off: Permissions → User → Add Permission → pick permission key + scope.
- Revoke same way; effective permissions are computed live on the next request.
- Audit: every grant / revoke logged.
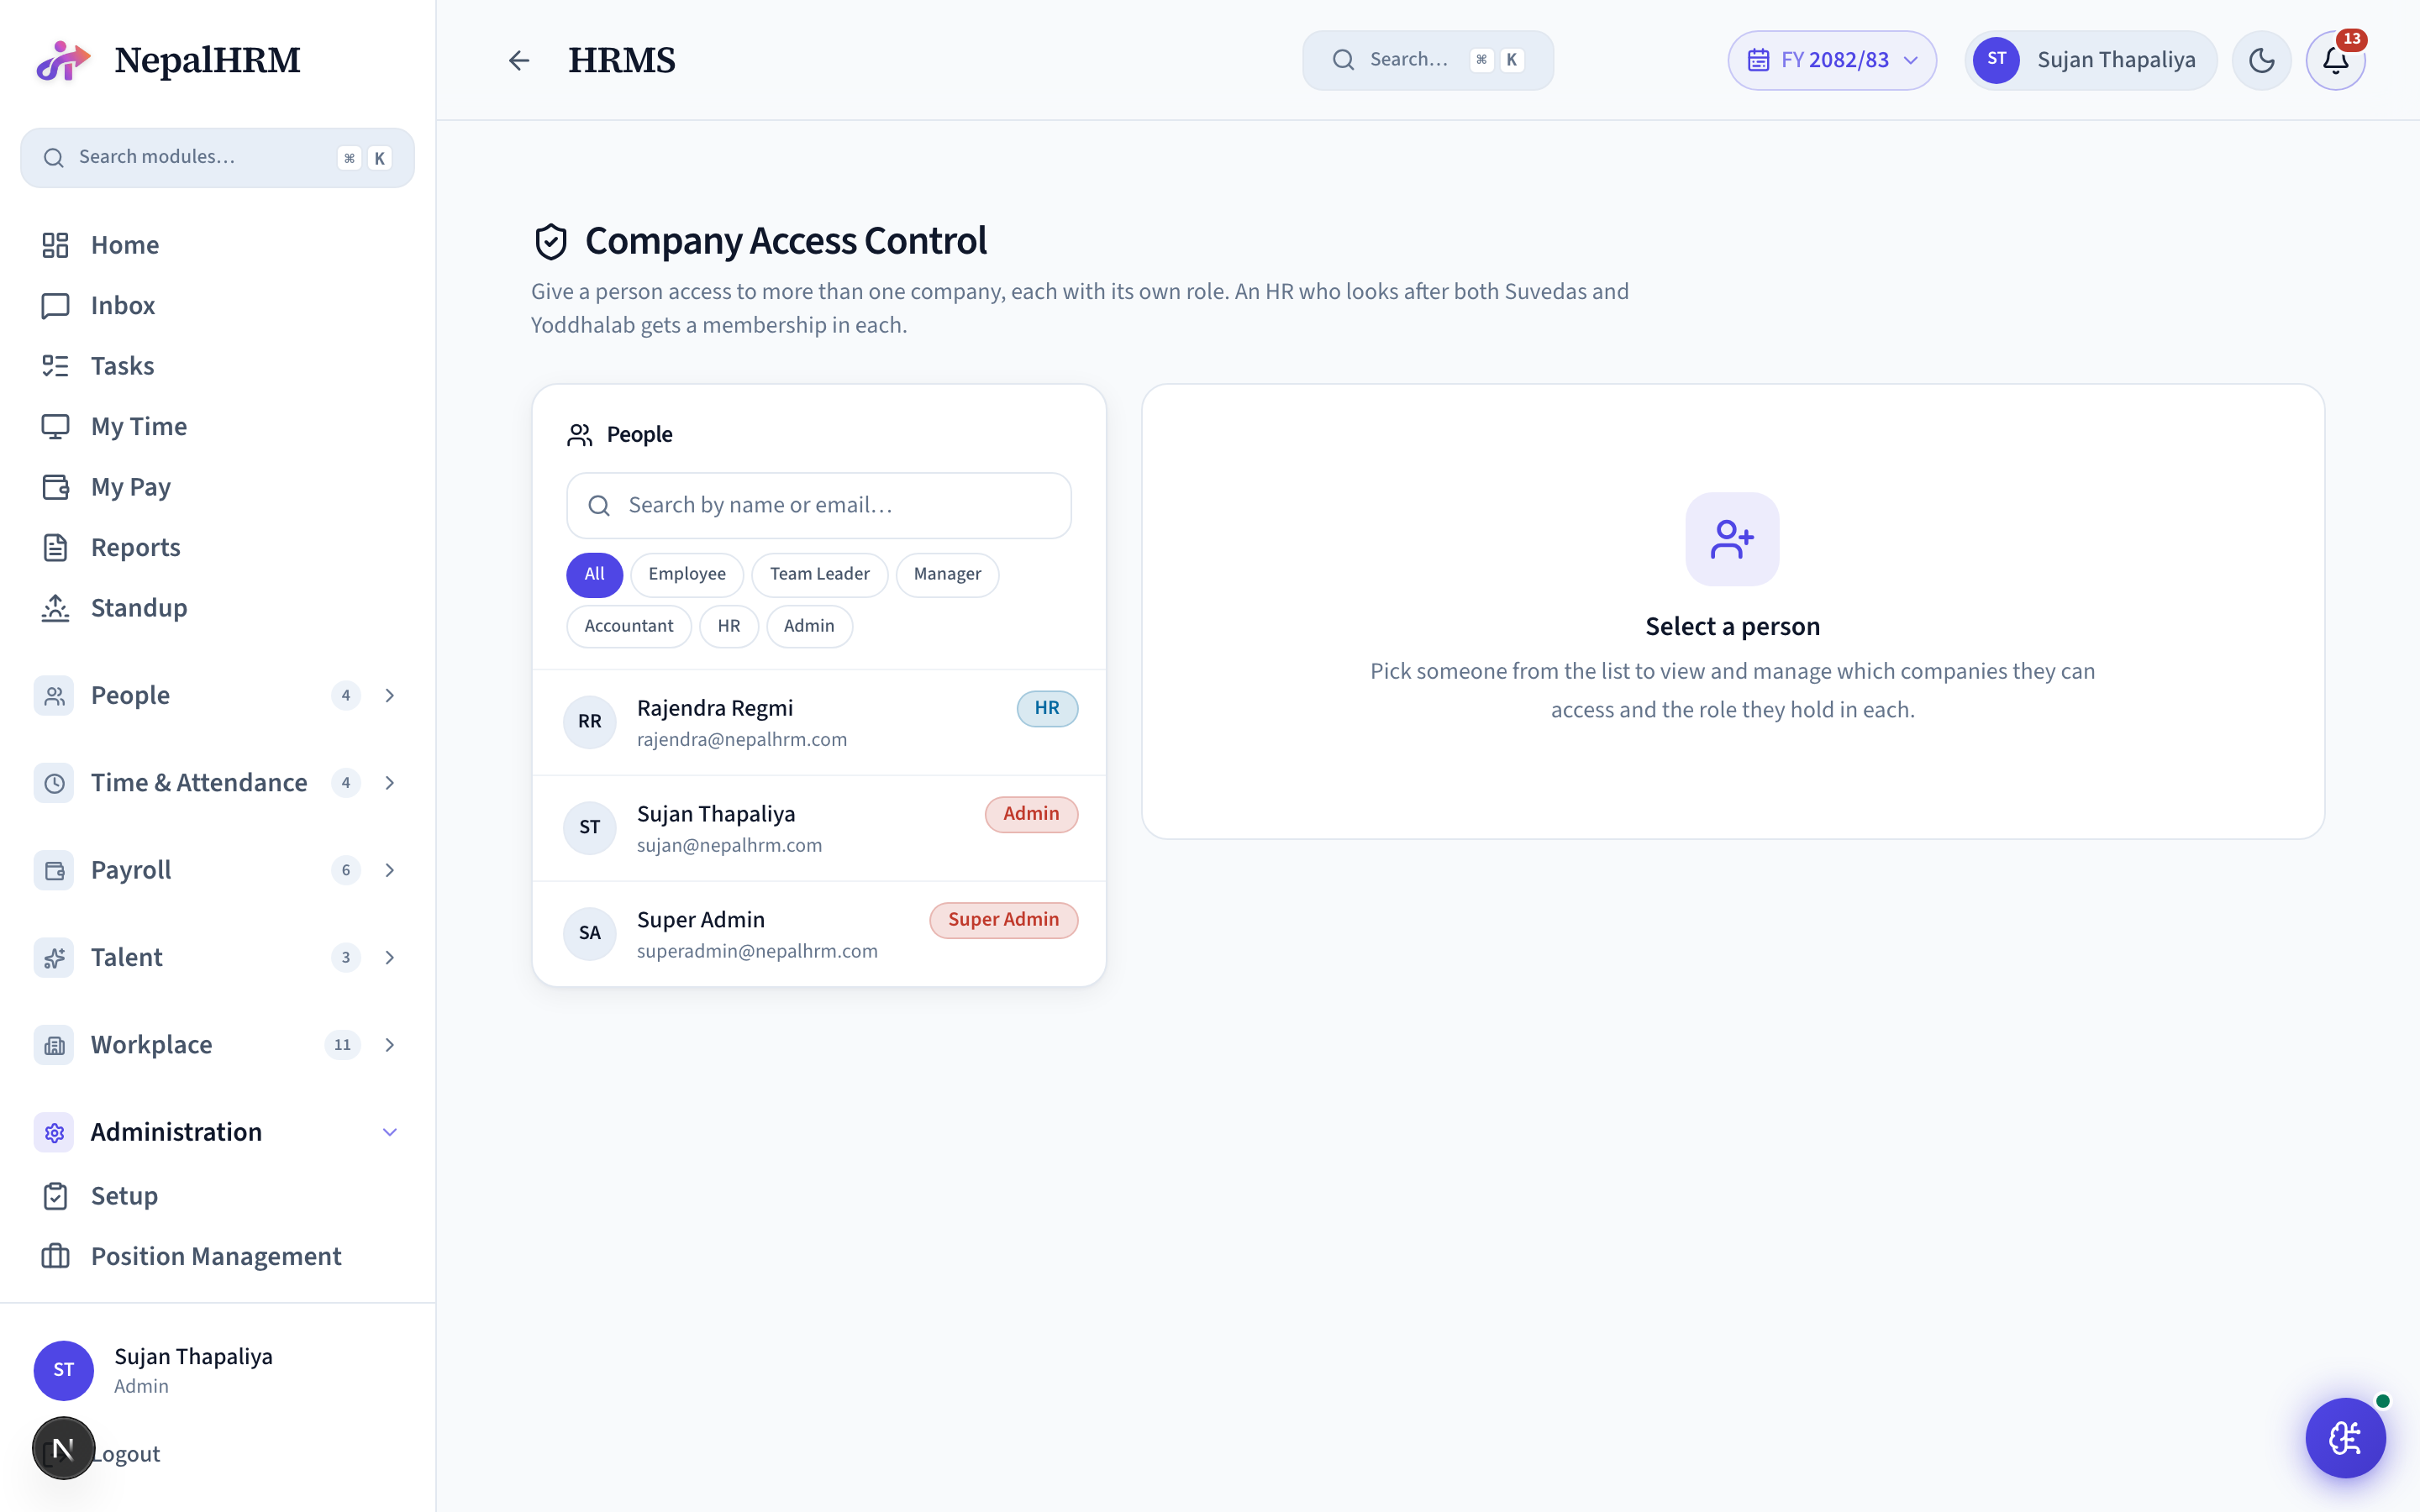
Company Access
Multi-company support. A user can hold memberships in multiple companies (e.g. a consultant working with two tenants); the company switcher in the header changes which tenant they're operating in.
Setup
- Add a membership: Company Access → User → Add Company → pick role for that company.
- Default company: the first one a user is granted access to.
Day-to-day operations
- User switches via the header dropdown.
- Revoking a membership terminates their access to that tenant on the next request.
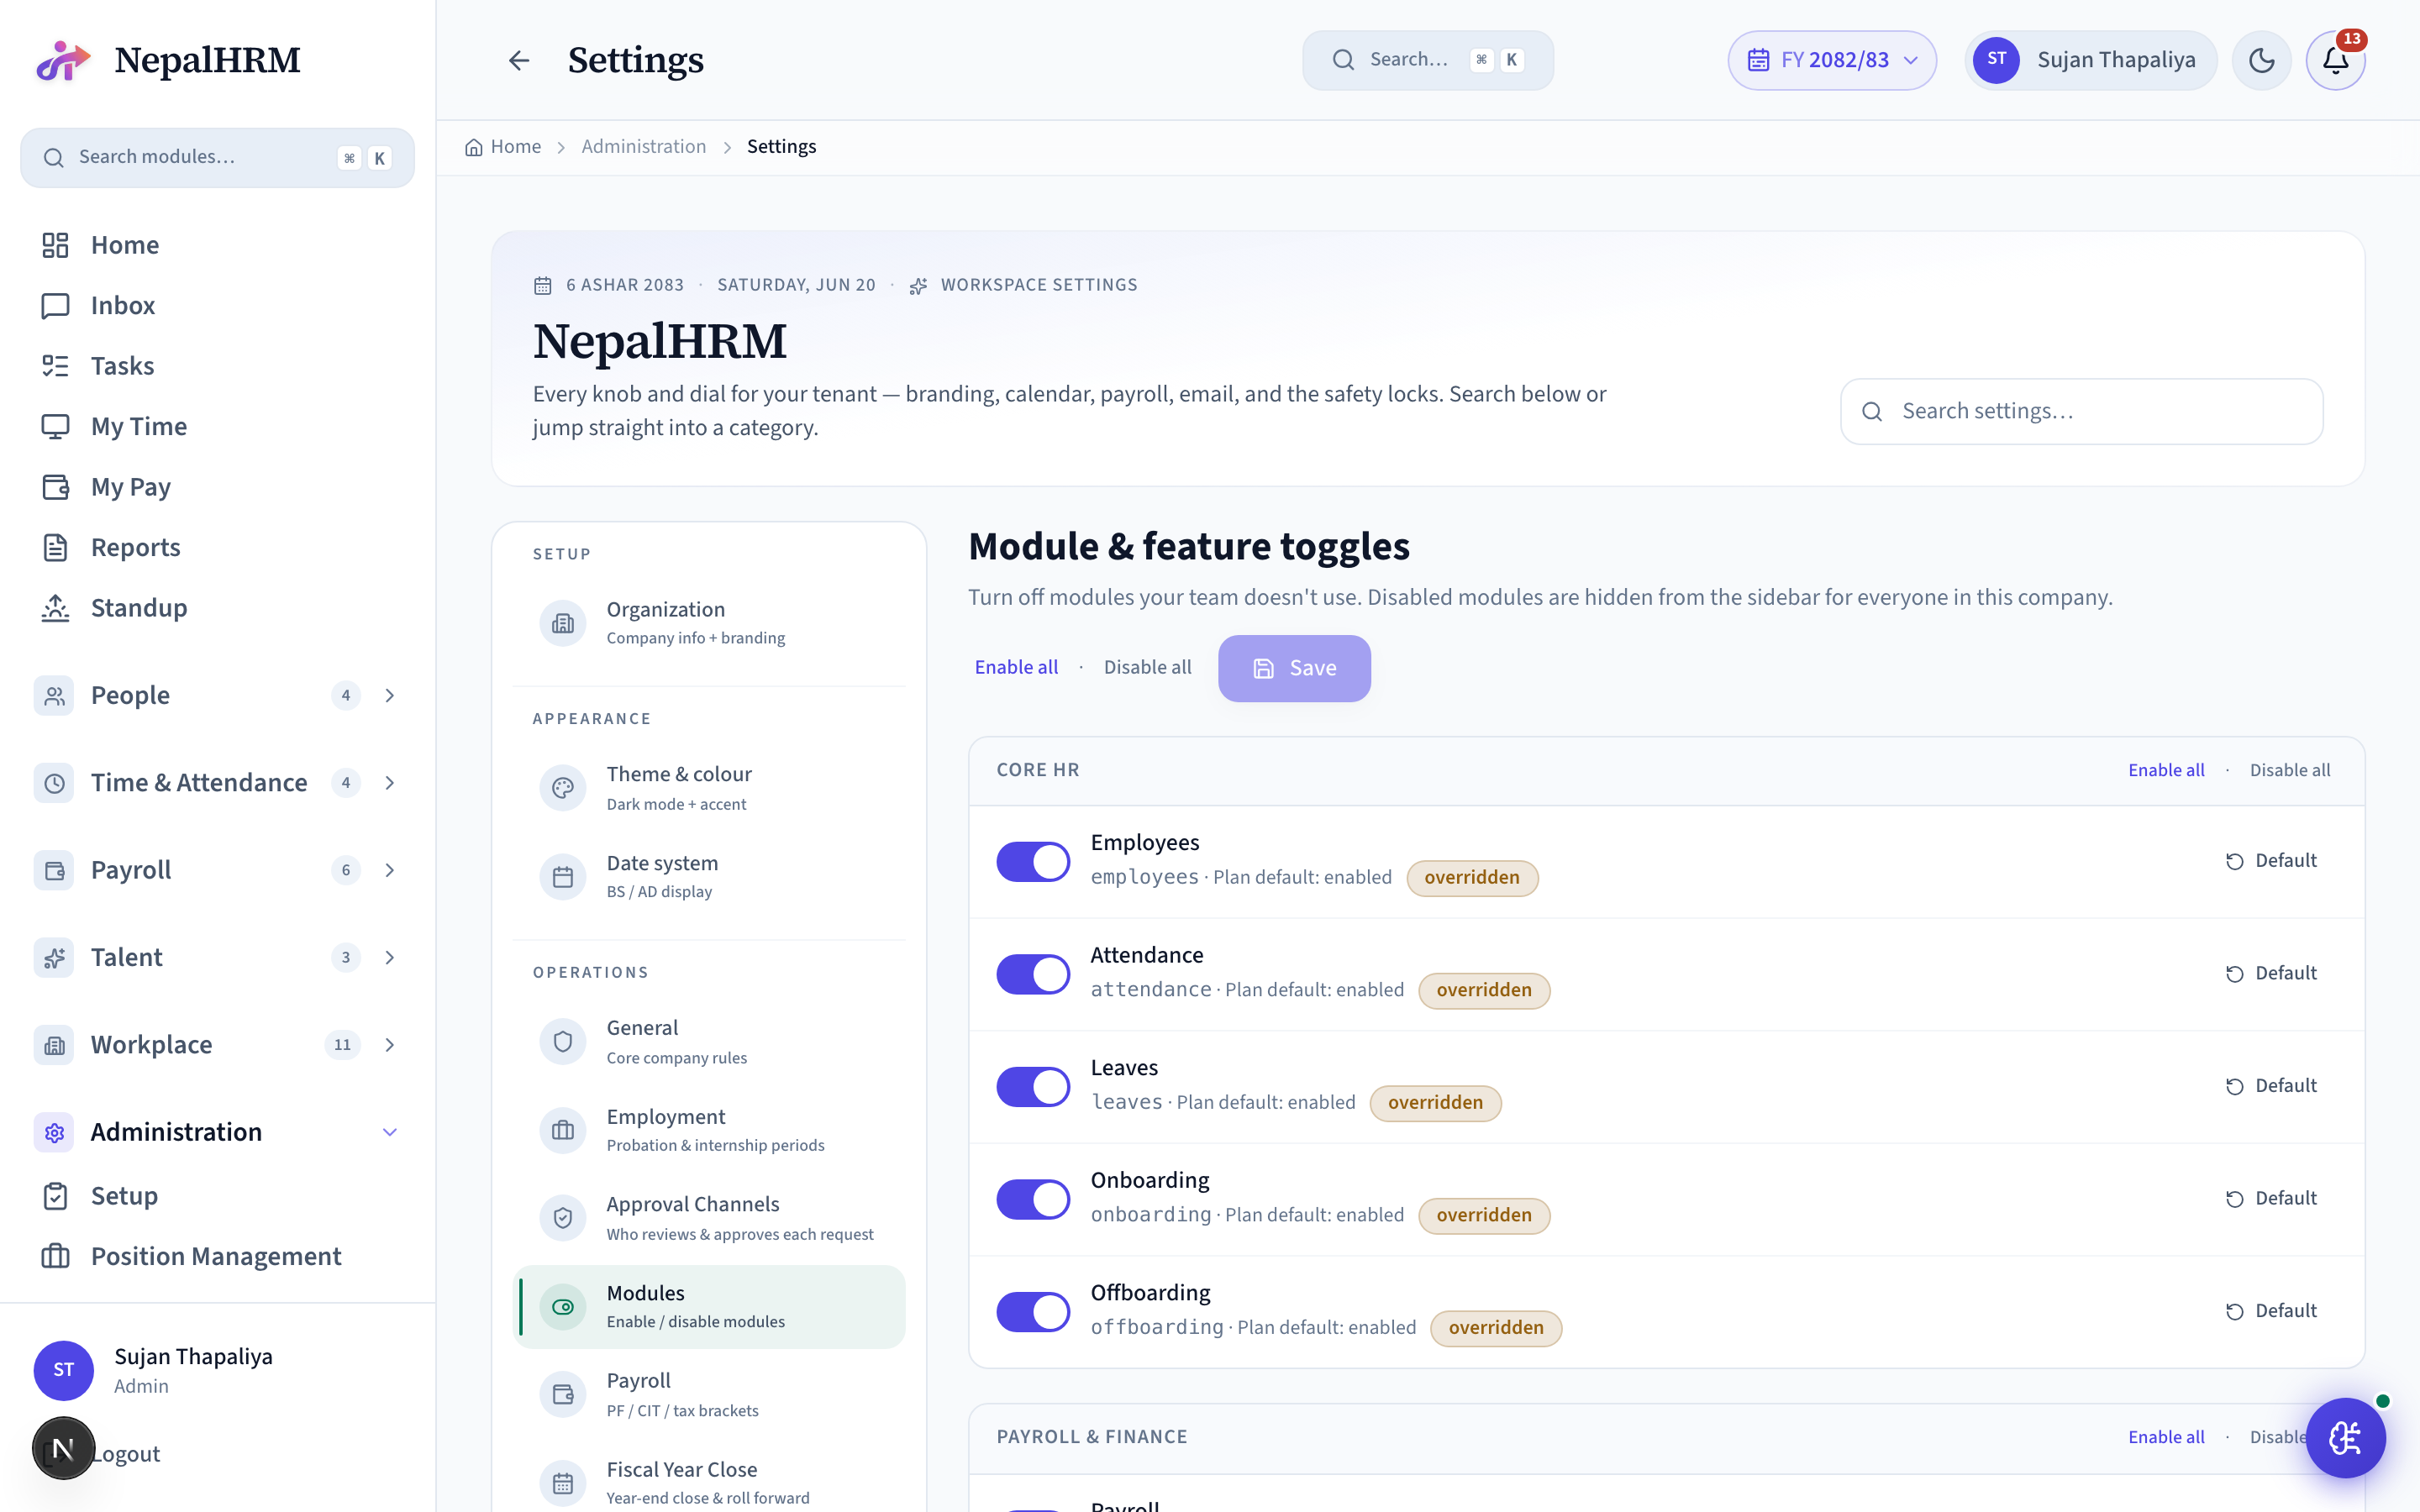
Module Toggles
Per-tenant feature flags. Disable Recruitment if you don't hire through the platform; disable Activity Tracker for non-remote teams. Hidden modules don't appear in the sidebar or count toward billing.
Setup
- Module Toggles → review the catalog → toggle each module on / off.
Day-to-day operations
- Changes take effect on the user's next page load.
- Audit: every toggle change logged with who flipped it.
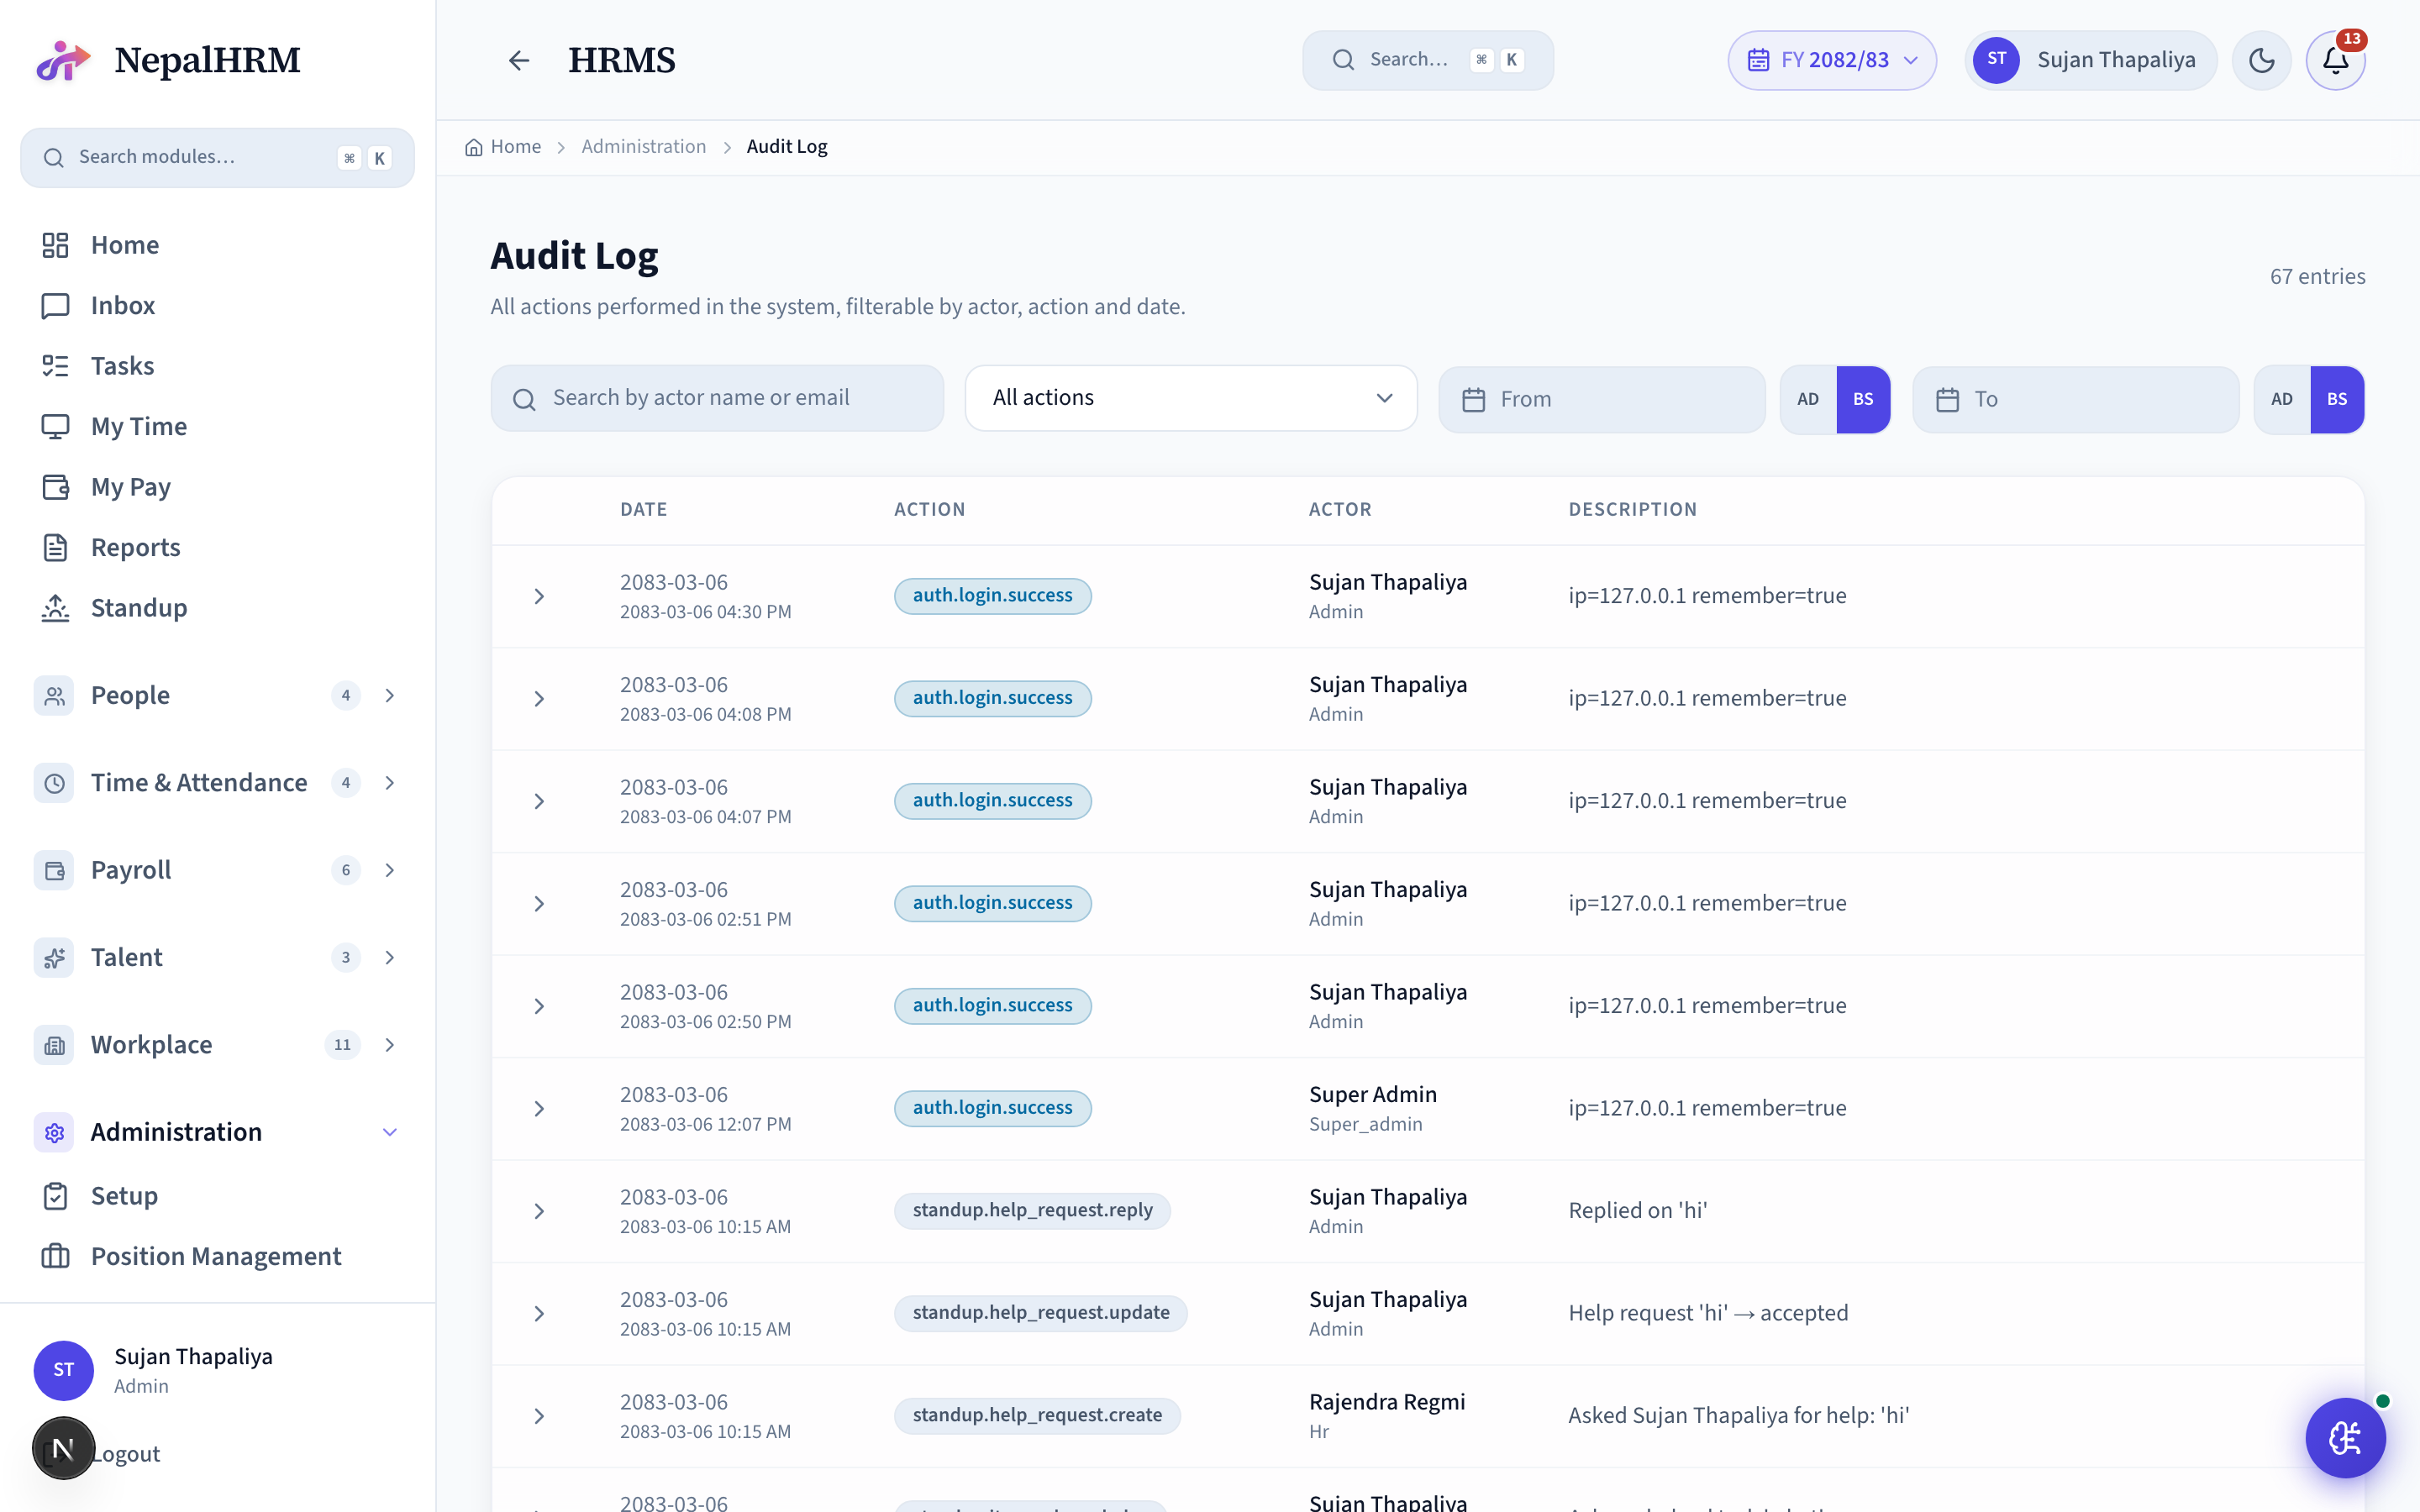
Audit Log
Append-only log of every state-changing action: who did what, when, with what before / after. Compliance-grade trail; can't be edited from the UI.
Setup
- Built-in - every change is recorded automatically; nothing to switch on.
- Just make sure the right people have access to read it (Settings → Permissions).
Day-to-day operations
- Filter by user / module / action / date range.
- Export to CSV for auditor handover.
- Drill into a row to see the JSON before / after diff.